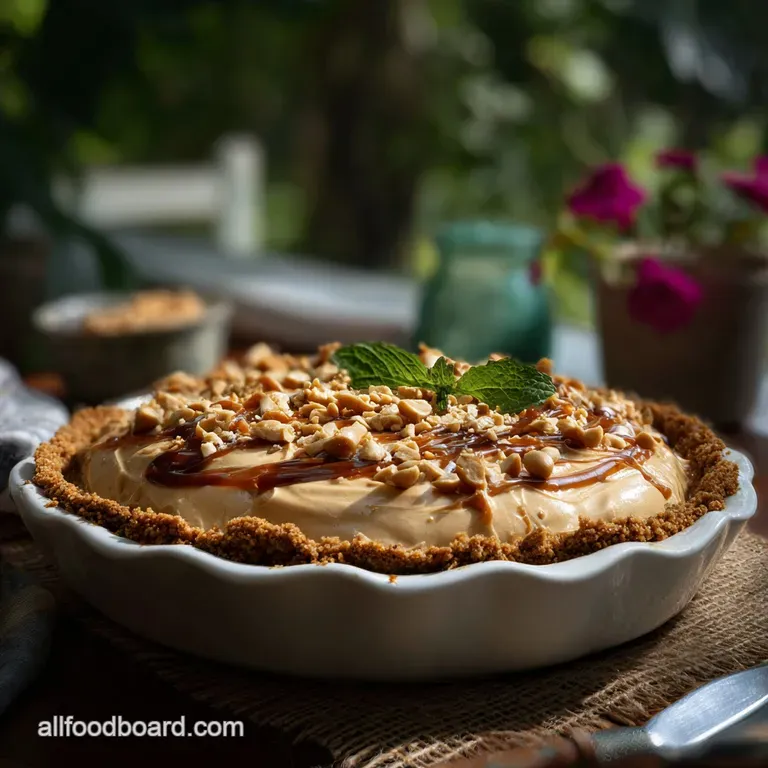
Peanut Butter Pie: Cloud-Like Filling
- Time: Active 20 minutes, Passive 4 hours, Total 4 hours 20 minutes
- Flavor/Texture Hook: Shatter crisp chocolate crust with a velvety, salt sweet peanut mousse.
- Perfect for: over High heat summer days, last minute potlucks, and beginner bakers.
- Create a Luscious No Bake Peanut Butter Pie
- The Science of Why it Works
- Component Analysis and Ingredient Roles
- Essential Components and Substitutes
- Necessary Kitchen Tools
- Methodical Construction Process
- Solving Common Texture Issues
- Creative Flavor Profile Shifts
- Freshness and Storage Strategy
- Best Ways to Serve
- Recipe FAQs
- 📝 Recipe Card
Create a Luscious No Bake Peanut Butter Pie
Honestly, if you have ever struggled with a dessert that ends up soupy or a crust that turns into a pile of dry sand, this is the one for you. I used to think a Peanut Butter Pie required some sort of chemical magic or a pastry degree, but the reality is much simpler.
It is all about how you manage the temperature of your fats and the way you incorporate air into the filling.
The first time I made this, I rushed the cream cheese step. Big mistake. You end up with these tiny, stubborn white lumps that ruin the velvety mouthfeel. Now, I let that block sit on the counter until it is so soft you could spread it with a feather.
That little bit of patience transforms the final product from "okay" to something your friends will swear you bought from a boutique bakery.
We are skipping the oven today because, let's be real, nobody wants to heat up the house when you can get a better texture through chilling. This version is rich enough to satisfy a crowd but light enough that you won't feel weighed down.
It is the kind of treat that makes everyone at the table go silent for a second, and that is exactly the energy we are looking for.
The Science of Why it Works
Fat Emulsification: The high fat content in the peanut butter and cream cheese creates a stable matrix that holds air bubbles when folded with the whipped topping.
Starch Stabilization: The cornstarch found in the powdered sugar absorbs residual moisture, preventing the filling from weeping as it sits.
Chef Tip: Freeze your mixing bowl and beaters for 10 minutes before whipping the heavy cream or adding the whipped topping. This keeps the fat molecules solid, which leads to a much firmer and more stable mousse.
| Method | Time | Texture | Best For |
|---|---|---|---|
| Stovetop (Butter) | 5 minutes | Chewy, buttery crumbs | A traditional, rich base |
| No Bake (Chilled) | 2 hours | Firm and snappy | Hot days with no oven use |
| Oven (Baked) | 10 minutes | Very crisp, toasted | Maximum structural integrity |
Choosing the right method for your crust depends on your kitchen climate. If you find yourself in a humid environment, a quick 8 minute bake at 350°F (175°C) can help the chocolate graham cracker crumbs lock together better than chilling alone.
However, for a true no bake experience, simply ensuring your butter is fully incorporated into the 170g of chocolate crumbs will create that signature "shatter" when your fork hits the plate.
Component Analysis and Ingredient Roles
| Ingredient | Science Role | Pro Secret |
|---|---|---|
| Creamy Peanut Butter | Primary fat and flavor | Avoid "natural" oils on-top versions; they separate too easily. |
| Full fat Cream Cheese | Structural backbone | Use the block variety, not the whipped tub version, for density. |
| Powdered Sugar | Sweetener and thickener | Sift it twice to ensure no clumps disrupt the silky texture. |
It is worth noting that the choice of peanut butter can make or break the stability of the filling. While I love a good artisanal spread, those usually lack the emulsifiers like palm oil or hydrogenated oils that help this specific pie hold its shape at room temperature. For a similar flavor profile in a cookie format, you might enjoy my Perfectly Chewy Peanut recipe which handles the fats a bit differently.
Essential Components and Substitutes
To get this right, you'll need to gather your ingredients precisely. We aren't just throwing things in a bowl; we are building layers.
- 1.5 cups (170g) chocolate graham cracker crumbs: Why this? Provides a bitter contrast to the sweet filling. (Substitute: Crushed Oreo cookies without the cream).
- 6 tbsp (85g) unsalted butter, melted: Why this? The "glue" that hardens when chilled. (Substitute: Salted butter, but omit the extra 0.25 tsp salt).
- 1 tbsp (12g) granulated sugar: Why this? Helps the crust granules bind. (Substitute: Brown sugar for a deeper molasses note).
- 1 cup (250g) creamy peanut butter: Why this? Dense protein and fat for flavor. (Substitute: Almond butter, though it will be softer).
- 8 oz (225g) full fat cream cheese, softened: Why this? Adds tang and necessary structure. (Substitute: Mascarpone for a richer, less tangy finish).
- 1 cup (120g) powdered sugar, sifted: Why this? Dissolves instantly without graininess.
- 1 tsp pure vanilla extract: Why this? Rounds out the nuttiness.
- 8 oz (225g) whipped topping: Why this? Provides the "lift" and fluffiness. (Substitute: 1.5 cups heavy cream whipped to stiff peaks).
- 0.25 cup (40g) salted peanuts, chopped: Why this? Essential texture contrast.
- 2 tbsp chocolate syrup: Why this? Visual appeal and extra sweetness. (Check out the drizzle technique in this Peanut Butter Cup recipe for inspiration).
| Original Ingredient | Substitute | Why It Works |
|---|---|---|
| Whipped Topping (8 oz) | Heavy Cream (1.5 cups) | Higher fat content makes it richer. Note: Will be less stable at room temp. |
| Chocolate Grahams | Digestive Biscuits | Neutral flavor. Note: Adds a more wheaty, rustic texture. |
| Creamy Peanut Butter | Chunky Peanut Butter | Adds bite. Note: Makes folding difficult; might deflate the air. |
If you decide to swap the graham crackers for digestive biscuits or even vanilla wafers, keep in mind that the sugar levels in the base will change. The chocolate grahams offer a specific cocoa bitterness that balances the 120g of powdered sugar in the filling.
If you go with a sweeter biscuit, I suggest adding a pinch more salt to the crust mixture to keep things from becoming cloying.
Necessary Kitchen Tools

You don't need a lot of fancy gear, but a few specific items will make your life much easier. I highly recommend using a 9 inch (23cm) pie plate. If you use a springform pan, the crust might be harder to press up the sides, but it makes for a beautiful presentation when you remove the ring.
A stand mixer or a handheld electric mixer is almost non negotiable here. While you could whisk this by hand, achieving the level of aeration needed for the cream cheese and peanut butter mixture to become "fluffy" would take some serious arm strength.
You are looking for the mixture to change color slightly, becoming a paler tan, which indicates you've successfully beaten in enough air.
Finally,, grab a silicone spatula for the folding step. This is where most people go wrong. If you use a wooden spoon or a whisk to mix in the whipped topping, you'll knock out all the air you just worked so hard to incorporate.
The silicone spatula allows you to cut through the center and turn the mixture over gently, preserving that cloud like "mousse" feel.
Methodical Construction Process
- Prep the base. Combine the 170g of chocolate graham cracker crumbs, 85g of melted butter, 12g of sugar, and 0.25 tsp salt in a bowl. Note: It should feel like wet sand.
- Form the crust. Press the mixture firmly into the bottom and up the sides of your 9 inch pie dish. Press 3 minutes until solid and even.
- Cream the cheese. Beat the 225g of softened cream cheese in a large bowl until smooth and silky. Note: This prevents those dreaded lumps.
- Add the protein. Mix in the 250g of creamy peanut butter and 120g of powdered sugar. Beat 2 minutes until the color lightens.
- Flavor the core. Pour in the 1 tsp of vanilla extract and a tiny pinch of extra salt if you like. Note: Salt enhances the nuttiness.
- The gentle fold. Add half of the 225g whipped topping and fold gently with a spatula. Fold 10 times until no white streaks remain.
- Final aeration. Incorporate the remaining whipped topping using the same gentle folding motion. Note: This ensures maximum volume.
- Fill the shell. Spoon the filling into the prepared crust and smooth the top with your spatula. Smooth 1 minute until level.
- Set the structure. Place the pie in the refrigerator. Chill 4 hours until the center is firm to the touch.
- Garnish and serve. Sprinkle with 40g of chopped peanuts and drizzle with 2 tbsp of chocolate syrup right before slicing. Note: Cold chocolate syrup sets faster.
Chef Tip: To get a perfectly even crust, use the bottom of a flat measuring cup to press the crumbs into the corners of the pie plate. This creates a uniform thickness that won't crumble when sliced.
Solving Common Texture Issues
The Filling is Runny
If your pie won't hold its shape after four hours, the culprit is usually the temperature of the ingredients or the folding technique. If the cream cheese was too warm or you over mixed the whipped topping, the fat structure collapses. The solution is to pop it into the freezer for 45 minutes.
It will firm up into a semi frozen treat that is actually quite delicious, similar to a frozen mousse.
The Crust is Falling Apart
This usually happens if the butter wasn't evenly distributed or if the crumbs were too large. For a really solid base, you want the crumbs to be as fine as flour. If it’s already made and crumbling, there isn't much you can do for this specific pie, but next time, try the "pre bake" method mentioned in the comparison table.
It melts the sugar and butter together to form a literal caramel like bond between the crumbs.
| Problem | Root Cause | Solution |
|---|---|---|
| Grainy Texture | Un sifted powdered sugar | Sift sugar and beat cream cheese longer before adding other ingredients. |
| Soggy Bottom | Butter pooled at the bottom | Ensure crumbs are evenly coated; don't over grease the pie dish. |
| Top is Cracking | Pie is too cold/dry | Cover loosely with plastic wrap during the chill; don't over chill beyond 24 hours. |
Common Mistakes Checklist:
- ✓ Ensure cream cheese is truly room temperature (about 68°F or 20°C).
- ✓ Never use "Natural" peanut butter with oil separation issues.
- ✓ Sift the powdered sugar to avoid microscopic lumps.
- ✓ Fold the whipped topping by hand, never with the electric mixer.
- ✓ Give the pie the full 4 hours to set - do not rush this!
Creative Flavor Profile Shifts
If you want to move away from the classic version, there are some really fun ways to tweak this. For a Salty Sweet Twist, try using pretzels instead of graham crackers for the crust.
You will need about 200g of crushed pretzels and you might need an extra tablespoon of butter since pretzels are drier than crackers. It creates a massive crunch that works perfectly with the velvety filling.
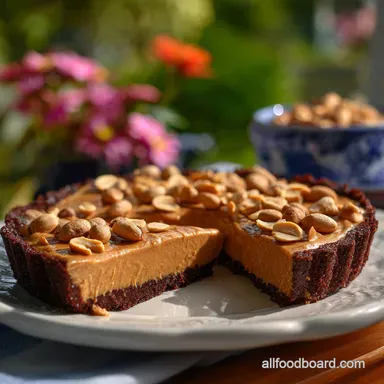
For the Chocolate Lover, you can fold in half a cup of mini chocolate chips or chopped Peanut Butter Cups into the filling itself. This adds a surprise texture in every bite. If you’re feeling really fancy, you can even make a ganache instead of using store-bought chocolate syrup.
Just melt equal parts heavy cream and dark chocolate and pour it over the chilled pie.
- For a lighter, airier pie
- Use 2 cups of whipped topping instead of 8 oz, but be aware it will be more delicate.
- For a dense, fudge like pie
- Increase the peanut butter to 1.5 cups and reduce the whipped topping by half.
- For a "frozen" version
- Freeze the pie for 6 hours and serve it directly from the freezer for a texture like high end ice cream.
Freshness and Storage Strategy
This pie is a superstar for make-ahead planning. You can keep it in the fridge for up to 4 days, though the crust will eventually start to soften as it absorbs moisture from the filling.
I recommend keeping it covered with a pie dome or loosely draped plastic wrap to prevent it from picking up any "fridge smells" from your leftovers.
If you want to freeze it, this Peanut Butter Pie handles the cold beautifully. Wrap it tightly in a double layer of plastic wrap and then a layer of foil. It will stay fresh for up to 2 months. When you're ready to eat, you can either eat it frozen (my personal favorite) or let it thaw in the fridge for about an hour.
Don't thaw it on the counter, or the whipped topping might lose its stability and start to weep.
For zero waste, if you have leftover chocolate graham cracker crumbs, don't toss them! They are incredible sprinkled over vanilla ice cream or used as a base for my Homemade Breakfast Biscuits recipe if you're feeling adventurous with a sweet and salty breakfast twist. Leftover peanut butter? Well, that's never really a problem in my house, but it can always go into a quick satay sauce.
Best Ways to Serve
Presentation is everything with a pie this simple. I like to wait until the very last second to add the 40g of chopped peanuts. This ensures they stay perfectly crunchy and don't get softened by the moisture in the filling.
The 2 tbsp of chocolate syrup should be drizzled in a zig zag pattern across the entire surface to give it that "diner style" look we all love.
When it comes to slicing, there is a trick. Run a thin knife under hot water, wipe it dry, and then make your cut. The heat will glide through the fats in the peanut butter and cream cheese, giving you those clean, sharp edges you see in professional food photography.
Wipe the knife clean and reheat it between every single slice.
I usually serve this with a very strong cup of black coffee or a cold glass of milk. The bitterness of the coffee cuts right through the richness of the 498 kcal per serving. If you're serving this at a party, consider a side of fresh raspberries.
The tartness of the fruit provides a bright contrast to the heavy, nutty flavors of the pie, making the whole experience feel a bit more balanced and sophisticated.

Recipe FAQs
What is the recipe for Dolly Parton's peanut butter pie?
While Dolly Parton is known for many delicious recipes, a specific peanut butter pie recipe attributed solely to her is not widely published. Many popular peanut butter pie recipes exist, often featuring a creamy, no-bake filling in a chocolate crust, similar to the one described in our guide.
Is peanut butter pie a southern thing?
Yes, peanut butter pie is strongly associated with Southern cuisine. It's a comfort food staple often found at potlucks and family gatherings, cherished for its rich, sweet, and nutty flavor profile.
What was Jimmy Carter's favorite pie?
Jimmy Carter's favorite pie is widely reported to be pecan pie. He often expressed his fondness for this classic Southern dessert, especially when made with fresh ingredients.
What is Dolly Parton's favorite pie?
Dolly Parton has expressed a love for many desserts, but one pie consistently mentioned as a favorite is apple pie. She appreciates traditional comfort foods and has been known to enjoy a good slice of homemade apple pie.
Can I use chunky peanut butter instead of creamy?
You can, but creamy peanut butter is recommended for the smoothest texture. Chunky peanut butter will add bits of peanuts to your filling, which alters the texture. If you enjoyed mastering the texture control in this recipe, you might also like how we achieve a smooth finish in our Silky Smooth Homemade Cashew Butter recipe.
How long does peanut butter pie need to chill?
Peanut butter pie needs to chill for at least 4 hours. This allows the filling to set properly, achieving a firm yet velvety texture that slices cleanly. For optimal results, ensure it's chilled until the center is firm to the touch.
My peanut butter pie filling is runny, what went wrong?
A runny filling is usually due to ingredients being too warm or overmixing the whipped topping. Ensure your cream cheese is properly softened but not melted, and fold the whipped topping gently to maintain its airy structure. If you master the technique of stable emulsions here, you'll find it applies to many other recipes, like those found in our Homemade French Bread Crispy Baked in 30 Minutes for achieving perfect dough consistency.
Peanut Butter Pie
Ingredients:
Instructions:
Nutrition Facts:
| Calories | 498 kcal |
|---|---|
| Protein | 8.6 g |
| Fat | 34.4 g |
| Carbs | 39.4 g |
| Fiber | 2.8 g |
| Sugar | 24.5 g |
| Sodium | 253 mg |
