Ghoulishly Good Gourmet Chocolate Eyeball Cake Pops with a Vanilla Bean Core
- Setting the Stage: Why These Eyeball Cake Pops Demand Attention
- Beyond the Basics: Achieving Maximum Flavor in Your Spooky Creations
- The Essential Inventory: Gathering Supplies for Your Confectionery Craft
- Decoding the Components: Quality Matters for Perfect Eyeball Cake Pops
- The Transformation Process: From Crumbles to Ocular Orbs
- Sculpting and Dipping: Achieving the Perfect Shell Finish
- Maximizing Shelf Life and Presentation of Your Spooky Bites
- Troubleshooting Common Setbacks in Cake Pop Construction
- Creative Customizations: Variations on the Eyeball Theme
- Recipe FAQs
- 📝 Recipe Card
Setting the Stage: Why These Eyeball Cake Pops Demand Attention
When the Halloween season rolls around, we all look for those show stopping centrepieces, those creepy desserts for Halloween that make guests gasp before they eagerly devour them.
These aren’t just sweets; they are miniature edible sculptures designed to bring a delightful shiver down the spine. We are focusing today on crafting Eyeball Cake Pops that are as intensely flavourful as they are visually shocking.
Forget dry, disappointing cake pops of the past; our goal is velvety smooth texture paired with a truly gruesome aesthetic. If you’re seeking spooky desserts easy enough for a novice baker but impressive enough for a themed event, mastering these orbs is your golden ticket.
They promise a major ‘wow’ factor, making them the undisputed highlight of any Halloween party cake pops selection.
Beyond the Basics: Achieving Maximum Flavor in Your Spooky Creations
The difference between a mediocre cake pop and an exceptional one lies entirely in the quality of the foundational components. Too often, bakers overlook the "cake" part, relying solely on decoration.
For our Ghoulishly Good: Gourmet Chocolate Eyeball Cake Pops with a Vanilla Bean Core , we elevate every layer. We begin with a moist, rich vanilla bean cake, infused with real vanilla and bound perfectly with cream cheese, creating a dense yet tender interior that complements the snappy chocolate shell.
This approach ensures that long after the initial shock of the eyeball design wears off, your guests are left craving another bite of the delicious cake within.
The Secret to a Moist, Non-Crumbly Cake Foundation
To achieve that perfect, blendable interior for our Eyeball Cake Balls , we eschew boxed cake mixes for a from scratch vanilla bean recipe. The key isn't just the ingredients flour, sugar, eggs, butter, and milk but the technique.
Baking the cake just until done, ensuring it doesn't dry out in the oven, is paramount. Once cooled entirely, crumbling it finely allows it to accept the binding agent softened cream cheese mixed with a touch of powdered sugar evenly.
This combination creates a dough like consistency that chills beautifully, preventing that frustrating crumbling that causes coatings to crack later.
Visualizing the Horror: Your Edible Masterpiece Concept
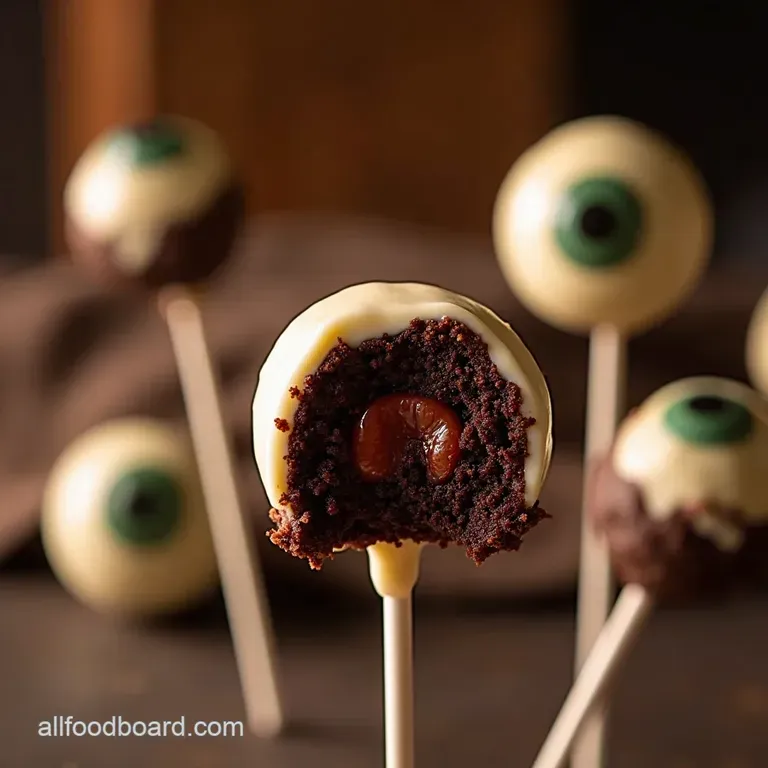
These Halloween Eyeball Cake Pops require a clear vision for the final look. Our concept focuses on a clean, high-quality white chocolate shell acting as the sclera (the white of the eye). The drama comes from the carefully constructed iris and pupil.
We will be using concentrated gel food colours mixed into small batches of melted coating to paint on the iris, followed by precise placement of the pupil and delicate, fine lines of red to simulate blood vessels. This attention to detail transforms a simple dessert into a conversation starter.
Why Our Gourmet Approach Trumps Standard Cake Pop Fare
What sets this recipe apart is the commitment to gourmet flavour profiles alongside the visual gimmick. While many recipes rush the process, resulting in overly sweet, one-note treats, we incorporate the subtle perfume of real vanilla bean into the core and use high-quality melting wafers for a superior snap upon biting.
On top of that,, for an extra layer of complexity especially if you want to push the envelope toward bloody eyeball cake pops —we can integrate a surprise centre.
Consider a small dollop of tart raspberry jam mixed right into the cake dough before rolling; this gives you an unexpected burst of "blood" flavour when you bite in, enhancing the overall experience of these creepy desserts for Halloween .
The Essential Inventory: Gathering Supplies for Your Confectionery Craft
To successfully navigate the creation of these stunning Eyeball Cake Pops , preparation of your materials is just as important as the mixing itself. Having everything ready before you begin baking saves time and prevents rushed cooling periods.
Think of this as setting up your confectionery workstation for maximum efficiency, ensuring a smooth transition from baking the cake to rolling the Eyeball Cake Balls .
You will need standard baking equipment, but the decoration stage requires a few specialized tools to achieve that convincing ocular detail.
Decoding the Components: Quality Matters for Perfect Eyeball Cake Pops
The ingredients we select directly dictate the final texture, stability, and flavour of your finished product. For a treat that needs to hold its shape and showcase intricate detail, compromise is not an option, especially when dealing with the coating and colouring elements.
The Inner Core Mix: Cake, Binder, and Flavor Infusions
For the cake base, we opt for a moist vanilla cake, baking the batter in a standard 8 or 9 inch round pan. Once baked and cooled, the true magic begins when binding it with softened cream cheese and a touch of powdered sugar. This binder must be smooth and fully incorporated into the fine cake crumbs.
If you are seeking an extra layer of depth, consider substituting a portion of the vanilla extract with a few scraped seeds from a fresh vanilla bean. For those aiming for Bloody Eyeball Cake Pops , incorporate a small, measured amount of seedless raspberry jam directly into the dough mix during the binding stage; this adds tartness and that internal 'blood' element.
Surface Detailing: Mastering the Chocolate Coating and Iris Hues
The exterior shell requires patience and quality ingredients. We recommend using high-quality white chocolate melting wafers over standard confectionery coating, as they melt smoother and provide a superior snap.
For the colourful details of the iris and pupil, we rely on concentrated food colouring gels, which won't thin the melted chocolate as much as liquid dyes. You will need black for the pupil, red for the delicate veining, and your choice of vibrant colour blue, green, or brown for the main iris.
Essential Tools Beyond the Basics for Seamless Preparation
Beyond the usual mixer and bowls, you will need lollipop sticks and a stable drying surface, such as a Styrofoam block or a dedicated cake pop stand. Crucially, for the detailed painting of the eyes, have small piping bags fitted with the tiniest round tips ready, or alternatively, use toothpicks or fine skewers for creating the radiating vein effect.
These precision tools are the difference between a blob and a convincing eyeball.
Related Recipes Worth Trying
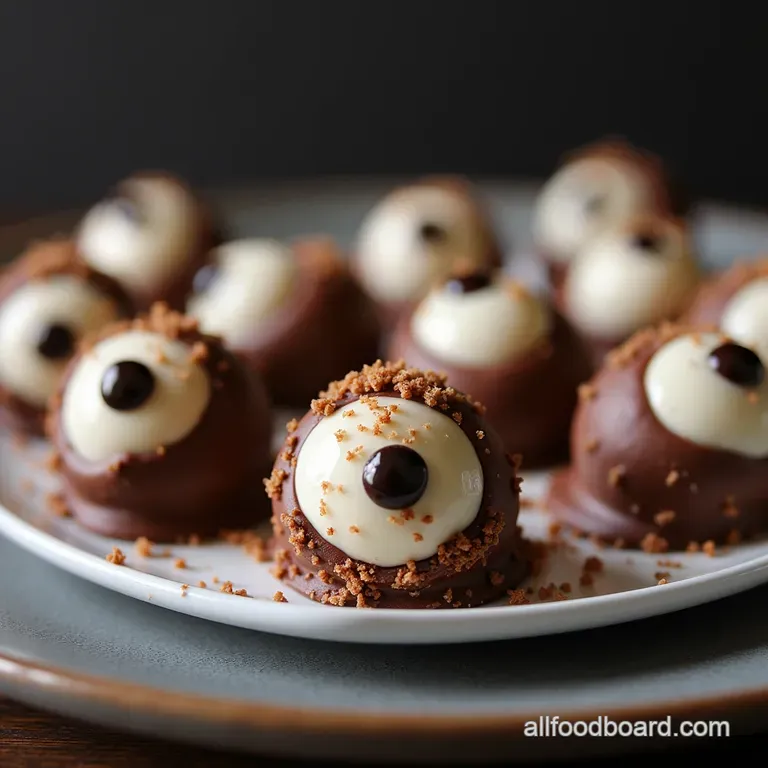
- Ghoulishly Good Spooky Eyeball Truffles Recipe — Learn how to make these surprisingly simple Spooky Eyeball Truffles Rich dark chocolate meets a detailed creepy decoration for the ultimate Halloween...
- The Midnight Graveyard Spiced Pumpkin Cheesecake Recipe — Bake the Best Halloween Desserts This Spiced Pumpkin Cheesecake features a dramatic black cocoa crust and an elegant spiderweb topping Foolproof technique...
- Silky Pumpkin Cottage Cheese Cheesecake Recipe Lighter Autumn Bake — Discover the best Pumpkin Cottage Cheese Cheesecake Recipe This lighter version uses cottage cheese for an airy texture atop a gingersnap crust Get the...
The Transformation Process: From Crumbles to Ocular Orbs
The journey from baked batter to chilled dough is crucial for stability. After the cake is baked (about 25– 30 minutes at 350° F/ 175° C) and completely cooled, it must be crumbled finely.
Once the cream cheese binder is added, the resulting mixture should feel like thick, pliable cookie dough. From this dough, roll uniform balls, approximately one inch in diameter, yielding about 24 Easy Eyeball Cake Pops .
These orbs must then be chilled for a minimum of two hours; this firming stage is non-negotiable for success, preventing breakage when dipped.
Sculpting and Dipping: Achieving the Perfect Shell Finish
With your Eyeball Cake Balls perfectly chilled, the next phase focuses on creating a flawless, smooth exterior before moving onto the detailed, gruesome decoration.
This stage tests your patience, but the results are worth the effort required to produce these phenomenal Spooky Desserts Easy to execute if you follow the temperature rules precisely.
Mixing and Chilling: The Critical Stage for Structural Integrity
As mentioned, the chilling of the cake balls is paramount. Before dipping, melt your white chocolate wafers gently either over a double boiler or in short, 30-second microwave bursts, stirring well each time.
If the chocolate is too thick to flow smoothly, add a small amount of coconut oil (about 1 tablespoon per 2 cups of chocolate) to thin it slightly. Once melted, insert the lollipop stick halfway into a chilled cake ball after dipping the tip first into the chocolate (this acts as "glue").
Return these to the fridge for about 10 minutes to set this initial anchor before the main dip.
step-by-step Dipping Technique for Streak Free Coating
Submerge the chilled cake pop into the melted white chocolate, rotating slowly until the entire surface is coated. Lift it out, gently tap the stick against the side of the bowl to allow excess coating to drip off, creating a clean, thin shell. Place the stick into your Styrofoam block or stand to dry completely.
The shell must be completely hard before any painting begins this can take 15– 20 minutes at room temperature or less time in the refrigerator.
Creating the Bloodshot Effect: Detailed Iris and Pupil Placement
Once the white coating is hard, it’s time for the artistry. Melt small portions of candy melts separately and colour them for the iris (e.g., green or blue). Apply a slightly irregular circle of this coloured mixture onto the centre of the white pop.
While this iris layer is still slightly tacky (but not wet), use a toothpick dipped very lightly in black gel colour to dot the pupil directly in the centre. Immediately after placing the pupil, use a toothpick dipped in red gel colouring to paint fine, spidery veins radiating outward from the pupil across the iris.
This technique gives the Bloody Eyeball Cake Pops their truly horrifying, realistic appearance.
Setting the Final Glaze: Ensuring Your Creations Look Freshly Baked (or freshly harvested)
Allow ample time for the painted details to fully dry and set. The black and red details should harden to a matte finish atop the glossy white shell. If you want an extra professional sheen, a very light dusting of edible pearl or petal dust over the finished, dry eye can make the surface look wet and fresh a truly unsettling effect perfect for your Halloween Eyeball Cake Pops .
Maximizing Shelf Life and Presentation of Your Spooky Bites
Once decorated, the presentation of your Eyeball Cake Pops is vital for maximizing their spooky impact. They look best displayed on a dark, contrasting surface, perhaps nestled into shredded black tissue paper to mimic a nest.
For serving, having a selection of other Spooky Desserts Easy to pair them with, like ghost meringues or spider cookies, rounds out the theme perfectly.
Troubleshooting Common Setbacks in Cake Pop Construction
Every baker encounters hurdles. With Halloween Eyeball Cake Pops , the two main issues are cracking shells and sliding cake balls. Cracks usually happen when the cake ball is too warm when dipped, causing rapid expansion as the warm cake meets the cool chocolate, or if the chocolate is too thick.
Sliding is almost always a failure to 'glue' the stick properly or not chilling the stick inserted ball long enough before the main dip.
Creative Customizations: Variations on the Eyeball Theme
While the classic white and bloodshot look is fantastic, these Eyeball Cake Balls are highly adaptable. You can achieve dramatically different effects by altering the base coating colour or the iris shade. Imagine sickly yellow or toxic green eyes instead of standard browns and blues!
Storage Protocols: Keeping Eyeball Cake Pops Firm and Fresh
Because our recipe uses cream cheese as a binder, refrigeration is necessary for long term storage, though they are best served at room temperature for optimal flavour. Store finished, decorated Eyeball Cake Pops in an airtight container in the refrigerator for up to one week.
Before serving, allow them to sit out for about 30 minutes to bring the cake core back to its softest texture.
Nutritional Insights: A Quick Look at the Indulgence
Let’s be honest: these are a holiday indulgence. Combining rich cake, cream cheese frosting, and a thick layer of chocolate coating puts these firmly in the treat category. They are designed to be a highlight, not an everyday snack.
Enjoy them as the magnificent, albeit slightly frightening, confection they are meant to be!
Troubleshooting: Fixing Cracks and Slippage During the Dip
If you notice cracks forming shortly after dipping, you can often fix them by warming a small amount of your melted white chocolate, letting it cool slightly until it’s the consistency of thick honey, and then gently brushing a thin layer over the cracked area.
Once set, you can often camouflage the crack with a touch of red veining detail. For slippage, the next batch must spend more time chilling after the stick insertion.
Alternative Flavor Profiles to Delight Your Guests
If vanilla isn't your preference for these Halloween Eyeball Cake Pops , remember the cake foundation is highly adaptable. Consider using a rich chocolate cake base bound with chocolate ganache instead of cream cheese for a deeper, fudgier interior, or perhaps even a spice cake paired with an orange coloured iris for a harvest themed spooky look.
No matter the flavour, the visual impact of these detailed Eyeball Cake Pops with Raspberry Filling (if you chose that optional route) remains unforgettable.

Recipe FAQs
Why are my Eyeball Cake Pops cracking after I dip them?
This is usually down to a temperature mismatch, dearie. If your chilled cake balls are too cold, the warm chocolate coating tightens too fast and cracks as it sets. Make sure to let your cake pops warm up for about 10 minutes outside the fridge after inserting the stick, letting that initial chocolate ‘glue’ set firmly before you dip the entire sphere.
A bit of coconut oil in your coating helps keep things smooth, too!
Can I make these Eyeball Cake Pops ahead of time, or do they need eating right away?
You absolutely can make them ahead, which is a lifesaver if you're hosting! Once fully set and decorated, store them in an airtight container at cool room temperature for up to three days, or in the fridge for up to a week.
If chilling, let them sit out for about 20 minutes before serving so the cake core isn't too hard.
The decorations are tricky! What's the secret to getting those realistic veins on the eyeballs?
Ah, the artistic bit! The trick is using gel food colouring and a very fine tool, like a clean toothpick or thin skewer. You need the iris colour to be slightly tacky, but not fully dry, before you add the red 'veins'.
Use the tiniest dab of colour and just lightly drag the toothpick across the surface less is definitely more here, or it looks like a paint spill!
My cake pop mixture feels too wet/crumbly to roll; what should I do?
If it’s too wet, you might have used too much frosting or your cake was extra moist; pop the whole bowl into the fridge for 20 minutes to firm up. If it’s too dry and crumbly, it needs a binder add a tablespoon of extra cream cheese frosting or a tiny splash of milk and mix gently until it holds together nicely, almost like playdough.
Are these safe to serve if they are sitting out on a buffet table for a few hours?
Because these contain cream cheese frosting in the core, they prefer cooler temperatures. If your party is indoors and air-conditioned, they should be fine for 3 4 hours, much like a cream cheese frosting cupcake.
However, if it's a warm room or outdoors, I’d recommend putting them on a platter surrounded by ice packs or bringing them out in smaller batches to keep things tip-top.
Gourmet Eyeball Cake Pops
Ingredients:
Instructions:
Nutrition Facts:
| Calories | 237 kcal |
|---|---|
| Protein | 2.5 g |
| Fat | 11.0 g |
| Carbs | 19.1 g |
| Fiber | 0.3 g |
| Sodium | 77 mg |
