The Ultimate Golden Crisscross Peanut Butter Cookies Truly Classic Chewy
- The Nostalgia Factor: Why These Peanut Butter Cookies Reign Supreme
- Decoding the Perfect Texture: Chewy vs. Crumbly Peanut Butter Perfection
- Curating Your Pantry for Peak Peanut Butter Cookies
- Essential Baking Gear for Flawless Execution
- Mastering the Mix: Step-by-Step Cookie Dough Construction
- The Art of the Press: Achieving the Iconic Criss-Cross Pattern
- Troubleshooting Common Batch Failures and Expert Fixes
- Elevating Your Recipe: Creative Twists on Classic Peanut Butter Cookies
- Recipe FAQs
- 📝 Recipe Card
The Nostalgia Factor: Why These Peanut Butter Cookies Reign Supreme
There’s a specific, comforting scent that fills a home when a batch of Peanut Butter Cookies is baking a warm, nutty aroma that instantly transports you back to childhood kitchens and cozy afternoons. These aren't just any cookies; they are icons of home baking.
Forget overly complicated, multi step bakes; the magic here lies in simplicity and pure, unadulterated peanut flavor. Achieving that perfect balance a slightly crisp edge giving way to a soft, deeply nutty interior is the hallmark of true success, making this Peanut Butter Cookie Recipe a staple everyone needs in their repertoire.
We are aiming for the Best Peanut Butter Cookies you've ever tasted, ones that genuinely live up to the promise of being Irresistible Peanut Butter Desserts .
Decoding the Perfect Texture: Chewy vs. Crumbly Peanut Butter Perfection
The great cookie debate often centers on texture, and peanut butter cookies are no exception. Some prefer a deeply crumbly texture, while others demand chewiness. This particular blueprint succeeds by leaning into a delightful middle ground resulting in Melt-in-your mouth Peanut Butter Cookies that are satisfyingly tender without falling apart the moment you pick them up.
This achievement relies heavily on the ingredients chosen and the method employed.
Setting the Stage: What Makes This Recipe Foolproof?
Our goal is to create a Foolproof Peanut Butter Cookie experience. This is why the recipe calls for standard, emulsified commercial peanut butter rather than its natural, oil-separated counterpart; consistency in the base fat is crucial for reliable results.
On top of that,, the ratio of the sugars using both granulated and packed brown sugar is meticulously calculated. The brown sugar introduces moisture and molasses solids, which are the secret handshake for achieving superior chewiness, ensuring these are delightfully soft cookies, not brittle snaps.
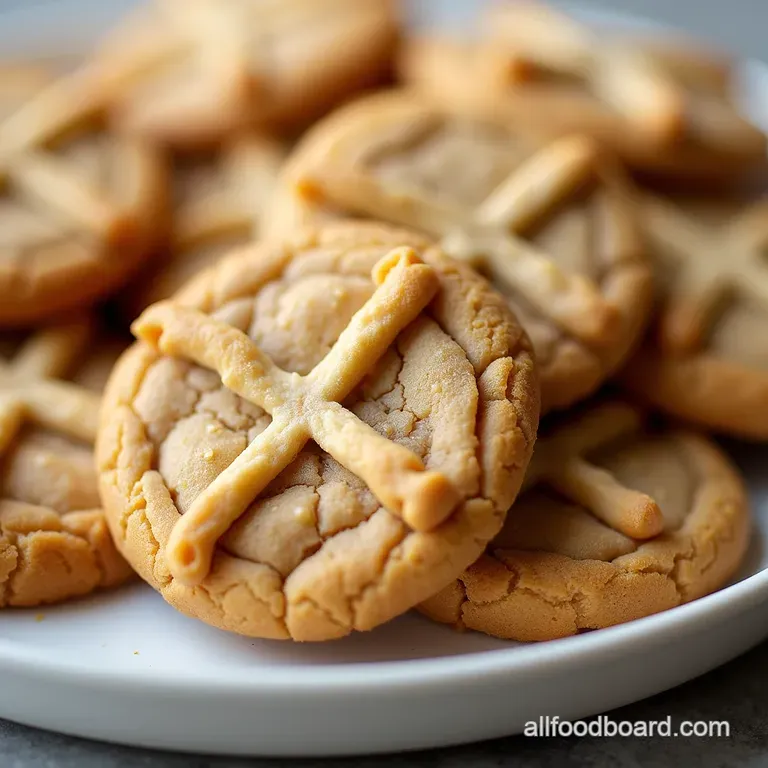
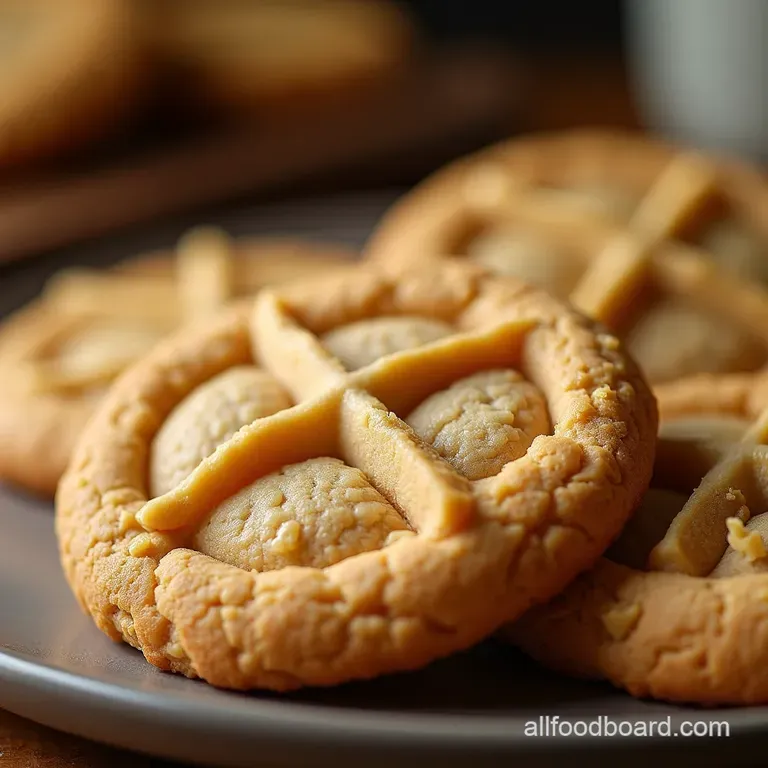
A Quick Dive into Classic Criss Cross Tradition
The fork marks aren't just decoration; they serve a functional purpose. Pressing the dough down with a fork ensures that the thick, rich dough balls flatten just enough to bake evenly throughout.
Without this compression, these dense Classic Peanut Butter Cookies might remain raw in the center while the edges burn. The traditional criss cross pattern achieves this necessary surface area reduction perfectly, promoting an even bake in the short 10 to 12 minutes required.
Meet the Secret Ingredient for Ultimate Melt-in-Your Mouth Goodness
While the ingredients are simple, the technique unlocks true delicacy. We use one large egg and a touch of vanilla extract, but the real key to that light texture often comes down to how you treat the butter and sugars.
Proper creaming (beating air into the fat and sugar mixture) creates tiny pockets that expand in the oven, giving the final product lift and contributing significantly to that desired melt-in-your mouth sensation once baked.
Curating Your Pantry for Peak Peanut Butter Cookies
Baking success often begins long before the oven is switched on it starts at the pantry shelf. To nail this Easy Peanut Butter Cookies batch, the quality and type of your core ingredients matter immensely.
For instance, using room temperature butter is non-negotiable; cold butter won't cream properly, leading to a dense, greasy final product rather than a light, aerated dough. Similarly, ensure your baking soda is fresh; old leavening agents yield flat, disappointing cookies.
Essential Baking Gear for Flawless Execution
While these are Easy Peanut Butter Cookies to mix, having the right tools helps streamline the process. A stand mixer is wonderful for the creaming stage, but a sturdy hand mixer will perform just as admirably. The most crucial equipment, however, lies in measurement and shaping.
Accurate measurement of the flour spooned into the measuring cup and leveled off, never scooped directly from the bag prevents a dry, flour heavy dough. For consistent texture, use a standardized 1.5 tablespoon cookie scoop every time.
The Dry Components: Measuring Flour and Leavening Agents Precisely
For the dry side, we are combining 1 ½ cups (about 180g) of all-purpose flour with 1 teaspoon of baking soda and ½ teaspoon of fine sea salt. Whisking these together thoroughly ensures the baking soda is evenly distributed throughout the flour mass.
If this step is skipped, you risk having pockets of intense saltiness or areas that refuse to rise properly.
Creaming Butter and Sugars: The Foundation of Flavor Depth
This is the make-or-break step for texture. Begin by beating ½ cup (113g) of softened unsalted butter together with ¾ cup (180g) of creamy peanut butter, ½ cup (100g) of granulated sugar, and ½ cup (100g) of packed light brown sugar.
You must beat this mixture until it becomes visibly lighter in color and fluffy in texture this aeration is what gives lift. This typically takes three full minutes in a stand mixer, with a necessary scrape down of the bowl sides halfway through.
Selecting the Right Peanut Butter Consistency (Creamy vs. Crunchy Debate Settled)
When seeking the quintessential texture for these Peanut Butter Cookies with Chocolate Chips (if you choose to add them later), creamy peanut butter is highly recommended.
Conventional, stabilized peanut butter (like Jif or Skippy) contains emulsifiers that help maintain a smooth, uniform dough structure. Natural peanut butter, due to its separated oil content, can cause the cookie dough to become greasy and spread too thin during baking, sacrificing that beautiful, thick profile we are aiming for.
Related Recipes Worth Trying
- Elevated Sweet Potatoes With Marshmallows Recipe Brown Butter Glory — Ditch the bland casserole This Sweet Potatoes With Marshmallows recipe uses brown butter for depth The top is perfectly toastedpure comfort food
- The Best Zesty 10Minute Cowboy Butter Recipe for Steak — Whip up The Ranchers Secret Weapon easy Cowboy Butter in just 10 minutes This garlic red pepper compound butter elevates steak chicken or pasta instantly
- Flavor Bomb Cowboy Butter Recipe Easy Steakhouse Butter — Whip up this ultimate Cowboy Butter recipe in minutesa zesty sauce packed with garlic and herbs that melts perfectly over steak or chicken Simple steps for...
Mastering the Mix: step-by-step Cookie Dough Construction
Once the fats and sugars are beautifully creamed, incorporate the single large egg and 1 teaspoon of vanilla extract until just combined. The trick here is restraint: do not overmix once the egg is added. Immediately slow the mixer speed to low and gradually introduce the flour mixture.
Mix only until the last visible streaks of flour disappear. Overmixing develops the gluten in the flour, leading to tough, bread like cookies instead of the tender results promised by this recipe.
The Art of the Press: Achieving the Iconic Criss Cross Pattern
After mixing, the dough must be chilled. Wrap the resulting dough into a disk and refrigerate for at least 30 minutes, though 60 minutes is better.
This chilling stage is non-negotiable; it firms up the fat content, ensuring the balls hold their shape when they hit the heat. Preheat your oven to 350° F ( 175° C) and line your baking sheets with parchment paper.
Scoop uniform balls (about 1.5 tablespoons worth) and place them two inches apart on the prepared sheets.
Prepping the Dough: Ensuring Proper Temperature for Handling
The chilling process is what makes the subsequent pressing easy. Take a standard dinner fork and lightly dust it with flour this prevents the dough from sticking to the tines. Gently press down on the center of the dough ball to flatten it slightly.
Lift the fork, rotate it 90 degrees, and press again to create the signature crosshatch pattern. This action creates the perfect blueprint for baking.
Baking Dynamics: Oven Calibration for Golden Edges
Bake the cookies for precisely 10 to 12 minutes. You are looking for visual cues of doneness: the edges should appear set and just starting to turn golden brown, but the centers should still look slightly pale and slightly puffy. They will firm up significantly as they cool.
Pulling them slightly early ensures that signature soft center.
From Tray to Cooling Rack: The Crucial Waiting Game Post Bake
Resist the urge to move the cookies immediately! They are incredibly delicate when hot. Allow them to rest directly on the hot baking sheet for a solid five minutes. This period allows the residual heat to finish setting the structure, firming up the bottom crust so they don't tear.
After five minutes, gently transfer them using a thin spatula to a wire rack to cool completely. This cooling step is essential for transforming a soft disk into a perfectly textured cookie.
Troubleshooting Common Batch Failures and Expert Fixes
If your Peanut Butter Cookies spread into thin puddles, it almost always comes down to the butter being too warm or the dough not being chilled sufficiently. The fix?
Next time, chill the dough for the full hour, or even consider chilling the scooped balls on the tray for 15 minutes before baking. If your cookies are too dry or crumbly, you likely added too much flour or overbaked them; reduce the flour slightly next time and monitor the bake time closely.
Elevating Your Recipe: Creative Twists on Classic Peanut Butter Cookies
While the classic version is superb, these cookies are a fantastic base for experimentation. For those who love added textural complexity, consider folding in ½ cup of peanut butter chips alongside the chocolate chips for a truly decadent experience.
Another delightful way to enhance these Irresistible Peanut Butter Desserts is a light drizzle of melted dark chocolate across the top once the cookies have cooled completely it adds a sophisticated bitter contrast to the rich peanut flavor.
Optimal Storage Solutions for Maintaining Freshness Over Time
To keep your Peanut Butter Cookies fresh for up to five days, store them in an airtight container at room temperature. To maintain peak chewiness, place a small slice of white bread or a marshmallow in the container with the cookies; the cookies will naturally absorb moisture from the bread/marshmallow, keeping them soft.
Freezing Techniques: Preserving Dough or Baked Delights
The dough freezes beautifully. Scoop the dough balls, place them on a lined baking sheet, and freeze until solid. Transfer the frozen balls to a heavy duty freezer bag. When you crave fresh cookies, simply pull the required number of balls from the freezer and bake them immediately, adding 2 to 3 minutes to the standard bake time.
Baked cookies can also be frozen for up to three months; layer them between sheets of wax paper in an airtight container.
Nutritional Snapshot: Understanding Your Indulgence
While these Peanut Butter Cookies are a delightful indulgence, they offer a moderate amount of protein thanks to the primary ingredient. Each cookie contains roughly 160 to 180 calories, balanced with a good serving of healthy fats derived from the peanut butter.
Enjoying one or two alongside a glass of milk makes for a perfectly balanced afternoon treat.
Ingredient Swaps: Making These Cookies Allergy Friendly
Should you need to accommodate nut allergies, swapping the peanut butter is simple. Sunflower seed butter (SunButter) makes an excellent substitute, providing a similar fat content and texture, though the flavour profile will shift slightly toward sunflower notes.
If you must avoid eggs, this specific dough formulation struggles a bit without them for binding, but you can attempt to substitute the single egg with a "flax egg" (1 tablespoon ground flaxseed mixed with 3 tablespoons of water, rested for 5 minutes) to yield Peanut Butter Cookies No Eggs , though the texture may be marginally denser.
Recipe FAQs
Why do my Peanut Butter Cookies spread out like a pancake in the oven?
This is usually down to one of two things: not chilling the dough enough, or using peanut butter that’s too oily. Make sure you refrigerate the dough for at least 30 minutes this firms up the butter so it melts slower.
Also, opt for standard commercial peanut butter rather than natural types, as the added stabilizers keep the dough structure solid.
Can I use crunchy peanut butter instead of smooth for these cookies?
Absolutely, if you fancy a bit of texture, feel free to swap it out! For the very best criss cross pattern, smooth peanut butter makes the dough easier to handle. If you use crunchy, just be mindful that the nuts might make the dough balls a bit more rustic looking, but the flavour will be brilliant.
How should I store leftover Peanut Butter Cookies to keep them soft?
Once they’ve cooled completely, store them in an airtight tin at room temperature. To keep them extra chewy, you can pop a slice of fresh bread or half an apple into the tin with the cookies the cookies will absorb moisture from the bread/apple, keeping them soft for several days.
Avoid the fridge, as that tends to dry them out.
My dough keeps sticking to the fork when I try to make the pattern what’s the trick?
Ah, the classic kitchen conundrum! Before you press down, lightly dust your fork tines with a bit of flour. This creates a tiny barrier between the dough and the metal. Remember to press firmly but gently once, lift, rotate 90 degrees, and press again for that quintessential criss cross look.
Can I freeze the cookie dough balls ahead of time?
Yes, this dough freezes beautifully, which is a real lifesaver for busy folk! Roll the dough into balls, place them on a baking sheet, and freeze until solid; then transfer them to a freezer safe bag.
When you fancy a treat, bake them straight from frozen, but add an extra 2 3 minutes to the baking time no need to thaw first!
Golden Crisscross Cookies

