Granola Bars the Soft Chewy Kitchen Cupboard Recipe
- Bypassing the Bakery: Why Homemade Granola Bars Reign Supreme
- Assembling Your Kitchen Cupboard Stash: Essential Components
- The Path to Perfection: Mixing, Melting, and Setting Your Granola Bars
- Infinitely Adjustable: Creative Swaps for Your Granola Bar Recipe
- Troubleshooting and Advanced Tips for Sturdy Granola Bars
- Recipe FAQs
- 📝 Recipe Card
Bypassing the Bakery: Why Homemade Granola Bars Reign Supreme
Right, let’s talk about those supermarket health bars. They promise energy and convenience, but honestly? They taste like disappointment wrapped in plastic, and if you actually look at the ingredient list, you need a science degree just to decode the stabilizers.
Why bother when learning how to make homemade granola bars is genuinely so quick?
The beauty of a DIY cereal bar isn't just saving a fortune (which you absolutely will). It's the texture control. I spent years accidentally making crunchy granola bricks that threatened to crack a tooth, or worse, making musli bars that crumbled into useless dust the moment I looked at them sideways.
We are not aiming for brittle here. We are aiming for proper, robust, soft and chewy granola bars that stand up to being thrown in a backpack. Trust me, it’s a game changer.
Achieving the Perfect Soft Chew Without the Crumble
The secret to that perfect soft chew is twofold: the ratio of your "golden glue" binder to your dry oats, and knowing when to pull them out of the oven. If you overbake them, all the moisture evaporates and the sugar caramelizes past the point of chewiness, turning them into hard, brittle rectangles.
You want them slightly underdone in the centre when they come out, because the residual heat sets the middle perfectly. But what about the stickiness? That all comes down to the binder. We need to focus on a mixture that’s gooey but sets firm enough to allow for clean, non and sticky slices later on.
The Easy Pantry Project: No Specialist Skills Required
This is, dare I say it, an idiot and proof recipe. Seriously. If you can melt butter and stir ingredients, you can nail these. There's no fancy folding, no tricky whisking, and no worrying about dough temperature. It's essentially a one and pot melt and mix job, followed by a crucial pressing stage.
Most of the ingredients needed for these homemade granola bars are already lurking in your cupboard. It feels more like a relaxed kitchen cupboard stash mission than actual baking.
Assembling Your Kitchen Cupboard Stash: Essential Components
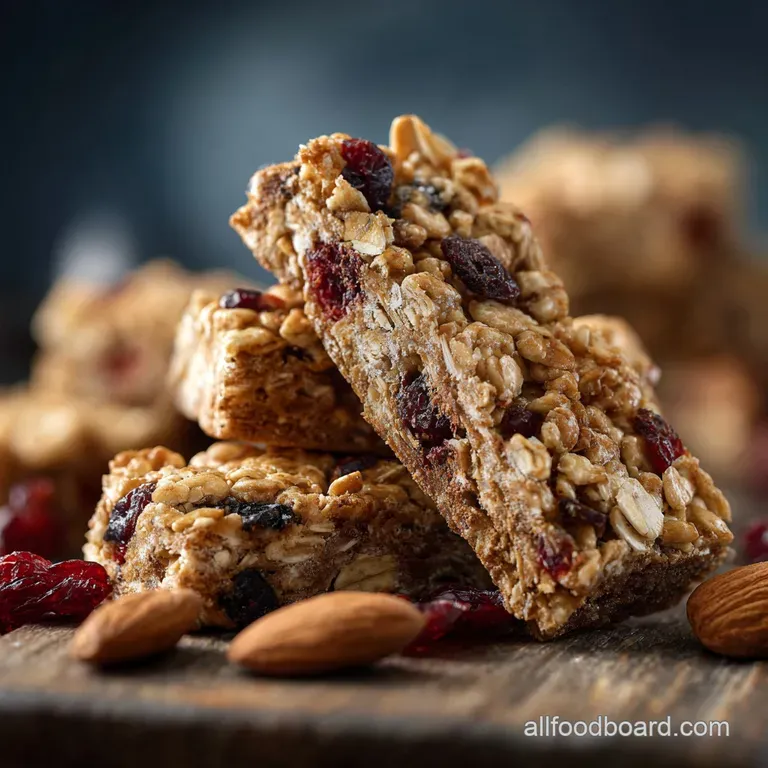
Before we get to the sticky bit, we need the foundation. Use good, old and fashioned rolled oats. I cannot stress this enough. If you try to use quick oats, they just soak up the liquid too fast and you end up with a denser, cakey, slightly sad texture. Don't do it to yourself.
The Golden Glue: Selecting the Right Syrup and Nut Butter
The binder is the absolute hero of this recipe. It has to be sticky, rich, and balanced. This is why we use two different sweeteners: brown sugar (for moisture and flavour) and liquid sweetener (for stickiness).
| Binder Component | Why We Use It |
|---|---|
| Butter/Fat | Adds richness and ensures the mixture melts smoothly. |
| Nut Butter | Provides critical emulsification and density; adds protein. |
| Liquid Syrup | The primary sticking agent; must be thick and viscous. |
Honestly, I usually reach for smooth peanut butter and honey. That combination is unbeatable for texture and flavour. However, if you're trying to make homemade granola bars without peanut butter, almond butter works brilliantly just make sure whatever you choose is smooth, not chunky.
Swapping Out the Staples: Vegan and Allergen and Friendly Alternatives
If you’re looking for options, you’ve got loads of wiggle room. This is a very accommodating recipe.
Crucial Note: When making granola bars without nuts, swap the nut butter for sunflower seed butter (Sunbutter). It has a unique flavour, but it works exactly the same as a binder. Be warned, some brands can turn the baked bars slightly green due to a reaction with baking soda (it’s harmless, just odd looking!).
For the chopped nuts, just use extra pumpkin seeds or hemp hearts.
For vegan friends, swap the honey for maple syrup or brown rice syrup. Maple syrup adds lovely flavour, but brown rice syrup is the ultimate sticky component. It yields an incredibly chewy result. Just remember to use coconut oil or a good plant butter in place of dairy butter.
Must and Have Baking Gear for Perfect Pressing and Cutting
You don't need much, but you do need a sturdy 8x8-inch pan and parchment paper. Seriously, forget trying to grease the pan. The binder is so sticky that you will regret it instantly.
You need to create a parchment sling (the paper hangs over the sides), which allows you to lift the entire, perfectly set block out of the pan before cutting. This simple trick prevents disaster.
Related Recipes Worth Trying
- MM Cookie Bars The Easiest Chewy Dessert Bar Recipe No Rolling — These MM Cookie Bars are the ultimate chewy MM bars packed with colour and flavour This easy cookie bar recipe requires no chilling or rollingjust press...
- Foolproof Graham Cracker Toffee Bars Christmas Crack Easy Recipe — The original Graham Cracker Toffee Bars Christmas Crack recipe These easy nobake holiday bars feature crunchy graham crackers buttery toffee and flaky salt...
- Foolproof Chewy Granola Bars Recipe Stable Soft and Perfect for Meal Prep — Stop buying sad bars This chewy granola bars recipe guarantees stability and softness Brilliant homemade granola bars for packed lunches or a welldeserved...
The Path to Perfection: Mixing, Melting, and Setting Your Granola Bars

Mastering the Binder: Melting the Wet Ingredients Into a Silky Sauce
This phase starts on the hob. Get your butter melted over medium and low heat. Then add your brown sugar, your sticky syrup (honey or maple), and your nut butter. Stir constantly. You are doing two things here: emulsifying the fat and the liquids, and, more importantly, dissolving the brown sugar.
If you feel little grains of sugar when you rub a tiny bit between your fingers, keep stirring! If you don't dissolve the sugar, the bars will be grainy and won’t set properly. Just let it bubble gently around the edges for 2 minutes.
Don't let it boil hard and fast; that's candy territory, and we are not making toffee.
Thoroughly Coating the Dry Mix for Optimal Stickiness
As soon as the binder is smooth and silky, pour it immediately over your toasted oats and mix and ins. You have to work quickly here because that binder starts to cool and seize up fast. Use a strong spatula and turn the mixture over and over until every single oat is glossy and wet.
If you see any dry pockets, your final bars will crumble in those spots. Every oat needs a coat.
The Critical Press: Ensuring Even Density for Clean Slices
This is where the magic happens, and where most novice bakers fail. Get the sticky mixture into the prepared pan and then press it down with serious force. I mean, proper elbow grease. Use the flat bottom of a measuring cup or a straight and sided jar.
You want the mixture compressed so tightly it barely looks like oats anymore. Density is key to bars that don’t fall apart. If you just gently flatten it, you’ll end up with granola dust.
Mandatory Warning: The denser the pack, the sturdier the bar. Press, press, and press again. Ensure the corners are just as compact as the centre.
Patience is Key: Cooling Times for Non and Naughty Slices
Once they are baked (remember: slightly soft in the centre!), you must leave them alone. They need to cool on the counter until they are completely room temperature (usually about 30– 45 minutes). Then, the second non and negotiable step: chilling.
Stick the whole pan in the fridge for at least an hour. If you try to cut them while they are warm or merely room temperature, the binder will still be too soft, and you will get messy, raggedy bars. Wait until they are properly cold; the binder hardens into a solid structure, giving you those beautiful, clean slices.
Infinitely Adjustable: Creative Swaps for Your Granola Bar Recipe
The base formula for these nuts bars homemade style is so flexible you can basically throw in whatever you find in the snack cupboard.
- Spice Swap: Instead of just cinnamon, try adding a pinch of nutmeg and cardamom for warmth, or a dash of ginger powder if you like a bit of a kick.
- Super Seeds: Add flax seeds, chia seeds, or hemp seeds (up to 1/4 cup total) for an extra healthy hit. They integrate perfectly with the oats.
- The Adult Crunch: Swap out half the rolled oats for puffed rice cereal (like Rice Krispies). This makes the bars lighter and chewier, almost like a massive flapjack. But only use half the amount, otherwise, they get too brittle.
- Dried Fruit Revival: I like traditional dried cranberries, but try chopped dried apricots, dates, or even candied ginger if you’re feeling adventurous.
Troubleshooting and Advanced Tips for Sturdy Granola Bars
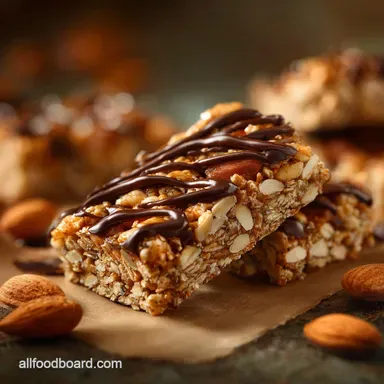
Adding That Proper Naughty Kick: Chocolate, Seeds, and Desiccated Coconut Ideas
For the proper naughty granola bars healthy enough to eat for breakfast, chocolate is mandatory. Don't stir the chocolate chips into the hot binder mixture (it will melt into a mess). You add them to the dry mix.
If you want a visually appealing bar, press half the chocolate chips/desiccated coconut onto the surface after you’ve pressed the mixture into the pan, right before baking. It ensures the toppings stay visible and don't sink.
For seeds, pumpkin and sunflower seeds toasted lightly add a fantastic crunch.
Keeping Them Fresh: Best Practices for Storing Granola Bars
These keep surprisingly well. Store them in an airtight container. If you keep them at room temperature, they will stay perfect for about 5 days. If you keep them chilled (my preference, as I like the density), they last well over a week.
If you plan to freeze them (they freeze beautifully!), wrap each bar individually in plastic wrap, then store them all in a large freezer bag. They thaw in about 20 minutes on the counter.
Why Are My Granola Bars Crumbly? Fixing the Binder and to-Dry Ratio
If you’re ending up with granola bars that crumble, there are usually three culprits.
- Not Enough Binder: You measured the syrup or nut butter incorrectly, or you used ingredients that were too dry (like extra and large nuts that need more glue).
- Too Dry a Mix: You overbaked them! This dried out the moisture in the binder, essentially turning it back into loose sugar. Aim for soft centres.
- The Pressing Fail: You simply didn't press hard enough. Seriously. Go back to that crucial press step next time and use more force.
Pairing Suggestions: What to Serve Alongside Your Homemade Snack
Honestly, they’re designed to be eaten in one hand while you’re doing something else. But if you're taking a proper five and minute break, try them with a big, steaming mug of coffee or a milky tea.
They also make a fantastic, robust layer in a portable breakfast jar layer Greek yoghurt, a crumbled bar, and fresh berries. It feels substantial, satisfying, and is the perfect, sturdy start to the day.

Recipe FAQs
Crikey, my homemade Granola Bars keep crumbling! What’s the secret to keeping them together?
The key to preventing a crumbly disaster is proper pressing; use serious elbow grease to pack the mixture down before baking, and ensure you chill them for at least an hour before cutting it’s non-negotiable!
My bars turned out rock hard, not chewy. Did I bake them for too long?
Yes, overbaking is the usual culprit! Aim for the edges to be golden but the centre still slightly soft when you pull them out; residual heat finishes the setting and ensures they remain lovely and chewy.
I need a dairy-free binder option. Can I make these without butter or honey?
Absolutely; you can swap the butter for coconut oil or a solid plant based shortening, and use maple syrup or thick brown rice syrup instead of honey for a brilliant vegan binder that works just as well.
I’ve run out of almonds and cranberries. Can I use different mix-ins?
Infinitely! Feel free to raid the cupboard for seeds, different dried fruits like apricots, or even chopped white chocolate; just keep the total volume of mix-ins consistent to ensure the binder holds everything properly.
How long do these cheeky little snacks last once I’ve made a big batch?
They keep brilliantly! Stored in an airtight container, they’ll last up to 5 days at room temperature, or you can stick them in the fridge for a good two weeks perfect for packed lunches and future cuppas.
Chewy Homemade Granola Bars Recipe
Ingredients:
Instructions:
Nutrition Facts:
| Calories | 146 kcal |
|---|---|
| Protein | 2.0 g |
| Fat | 9.0 g |
| Carbs | 15.0 g |
