Halloween Cookies: the Crypt Keepers Black Cocoa Cut-Outs
- Conjuring the Perfect Batch of Halloween Cookies: An Overview
- Essential Haunting Components: Ingredients for the Dough and Icing
- The Ritual: Step-by-Step Guide to Baking Black Cocoa Cut-Outs
- Troubleshooting Your Black Cocoa Halloween Cookies: Chef's Wisdom
- Preserving the Haunt: Storage, Freezing, and Make-Ahead Planning
- Pairing Your Spooky Sweets: Recommended Serving Suggestions
- Recipe FAQs
- 📝 Recipe Card
Conjuring the Perfect Batch of Halloween Cookies: An Overview
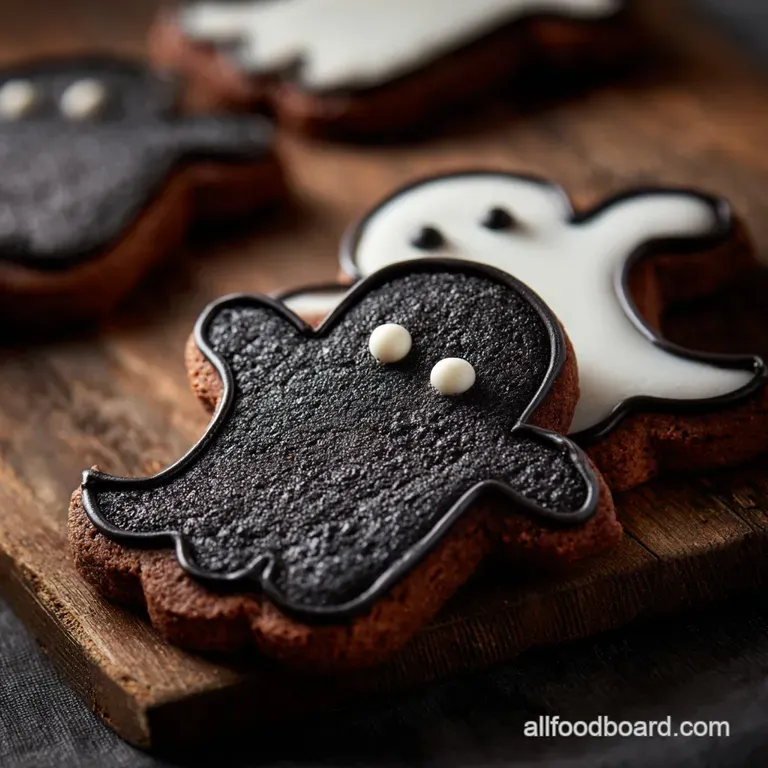
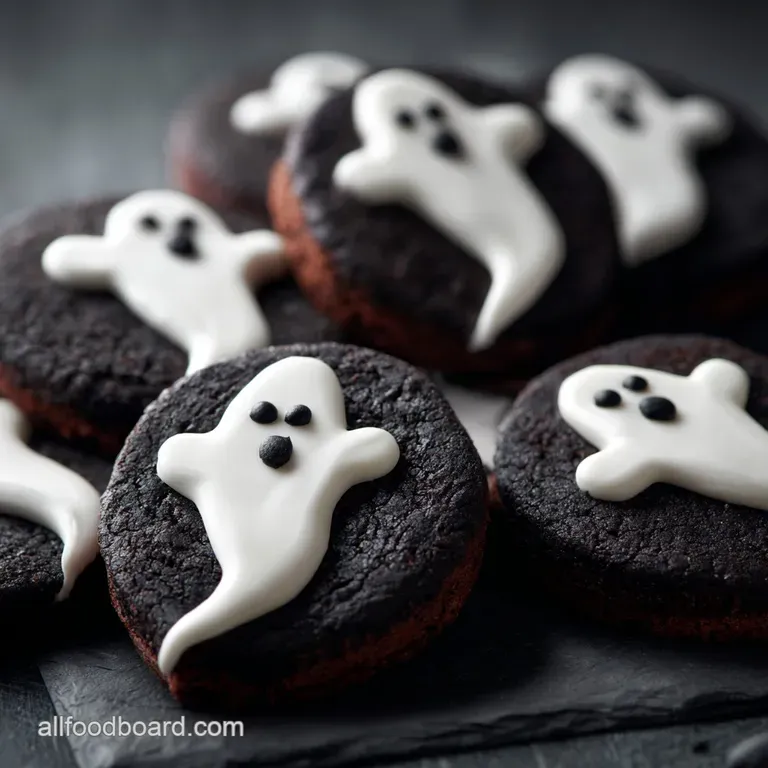
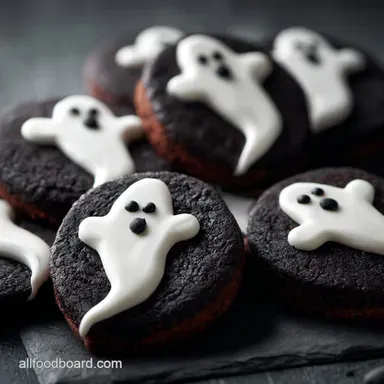
When you pull these Halloween Cookies out of the oven, the aroma alone is enough to stop people in their tracks; it’s that deep, earthy black cocoa smell, kind of like an Oreo exploded in your kitchen.
The texture is key here, yielding a sturdy, buttery cookie that holds a complex, almost smoky chocolate flavour beneath a perfect, flat surface. Trust me, the sheer dramatic contrast of the intense midnight black dough against the bright white royal icing is absolutely stunning.
Look, throwing a party means you need a few showstoppers that aren't also a massive headache. This recipe is your secret weapon for the dessert table. It is certainly not the fastest cookie recipe on the planet, since chilling is required, but the actual active prep is super quick.
Plus, once you master this dough, you’ve basically unlocked the best foundation for all your spooky Halloween Desserts .
If you've struggled with cut-out cookies that spread into blobs or icing that never quite dries, this is the tutorial you need. We’re skipping the artificial food dyes and going straight for natural drama using black cocoa powder, creating the most incredible backdrop for your ghosts and skeletons.
Let's crack on and make some unforgettable Halloween Food For Party guests.
Recipe at a Glance: Difficulty, Prep Time, and Yield
This is a medium difficulty bake, primarily because of the royal icing requirement. You’ll spend maybe 20 minutes getting the dough together and 60 minutes waiting for the chill. The reward is about 2 dozen perfectly stable, deeply flavored cut-out cookies.
If you need more Halloween cookies to decorate , simply double the batch; this recipe scales beautifully.
Why Black Cocoa is the Ultimate Spooky Secret Weapon
Traditional cocoa powder gives you brown cookies, right? We don't want brown; we want dramatic, dark, midnight black. Black cocoa powder is ultra Dutch processed, meaning it has zero acidity, a higher fat content, and that gorgeous, deep dark color naturally.
This is crucial: the flavor is also milder and less bitter than standard cocoa, tasting exactly like the base of a store-bought chocolate sandwich cookie. It makes for beautiful Halloween Cookies Decorated without messing with gels or pastes.
The Ghostly Icing: Mastering the Royal Icing Consistency
Royal icing is the key to creating those crisp edges and smooth, matte surfaces that make these look professionally made. We use meringue powder instead of raw egg whites because it’s safer, easier, and dries rock hard every single time.
The trick is nailing the two consistencies: the thick outline icing (your dam) and the slightly thinner flooding icing (the pond). We’ll discuss the ten-second rule later it’s non-negotiable for success!
Essential Haunting Components: Ingredients for the Dough and Icing
Every cook needs a few fallback substitutions. Maybe you ran out of baking powder, or maybe you don't keep meringue powder on hand. Don't panic! Always remember, baking is science, but sometimes you gotta be flexible.
Decoding the Cocoa: Sourcing True Black Cocoa Powder
I know it can be a specialty item, but the color payoff is worth it. If you absolutely cannot source black cocoa, you have a couple of options. You could substitute it with standard Dutch process cocoa and add a few drops of black gel dye to the dough when you add the egg. It works, but the texture and flavor won't be quite as rich. If you are baking a different kind of cut-out cookie, like our beautiful Christmas Sugar Cookies: The Ultimate No-Spread Recipe for Decorating , standard flour works perfectly fine.
Meringue Powder vs. Egg Whites: Choosing Your Icing Stabilizer
Meringue powder is my preferred stabilizer for royal icing. It gives guaranteed structure and doesn't require tempering or separating eggs. If you don't have it, you can use pasteurized egg white powder or even fresh, pasteurized egg whites, but meringue powder truly simplifies the process.
Fat Matters: Using Unsalted Butter for Superior Texture
We use unsalted butter so we can control the salt level perfectly. Plus, the high fat content contributes to a tender, melt-in-your mouth crumb. Crucial Tip: Make sure your butter is actually softened, not melted.
If it's too warm, your dough will be sticky and you’ll have ghost blobs instead of sharp, crisp ghosts.
| Ingredient | Substitute Option | Notes |
|---|---|---|
| Unsalted Butter | Salted Butter (Omit the salt in the recipe) | The dough will still be rich and tender. |
| Black Cocoa Powder | Dutch Process Cocoa + Black Gel Dye | Color is achieved, but flavor might be slightly less intense. |
| Granulated Sugar | Caster Sugar | Same quantity, but caster sugar dissolves faster in the dough. |
| Meringue Powder | Pasteurized Egg White Powder | Use volume equivalent, but add water slowly. |
The Ritual: step-by-step Guide to Baking Black Cocoa Cut-Outs
Preparing the Dough: Creaming and Achieving the Perfect Consistency
Creaming the butter and sugar is where you incorporate air, making the cookie light and tender. Don't rush this step; beat them until they are truly pale yellow and fluffy, which usually takes about four minutes. When incorporating the dry ingredients, stop the mixer immediately once the flour disappears.
Overmixing develops too much gluten, resulting in tough, chewy cookies nobody wants leathery Halloween Cookies .
The Crucial Chill: Why Resting the Dough is Non-Negotiable
This is where I messed up constantly when I first started baking cut-outs. If you skip the chill, the fat in the dough is too warm and will melt immediately when it hits the oven heat. This causes the edges of your shapes to spread, turning sharp bats into indistinguishable ovals.
Wrap your dough tightly and give it a full hour in the fridge, minimum.
Chef's Note: If you want zero spread, roll the dough between two sheets of parchment paper before chilling. That way, the dough is already the correct thickness when you go to cut your shapes.
Baking the Black: Optimal Oven Temperature and Time
We bake these at a standard 350°F (175°C). Because the dough is already black, you cannot rely on visual browning to determine doneness, which is tricky. Bake for the suggested 10– 12 minutes and look for the surface to transition from shiny or wet-looking to a solid, matte black.
The edges should look firm. Pull them out quickly, and let them set on the hot tray for five minutes before moving them to a cooling rack.
Achieving Ghostly White: Mixing and Bagging the Royal Icing
Make sure your bowl is perfectly clean and grease free, darling; any residual fat will absolutely ruin your royal icing structure. Whip the icing ingredients until they are stiff and glossy, then divide.
Use small squeeze bottles for the flooding icing it makes creating Easy Halloween Cookies so much less messy and gives you better control than a piping bag.
Troubleshooting Your Black Cocoa Halloween Cookies: Chef's Wisdom
We all face cookie disasters, but knowing the fixes is half the battle. If you find your cookie edges are soft and puffy, or the icing is pooling everywhere, here are the likely culprits. These tips ensure your Halloween cookies ideas actually turn out as planned.
Troubleshooting Runny Royal Icing and Puffy Cookies
If your royal icing is too runny, that means you added too much water to reach the ten-second consistency. Just whisk in more sifted powdered sugar, maybe a tablespoon at a time, until that line you drag through it disappears in 8 10 seconds not two seconds.
If your cookies are puffy, you likely didn't chill the cut-out shapes long enough right before baking; cold dough is the answer every single time.
How to Prevent the Dough from Sticking to Your Cutters
This is a common issue with high cocoa doughs! Instead of dipping your cutters in flour, dip them in extra cocoa powder . This prevents adding white streaks to your beautiful black shapes and stops the dough from clinging to the edges. Lightly coat the work surface in cocoa, too.
Master Class: Achieving Crisp Lines and Smooth Flooding
Use the thick outlining icing to create a perfect barrier, ensuring the line is fully connected with no breaks. Once that line sets ( 10 minutes), fill the center with the thinner flood icing and use a toothpick to work it right up to the edge. Pop any bubbles immediately.
Preserving the Haunt: Storage, Freezing, and make-ahead Planning
Baking ahead is the only way to manage large Halloween parties, right? You can absolutely conquer these Halloween Cookies in stages.
Freezing the Raw Dough for Later Use
This dough freezes like a dream. After you create the flat disks, wrap them tightly in two layers of plastic wrap and one layer of foil. They will last three months in the deep freeze. Thaw overnight in the fridge before rolling and cutting.
You can also freeze the cut-out shapes before baking; just pull them straight from the freezer and bake for an extra minute or two.
Optimal Storage for Fully Iced and Decorated Cut-Outs
Once the royal icing is completely dry and I mean rock hard dry, which usually takes 4 hours or overnight you can stack the cookies carefully. Store them in an airtight container at cool room temperature for up to two weeks.
Do not refrigerate them ; the moisture can cause the icing to weep or become sticky.
Best Practices for Transporting Large Batches
If you're taking your Halloween Cookies to a huge bash, layer them between sheets of parchment paper in a sturdy container. For extra safety, wrap the whole container tightly in plastic film to prevent shifting. This is especially helpful if you're also bringing savory treats like our Halloween Party Foods: Spiced Sausage Mummies (Savory Hand Pies) .
Pairing Your Spooky Sweets: Recommended Serving Suggestions
These dark, decadent Halloween cookies ideas pair beautifully with rich, warm beverages or even chilled, tart drinks that cut through the cocoa and sugar.
If you’re hosting a full spread, check out the rest of the Halloween Party Foods Collection: Easy Savory Sweet Ideas . For these cookies specifically, I love serving them with a hot, spiced cider for the kids and a dark, creamy espresso martini for the adults. The coffee notes really enhance the deep cocoa flavor.
For a visually striking display, place the finished black and white cookies on a tiered stand. I also think they look incredible next to our truly creepy and dark Halloween Cookies: Ultimate Midnight Black Spiderweb Sugar Cookies . The variety of cookie shapes and darkness really makes the whole table pop.

Recipe FAQs
Why aren't my cookies truly black, only dark brown?
You must use specific, heavily alkalized black cocoa powder, not just standard Dutch processed or regular dark cocoa. Black cocoa is what provides the intense, near ink-like colour and a specific subtle, deep flavour profile.
If you substitute it with standard cocoa, your cookies will only achieve a rich dark brown colour.
My cookie dough is too sticky and breaks when I try to transfer the cut-outs. What should I do?
Proper chilling is non-negotiable for sturdy cut-out cookies; ensure the dough has been refrigerated for a minimum of two hours. If it remains sticky, try rolling the dough between two sheets of parchment paper instead of directly on a floured surface.
For particularly warm kitchens, briefly chill the entire baking sheet of cut-outs for 5 10 minutes before placing them in the oven.
How far in advance can I decorate and store these Halloween cookies?
Once the royal icing is completely dry and hardened (allow 6 8 hours minimum), the decorated cookies can be stored in an airtight container at room temperature for up to two weeks. Ensure you layer them carefully with wax or parchment paper to prevent delicate icing designs from chipping or sticking together.
Avoid refrigerating decorated cookies, as the condensation can cause the royal icing to weep or soften.
Can I freeze the baked cookies, and should I ice them before or after freezing?
Yes, the baked, unfrosted cookies freeze exceptionally well; allow them to cool completely, stack them in an airtight container, and freeze for up to 3 months. Always decorate the cookies after they have been thawed completely at room temperature, as the high moisture content of fresh icing does not tolerate the freezing process well.
Thawing usually takes about one hour.
My royal icing is gritty or takes forever to dry. How do I fix this?
Gritty icing typically results from un-sifted powdered sugar, so always sift thoroughly before mixing to ensure smoothness. If the icing is drying slowly, it means the consistency is too thin; incorporate more sifted powdered sugar slowly until it reaches the desired firmness.
For maximum drying speed, ensure you are using meringue powder or egg whites and allow air circulation in the room.
I need a dietary variation. Can I make this black cocoa recipe gluten-free or dairy-free?
This recipe adapts well to both variations: substitute the all-purpose flour with a high-quality 1:1 gluten-free baking blend that contains xanthan gum. For dairy-free, simply swap the unsalted butter for a high-quality plant based butter alternative.
Note that dairy-free versions may require slightly less chilling time.
My cookies spread slightly during baking, causing them to lose their sharp cut-out edges. Why?
Cookie spread is often caused by warm dough or using too much leavening agent (baking powder/soda). Ensure your butter is softened but not melted, and always keep your dough cold right up until it hits the oven, potentially chilling the cut-outs again before baking.
Also, double check your flour measurement, as too little flour makes the dough structurally weak.
Black Cocoa Halloween Cut Out Cookies
Ingredients:
Instructions:
Nutrition Facts:
| Calories | 200 kcal |
|---|---|
| Fat | 8 g |
| Fiber | 1 g |
