Artisan Bread: Rustic Loaf
- Time: Active 15 minutes, Passive 3 hours 45 mins, Total 4 hours
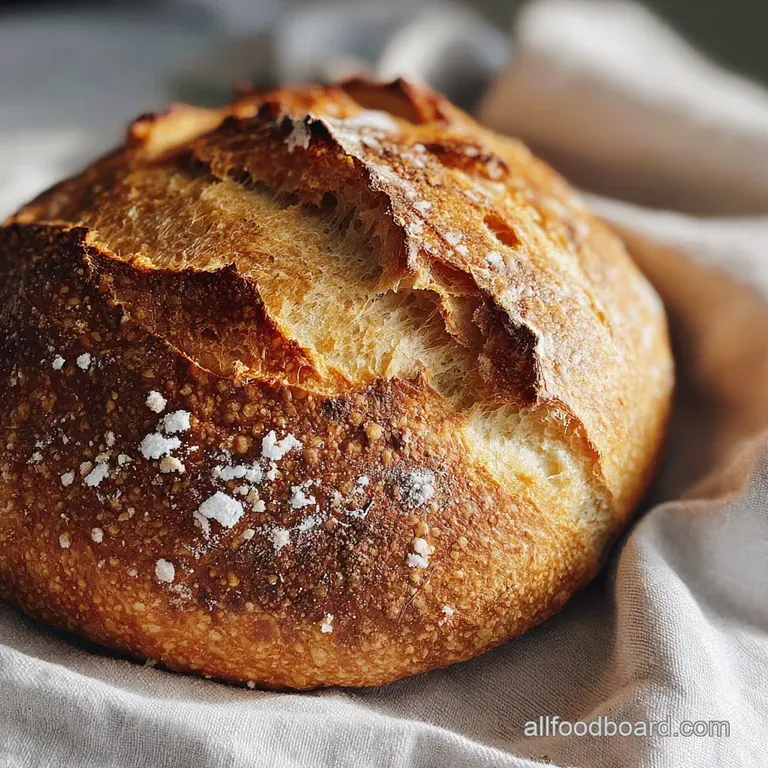
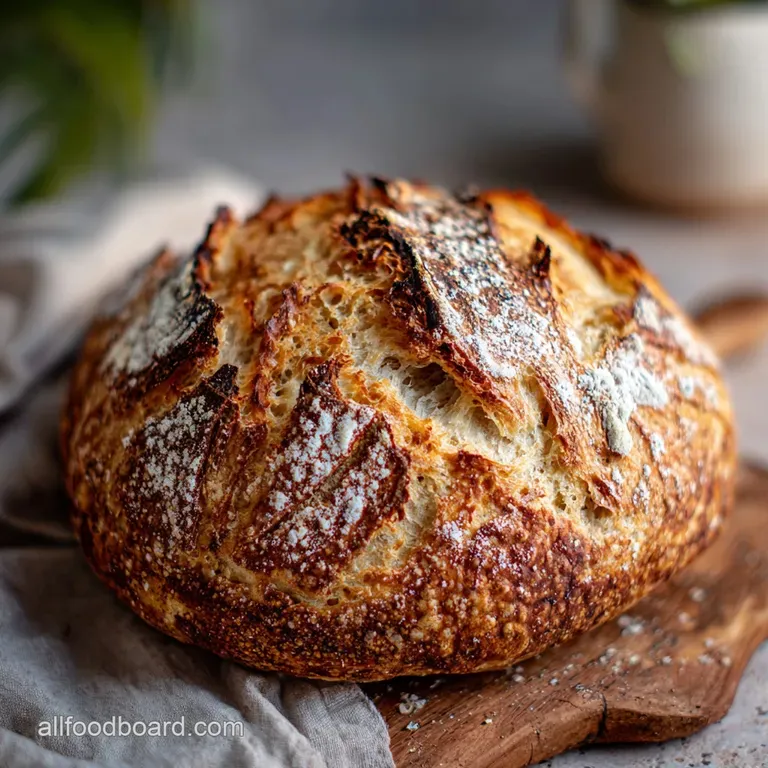
- Flavor/Texture Hook: Shatteringly crisp mahogany crust with a velvety, honeycomb crumb
- Perfect for: Slow weekend mornings, cozy dinner parties, or beginner bakers seeking a "wow" result
- Achieve the Perfect Crusty Artisan Bread Today
- The Architecture of the Crumb
- Component Analysis for Better Baking
- The Essential Pantry Elements
- Critical Equipment for Better Loaves
- Detailed Path to Golden Crusts
- Resolving Common Dough Failures
- Creative Flavor Infusion Ideas
- The Slow Fermentation Myth
- Preservation and Leftover Strategies
- Artistic Serving and Garnish Tips
- Artisan Bread FAQs
- 📝 Recipe Card
Achieve the Perfect Crusty Artisan Bread Today
There is a specific, haunting sound that happens about five minutes after you pull a fresh loaf out of the oven. It is a series of tiny, delicate pops and crackles the "song" of the bread as the cool air hits the scorching crust, causing it to contract and shatter in microscopic fractals.
I remember standing in my kitchen, flour dusted and exhausted, just leaning in to listen to that first successful loaf. It smelled of toasted grain and old world comfort, a scent that instantly transported me back to the small boulangerie near my grandmother's house.
For years, I thought this kind of magic was reserved for professionals with stone hearths and years of apprenticeship. I’ve had my fair share of "bread bricks" and gummy centers, believe me.
But the truth is, creating incredible Artisan Bread isn't about physical strength or expensive gadgets; it’s about understanding the quiet dance between hydration and heat. Today, we’re skipping the exhausting kneading and letting physics do the heavy lifting for us.
We are going to focus on a high hydration dough that creates those coveted, irregular air bubbles and a crust so rustic it looks like it belongs in a still life painting. You don’t need a culinary degree, just a little patience and a hot pot.
By the time we’re done, your kitchen will smell like a professional bakery, and you’ll have a loaf that’s almost too beautiful to cut almost.
The Architecture of the Crumb
Starch Gelatinization: High heat causes flour starches to absorb water and swell, creating the structural "walls" of your bread’s internal bubbles.
Steam Expansion: Trapped moisture evaporates rapidly in the oven, inflating the dough and creating a thin, crispy exterior before the crust sets.
The Magic of Autolysis
When we let the flour and water sit, the proteins begin to link up into gluten chains without us moving a finger. This natural process creates a more extensible dough that can hold more air.
Steam and Crust Physics
Baking inside a sealed environment, like a Dutch oven, traps the moisture escaping from the dough. This keeps the surface soft longer, allowing the bread to expand fully a process known as oven spring before the sugars caramelize into a deep gold.
The Slow Fermentation Advantage
Even with instant yeast, giving the dough a full 3 hours to rest allows organic acids to develop. This creates a complex, slightly tangy profile that mimics the depth of a long aged sourdough.
| Method | Total Time | Crust Texture | Skill Level |
|---|---|---|---|
| The Classic Approach | 4 hours | Thick and crackly | Beginner friendly |
| The Cold Ferment | 12-24 hours | Blistered and thin | Intermediate |
| The Quick Loaf | 1.5 hours | Soft and chewy | Casual baker |
If you find yourself falling in love with this slower pace of baking, you might want to try our Artisan Sourdough Bread Recipe for even more complex fermentation. The transition from commercial yeast to a wild starter is a rewarding challenge for any home cook.
Component Analysis for Better Baking
| Ingredient | Science Role | Pro Secret |
|---|---|---|
| Bread Flour (450g) | Provides the high protein content (12-14%) needed for a strong gluten network. | Sift the flour from a height to aerate it before measuring by weight. |
| Warm Water (350ml) | Hydrates proteins and activates yeast; 100°F is the "sweet spot" for speed. | Use filtered water if your tap water smells strongly of chlorine, which can stunt yeast. |
| Instant Yeast (3g) | Ferments sugars to produce CO2 gas, which creates the lift and airy texture. | Store your yeast in the freezer to keep it potent for months. |
The Essential Pantry Elements
To get that rustic, flour dusted look, the quality of your base ingredients is everything. Don't settle for "okay" when you can have exceptional.
- Bread Flour (450g): Why this? Higher protein ensures the loaf stands tall instead of spreading into a pancake. Substitute: All purpose flour (yields a softer, tighter crumb).
- Warm Water (350ml): Why this? The high 77% hydration is the secret to those large internal holes. Substitute: Room temperature beer (adds a malty, fermented depth).
- Kosher Salt (10g): Why this? Enhances flavor and regulates yeast activity so it doesn't over proof. Substitute: Fine sea salt (use 8g as it is denser).
- Instant Yeast (3g): Why this? No blooming required; it mixes straight into the dry ingredients. Substitute: Active dry yeast (must bloom in warm water first).
- Cornmeal (1 tablespoon): Why this? Prevents sticking and adds a professional "crunch" to the bottom. Substitute: Rice flour (excellent for over high heat non sticking).
- Extra Virgin Olive Oil (1 teaspoon): Why this? A tiny amount helps the dough release from the bowl easily. Substitute: Any neutral vegetable oil.
For those mornings when you want that bakery crunch but only have thirty minutes to spare, our Homemade French Bread recipe is a fantastic alternative that uses a more traditional kneading method for speed.
Critical Equipment for Better Loaves
While you don't need a professional oven, a few specific tools will transform your results from "homemade" to "artisan." The most important is a heavy bottomed vessel.
- Dutch Oven (5-7 quart): This is your "oven within an oven." It traps steam, which is non negotiable for that shatteringly crisp crust.
- Digital Scale: Bread is a game of ratios. Measuring 450g of flour is infinitely more accurate than using measuring cups, which can vary by 20% depending on how you pack them.
- Bench Scraper: This helps you handle the sticky, high hydration dough without it gluing itself to your hands.
- Parchment Paper: Essential for "slinging" the dough into the scorching hot pot without burning yourself.
Chef's Note: If you don't own a Dutch oven, place a shallow pan of boiling water on the bottom rack of your oven to create a makeshift steam chamber.
Detailed Path to Golden Crusts
Mixing the Flour Mixture
Whisk together 450g bread flour, 10g kosher salt, and 3g instant yeast in a large glass bowl. Pour in 350ml of warm water (aim for 100°F) and use a sturdy spatula to stir until no dry streaks of flour remain.
Note: The dough will look "shaggy" and messy; this is exactly what we want.
Timing the First Rise
Drizzle 1 teaspoon of olive oil around the edges of the bowl to prevent sticking. Cover tightly with plastic wrap and let it sit in a warm, draft free spot until the dough has doubled in size and looks bubbly, about 3 hours.
Preparing the Steam Chamber
Place your empty Dutch oven (with the lid) into the oven and preheat to 450°F. Bake the pot for at least 30 minutes until the metal is radiating intense heat. Note: This creates the immediate "oven spring" needed for a tall loaf.
Shaping for Structural Strength
Turn the sticky dough onto a flour dusted surface. Instead of kneading, use your floured hands to fold the edges toward the center, creating a round ball. Flip it over so the seam side is down, and let it rest on a piece of parchment paper for 15 minutes until the surface looks taut.
Scoring and Final Bake
Dust the top with a pinch of flour and use a sharp knife to slash a 1/2 inch deep "X" across the top. Carefully lift the parchment paper and drop the dough into the hot Dutch oven. Cover with the lid and bake for 30 minutes until the structure is set and pale gold.
The Final Color Development
Remove the lid and continue baking for another 12-15 minutes until the crust is a deep, burnished mahogany. Tap the bottom; it should sound hollow like a drum.
The Cooling Mandate
Transfer the loaf to a wire rack. Let it cool for at least 45 minutes until the internal starches have finished setting. Note: Cutting too early will result in a gummy, wet interior as the steam escapes too fast.
Resolving Common Dough Failures
Fixing Overly Sticky Dough
High hydration Artisan Bread is supposed to be tackier than standard sandwich bread, but it shouldn't be impossible to handle. This usually happens if the flour didn't have enough protein to absorb the water.
| Problem | Root Cause | Solution |
|---|---|---|
| Dough is a puddle | Low protein flour or over proofing | Use Bread Flour and stick to the 3 hour limit at room temp. |
| Pale, soft crust | Not enough steam or low heat | Ensure the Dutch oven is preheated for 30 mins and the lid is tight. |
| Gummy interior | Slicing the bread while hot | Wait 45-60 minutes before cutting to allow the structure to firm up. |
Preventing Flat Baked Loaves
If your bread looks more like a focaccia than a boule, it likely lost its structural integrity during the shaping phase. You need to create surface tension.
- ✓ Always use a digital scale for the flour/water ratio.
- ✓ Ensure your yeast is fresh by checking the expiration date.
- ✓ Don't skip the "rest" period after shaping; it relaxes the gluten so it can expand.
- ✓ Score the top at least 1/2 inch deep to give the steam an escape route.
- ✓ Use a heavy pot that retains heat effectively, like cast iron.
Creative Flavor Infusion Ideas
Once you've mastered the basic loaf, the variations are endless. Just remember that adding "wet" ingredients like olives or cheese can change the hydration.
- Roasted Garlic & Rosemary: Fold in 6 cloves of smashed roasted garlic and 1 tablespoon of fresh chopped rosemary during the initial mixing.
- Cheddar & Jalapeño: Add 100g of cubed sharp cheddar and 1 chopped jalapeño. Note: The cheese will create beautiful crispy "frico" spots on the crust.
- Honey & Walnut: Replace 1 tablespoon of water with honey and add 50g of toasted walnut halves for a rustic breakfast loaf.
| Serving Size | Flour Amount | Water Amount | Pan Size |
|---|---|---|---|
| Small Loaf (6 servings) | 225g | 175ml | 3 quart pot |
| Standard Boule (12 servings) | 450g | 350ml | 5-7 quart pot |
| Double Batch (24 servings) | 900g | 700ml | Bake in two batches |
If you find yourself with extra loaves, you can repurpose them into a Classic Bread and recipe — it's the best way to use bread that's a day or two old and needs a second life in a creamy custard.
The Slow Fermentation Myth
Many people believe that "no knead" bread is a shortcut that sacrifices quality. In reality, time is a better gluten developer than human hands. Long fermentation periods allow the enzymes in the flour to break down complex starches into simple sugars, which results in a better tasting, more digestible loaf.
Searing the crust doesn't "lock in moisture" either; the steam trapped inside the pot is what does the heavy lifting for the texture.
Preservation and Leftover Strategies
Storage: Keep your Artisan Bread in a paper bag at room temperature for up to 2 days. Avoid plastic bags, as they trap moisture and turn that beautiful crust into a rubbery mess. For longer storage, slice the loaf and freeze it in a sealed bag for up to 3 months.
Zero Waste: Never toss the ends! Turn stale heels into "Golden Shards" by tossing them in olive oil and sea salt, then baking at 375°F until they shatter. These are worlds better than any store-bought crouton.
You can also blitz dried chunks in a food processor for high-quality breadcrumbs that actually have flavor.
Artistic Serving and Garnish Tips
For a truly evocative presentation, focus on a balanced color palette. I like to use a three accent strategy to make the loaf pop on the table:
- The Flour Dust (White Accent): Sift a very fine layer of white flour over the dough just before scoring. This creates a stark, beautiful contrast against the dark crust once baked.
- The Mahogany Crust (Deep Accent): Don't be afraid of a dark bake. That deep brown color is where the flavor lives. It should look like a rustic chestnut.
- The Fresh Garnish (Vibrant Accent): Serve the bread on a wooden board with a sprig of fresh rosemary and a small bowl of golden honey or emerald green olive oil for dipping.
The Classic Bistro Board
Slice the bread thick and serve alongside salted butter (the kind with the big flakes) and a few slices of prosciutto. The saltiness of the meat against the creamy, velvety crumb of the bread is a pairing that never fails.
The Ultimate Dipping Experience
This bread is a sponge for flavor. If you're serving a soup or stew, try our The Homemade French recipe technique to turn these loaves into edible bowls. It's the ultimate way to ensure not a single drop of broth goes to waste.

Artisan Bread FAQs
What is artisan bread?
Artisan bread is made using traditional methods with simple ingredients. It typically has a rustic appearance, a crisp crust, and a tender, airy interior, often achieved through long fermentation times and minimal handling.
Is artisan bread healthier than white bread?
Generally, yes, it can be healthier. Artisan breads are often made with whole grains and less processed ingredients, meaning they can have higher fiber content and a lower glycemic index compared to highly refined white bread.
What is the difference between rustic bread and artisan bread?
The terms are often used interchangeably, but "artisan" implies a specific craft and quality. While both are typically crusty and less uniform than mass produced bread, "artisan" suggests a dedication to traditional techniques and high-quality ingredients, often made by skilled bakers.
Is artisan bread hard or soft?
It has a distinctively crisp crust, but a soft, chewy interior. The hallmark of artisan bread is that shatteringly crisp exterior, which contrasts beautifully with the moist, airy crumb inside.
Can I make artisan bread without a Dutch oven?
Yes, but you'll need to create steam. You can achieve a similar crust by placing a pan of boiling water on the bottom rack of your oven while baking. If you enjoyed mastering steam for crust, see how it applies to creating crispiness in The Best Crusty Bread Bowls Recipe for Hearty Soups.
What makes the crust on artisan bread so good?
It's a combination of high heat and steam. Baking in a Dutch oven traps steam released by the dough, keeping the crust pliable longer, allowing for maximum oven spring before it caramelizes into that desired crispiness.
How long does artisan bread typically take to make?
It often requires significant passive time for fermentation. While active prep can be as little as 15-30 minutes, the dough usually needs 3-12 hours (or more if cold fermented) to develop its flavor and texture, making it a project for a slow weekend.
Artisan Bread Recipe

Ingredients:
Instructions:
Nutrition Facts:
| Calories | 144 kcal |
|---|---|
| Protein | 3.9 g |
| Fat | 0.8 g |
| Carbs | 29.2 g |
| Fiber | 1.1 g |
| Sugar | 0.1 g |
| Sodium | 323 mg |
