Smooth Hummus the Velvet Dip Chefs Guide to Silky Smooth Results
- The Pursuit of Perfect Texture: Why Most Hummus Fails
- Unlocking the Chef's Secrets for Silky Smooth Hummus
- The Foundation: Essential Ingredients for Superior Smooth Hummus
- Tools of the Trade: Equipping Your Kitchen for Emulsification
- The Process: Step-by-Step Mastery to Achieve Velvety Hummus
- Achieving the Swirl: Blending Techniques for Maximum Smoothness
- Hummus Beyond the Bowl: Storage and Serving Suggestions
- Recipe FAQs
- 📝 Recipe Card
The Pursuit of Perfect Texture: Why Most Hummus Fails
Okay, let’s be real. How many times have you made hummus at home, scraped it out of the food processor, and then tasted that gritty texture? You know the one. It tastes fine, but it’s definitely not that magical, velvety dip you get at proper Middle Eastern restaurants. Why is that? You followed the recipe!
I spent years messing around with this. I tried adding more oil. I tried switching up my lemon juice. I even tried those "no peel" recipes, which, honestly, are just lying to you about the smoothness factor. The simple, harsh truth is that most homemade hummus fails because we treat it like a simple mash job.
It's not a mash. It’s an emulsion . We need to break down everything to microscopic levels, and that means we have to address the chickpea skins.
If you are currently relying on a quick blitz and hoping for the best, this article is for you. We are going beyond the basics. We are going to make silky smooth hummus —the kind you can eat with a spoon.
Unlocking the Chef's Secrets for Silky Smooth Hummus
To get that beautiful, light, almost whipped texture, we need to respect the process. Think of it less like throwing things in a blender and more like baking a delicate meringue. Seriously.
The Hummus Hall of Fame: Defining Restaurant Quality Creaminess
What makes that expensive bowl of hummus in a nice restaurant so different? It's the lightness. It’s not dense. It doesn't stick to your spoon like peanut butter. It should feel like velvet, clinging slightly to the pita, but dissolving on your tongue.
Achieving this means two things: perfect hydration and maximum aeration. We need to introduce air (which happens during the whipping phase) and ensure the starches in the chickpeas are completely gelatinized and softened.
Myth vs. Fact: Debunking Common Hummus Mistakes
I’ve made these mistakes, so trust me when I tell you to ignore these popular 'shortcuts.'
| The Myth | The Truth |
|---|---|
| Use all the reserved chickpea liquid (aquafaba) for creaminess. | While great for vegan baking, too much aquafaba can make hummus taste slightly metallic or watery. Use water instead, or only a little reserved liquid. |
| Just rinse canned chickpeas; they're soft enough. | No way. The skins remain tough and will always cause graininess. You must cook them down further. |
| Adding ice cubes right away makes it fluffier. | Wrong timing! The ice water is crucial, but it goes into the tahini first, not the finished product. |
The Science of Smoothness: Baking Soda's Crucial Role
This is the real secret. You know how dried beans sometimes have hard shells even after boiling? Chickpeas are the same. Their outer membrane is built tough. Baking soda (sodium bicarbonate) is highly alkaline, and when you boil the chickpeas with it, that alkalinity breaks down the pectin and hemicellulose in the skins and the bean itself.
This makes the chickpeas so tender that they practically disintegrate when processed. It also helps those pesky skins float right off!
CRUCIAL WARNING: Do not skip the 10-minute boil with baking soda, even if you are using high-quality canned chickpeas. This step is the difference between good hummus and silky smooth hummus .
The Foundation: Essential Ingredients for Superior Smooth Hummus
We’re keeping the ingredient list tight. We only need five things, really, but their quality matters immensely. Don’t skimp here. If you buy cheap, thick, bitter tahini, you’ll end up with thick, bitter hummus. Simple equations, people.
Related Recipes Worth Trying
- RestaurantQuality Smooth Hummus The Bicarb Secret to Creaminess — Master truly smooth hummus with this quick easy recipe Use our bicarb hack for restaurantquality creaminess without peeling Perfect for homemade hummus spreads
- Effortlessly Smooth Marshmallow Fondant MMF Recipe That Tastes Divine — Ditch the cardboard taste This easy Marshmallow Fondant recipe delivers professional smoothness and a lovely vanilla flavour Perfect for all your creative...
- The Silky Smooth Standard Authentic Hummus Recipe Better Than ShopBought — Ditch the dusty supermarket tubs Learn the chefs secret for truly Silky Smooth Hummus originating from the Levant Our easy hummus recipe uses ice water for...
Tools of the Trade: Equipping Your Kitchen for Emulsification
You can try to use a regular blender, but honestly, you’re just going to frustrate yourself. For true restaurant level smoothness, you need a high powered food processor. The continuous, rapid motion is what turns it from a paste into a light, airy fluff.
If your food processor is weak, you might need to process for even longer maybe 8 full minutes.
Tahini Matters: Selecting the Right Sesame Paste
Tahini is the second most important ingredient after the chickpea itself. Look for tahini paste that is light beige, not dark brown. It should be runny like pouring thin peanut butter.
If you open the jar and the oil has completely separated from the paste, that’s fine, but stir it thoroughly before measuring. Lebanese or Ethiopian tahini is often best, as they tend to be roasted more lightly.
The Chickpea Dilemma: Canned vs. Dried (and How to Prepare Them)
I know the purists will argue for dried, and yes, if you soak dried chickpeas overnight and boil them for an hour or two until they are practically mush, you will get an amazing texture. But who has time for that on a Tuesday?
I use canned chickpeas 99% of the time, and they work perfectly, provided you follow the baking soda rule (Phase 1, Step 1). This extra 10 minutes of simmering saves you 10 hours of waiting and soaking, and gets the texture exactly where it needs to be.
Zest and Acidity: Maximizing Fresh Lemon Flavor
You absolutely must use fresh lemon juice. That yellow plastic squeeze bottle from the fridge? Toss it. It tastes fake, and the acidity balance is completely wrong for the emulsion process. Acidity is necessary not just for flavor, but for whipping the tahini into that pale, fluffy base.
Water or Ice? The Temperature Trick for Whipped Texture
Ice water, always. When you whip the tahini and lemon together, the mixture will seize up and look like peanut butter. It might look gross. Adding the shocking cold water while the processor is running helps the mixture loosen up, forcing the oils and liquids to come together in a light, stable emulsion. It's magic!
The Process: step-by-step Mastery to Achieve Velvety Hummus
Right then, let's crack on with the method. Remember, the chickpeas are currently boiling with that powerful teaspoon of baking soda, breaking down every last bit of skin.
Achieving the Swirl: Blending Techniques for Maximum Smoothness
This section is dedicated entirely to the machine work. This is where we build the structure.
The Peel: Why Removing Chickpea Skins is Non-Negotiable
After you boil and rinse the chickpeas, you will see a lot of skins floating around. Take a few minutes I know, it’s tedious and gently rub the chickpeas between your hands in the colander. This dislodges any remaining tough skins. Removing the skins guarantees a superior final product.
If you absolutely cannot face this, the baking soda step at least ensures the skins are soft enough that your food processor might obliterate them, but why risk it?
Building the Base: Whipping Tahini and Lemon Juice First
This is the first critical step after prepping the chickpeas. Do not add the chickpeas yet!
In your food processor, drop in the tahini, lemon juice, salt, and garlic. Process for about 30 seconds. It will seize. It will turn pale. This is exactly what you want. You are making a tahini mayonnaise, essentially.
Temperature Control: Incorporating Ice Water for Aeration
Now, while the processor is running and I mean continuously running drizzle in the ice water slowly. It needs to look like it’s struggling, then suddenly, poof ! It will lighten up, turn extremely pale (almost white), and become fluffy and smooth. This is the perfect base.
Once this is whipped and aerated, you introduce the warm chickpeas.
Why warm? Warm starch molecules break down much easier than cold, stiff starch molecules. Adding warm chickpeas to a cold, airy base helps everything combine instantly. Now, process for a full five to seven minutes . Seriously. Scrape the sides down every minute, but let it run.
That long processing time is crucial for the velvety finish.
Final Taste Adjustments and Plating Aesthetics
Don't panic if it looks slightly too thick when you scrape it out. It will firm up considerably in the fridge. But before chilling, check the seasoning. Does it need more salt? Often, yes. Does it need more zing? Add a tiny splash more lemon. Once you're happy, transfer it to an airtight container.
Hummus Beyond the Bowl: Storage and Serving Suggestions
Longevity and Texture: Proper Storage Techniques for Freshness
Your hummus will keep beautifully in the fridge for up to four days. Here's a quick trick: before sealing the container, pour a thin layer of olive oil right over the top surface of the hummus. This creates a seal, preventing a crust from forming and locking in the fresh flavor.
When you are ready to serve, just scrape that top layer off (or stir it in) and garnish fresh.
The Spicy Corner: Adding Harissa or Roasted Tomato Paste
If you want a little kick, mix one tablespoon of high-quality harissa paste with a drizzle of olive oil, and swirl it gently into the hummus just before serving. Another great twist is smoky roasted tomato paste. Add it during the final minute of processing. It gives a deep, slightly savory sweetness.
A Summer Pairing: Serving Hummus with Mango and Avocado Salad
I know, it sounds weird, but hear me out. For a light lunch, serve a dollop of hummus with a salad featuring diced fresh mango, avocado, chopped cilantro, and a lime vinaigrette. The sweetness of the mango against the savory, nutty dip is surprisingly refreshing and totally unexpected. Try it!
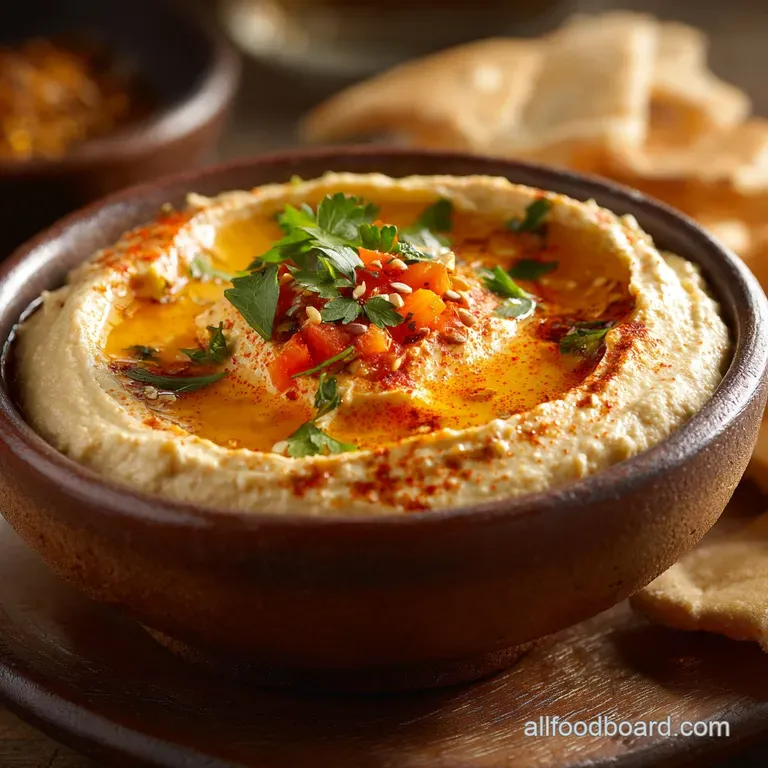
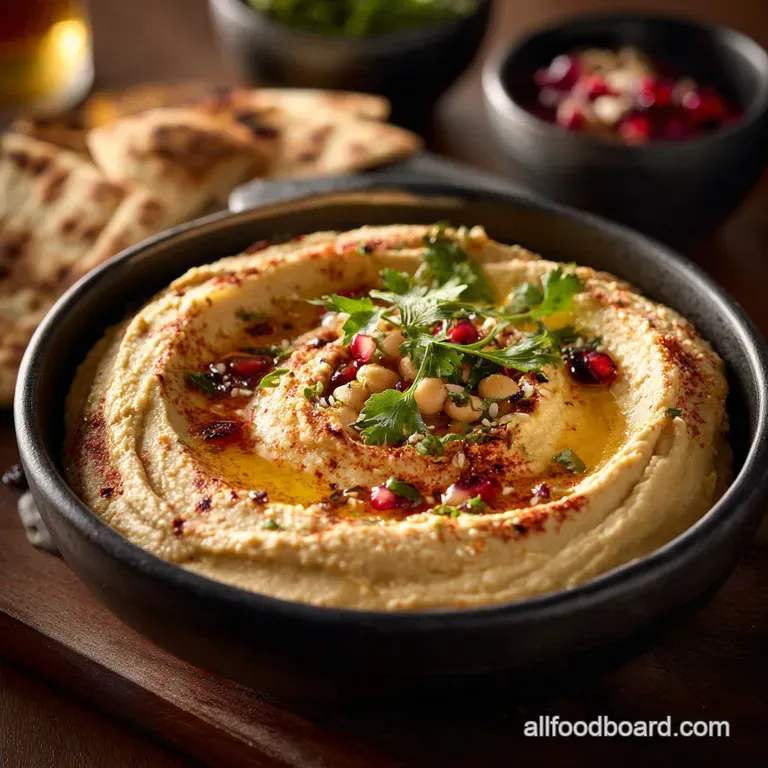
Garnishing Secrets: Olive Oil Drizzle and Pine Nut Toasting
Presentation matters, especially after all that work!
- The Swirl: Spoon the hummus onto a shallow dish, and use the back of the spoon to create a beautiful spiral or a well in the center.
- The Oil: Use your best, most peppery extra virgin olive oil for the drizzle. It should pool slightly in the well.
- The Crunch: Toast pine nuts gently in a dry pan until golden brown, then sprinkle them over the top. A light dusting of smoked paprika or sumac adds color and depth. Bob's your uncle it’s perfect.

Recipe FAQs
I followed the recipe, but my hummus is still a bit grainy. How do I achieve truly Smooth Hummus?
Graininess usually comes from the tough chickpea skins. For that guaranteed velvet texture, you must boil the chickpeas with baking soda for the full 10 minutes to loosen the skins, and crucially, process the mixture for at least five minutes in a high powered blender.
Can I prep this velvet dip ahead of time, and how long does it last in the fridge?
Absolutely, chilling improves the flavour, allowing everything to meld beautifully. Store the hummus in an airtight container for about 4 to 5 days; just give it a good stir and perhaps a dash of cold water before serving if it's thickened up.
I’m running low on baking soda is that step really necessary for canned chickpeas?
While not strictly essential, the baking soda step is the biggest secret to avoiding the massive faff of peeling every single chickpea. It raises the pH of the water, dramatically softening the hull (skin), making the long blending process much more effective.
My tahini and lemon mixture seized up and looks like cement! Is the recipe knackered?
Not at all, that means you're doing it right! The mix seizes because the acid reacts with the tahini fat; simply keep blending while slowly streaming in the ice water, and it will immediately emulsify into a light, fluffy, pale cream that's the magic.
I’ve made the perfect batch; what’s the best way to serve this (beyond just pitta bread)?
Beyond the classic warm pitta (Bob's your uncle!), try using it as a creamy, high protein base spread in a chicken or falafel wrap, or serve it under warm spiced lamb or alongside a vibrant platter of roasted vegetables.
Silky Smooth Hummus Baking Soda Trick
Ingredients:
Instructions:
Nutrition Facts:
| Calories | 53 kcal |
|---|---|
| Protein | 0.1 g |
| Fat | 4.9 g |
| Carbs | 0.7 g |
| Fiber | 0.1 g |
| Sodium | 1 mg |
