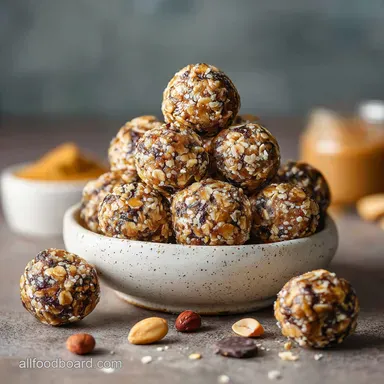
Nobake Oatmeal Peanut Butter Energy Bites

- Time: Active 10 mins, Passive 30 mins, Total 40 mins
- Flavor/Texture Hook: Salty sweet fudgy base with crispy oat chew
- Perfect for: Mid afternoon slumps or pre workout fuel
- Perfectly Fudgy NoBake Oatmeal Peanut Butter Energy Bites
- The Physics of Sticky Bonds
- Essential Recipe Performance Metrics
- The Essential Pantry List
- Simple Tools for Success
- The Mixing Flow Steps
- Fixing Texture Problems Fast
- Flavor Swaps and Tweaks
- Storage and Waste Tips
- Serving These Salty Treats
- Kitchen Wisdom Debunked
- Recipe FAQs
- 📝 Recipe Card
Perfectly Fudgy NoBake Oatmeal Peanut Butter Energy Bites
I still remember the first time I tried to make a version of these. I was in such a rush to get to the gym that I didn't let the mixture rest. I ended up with what I can only describe as "energy puddles" instead of spheres. The smell of the salty peanut butter was incredible, but the texture was a total mess.
I had to eat the mixture with a spoon straight out of the bowl, which wasn't exactly the portable snack I had envisioned!
Since then, I've spent plenty of time in my kitchen figuring out the exact ratio of wet to dry ingredients that makes these hold their shape. There's something so satisfying about that first bite where the mini chocolate chips snap against the soft, chewy oats.
It's the ultimate snack for when you're craving something sweet but want to keep things on the healthier side.
You're going to love how these come together. We're talking ten minutes of actual work, then a little patience while they firm up. No processors, no ovens, just one bowl and a sturdy spatula.
Whether you're packing these for a hike or just hiding them in the back of the fridge so the kids don't find them, they are a total staple in my house.
The Physics of Sticky Bonds
Hydration Mechanism: The old-fashioned oats act like tiny sponges, slowly absorbing the moisture from the honey and vanilla over 30 minutes to create a cohesive structure.
Fat Stabilization: The natural oils in the creamy peanut butter solidify at lower temperatures, which is why the refrigeration step is non negotiable for a firm bite.
Mucilage Binding: When ground flaxseed meal meets the liquid ingredients, it creates a subtle gel like bond that holds the crumbly oats together without the need for flour.
This process is quite similar to the way fats and fibers interact in my Cashew Butter recipe, where temperature determines the final spreadability.
| Texture Style | Time Investment | Mouthfeel | Best For |
|---|---|---|---|
| No Bake (Fast) | 40 mins | Fudgy and dense | Quick prep / Raw nutrition |
| Baked (Classic) | 65 mins | Crispy and toasted | Long shelf life / Crunchy lovers |
| Dehydrated | 6 hours | Brittle and dry | Ultra lightweight hiking |
Getting the consistency right is all about understanding how these ingredients play together. If the peanut butter is too runny, the bites will slump. If the honey is too cold, it won't mix evenly. It's a delicate balance of temperature and timing.
Essential Recipe Performance Metrics
| Ingredient | Science Role | Pro Secret |
|---|---|---|
| old-fashioned Oats | Structural fiber | Never use steel cut, they stay too hard to chew |
| Creamy Peanut Butter | Lipid binder | Use a brand that requires stirring for better fat content |
| Ground Flaxseed | Emulsifier | Store in the freezer to prevent the oils from going rancid |
| Honey / Maple Syrup | Hygroscopic sweetener | Warm it for 10 seconds to make it pour like water |
We need to pay attention to these three checkpoints to ensure success every single time you make this batch. First, ensure the mixture chills for at least 30 minutes. Second, aim for a 1 inch diameter for each ball to ensure they stay structurally sound.
Third, the batch should yield exactly 20 servings if you use a standard tablespoon scoop.
The interaction of these elements creates a snack that doesn't just taste good but actually fuels you. The fats provide long lasting energy while the fiber from the oats keeps you full. It is a simple piece of kitchen engineering that works every time.
The Essential Pantry List
- 2 cups (180g) old-fashioned rolled oats: These provide the necessary "bite" and structure. Why this? Rolled oats absorb liquid better than steel cut without turning to mush like quick oats.
- Substitute: Quick oats (Note: Results in a softer, less chewy texture).
- 1 cup (250g) creamy peanut butter: This is our primary glue and flavor base. Why this? Creamy versions provide a smoother surface area for the oats to stick to.
- Substitute: Almond butter or sunflower seed butter for nut allergies.
- 0.5 cup (65g) ground flaxseed meal: Adds a nutty flavor and helps bind the mixture. Why this? Flaxseed acts as a nutritional powerhouse and a structural stabilizer.
- Substitute: Chia seeds (Note: Adds a distinct crunch).
- 0.5 cup (170g) honey or pure maple syrup: The sticky sweetener that holds everything together. Why this? Honey is thicker and provides a more reliable "set" than thinner syrups.
- Substitute: Brown rice syrup for a vegan, less sweet option.
- 1 tsp (4g) pure vanilla extract: For that classic bakery aroma. Why this? It bridges the gap between the salty nut butter and the sweet honey.
- Substitute: Almond extract (Note: Use only 1/4 tsp as it is very strong).
- 0.5 tsp (3g) sea salt: To balance the sweetness. Why this? Salt enhances the chocolate and peanut butter flavors significantly.
- Substitute: Table salt (Note: Use slightly less as it is denser).
- 0.5 cup (90g) mini semi sweet chocolate chips: These distribute better than large chips. Why this? Smaller chips ensure you get chocolate in every single bite without breaking the ball apart.
- Substitute: Cacao nibs for a less sweet, crunchier alternative.
- 0.33 cup (30g) unsweetened shredded coconut: For a hint of tropical flavor and extra texture. Why this? Shredded coconut adds a light fluffiness to the dense base.
- Substitute: Finely chopped walnuts or pecans.
Simple Tools for Success
You don't need a fancy kitchen to pull this off. I usually just grab my large glass mixing bowl because it gives me enough room to really fold the ingredients together without making a mess.
A heavy duty silicone spatula is your best friend here something that can handle the resistance of the thick peanut butter without bending.
I also highly recommend using a small cookie scoop (the 1 tablespoon size). It makes the process so much faster and ensures every bite is the same size, which is great for meal prepping. If you don't have one, a standard measuring tablespoon works just fine.
You'll also need a bit of parchment paper or a silicone mat to set the finished bites on so they don't stick to your plate or tray while they finish setting in the fridge.
Chef Tip: Freeze your shredded coconut for 10 minutes before adding it to the mix. The cold flakes help the peanut butter begin to firm up immediately upon contact, making the initial mixing phase much cleaner.
The Mixing Flow Steps

- Place 2 cups old-fashioned rolled oats, 0.5 cup flaxseed meal, 0.5 cup mini chocolate chips, 0.33 cup shredded coconut, and 0.5 tsp sea salt in a large bowl.
- Stir the dry ingredients until the white flaxseed meal is evenly distributed through the oats. Note: This prevents clumps of flaxseed in the final product.
- Add 1 cup creamy peanut butter, 0.5 cup honey, and 1 tsp vanilla extract to the center of the dry mixture.
- Fold the wet ingredients into the dry until no streaks of honey or dry oat patches remain.
- Cover the bowl and place it in the refrigerator for 30 minutes. Wait until the mixture feels tacky and firm to the touch.
- Scoop approximately 1 tablespoon of the mixture at a time.
- Roll the portion between your palms until a smooth, tight sphere forms. Note: If the mixture sticks to your hands, dampen them slightly with cold water.
- Place the rolled spheres onto a parchment lined tray.
- Return the tray to the fridge for another 10 minutes until the bites are fully set and no longer glossy.
- Transfer the finished bites to an airtight container for long term storage.
Fixing Texture Problems Fast
Getting the right feel for the "dough" takes a minute. If you find your mixture is falling apart, it usually means the oats haven't had enough time to hydrate or your peanut butter was a bit too dry. On the flip side, if it's sticking to everything, it might be too warm.
Crumbly Mixture Solutions
If the mixture won't hold a ball shape, don't panic. This usually happens if the peanut butter used was the bottom of the jar (which is often drier) or if the oats are particularly thirsty. Add one extra tablespoon of honey or peanut butter and mix again. This extra bit of liquid acts as the glue you're missing.
Shape Retention Fixes
When the bites look like they are melting or flattening out on the tray, they are likely too warm. This often happens in humid kitchens. Pop the whole bowl into the freezer for 10 minutes instead of the fridge. The rapid cold will snap the fats into place, making them much easier to handle.
| Problem | Root Cause | Solution |
|---|---|---|
| Too sticky to roll | Honey is too warm | Chill mixture for an extra 15 minutes |
| Falling apart | Not enough binder | Add 1 tbsp peanut butter and stir well |
| Chocolate melting | Added to warm liquid | Ensure honey/PB are room temp before adding chips |
Common Mistakes Checklist
- ✓ Use creamy peanut butter rather than "extra crunchy" for better structural integrity.
- ✓ Don't skip the 30 minute refrigeration; it is vital for oat hydration.
- ✓ Keep your hands slightly damp or use a light coating of oil when rolling.
- ✓ Use mini chocolate chips to ensure the balls don't crumble around large chunks.
- ✓ Measure the honey accurately using a greased measuring cup so it all slides out.
This recipe is very forgiving once you understand the basic mechanics. It's quite different from the precision needed in my Perfectly Chewy Peanut recipe, where oven temperature can change everything. Here, your hands are the best gauge of success.
Flavor Swaps and Tweaks
The beauty of this base is how easily it adapts to what you have in the cupboard. If you aren't a fan of coconut, just leave it out and add an extra 1/4 cup of oats. I've even seen people swap the chocolate chips for dried cranberries or chopped raisins for a more "oatmeal raisin cookie" vibe.
Nut Free Alternative Ideas
If you need to send these to a nut free school, swap the peanut butter for sunflower seed butter (SunButter). Be aware that sunflower butter can sometimes react with baking soda to turn green, but since this is a no bake recipe, you won't have that issue! The flavor is slightly more earthy but still delicious.
Dark Chocolate Cherry Variation
For a more "grown up" version, swap the semi sweet chips for dark chocolate chunks and add 1/4 cup of dried tart cherries. The acidity of the cherries cuts through the richness of the peanut butter perfectly. If you really want to lean into the cookie flavor, try a version inspired by my Peanut Butter Cup recipe by adding a drizzle of melted chocolate on top.
| Servings | Ingredient Adjustments | Prep Time | Storage Vessel |
|---|---|---|---|
| 10 (Half Batch) | Use 1 cup oats, 0.5 cup PB | 10 mins | Small mason jar |
| 20 (Standard) | Follow recipe exactly | 10 mins | Medium Tupperware |
| 40 (Double) | Use 4 cups oats, 1.5x salt | 20 mins | Large freezer bag |
Storage and Waste Tips
These bites are best kept in the refrigerator. While they can sit out at room temperature for a few hours (like in a lunchbox), they will soften up quite a bit. In an airtight container, they'll stay fresh and fudgy for up to 2 weeks.
I actually think they taste better on day three once the flavors have really melded together.
If you want to make a massive batch, they freeze beautifully. I usually lay them out on a baking sheet to freeze individually for an hour, then toss them all into a freezer safe bag. They'll last for up to 3 months.
You can eat them straight from the freezer for a super firm, candy like texture, or let them sit on the counter for 5 minutes to soften.
To keep this a zero waste operation, don't throw away the "dust" at the bottom of the oat container. Those fine bits are actually great for helping bind the mixture. If you have leftover shredded coconut that didn't make it into the balls, toast it in a dry pan for 2 minutes and use it as a topping for your morning yogurt.
Serving These Salty Treats
I love serving these as part of a "snack board" when friends come over. Put them in a bowl alongside some apple slices and maybe some sharp cheddar cheese. The combination of the sweet, nutty bites with the tart apples is a classic for a reason.
Morning Commute Strategy
If you're using these for breakfast, I recommend pairing two bites with a hard boiled egg. The protein from the egg and the healthy fats from the energy bites will keep you full until lunch. They are also the perfect size to pop in your mouth while driving without making a crumbly mess all over your car seat.
Post Workout Recovery Fuel
After a heavy lifting session or a long run, your body needs quick carbs and protein. These bites deliver both. Because they are dense, they don't feel heavy on the stomach, but they provide that immediate "recharge" feeling. Keep a small stash in a cooler bag in your gym locker for the best results.
Kitchen Wisdom Debunked
Many people think you have to cook oats to make them digestible. That is simply not true. Rolled oats are steamed and pressed during processing, so they are perfectly safe to eat raw. In this recipe, the liquid from the honey and peanut butter softens them enough that they have a pleasant chew rather than a raw crunch.
Another common misconception is that you need a high powered food processor to make energy balls. While some recipes use dates and require a blender, this specific version relies on the sticky power of honey and nut butter.
Mixing by hand actually preserves the texture of the oats and the chocolate chips, giving you a much better mouthfeel than a pulverized paste.
Finally, don't believe the myth that you need "specialty" health food ingredients like expensive powders to make these effective. The humble combination of oats, flax, and nut butter provides all the sustained energy you need. It is about the ratio of fiber to fat, not the price tag on the label.

Recipe FAQs
Can I use quick oats instead of old-fashioned oats?
Yes, but the texture will be softer. Quick oats absorb liquid faster and break down more, resulting in a less chewy bite.
Do I really need to refrigerate the mixture for 30 minutes?
Yes, this step is crucial for proper texture. The oats need time to hydrate and absorb moisture from the honey and peanut butter, which helps the bites hold their shape.
How can I prevent the mixture from sticking to my hands when rolling?
Slightly dampen your hands with cold water. This creates a barrier that prevents the sticky mixture from adhering to your skin, making rolling much easier.
What's the best way to store these energy bites?
Store them in an airtight container in the refrigerator. They'll stay fresh and firm for up to two weeks, and taste even better after a few days as flavors meld.
Can I substitute the peanut butter with another nut or seed butter?
Yes, most creamy nut or seed butters work well. Almond butter or sunflower seed butter are great alternatives, though sunflower butter may have a slightly earthier flavor.
What if my mixture is too crumbly to form balls?
Add a little more binder, like an extra tablespoon of honey or peanut butter. This will help the dry ingredients stick together and create a more cohesive mixture.
Are these bites safe to eat raw?
Yes, all the ingredients are safe to consume raw. Old-fashioned oats are steamed and pressed during processing, making them perfectly edible without cooking.
Oatmeal Peanut Butter Bites
Ingredients:
Instructions:
Nutrition Facts:
| Calories | 182 calories |
|---|---|
| Protein | 5.2 g |
| Fat | 10.5 g |
| Carbs | 19.4 g |
| Fiber | 2.9 g |
| Sugar | 10.3 g |
| Sodium | 113 mg |
