The Emergency Chocolate Fix Oneminute Molten Mug Cake
Solving the 90-Second Dessert Dilemma
There are moments when a sudden, powerful craving for something warm, sweet, and deeply chocolatey strikes. These are the moments when a full scale baking operation involving mixers, cooling racks, and 45 minutes of oven time simply won't do.
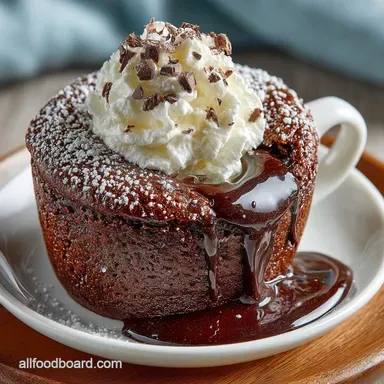
This is where the magic of the Chocolate Mug Cake shines. It is the ultimate expression of instant gratification, transforming pantry staples into a generous, decadent dessert in under seven minutes total, start to finish.
We call this particular formula the "Emergency Chocolate Fix" because it requires minimal effort and delivers maximum flavour payoff, offering a rich, fudgy texture far superior to anything store-bought. It truly is the definitive Instant Cake In A Cup solution.
The Anatomy of a Perfect Molten Centre
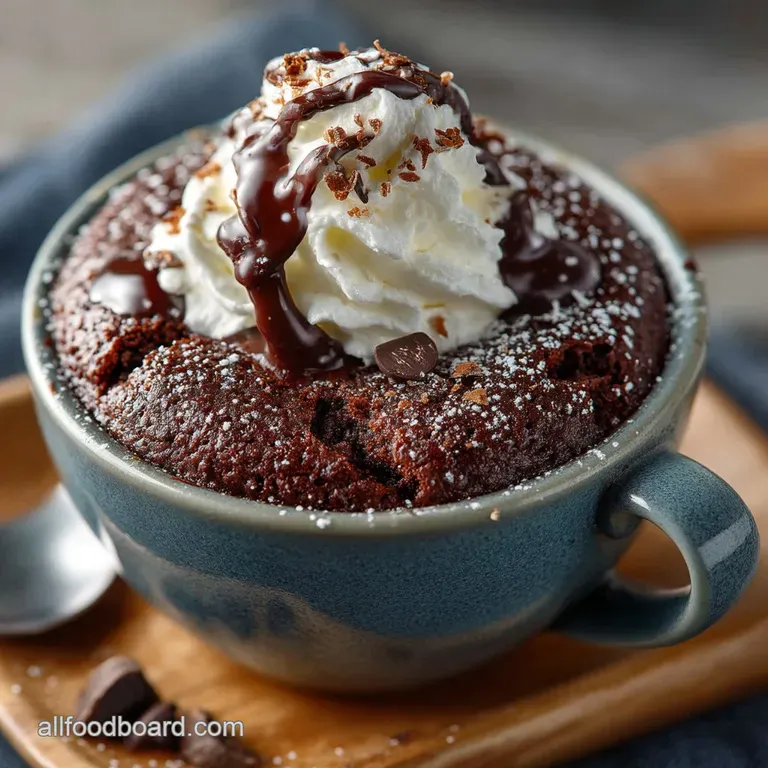
While speed is critical to this chocolate mug cake recipe , we refuse to compromise on texture. The goal here is not merely a warm sponge, but a deeply satisfying treat with a gorgeous, gooey core.
To achieve this hallmark of premium baking, we rely on one optional but highly recommended addition: a tablespoon of dark chocolate chips or chunks. Dropping these directly into the center of the batter before cooking ensures that they melt into a pocket of pure liquid cocoa delight, elevating this simple Mug Cake For One from basic snack to high level indulgence.
Skip the Mixer: Why Mugs Are Better Bakers
The brilliance of Mug Cakes Chocolate lies in their unparalleled simplicity and minimal clean-up. Everything, from mixing the dry goods to the actual cooking, happens directly in one large (12 to 14 oz) microwave safe vessel. This eliminates the need for bowls, whisks, or baking tins.
On top of that,, because this particular chocolate mug cake no egg recipe relies solely on the quick acting power of baking powder for its rise, the mixing process is extremely forgiving as long as you avoid overworking the gluten, which we'll discuss shortly.
If you are learning How To Make A Cake In The Microwave , starting with a mug cake provides the perfect, low-risk laboratory.
Essential Toolkit and Ingredients for the Ultimate Chocolate Mug Cake

Success in micro baking is less about skill and more about precise measurement. You must treat these tiny quantities with the same respect you would a full scale layer cake. We utilize standard kitchen items, including measuring spoons, a fork for mixing, and a durable 12-14 oz mug that can handle the microwave's heat and the batter's dramatic rise.
The Ideal Cocoa Powder Ratio for Deep Flavor
The true depth of this recipe comes from the specific ratio of cocoa powder. We use two full tablespoons of unsweetened cocoa powder preferably Dutch process alongside four tablespoons of granulated sugar. This 2:4 ratio ensures the cake is profoundly chocolatey without becoming cloyingly sweet.
For optimal flavour enhancement, don't skip the tiny pinch (about ⅛ teaspoon) of fine sea salt. Salt is absolutely crucial; it balances the sugars and amplifies the richness of the cocoa, preventing the final product from tasting flat.
Mastering the Mini Measurements (That Crucial Teaspoon)
Accuracy in measuring the dry components is non-negotiable. Our foundation requires four level tablespoons of all-purpose flour, four tablespoons of sugar, and just a quarter teaspoon of baking powder.
Since the volume of the finished product is so small, an extra eighth of a teaspoon of flour or too much baking powder can drastically alter the final structure. Once the dry ingredients are combined and any lumps in the cocoa powder are whisked out, we introduce the wet elements: three tablespoons of whole milk (or a dairy alternative, making this easily a chocolate mug cake no milk option) and a half teaspoon of vanilla extract.
The Secret to Preventing a Rubbery Texture
The single biggest enemy of a delicious Chocolate Mug Cake is overmixing, which develops the gluten in the flour and leads to an unpleasantly chewy, rubbery texture. Before combining anything, two tablespoons of unsalted butter must be melted and then allowed to cool slightly.
Introducing warm butter to flour begins the cooking process prematurely. When you combine the slightly cooled butter, milk, and vanilla with the dry mixture, only stir until the flour streaks have just disappeared.
Since this is a chocolate mug cake no egg formula, we rely heavily on careful mixing and proper baking powder activation to achieve a light crumb. Stop stirring immediately; a few tiny lumps are far preferable to an over developed batter.
Related Recipes Worth Trying
- StickyMoist Carrot Cake with Cream Cheese Frosting A British Classic — This Best Carrot Cake with Cream Cheese Frosting recipe delivers a profoundly moist sticky sponge A true English teatime triumpheasy assembly zero lumps and...
- CloudBusting Fluffy Pancakes The Secret to Soufflé Heights — Learn how to make truly fluffy pancakes from scratch This recipe uses whipped egg whites for a pillowy cloudbusting stack Forget thin floppy affairsthis is...
- The Best Spiced Dark Chocolate Christmas Truffles Recipe — Master these velvety spiced dark chocolate Christmas Truffles perfect for gifting Learn how to make festive truffles with our foolproof ganache technique
The Lightning Fast Path to Fudgy Perfection
Now that your ingredients are perfectly proportioned and your batter is minimally mixed, it's time to unleash the power of the microwave. This stage moves quickly, and attentiveness to time is key to achieving that perfect fudgy consistency.
Achieving a Smooth Batter in Just Five Stirrers
The preparation stage is swift. Begin by melting your butter in a separate small bowl or directly in your mug. While it cools, combine all the dry ingredients. Once the butter is ready, add all the wet components the butter, milk, and vanilla into the dry mixture. Use a fork to mix rapidly but gently.
You should need no more than five substantial stirs to bring the batter together. If you are adding the optional dark chocolate chunks for that molten interior, drop them right into the center of the batter now, resisting the urge to stir them into the mix.
Setting Your Microwave for Optimal Gooiness
Cooking this chocolate mug cake microwave style requires familiarity with your appliance. The provided cook time is calibrated for a standard high wattage unit (around 1000 watts). Place the mug in the center of the microwave and start with 60 seconds on high.
This short blast of heat is usually enough to set the edges and generate a dramatic rise. For those with lower wattage microwaves (closer to 800W), an additional 15 to 30 seconds may be necessary, bringing the total cook time up to 75 to 90 seconds.
The magic of How To Make A Cake In The Microwave is ensuring the edges are set while the center remains delightfully soft.
The Toothpick Test is Optional (But Recommended)
Unlike traditional baking, where a clean toothpick signifies readiness, a perfect mug cake will show some residue in the center. After the initial 60 seconds, you should observe edges that look fully cooked and firm. The top center, however, should still appear slightly moist or shiny.
If the cake looks obviously wet or sunken, return it for increments of 10 seconds. Once the edges are set, remove the mug (carefully, it will be hot!) and let the cake rest for 1 to 2 minutes.
This crucial resting period allows residual heat to finish cooking the cake without turning it dry, transforming the gooey core into a truly molten delight.
Advanced Notes and Troubleshooting Your One-Minute Chocolate Mug Cake
Mastering the Chocolate Mug Cake is simple, but perfection comes through personalization and addressing common microwave mishaps.
Customizing Your Core: Flavor Boost Variations
This rich base is an excellent starting point for culinary experimentation. For a deeper, more sophisticated flavour, stir half a teaspoon of instant espresso powder into your dry ingredients it enhances the chocolate notes without adding overt coffee taste.
Alternatively, for a creamy, surprising center, dollop one teaspoon of smooth peanut butter on top of the batter before microwaving; it sinks slightly and creates a warm, gooey pocket.
For a refreshing seasonal twist, replace the vanilla extract with half a teaspoon of peppermint extract for a classic mint chocolate profile.
Pro Tips for a Clean Mug Finish (No Scorched Bottoms)
Preventing overflow and ensuring easy cleanup are essential steps for the perfect Chocolate Mug Cake . Always use a generous mug (12 oz minimum) to accommodate the batter's impressive rise, preventing messy spills inside your appliance.
Regarding the mug itself, ensure it is completely clean before mixing; any lingering oil or residue can lead to scorching. Most importantly, ensure the butter is completely incorporated into the batter, as pockets of pure fat resting on the bottom can cook too quickly and burn.
Allowing the cake to cool for two minutes post cooking not only improves texture but also helps the cake pull slightly away from the mug walls, leading to easier scooping if you choose to transfer it.
Pairing the Cake: Best Toppings and Servings
Because the chocolate mug cake recipe yields such an intensely rich and warm dessert, simple, cold toppings provide the perfect textural contrast. A scoop of high-quality vanilla bean ice cream is the classic choice, melting slowly down the sides of the cake.
For a professional, polished finish, simply dust the warm cake with a light coat of confectioner's sugar. To cut through the deep cocoa profile, serve this glorious treat alongside a strong, hot beverage, such as a sharp black coffee or Americano.
Recipe FAQs
Crikey, my cake turned out rubbery! What did I do wrong?
A rubbery texture usually means you've either overmixed the batter or, more likely, overcooked it. Overmixing develops the gluten, making the cake feel tough, like chewing on an old boot! Ensure you stop stirring as soon as the dry ingredients disappear.
Next time, reduce the microwave time by 10-15 seconds, as your microwave might be more powerful than average (around 1000 watts). You want the edges set, but the middle should still look slightly moist for that perfect fudgy texture.
Can I prep the Chocolate Mug Cake batter ahead of time for a quick treat later?
This recipe is truly designed to be an immediate fix, as preparing the batter too far in advance is a bit risky. Once the wet and dry ingredients mix, the baking powder activates, and if left sitting, the cake will lose its lift, coming out flatter than a pancake!
If you need to prep, measure and combine only the dry ingredients (flour, sugar, cocoa, salt, baking powder) and store them in a jar like a ready-made pudding mix. When the craving hits, just add the wet ingredients and zap it.
I haven't got any milk or butter. Can I make substitutions and still get a decent result?
Absolutely, you can still crack on with this! For a dairy-free cake, swap the milk for almond, soy, or oat milk they all work a treat. You can also substitute the melted butter for a neutral flavoured oil, such as canola or sunflower.
Just remember that oil is pure fat, so use slightly less than the butter measurement (about 1.5 Tbsp of oil for 2 Tbsp of butter). The flavour might be marginally different, but it still delivers a gorgeously rich cake.
I fancy a change what are the best ways to jazz up this recipe?
There are loads of ways to elevate this speedy pud! For a richer, deeper chocolate flavour, stir in half a teaspoon of instant espresso powder with the dry ingredients it enhances the cocoa without tasting overtly like coffee.
Alternatively, for a gooey, savoury pocket, drop a teaspoon of smooth peanut butter right onto the centre of the batter before cooking. For those who like things fancy, a pinch of chilli powder is surprisingly good for a fiery Mexican chocolate twist.
My cake overflowed and made a right mess! Was my mug too small?
Yes, that’s usually the culprit! This recipe creates a dramatic rise thanks to the baking powder and heat, which requires plenty of space. It’s a bit like trying to cram too many people onto the tube at rush hour it's going to spill out!
Ensure you are using a generously sized microwave safe mug, ideally 12 14 oz (350 400 ml) minimum. If you’re unsure, switch to a small, deep bowl or ramekin instead to avoid any further cleaning disasters.
Molten Chocolate Mug Cake Recipe