Diy Mochi Magic Chewy Dreamy Homemade Ice Cream Bombs
- The Magic of DIY Mochi Ice Cream: Chewy, Cold Perfection
- Essential Building Blocks for Your Ice Cream Bombs
- Phase One: Prepping the Perfect Ice Cream Spheres
- Crafting the Silky Mochi Dough (Microwave Method)
- The Final Assembly: Encasing the Frozen Treats
- Expert Tips and Troubleshooting for Flawless Results
- Flavor Innovations and Storage Solutions
- Recipe FAQs
- 📝 Recipe Card
The Magic of DIY Mochi Ice Cream: Chewy, Cold Perfection
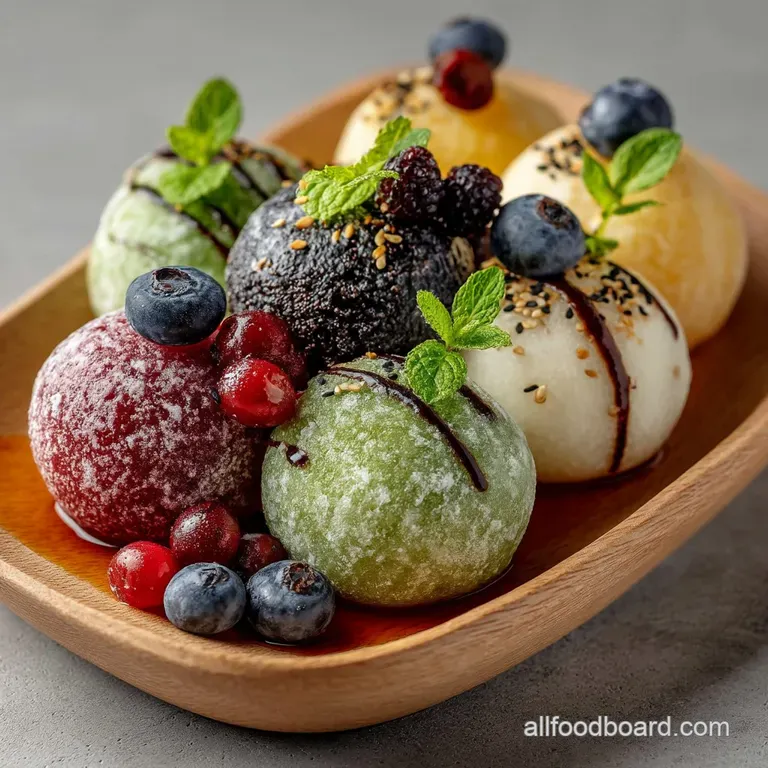
There is perhaps no dessert more delightful or texturally intriguing than Mochi Ice Cream , the quintessential Japanese confection that delivers both cold relief and satisfying chewiness in a single bite.
This sophisticated creation marries a tiny scoop of perfectly frozen ice cream with a tender, elastic wrapper made from steamed glutinous rice dough. While the results look like something only professionals could produce, tackling this Mochi ice cream recipe at home is highly rewarding.
The process requires precision, particularly during the wrapping stage, but with an active preparation time of only about 30 minutes, it's a wonderfully achievable project for the adventurous home chef.
Why Homemade Mochi Dough Beats store-bought
The greatest advantage of crafting your own Homemade Mochi Dessert is the undeniable difference in texture. store-bought versions, designed for long shelf life, often feature a dough that is firm, sticky, or slightly chalky.
By contrast, freshly prepared mochi dough is incomparably soft, yielding, and pliable. Using the fast and reliable microwave method outlined here, you gain complete control over the hydration and cooking time, ensuring a truly delicate wrapper that melts elegantly around the cold filling.
This freshness is key to creating truly irresistible Homemade Ice Cream Bombs .
Understanding the Key Ingredient: Glutinous Rice Flour (Mochiko)
If you are wondering How Do You Make Mochi that possesses that signature stretch and chew, the answer lies exclusively in the flour. Glutinous rice flour, sometimes labeled Mochiko or Shiratamako, is fundamental.
It is derived from short grain sticky rice and contains high levels of amylopectin starch, which, when cooked, produces the characteristic elastic texture. It is vital to understand that regular rice flour, often used for dusting or thickening, is not a suitable substitute.
For this recipe, we require 1 level cup (120 grams) of this specific flour to achieve the necessary pliability.
Essential Building Blocks for Your Ice Cream Bombs
Moving past the star ingredient, successful mochi construction depends on careful ingredient sourcing and having the right tools prepared before you begin the active cooking phase.
Pantry Staples for the Perfect Chewy Dough
Beyond the Mochiko, the remaining dough components are common kitchen staples. You will combine the flour with 1/4 cup (50 grams) of granulated sugar for sweetness and a small pinch of salt to balance the flavor. The liquid binder is 3/4 cup (180 ml) of cold water.
However, the most critical "pantry staple" for handling is the massive amount of starch you'll need about 1/2 cup of cornflour (cornstarch) or potato starch dedicated solely to dusting the finished dough, preventing it from adhering to everything it touches.
Selecting Premium Ice Cream Flavors and Textures
The heart of these frozen Japanese Sweet Treats is the filling. While you will need approximately 1 pint (475 ml) of ice cream to yield 12 servings, selecting the right flavor and texture is crucial.
Vanilla, Matcha (Green Tea), and Strawberry are classics that pair perfectly with the mild, sweet rice dough. Choose a premium brand with a dense texture, as softer, airier ice creams melt too quickly, making the assembly nearly impossible.
Must Have Tools for Shaping and Freezing
While much of the cooking is handled efficiently by a microwave safe bowl and a spatula, the true necessities are related to shaping and chilling. You must have at least two baking sheets, parchment paper for lining, and plastic cling film.
For precise shaping, a small scoop (about 1.5 inches or 4 cm in diameter) is required for the ice cream, and a corresponding 1.5 inch circular cookie cutter is essential for the dough wrappers. Above all, you need a highly reliable freezer that can reach and maintain rock hard temperatures for several hours.
Phase One: Prepping the Perfect Ice Cream Spheres
The first and most non-negotiable step is ensuring the ice cream filling is absolutely solid. If the filling is not completely frozen, it will collapse the moment it touches the room temperature dough. To begin, line a baking tray with parchment paper.
Using your small scoop, portion out 12 individual balls of your chosen ice cream. Once scooped, cover the tray tightly with plastic wrap and freeze the spheres for a minimum of four hours. Ideally, prepare these centers the night before to guarantee success.
Related Recipes Worth Trying
- Easy Creamy Miso Chicken Ramen Recipes at Home — Whip up these familyfriendly ramen recipes in under 45 minutes This creamy chicken broth version is full of flavourperfect for a weeknight wonder
- Rich Creamy Ground Beef Gnocchi Bake Under an Hour — Ditch the takeaway This Easy Ground Beef Gnocchi recipe delivers ItalianAmerican comfort in a rich bubbly bake ready in under an hour
- Sunshine in a Bowl Creamy Berry Cottage Cheese Salad Recipe — Transform your lunch with this vibrant Berry Cottage Cheese Salad High in protein ready in 15 minutes and utterly delicious A perfect healthy fruit salad
Crafting the Silky Mochi Dough (Microwave Method)
The dough preparation is surprisingly fast. In your microwave safe bowl, whisk the glutinous rice flour, sugar, and salt until the dry ingredients are thoroughly mixed. Pour in the cold water and whisk until you achieve a thin, smooth batter, similar to thin pancake batter.
Cover the bowl loosely with plastic wrap and initiate the cooking in three short, timed stages. First, microwave on high for 1 minute; the edges will begin to set. Stir quickly. Next, microwave for 1 minute 30 seconds; the batter will thicken considerably stir vigorously.
Finally, cook in a short 30-second burst until the dough is entirely stiff, translucent, and glossy, pulling cleanly away from the sides of the bowl. After cooking, let the dough rest in the bowl for 5 minutes to cool just enough to be handled safely.
The Final Assembly: Encasing the Frozen Treats
The assembly process is the most demanding stage and requires speed, precision, and a cold environment.
Scooping, Chilling, and Firming Up the Centers
Before moving the dough, ensure your prepared assembly station is ready. This includes the cooked mochi dough, your heavily starched work surface, and the tray of rock hard ice cream centers retrieved directly from the deep freezer. Keep the ice cream spheres as cold as possible throughout the entire wrapping process.
Steaming and Kneading the Dough to Pliability
Generously sift the cornflour or potato starch onto your work surface. Scrape the warm, sticky dough onto this floured area, dusting the top surface liberally as well. The starch acts as a lubricant.
Gently knead the dough only a few times just enough to form a smooth ball but resist over kneading, which can make the dough tough.
Dusting and Rolling the Delicate Mochi Wrappers
Using the rolling pin (which is best wrapped in plastic film to avoid sticking), roll the dough out slowly to a uniform thickness of about 1/8 inch (3 mm). Once rolled, use the 1.5 inch (4 cm) circular cookie cutter to punch out 12 wrappers.
Gather and quickly reroll any scraps to ensure you yield a full dozen Easy Japanese Snacks .
Sealing Techniques for a Seamless Mochi Ice Cream Ball
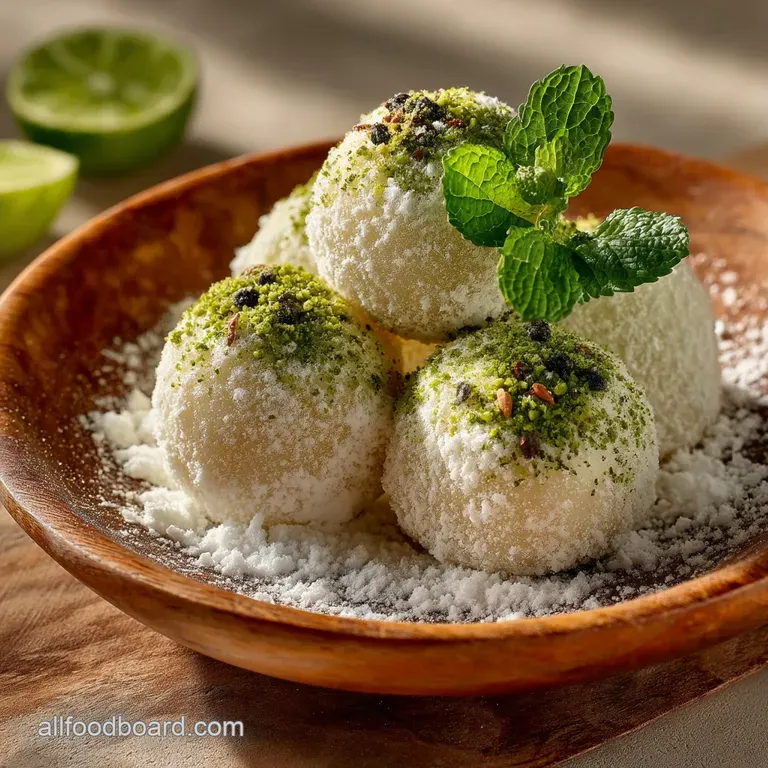
With your wrappers ready, place an ice cream sphere directly onto the center of a mochi circle. Quickly lift the edges of the dough up and around the ice cream, drawing them together at the top. Pinch the edges firmly to seal the wrapper completely.
If the dough resists sealing, moisten your fingers slightly with water to help fuse the edges. Place the newly created Homemade Ice Cream Bombs seam side down on a parchment lined tray and immediately return them to the freezer for their essential final set of at least 2 hours.
Expert Tips and Troubleshooting for Flawless Results
Success with this Mochi ice cream recipe often comes down to mastering simple techniques that combat the dough's inherent stickiness and the ice cream's tendency to melt.
Preventing Stickiness: The Starch Secret
The extensive use of dusting starch is your single best defense. If the dough starts to stick to the roller or the counter, simply add more starch. The goal is to create a barrier, not to incorporate the starch into the dough itself.
While you should use a fine mesh sieve to apply the starch thickly, gently brush off any major excess from the final cut mochi circles before wrapping the ice cream to avoid a chalky exterior.
How to Revive Stiff or Dry Mochi Dough
Sometimes, minor variations in microwave wattage or altitude can cause the dough to come out slightly too stiff or dry after cooking. If your dough feels difficult to roll, do not despair. Wrap the ball tightly in a lightly damp paper towel and microwave it for a very short 10 to 15-second burst.
This quick injection of steam and heat should restore its elasticity and pliability.
Flavor Innovations and Storage Solutions
Once you have mastered the basic technique, the world of customization opens up, transforming these simple Ice Cream Recipes Easy to execute into complex flavor profiles.
Creative Mochi Ice Cream Flavor Combinations
While classic vanilla is always welcome, feel free to experiment with flavoring the dough itself. Substitute a tablespoon of the water with cold brew coffee for a mocha kick, or swap one teaspoon of the rice flour for quality cocoa powder to produce a chocolate shell.
For a lighter approach, try wrapping a small frozen fruit, like a single strawberry or segment of mango, in place of the dairy ice cream.
Proper Freezing for Maximum Shelf Life
After their final assembly and two-hour deep freeze, your finished mochi can be transferred to an airtight container. While Mochi can last up to a week in the freezer, the ideal texture is achieved within the first 48 hours.
To serve these delectable Japanese Sweet Treats , remove them from the freezer and allow them to rest at room temperature for 5 to 10 minutes.
This essential resting time allows the mochi shell to soften slightly, giving you the perfect, springy chew that makes this dessert such a magic textural experience.
Recipe FAQs
My mochi dough is incredibly sticky it’s a proper mess! What went wrong during the shaping?
Don't panic! Mochi dough is notoriously clingy, which is why copious amounts of cornflour (or potato starch) are your best friend here. If it feels unmanageable, it usually means your work surface or hands weren't dusted generously enough, or the dough was too hot when you started rolling it out.
Scrape it up, give it another good dusting of starch, and ensure you are working quickly speed is key to winning the sticky battle.
How long can I keep my homemade Mochi Ice Cream bombs in the freezer, and how should I serve them for the best chewy texture?
Properly wrapped and stored in an airtight container, your homemade Mochi Ice Cream will keep happily in the freezer for up to two months, though they are usually snapped up much sooner! The essential serving trick is patience: take them out of the freezer 5 10 minutes before you plan to eat them.
This brief thawing time allows the mochi shell to soften into that perfect, characteristic chewy texture if you eat them straight out of the freezer, the shell will be sadly tough and icy.
I only have standard rice flour in the cupboard. Can I use that instead of the glutinous stuff for this recipe?
Afraid not, mate. Glutinous rice flour (like Mochiko) is absolutely non-negotiable for making proper mochi. Standard rice flour lacks the specific starch structure (amylopectin) needed to create that incredible, elastic chew.
If you try to substitute it, the dough will simply crumble or become tough, and you’ll end up with something closer to a biscuit than a dreamy ice cream shell.
My ice cream is melting while I’m trying to wrap it! Is there a secret to getting the perfect, sturdy filling?
The secret is temperature control your ice cream spheres must be truly rock hard before you even think about assembly. Make sure they’ve had a minimum of 4 hours in a reliable deep freeze.
If things start getting sloppy during wrapping, immediately stop work, put the tray of partially wrapped mochi back into the freezer for 15 minutes, and then try again. Working near an open freezer door also helps massively!
Is there a good old-fashioned way to cook the mochi dough if my microwave is on the blink?
Absolutely! The traditional method is steaming, and it often results in a wonderfully soft, even texture. Pour the mixed dough batter into a heatproof bowl, cover it with foil or plastic wrap, and steam it over boiling water for about 15 to 20 minutes, stirring vigorously halfway through.
The dough is done when it looks glossy and translucent, much like the result from the microwave method.
Easy Microwave Mochi Ice Cream Bombs

