The Indulgent Dark Chocolate Silk Pie Nobake Marvel
- Unveiling the Easiest, Most Decadent Chocolate Mousse Pie You'll Ever Make
- Why This No-Bake Masterpiece Outshines Baked Desserts
- Assembling Your Hall of Fame Components for the Ultimate Pie
- Sourcing Superstars: Essential Components for Deep Chocolate Flavour
- The Step-by-Step Construction of Your Dark Chocolate Silk Pie
- Achieving Perfection: Techniques for Fluffy Mousse Incorporation
- Beyond the Basic Recipe: Customizing Your Chocolate Mousse Pie Experience
- Expert Troubleshooting and Storage Wisdom
- Recipe FAQs
- 📝 Recipe Card
Unveiling the Easiest, Most Decadent Chocolate Mousse Pie You'll Ever Make
There are desserts, and then there are experiences . Our Chocolate Mousse Pie falls firmly into the latter category. This isn't just a sweet treat; it's a masterclass in effortless elegance, a dessert that whispers sophistication while demanding zero oven time.
If you’ve ever dreamed of creating a dessert that rivals the finest French patisseries but find the reality of baking intimidating, prepare to be delighted. This recipe, which yields The Indulgent Dark Chocolate Silk Pie (No-Bake Marvel!) , is your ticket to dessert glory.
It combines deep, bittersweet chocolate with a texture so ethereal it seems to float, all nestled atop a sturdy, buttery cookie foundation.
Why This No-Bake Masterpiece Outshines Baked Desserts
The brilliance of this No Bake Chocolate Mousse Pie lies in its inherent simplicity and stunning results. While baked pies demand precision in temperature and timing, this version focuses purely on the quality of the ingredients and the proper technique for achieving that signature airy lift.
It’s inherently approachable, making it the perfect candidate for both seasoned bakers needing a reliable fallback and absolute beginners looking to impress.
A Texture So Silky It Needs a Warning Label
The hallmark of a truly exceptional Dark Chocolate Mousse Pie is its texture it must be rich yet weightless. We achieve this divine mouthfeel by incorporating three essential elements: melted, high-quality chocolate for depth, egg yolks for richness, and carefully folded whipped cream and meringue for unparalleled aeration.
The final result is less like a dense Chocolate Cream Pie and more like a cloud infused with cocoa essence.
The Secret to Achieving Professional Level Richness at Home
The depth of flavour in this pie hinges on the chocolate itself. For this Chocolate Mousse Pie Recipe Easy , we mandate using high-quality dark chocolate, ideally between 60% and 70% cocoa solids.
A secret weapon we incorporate is a splash of strong black coffee or espresso it doesn't make the pie taste like coffee, but rather amplifies the complexity of the cocoa notes, ensuring that even a relatively Easy Chocolate Mousse tastes profoundly luxurious.
Setting Expectations: Speed and Simplicity Guaranteed
With only 30 minutes of active preparation time, this recipe proves that incredible desserts don't require hours of labor. Once assembled, the pie requires a minimum of four hours in the refrigerator to set properly, transforming the mixture into a sliceable dream.
This hands off chilling time means you can focus on your main course, knowing that a magnificent Chocolate Mousse Pie with Oreo Crust awaits its grand unveiling later.
Assembling Your Hall of Fame Components for the Ultimate Pie
To construct a truly show stopping dessert, we must first gather our building blocks. This Chocolate Mousse Pie Recipe is divided logically into the foundation (the crust) and the decadent topping (the filling).
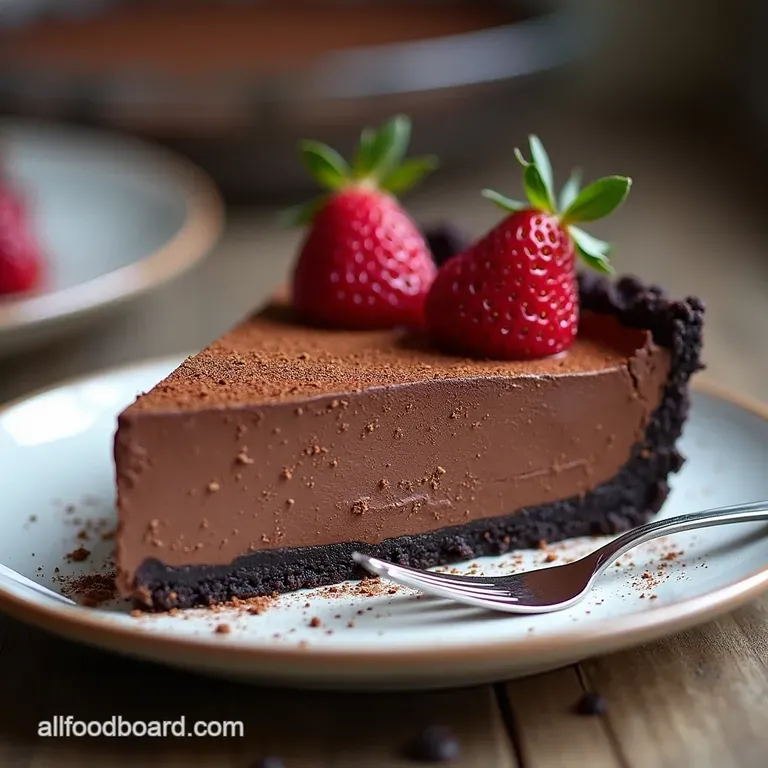
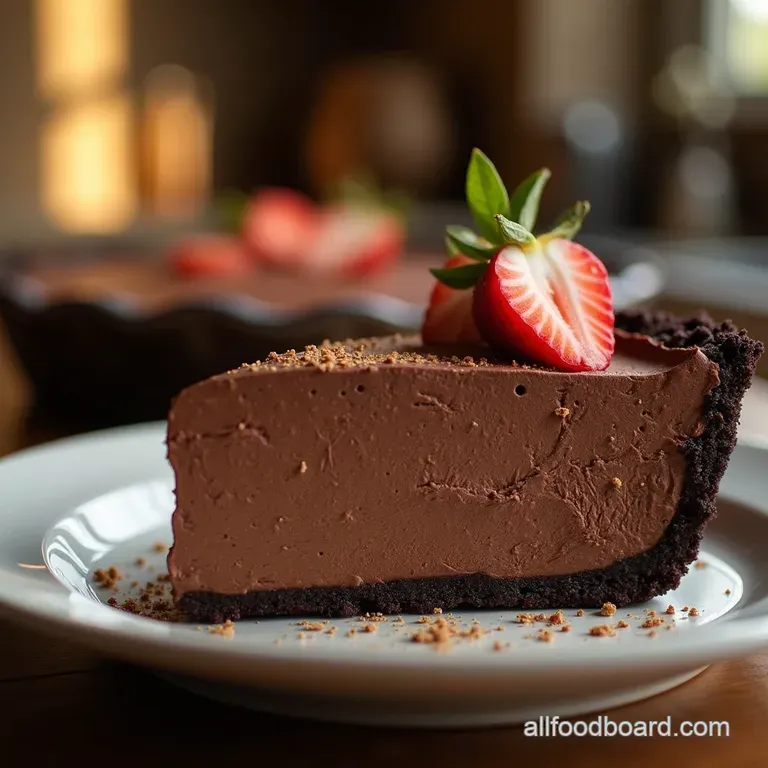
We will be using 24 chocolate sandwich cookies, ground finely, mixed with 6 tablespoons of melted unsalted butter, and a whisper of salt to balance the sweetness, creating a firm foundation within our 9 inch pie dish.
Sourcing Superstars: Essential Components for Deep Chocolate Flavour
The success of this entirely unbaked creation is deeply tied to the components we select. Since there is no baking process to mask or transform flavours, every ingredient must pull its weight.
The Unshakeable Foundation: Crust Component Checklist
Our crust must be robust enough to support the airy filling without crumbling under pressure. After crushing our cookies 24 are required the 6 tablespoons of melted butter binds them perfectly.
Remember, pressing this mixture firmly and evenly up the sides of the pie dish is crucial for structural integrity, especially when aiming for clean slices later on. Don't forget that essential pinch of salt to offset the sweetness of the cookies.
Decoding the Filling: Dairy, Chocolate, and Sweetener Ratios
The filling demands careful layering of textures. For the chocolate base, we melt 10 ounces of good dark chocolate with 4 tablespoons of butter. This rich mixture is then mellowed with the three egg yolks and 2 tablespoons of strong brewed coffee.
The lift comes from two sources: 1 1/2 cups of very cold heavy whipping cream, whipped to medium stiff peaks, and three egg whites, stabilized with 1/4 cup of granulated sugar to create a beautiful meringue. These airy elements are what elevate this from a simple ganache to a true mousse.
Necessary Gadgetry: Tools That Make the Magic Happen Seamlessly
While this is an Easy Chocolate Mousse Pie , having the right tools prevents unnecessary fuss. A food processor makes quick work of the cookies, though a sturdy zip-top bag and rolling pin work just as well.
Essential for aeration are at least two large, clean mixing bowls and an electric mixer (stand or handheld) to ensure your cream reaches perfect peaks and your egg whites become glossy and firm. Finally, a good rubber spatula is non-negotiable for the delicate folding process ahead.
Related Recipes Worth Trying
- Easy Chocolate Oatmeal Lace Cookies Recipe Decadent Crispness — Master these rich Chocolate Oatmeal Lace Cookiesthey bake up unbelievably thin and crispy balancing deep dark chocolate with toasted oats A truly easy...
- The Best Upgraded Boxed Chocolate Cake Recipe — Tired of dry cake Learn what to add to chocolate box cake mix to create a moist fudgy masterpiece that tastes homemade The ultimate chocolate cake mix upgrade
- Foolproof Buttery Christmas Toffee with Dark Chocolate Sea Salt — Master the perfect brittle Christmas Toffee with this easy recipe Achieve that satisfying snap every time finished with luxurious chocolate and sea salt
The step-by-step Construction of Your Dark Chocolate Silk Pie
The construction process moves through four distinct phases: preparing the chilled crust, creating the flavour forward chocolate base, incorporating the air, and finally, the all-important setting period.
Following these steps meticulously ensures you achieve that flawless texture described in the Chocolate Mousse Pie Recipe Easy blueprint.
Achieving Perfection: Techniques for Fluffy Mousse Incorporation
The difference between a heavy, dense pie and an airy Chocolate Mousse Pie lies entirely in how we treat our whipped elements. Precision here guarantees success.
First Act: Preparing and Firming Up Your Pre-Made Crust
Once the cookie crumbs, melted butter, and salt are perfectly combined to resemble wet sand, press the mixture firmly into your 9 inch pie dish. This foundation needs a minimum of 30 minutes in the refrigerator to chill and firm up before we introduce the delicate filling; this prevents the crust from becoming soggy under the weight of the mousse.
Whipping Up the Velvety Core: Folding Secrets Revealed
After melting the chocolate and butter and tempering the egg yolks into the mixture (whisking a small amount of hot chocolate into the yolks first prevents them from scrambling!), we begin layering the lightness.
First, gently fold half of the prepared whipped cream into the slightly cooled chocolate mixture to lighten the base. Next, the most crucial step: gently fold in the stiff egg whites, followed by the remaining whipped cream, using a slow, deliberate cut-and-fold motion with your spatula.
The goal is to combine without knocking out the air bubbles created by whipping this air is the soul of the mousse.
The Crucial Chill: Setting Times for Optimal Sliceability
Once the airy filling is spooned beautifully into the chilled crust and smoothed over, it must be covered loosely with plastic wrap and transferred to the refrigerator. A minimum of four hours is required for the fats and proteins to stabilize, resulting in a pie that slices cleanly and holds its shape beautifully.
For the very best texture, leaving it overnight is highly recommended.
Garnishing Glory: Final Touches Before Serving
Presentation elevates any dessert, even one as simple as this Easy Chocolate Mousse Pie . Just before serving, dust the surface lightly with high-quality cocoa powder or use a piping bag to add decorative swirls of reserved whipped cream.
A few delicate chocolate shavings complete the masterpiece.
Beyond the Basic Recipe: Customizing Your Chocolate Mousse Pie Experience
While this recipe delivers a stunning classic Dark Chocolate Mousse Pie , it’s wonderfully adaptable. You can introduce entirely new flavour profiles with minimal effort. For a stunning contrast, consider drizzling a bright raspberry coulis over individual slices.
If you desire a mocha experience, dissolve instant espresso powder directly into the warm chocolate mixture in Step 4. For those steering toward a completely different dietary path, a variation on this structure can lead to a delightful Vegan Chocolate Mousse Pie by substituting vegan chocolate chips, using coconut cream instead of heavy cream, and binding the crust with coconut oil.
Expert Troubleshooting and Storage Wisdom
Even the simplest recipes can sometimes cause small panics. If your filling seems too loose, it usually means the folding incorporated too little air, or the chocolate base wasn't cool enough when the cream was added. Remember, this is a mousse, not a dense ganache.
Elevating the Experience: Flavour Twists and Topping Innovations
To push this dessert further into extraordinary territory, consider adding a teaspoon of pure vanilla extract to the chocolate base or even a splash of high-quality liqueur, such as Grand Marnier or Kahlúa, right before folding in the egg whites.
For texture enthusiasts, a sprinkle of flaky sea salt just before chilling enhances the bittersweet profile perfectly.
Nutritional Snapshot: Approximating the Decadence (Per Slice)
As an indulgence designed for pleasure, this pie carries a rich profile. Approximating 8 generous slices, you can expect each serving to hover around 450 to 500 calories, mostly derived from the rich fats in the chocolate and cream. It’s a decadent treat best enjoyed mindfully.
Keeping the Dream Alive: Storage Duration and Best Practices
Due to the raw egg yolks and cream, this pie must remain refrigerated. It holds its peak texture beautifully for up to three days. If you wish to store it longer, up to a week is possible, though the whipped elements may begin to compress slightly after the third day.
Always cover it tightly before refrigerating to prevent the rich chocolate flavour from absorbing any competing fridge odours.
FAQ: Frequently Asked Queries on Pie Stability and Texture
Q: Can I make this pie ahead of time? A: Absolutely! Making the Easy Chocolate Mousse Pie the day before serving is ideal, as the longer chilling time ensures maximum stability and flavour integration.
Q: Why did my egg whites not get stiff peaks? A: The most common culprit is grease. Ensure your mixing bowl is scrupulously clean any trace of fat or yolk will inhibit the proteins from whipping to the necessary stiff, glossy meringue stage.
Q: Is this truly an "Easy Chocolate Mousse"? A: Yes. While we use both whipped cream and egg whites for maximum lift, the process relies on straightforward melting and careful folding, avoiding complex tempering of large batches of cream, placing it firmly in the "easy" category.

Recipe FAQs
Why is my Chocolate Mousse Pie filling so runny, even after chilling?
This is usually down to one of two things: either you didn't whip the cream or egg whites stiff enough, or you deflated the air when folding. Remember, folding should be done gently, cutting down the centre and turning the mixture over, rather than stirring vigorously.
Can I make this "Indulgent Dark Chocolate Silk Pie" ahead of time for a party?
Absolutely! This no-bake marvel is actually better made the day before you plan to serve it, as it gives the mousse time to fully set up, making cleaner slices possible. Aim to have it chilling for at least 6 hours, or preferably overnight, before slicing.
My crust seems soggy underneath the mousse what did I do wrong?
Sogginess usually happens if the melted butter wasn't evenly distributed, or if you skipped the mandatory chilling step for the crust before adding the filling. Make sure you press the crumbs down firmly; a good press creates a moisture barrier against the filling.
I'm nervous about using raw eggs. Are there any safe substitutions for the egg whites in this Chocolate Mousse Pie?
That’s a fair concern! If you’re worried about raw eggs, you can confidently skip the egg whites and achieve a denser, ganache like pie by using the substitution suggested in the variations. Simply use an extra cup of heavy cream, whipping it to stiff peaks and folding it into the cooled chocolate base.
How long does this pie keep in the fridge, and does it freeze well?
Kept well covered in the refrigerator, this pie is grand for about 3 to 4 days; the texture holds up beautifully. Freezing is less recommended, as the delicate structure of the mousse can become slightly grainy or watery upon thawing, so stick to refrigeration for best results.
What can I use instead of dark chocolate if my family prefers milk chocolate?
If you use milk chocolate, you’ll need to make some adjustments because it has more sugar and less cocoa solid. I'd recommend reducing the added sugar in the egg whites slightly, and be sure to use slightly less butter in the melted chocolate mixture, as milk chocolate is naturally softer.
Dark Chocolate Silk Pie

Ingredients:
Instructions:
Nutrition Facts:
| Calories | 645 kcal |
|---|---|
| Protein | 4.7 g |
| Fat | 43.1 g |
| Carbs | 43.6 g |
| Fiber | 1.8 g |
| Sodium | 105 mg |
