Fall Desserts: Salted Caramel Apple Crumble Bars
The Alchemy of Autumn: Why This Is the Ultimate Fall Dessert Bar
Right then, let's talk about Fall Desserts . Everyone goes straight for pumpkin spice, and look, I love a good pumpkin roll as much as the next person, but when the air gets that first crisp edge, my heart belongs to apples.
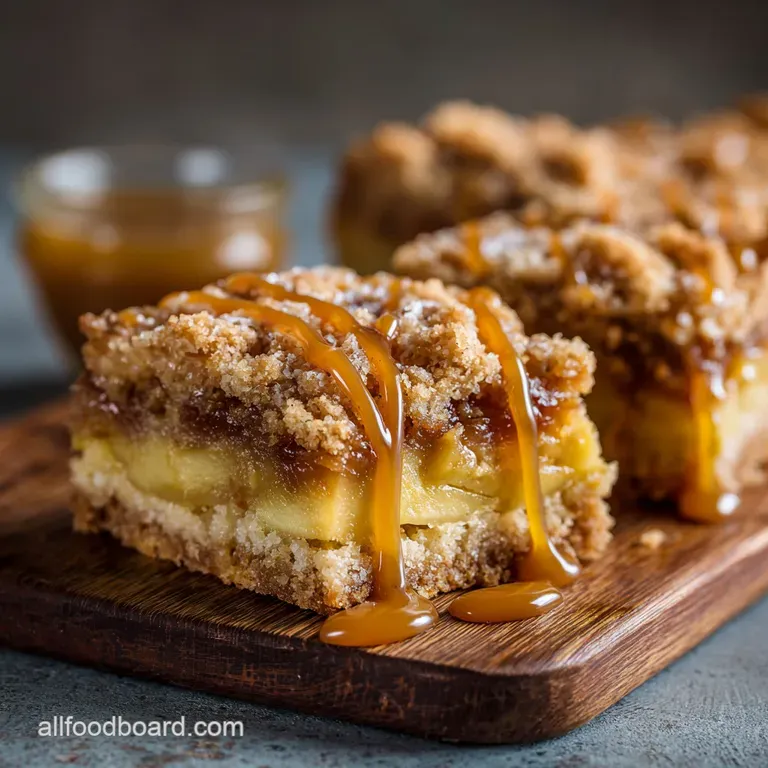
Specifically, apples drenched in salted caramel and sandwiched between two layers of buttery, toasty oats. These Salted Caramel Apple Bars are truly the pinnacle of fall baking. They have the cozy flavour of a classic crumble, but they’re portable, they slice beautifully (unlike a messy pie), and honestly, they feel a bit more sophisticated for your Thanksgiving Desserts table without requiring five hours of effort.
I swear, the aroma that fills your kitchen while these are baking is reason enough to make them.
Deconstructing the Delight: The Oaty Base vs. The Gooey Core
When you’re dealing with a wet, juicy fruit like apples, especially if you want to transport this glorious creation to a potluck or family dinner, structure is your best friend. This is where the oats come in.
We aren't just making a basic shortbread; we’re incorporating thick, rolled oats into both the bottom base and the topping. This does two brilliant things: first, it gives that incredible chewiness and rustic texture that a plain flour crumb just can't deliver.
Second, it acts like a sponge, helping to absorb some of the moisture that oozes out of the spiced apple filling during baking. We want gooey filling, yes, but we absolutely do not want a soggy bottom.
Caramel Chemistry: Achieving the Perfect Salt Balance
I used to make these bars with plain caramel sauce, and they were fine. Just... fine. They were sweet, they were rich, but they lacked that zing. That push and pull of flavour. Introducing flaky sea salt changed everything.
Salt cuts through the extreme richness of the butter and the sugar in the caramel and the filling. It forces your palate to notice the subtle spices in the apples, making the whole experience ten times more satisfying.
Trust me on this: don’t skip that final sprinkle of coarse flaky sea salt right before the bars go into the oven. It creates little salty bursts on the topping that are just absolutely addictive.
The Medium Challenge: Skills Required Before You Start
I’ve rated these as 'medium' difficulty, and I don't mean that the steps are hard. You’re mixing, you’re pressing, and you’re waiting. The challenge here is patience and discipline. You need to understand that this recipe demands certain non and negotiables, primarily related to temperature.
Do you need to know how to laminate dough? Nope. Do you need to be able to resist the urge to cut into the bars while they are still warm? Yes, you absolutely do. The success of those clean, gorgeous slices relies entirely on letting the whole tray cool completely.
That’s the real skill required here: self and control.
Sourcing the Season: Essential Components for Your Spiced Apple Filling
Gathering the Goods: The Complete Shopping List
When you’re making fall desserts with apples , the quality of your dry goods actually matters a lot because they form the majority of the structure. For instance, make sure you use rolled oats , not instant oats. Instant oats turn to mush, and we need that texture.
Similarly, use quality brown sugar (packed well!) because that molasses flavour is crucial for pairing with the spiced apples and the richness of the salted caramel. If you’re using store and bought caramel, spend a few extra dollars on the thick, rich stuff, not the thin syrup.
If you make your own (which is highly recommended if you have time), make sure it's thick enough to hold a swirl.
Crucial Equipment Check: Pans, Parchment, and Prep Tools
You don't need fancy gear for fall dessert recipes. A sturdy 9x13 inch pan is the backbone of this operation. But the absolute most important tool here is parchment paper. You must line your pan with parchment, letting the edges hang over like handles. Why?
This is your "sling." Once the bars are baked and completely cooled, you use those handles to lift the whole slab out of the pan in one clean go. No more scraping, no more broken edges. It's brilliant. Otherwise, all you need is a big bowl and maybe a pastry blender or two forks to cut in that cold butter.
Choosing Your Apples: Best Varieties for Baking (And Which to Avoid)
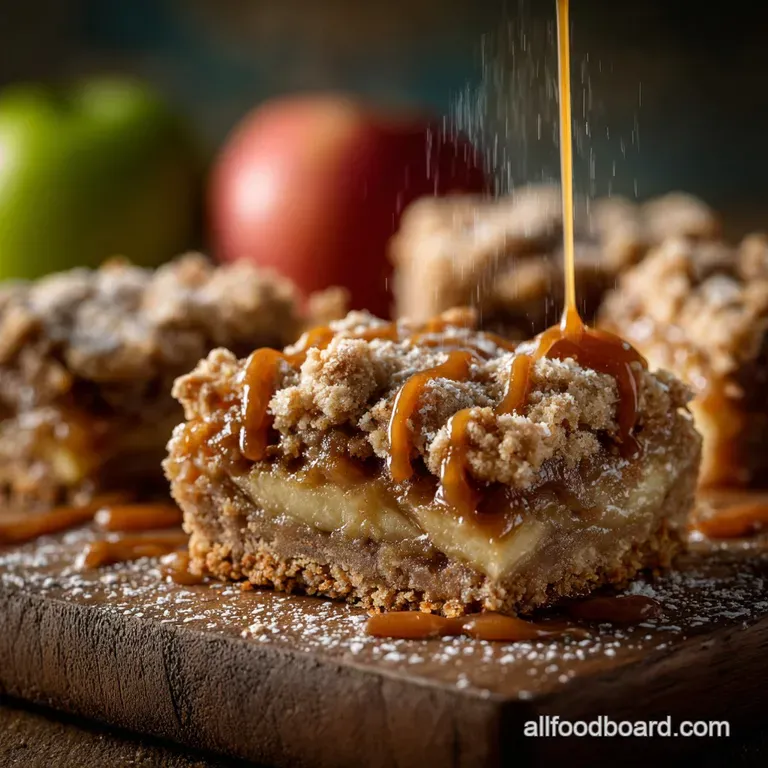
This is a hill I will die on: the type of apple you choose can make or break your fall baking . You need an apple that holds its shape. If you grab something like a McIntosh, you will end up with apple sauce instead of chunks of soft, spiced fruit.
We want apples that soften but maintain their integrity against the gooey caramel.
Here is a quick breakdown of what to aim for:
| Apple Type | Recommended for This Recipe? | Reason |
|---|---|---|
| Honeycrisp | Yes | Excellent crunch, sweet and tart balance, holds shape. |
| Braeburn / Fuji | Yes | Good balance of sweetness and firmness. |
| Granny Smith | Yes (Mix with sweet) | Excellent tartness to balance the heavy caramel and sugar. |
| McIntosh / Gala | Avoid | Too soft; breaks down easily into mushy filling. |
Related Recipes Worth Trying
- Fall Dinner Recipes: Ultimate Cider Braised Pork Shoulder for a Cozy Sunday Roast — Fall Dinner Recipes dont get cozier than this. This easy fall dinner transforms pork shoulder into a spoon tender, cider braised Sunday Roast. Perfect for...
- Fall Instant Pot Recipes UltraCreamy Butternut Squash Risotto — Need cozy comfort food Fall Instant Pot Recipes dont get easier than this This luxurious Instant Pot dinner recipe delivers creamy butternut squash risotto...
- Fall Appetizers Flaky Butternut Sage Stilton Tartlets — Fall Appetizers dont get better than these sophisticated Stilton Butternut Tartlets They are easy to make-ahead for a crowd and offer restaurantquality fine...
From Crumb to Glory: Mastering the Layering Technique
Creating the Buttery Oaten Foundation
Once you've mixed your dry ingredients and cut in that ice and cold butter, you will have a gorgeous, sandy mixture. Now, we take three and quarters of that mixture and press it firmly into the bottom of the pan. I mean firmly .
Use the bottom of a measuring cup or the flat base of a glass. You are creating a solid shortbread barrier. If the base isn't packed tightly, the caramel will leak into the crumb, creating a greasy mess rather than a distinct layer.
This base layer needs to feel solid under your touch. The 30 minute chill time is not negotiable; it ensures the base sets up before it hits the heat, preventing the butter from immediately dissolving and turning the layer into sludge.
Simmering Success: Preparing the Warmly Spiced Apple Filling
We par and cook the apples for a quick 5- 7 minutes. Why do this preliminary cooking? Well, the filling is quite thick (we added a tablespoon of flour to bind the juices), and if we just throw raw apples into the oven, the base might overbake before the apples fully soften.
By giving them a head start on the stove, we guarantee they finish up tender and juicy while the crumble achieves perfect golden and brown crispness. Plus, cooking them briefly really wakes up that cinnamon and nutmeg.
The Signature Swirl: Integrating Homemade Salted Caramel
The apples go down first, then the caramel. Don’t worry about spreading the caramel too perfectly; a messy, artful drizzle is actually better here. You want pockets of intense caramel flavour.
If you’re making these salted caramel apple bars for the first time, I recommend leaving a 1/2 inch border around the edge when you drizzle the caramel. This reduces the chance of it bubbling over and burning onto the pan sides.
Press, Bake, Chill: Ensuring Clean Slices and Crisp Edges
Once the caramel is swirled, cover the entire top with your reserved crumble mixture, breaking up any large clumps with your fingers. Sprinkle that coarse salt right over the top. Bake until the entire top is deeply golden brown and you see the apple filling bubbling happily at the corners.
Then comes the hard part: the cooling. Do not, under any circumstances, try to peek or cut into these while they are warm. I made this mistake once for a bake sale, thinking " 15 minutes will be fine," and ended up serving gooey puddles instead of bars.
Let them cool completely, preferably for two hours, before slicing. This setting time makes all the difference for those sharp edges we crave.
Perfecting Your Bake: Troubleshooting and Storage Secrets
Solving the Soggy Bottom Syndrome
Soggy bottoms are the nemesis of all bar and style fall desserts easy to make. If you followed the steps, you shouldn't have one, but if you struggle, here are the key factors to check:
- Did you chill the base? If you skipped the 30 minute chill, the butter melted too fast, creating grease instead of a crisp layer.
- Did you include flour in the filling? The flour binds the apple juices. Without it, the filling is too liquid.
- Did you par and cook the apples enough? If the apples were still rock and hard, they released too much water during the oven bake, overwhelming the base.
Ideal Storage Practices for Maximum Freshness
These bars are sturdy! They hold up beautifully, making them perfect fall desserts for a crowd or a potluck. Once completely cooled and sliced, store them in an airtight container at room temperature for up to three days.
If you need them to last longer (or if your kitchen runs warm), transfer them to the fridge. They’ll keep well for about a week, though the topping will lose a touch of its crunch. Bring them back to room temperature before serving for the best texture.
Pairing Perfection: What to Serve Alongside These Bars
While fantastic on their own, these bars become truly decadent when paired correctly. A dollop of lightly sweetened bourbon and spiced whipped cream is non and negotiable for me. If I'm feeling truly British, I serve them slightly warmed with a stream of homemade English custard poured over the top.
Since these are quite rich, a strong, bitter element works well to balance the sweetness. Think black coffee, or maybe a glass of dry apple cider.
Transforming Them Into Hand Pies or Minis
If you want to use the same glorious flavour profile but offer individual portions, you can easily adapt this recipe. Instead of pressing the base into a 9x13 pan, press it into the bottom of a muffin tin. Fill with the apple mixture, add the caramel swirl, and sprinkle the remaining crumble topping on.
The bake time will drop dramatically maybe 20 to 25 minutes but you get 18 20 perfect little mini and pies ready for individual servings! They are fantastic for holiday gatherings and Thanksgiving Desserts .
Swapping Spices: Using Ginger and Nutmeg Instead of Cinnamon
If you’re cinnamon and fatigued (it happens!), this recipe is super flexible. Try substituting the 1 teaspoon of cinnamon with 1/2 teaspoon of ground ginger and 1/4 teaspoon of ground cloves. This gives the filling a much sharper, deeper, spicier note that feels even more autumnal.
Nutty Additions: Introducing Pecans or Walnuts to the Topping
Want a little extra crunch? I highly recommend folding in 1/2 cup of coarsely chopped pecans or walnuts into the reserved crumble mixture just before topping the bars. The toasted nuts give an extra layer of flavour and satisfying chewiness, making these feel even more substantial.
For extra credit, toast the nuts quickly in a dry pan before mixing them into the topping.

Recipe FAQs
Blimey, do I really have to wait two hours before cutting these bars?
Yes, it’s a total patience test, but absolutely crucial! The filling is gooey when hot and needs that generous cooling time to set properly otherwise, you’ll lift a delicious mess rather than tidy, sliceable bars.
I worry about getting a soggy bottom; how do I ensure my shortbread base is perfectly crisp?
The secret is twofold: use ice-cold butter for the crumble mixture, and crucially, don't skip the 30-minute chill time for the pressed base, which ensures a lovely, sturdy foundation that won’t become greasy during baking.
What makes these the quintessential Fall Desserts, and can I swap the type of apples?
The combination of warm cinnamon, nutmeg, and gooey salted caramel laced through spiced apples makes these the peak of autumn comfort; stick to firm, crisp varieties like Braeburn or Granny Smith, as softer apples will turn to mush when baked.
How should I store these crumble bars, and how long will they keep fresh for a good brew?
Store them in an airtight container at cool room temperature for up to three days, or refrigerate them for a week; they also freeze brilliantly for those inevitable unplanned tea-time guests.
Is that step where you par-cook the apples necessary, or is it a bit of faff?
It’s essential, not faff, as it ensures the apples soften fully without turning the oven base into a pool of raw fruit juice; this short simmer also helps activate the starch (flour) to thicken the filling nicely.
Salted Caramel Apple Fall Bars

Ingredients:
Instructions:
Nutrition Facts:
| Calories | 340 kcal |
|---|---|
| Fat | 18 g |
| Fiber | 3 g |
