The King of Comfort Ultimate Peanut Butter Swirl Banana Bread
- Why This Peanut Butter Banana Bread Redefines Comfort Baking
- The Magic Pairing: Butter, Banana, and Nutty Delight
- Assembling Your Culinary Arsenal: What You Need
- A Step-by-Step Guide to Baking Glory
- Executing the Perfect Peanut Butter Swirl Integration
- Elevating Your Finished Peanut Butter Banana Bread Masterpiece
- Recipe FAQs
- 📝 Recipe Card
Why This Peanut Butter Banana Bread Redefines Comfort Baking
There are certain aromas that instantly transport us back to childhood kitchens the scent of cinnamon warming, the deep, caramelized sweetness of baked fruit, and that unmistakable, comforting richness of roasted nuts.
This Peanut Butter Banana Bread Recipe captures all those memories and elevates them into something truly special. Forget those dense, overly sweet loaves you might have encountered before; this creation delivers exceptional moisture, an intense banana flavour, and a beautiful, salty sweet ribbon of peanut butter running through every slice.
We’re not just making bread here; we’re crafting an experience that easily transitions from a hearty breakfast treat to a sophisticated afternoon snack. It’s truly the king of comfort baking.
The Magic Pairing: Butter, Banana, and Nutty Delight
The success of any great quick bread hinges on balancing fat, acid, and sweetness, and this recipe achieves that harmony perfectly. We start with the classic duo: beautifully ripe, nearly black bananas mashed until they are nearly liquid, providing natural sugars and intense moisture.
The richness comes from high-quality unsalted butter, creamed until light and airy with granulated sugar, which ensures a tender crumb structure. The surprising secret weapon for guaranteed moisture, however, is a dollop of sour cream folded in right at the end.
This acidity reacts beautifully with the baking soda, resulting in a loaf that stays unbelievably soft for days. When you combine these elements with creamy peanut butter, you transform a classic into something transcendent.
This Banana And Peanut Butter Bread showcases just how dynamic these humble ingredients can be.
Beyond the Basic Loaf: Our Signature Swirl Technique
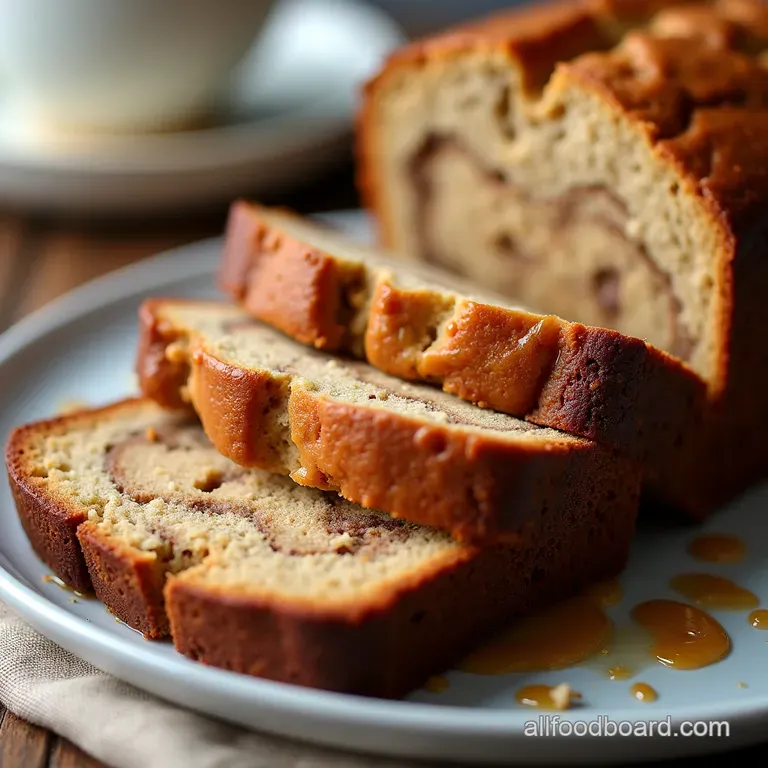
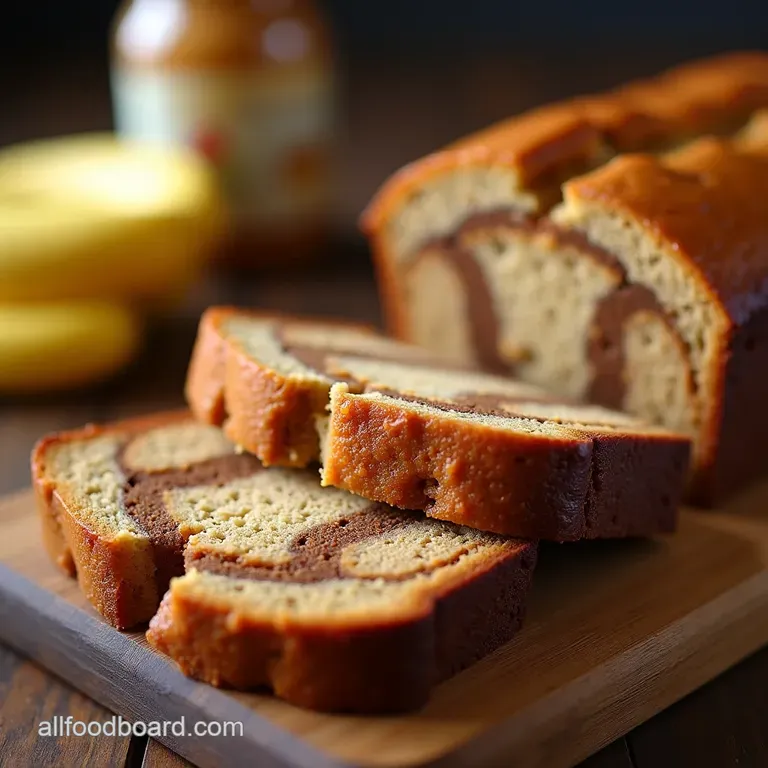
What sets this apart from a standard loaf is the integrated peanut butter element. We don't simply stir it into the batter, which often results in heavy sinking or uneven distribution.
Instead, we create a dedicated, slightly sweetened peanut butter filling, seasoned with a touch of powdered sugar to keep it luxuriously smooth. This mixture is layered between the batter halves, allowing for gentle marbling during the final moments before baking.
This technique ensures you get distinct pockets of nutty, savoury flavour throughout the tender banana crumb, making every bite exciting. If you’re looking for variations, imagine this exact swirl technique applied to Peanut Butter Banana Bread Muffins —the result is equally show stopping.
Setting the Scene: Why This Recipe is Your New Go-To Treat
We aim for results that look impressive but require minimal fuss. This recipe is classified as easy because it relies on the straightforward "dump and mix" method for the main batter.
The entire active prep time clocks in at only about 20 minutes, meaning you can whip this up after work and still have it cooling before dinner. Because it yields a full standard loaf (about 10 to 12 generous slices), it’s perfect for sharing, though I can attest that resisting a second piece is half the fun.
This superior Peanut Butter Banana Bread is destined to become a staple for weekend baking sessions.
Understanding the Nostalgia of a Perfect Loaf
Banana bread carries deep nostalgic weight for many bakers. It’s often the first thing we learn to bake, born from the necessity of using up overripe fruit. Our goal here is to respect that nostalgia while providing superior texture and flavour complexity.
The addition of the peanut butter brings a distinctly American comfort note think peanut butter and jelly sandwiches, but in warm, fluffy bread form. It’s the ultimate cozy bake, ideal for those days when only something deeply familiar and satisfying will do.
Assembling Your Culinary Arsenal: What You Need
Before diving into the blending process, gathering your components ensures a smooth, enjoyable baking experience. Since this is a quick bread, precision matters, especially regarding the temperature of your ingredients, which significantly impacts the final texture.
We are aiming for a rich, moist crumb, so read through this checklist carefully.
The Essential Dry Goods Checklist
For our dry ingredients, we rely on standard all-purpose flour, which gives us the right structure. We activate the lift with a level teaspoon of baking soda. To complement the sweetness of the banana and the richness of the peanut butter, we add just a half teasole of ground cinnamon enough to warm the flavour profile without overwhelming the fruit.
Don't forget the salt; a half teasole of fine sea salt is crucial for balancing the sweetness of the batter and enhancing the flavour of the peanut butter swirl.
Selecting the Perfect Overripe Bananas (Crucial Step!)
This is perhaps the most critical non-negotiable element of making superb Peanut Butter Banana Bread . You must use bananas that are heavily speckled, mostly brown, or even completely black.
Green or bright yellow bananas contain too much starch and not enough fermentable sugar, resulting in a dry, less flavourful loaf. You need about 1 ½ cups of mashed banana, which generally equates to three to four large bananas.
If your bananas aren't quite ready, resist the urge to bake early; patience ensures superior sweetness.
Tools of the Trade: Loaf Pan Preparation Secrets
For a standard 9x5 inch loaf pan, preparation is key to avoiding sticking and ensuring easy removal. Grease the pan thoroughly with softened butter or cooking spray. For an extra layer of protection and easy lifting later, line the pan with parchment paper, leaving an overhang on the long sides that acts as a sling.
This ensures that once the loaf is slightly cooled, you can effortlessly lift it out onto the cooling rack, preventing any structural damage to your beautiful swirl.
Related Recipes Worth Trying
- The Ultimate Peanut Butter Chocolate Swirl Banana Bread — Whip up this ridiculously moist Peanut Butter Chocolate Banana Bread Easy to make with a decadent swirl its perfect for those spotty bananas Find the full...
- The Ultimate Peanut Butter Swirl Banana Bread Recipe — Master this gloriously moist Peanut Butter Banana Bread Our simple swirl technique ensures rich nutty flavour in every sliceperfect for elevenses
- The Best Soft Chewy Peanut Butter Cookies Recipe — Tired of dry biscuits This easy recipe delivers the softest chewiest homemade peanut butter cookies youve ever tasted Perfect for your biscuit tin
A step-by-step Guide to Baking Glory
The construction of this bread is methodical but straightforward. We first establish the flavour base with the creamed butter and sugar, then gently incorporate the flavour carriers (banana and vanilla), and finally, introduce the dry ingredients with minimal agitation.
The total active time is surprisingly short, allowing you to focus on perfection during the mixing stages.
The Wet Mix Unification Process
Begin by creaming the softened butter (one stick, or ½ cup) with the ¾ cup of granulated sugar until the mixture is visibly lighter in colour and fluffy this process incorporates vital air. Next, beat in two large eggs, one at a time, ensuring each is fully mixed before introducing the next.
This emulsifies the fats and liquids. Then, stir in your 1 ½ cups of mashed banana and one teaspoon of vanilla extract. Finally, for that ultimate tenderness, gently fold in ¼ cup of sour cream or plain yogurt until just combined into the wet base.
Folding Techniques: Avoiding Tough Bread Texture
Once the dry ingredients (flour, soda, salt, cinnamon) are whisked separately, they must be introduced to the wet mix with extreme care. Add the dry mixture in two stages. Use a rubber spatula to gently fold the flour into the batter.
Stop mixing the instant you see the last streak of dry flour disappear. Overmixing activates the gluten in the flour, resulting in a tough, chewy bread rather than the melt-in-your mouth crumb we desire.
This careful handling is what separates a standard loaf from a perfect Peanut Butter Banana Bread .
Baking Times and Temperature Secrets for Uniform Cooking
Preheat your oven accurately to 350° F ( 175° C). Pour roughly half of the batter into your prepared loaf pan. Now, prepare your swirl mixture (see below) and dollop it over the batter. Top with the remaining batter.
The total baking time usually ranges between 55 and 65 minutes. Because the peanut butter adds density, it can sometimes take longer to cook through the centre. Tent the loaf with foil halfway through if the top is browning too quickly.
Executing the Perfect Peanut Butter Swirl Integration
The peanut butter swirl mixture requires a specific consistency it needs to be thick enough to hold its ribbon shape during baking but soft enough to spread easily when layered.
To create this decadent addition, whisk together ½ cup of creamy peanut butter (avoiding the oily, natural separation kind for better structure), two tablespoons of powdered sugar, and one to two teaspoons of milk or cream until smooth and pliable.
Layering and Marbling
After spreading the first layer of banana batter, drop small dollops of the peanut butter mixture across the surface. Cover this with the remaining banana batter. To create that signature marble effect, insert a thin knife or skewer into the batter and gently pull it through in an 'S' pattern, weaving through the layers just two or three times.
Over manipulating the knife will simply merge the batters into a uniform, muddy colour, eliminating the beautiful contrast we are aiming for.
Elevating Your Finished Peanut Butter Banana Bread Masterpiece
Once out of the oven, the waiting period is perhaps the hardest part. The loaf needs 15 minutes in the pan to set its structure before it’s carefully turned out onto a wire rack to cool completely. Slicing too soon can cause the moist interior to compress.
Once cooled, the possibilities for enjoyment are endless. For those who love crunch, consider folding in ½ cup of finely chopped roasted peanuts or even some Peanut Butter Banana Bread Cookies fans often enjoy dipping their slices in melted dark chocolate.
Troubleshooting and Long Term Storage Solutions
If your bread dome cracked excessively, it usually indicates the oven was too hot initially, or perhaps the batter was slightly overmixed. If the center sinks, it likely means it was pulled out before being fully set.
The key to checking doneness is the toothpick test: a skewer inserted into the centre should come out with just a few moist, tender crumbs clinging to it, not wet batter.
Creative Variations: Adding Chocolate Chips or Other Goodies
While this recipe shines in its simplicity, feel free to experiment. Folding in ½ cup of semi sweet chocolate chips alongside the final batter fold is a guaranteed crowd pleaser.
For those looking to lighten things up slightly without sacrificing flavour, you can substitute up to half the AP flour with whole wheat pastry flour, making for a Healthy Peanut Butter Banana Bread that still feels indulgent.
And for those exploring egg-free options, while this recipe uses eggs, the banana and sour cream provide much of the binding, making it a great candidate for future Peanut Butter Banana Bread No Eggs experimentation!
How Long Will This Delicious Loaf Last (and Should You Freeze It?)
Because of the high moisture content from the bananas and sour cream, this loaf stays fresh, covered tightly, at room temperature for up to four days. However, if you are making a large batch or baking for Peanut Butter Banana Bread Waffles the following week, freezing is ideal.
Wrap the cooled loaf tightly first in plastic wrap, then in foil. It freezes beautifully for up to three months; simply thaw on the counter, slice, and toast.

Recipe FAQs
Why is my Peanut Butter Banana Bread a bit dense and dry?
This is usually down to one of two things: either you used bananas that weren't ripe enough (remember, they need to be black for max moisture!), or you overmixed the batter after adding the flour. Quick breads hate being overworked; mix only until the ingredients are just combined to keep that crumb light and fluffy.
Can I use natural peanut butter in the swirl for my Peanut Butter Banana Bread?
While you certainly can, it’s not ideal for creating a clean swirl, as natural peanut butter separates and is often runnier or oilier. For the best definition and texture in that lovely middle layer, stick to conventional, emulsified creamy peanut butter (like Jif or Skippy) for this recipe.
How should I store this loaf to keep it fresh for a few days?
Once completely cool and this is crucial, no peeking until it’s cold! wrap the entire loaf tightly in cling film or place it in an airtight container. It will keep beautifully at room temperature for 3-4 days; much longer and you risk it drying out.
I keep ending up with gooey batter in the middle; how do I ensure it bakes through?
The oven temperature might be too high, causing the outside to set before the centre cooks a common issue with rich, moist loaves. Try tenting the top lightly with foil around the 40-minute mark to shield it from direct heat, and always check for doneness with a skewer deep in the centre.
Can I freeze leftover Peanut Butter Banana Bread?
Absolutely, it freezes brilliantly, which is handy for batch baking! Slice the cooled loaf first, then wrap each slice securely in plastic wrap followed by a layer of foil or pop them into a freezer safe bag. They'll be perfect for thawing out for a quick snack later.
Are there any good mix-ins I can add besides the peanut butter swirl?
Oh yes, don't stop there! Try folding in about a half cup of chocolate chips milk or dark both work a treat or for a bit of crunch, some roughly chopped walnuts or pecans are fantastic additions to the batter.
Peanut Butter Banana Bread

Instructions:
Nutrition Facts:
| Calories | 300 kcal |
|---|---|
| Fat | 14g |
| Fiber | 2g |
