One Pot Chicken and Rice: Golden and Fluffy
- Time:15 minutes prep + 40 minutes cooking/resting = 55 minutes total
- Flavor/Texture Hook: Crispy skinned chicken over velvety, turmeric tinted rice
- Perfect for: Stress free weeknight dinners or simple family meal prep
- Master the Ultimate One Pot Chicken and Rice Recipe
- Why Searing and Toasting Ensure Success
- Component Analysis of the Perfect Pot
- Essential Ingredients and Smart Substitutions
- Recommended Equipment for Best Results
- Step-by-Step Cooking and Finishing Guide
- Resolving Common One Pot Texture Issues
- Adapting the Recipe for Every Diet
- Guidelines for Storage and Waste Reduction
- Perfect Pairings for a Complete Meal
- Common Kitchen Rice Misconceptions Debunked
- Recipe FAQs
- 📝 Recipe Card
Master the Ultimate One Pot Chicken and Rice Recipe
Have you ever walked into a house and immediately felt a sense of calm just from the scent of onions and garlic hitting hot oil? That’s exactly what happens the second you start this dish. It’s the ultimate kitchen hug.
I remember the first time I tried making a version of this years ago, I basically just dumped everything into a pot and hoped for the best. The result? A soggy, beige mountain of sadness that tasted like nothing.
But after a few dozen attempts and some very honest feedback from my family, I realized that the secret isn't in adding more ingredients - it’s in how you treat the ones you already have.
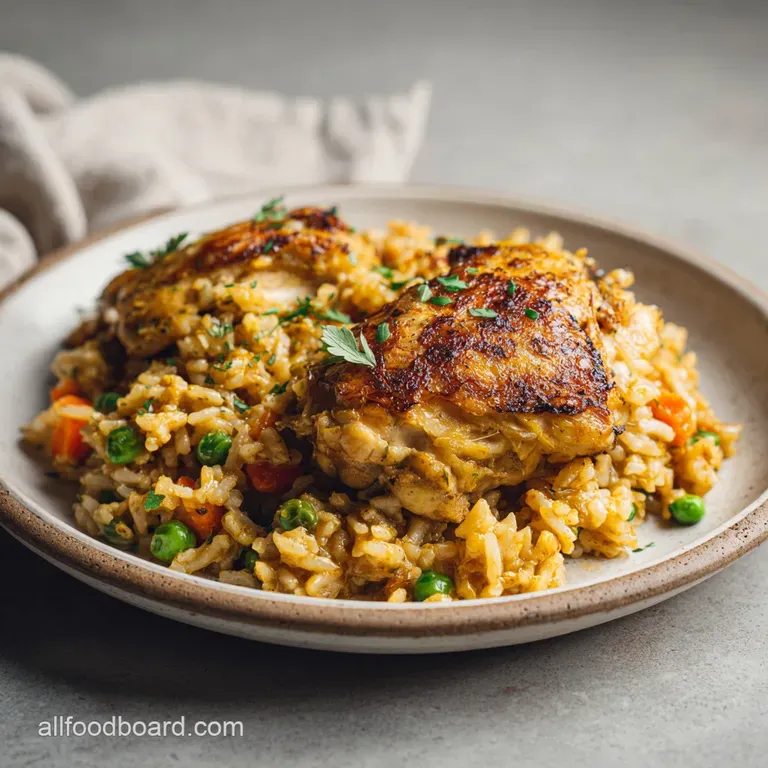
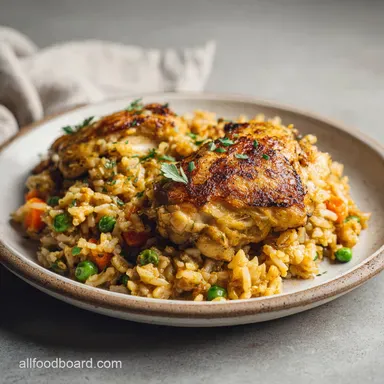
The magic happens when that chicken skin hits the bottom of the Dutch oven. You want to hear that aggressive sizzle that sounds like a summer rainstorm on a tin roof. That sound is the fat rendering out, turning into liquid gold that will eventually coat every single grain of rice.
It’s not just about cooking the meat; it’s about creating a foundation of flavor that makes the rice the actual star of the show. By the time you add the turmeric, the whole kitchen turns a vibrant, sunny yellow, and you know you’re onto something special.
This isn't just another dinner; it’s a reliable technique you’ll use for the rest of your life. Whether you’re exhausted after a long workday or you’ve got a house full of hungry kids, this one pot chicken and rice recipe delivers that "spent all day in the kitchen" taste with less than an hour of work.
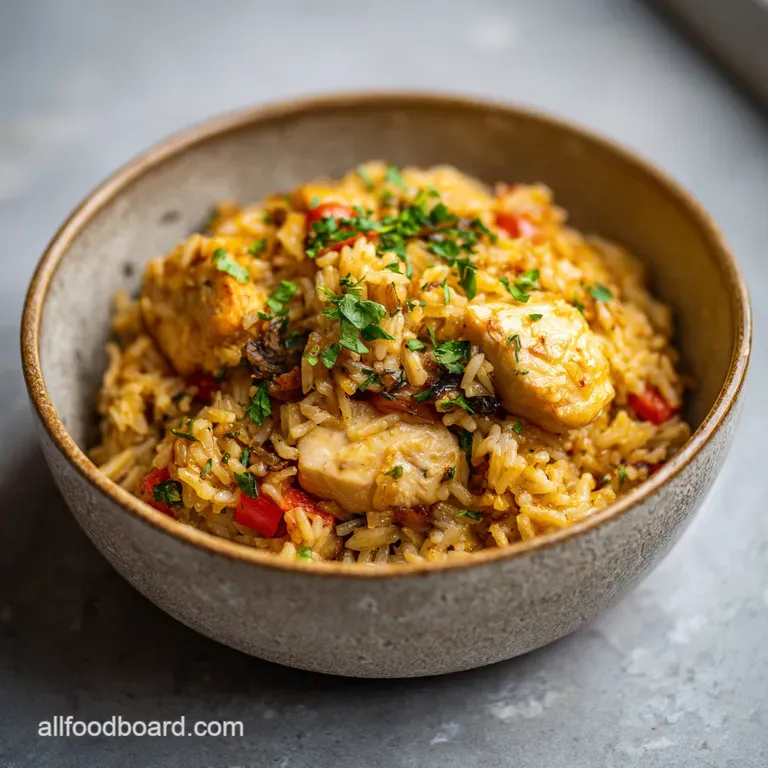
We’re going to focus on getting that skin mahogany brown and the rice perfectly steamed. It’s simple, it’s honest, and it’s exactly what home cooking should be. Trust me, once you see those peas pop against the golden rice at the end, you'll be as obsessed as I am.
Why Searing and Toasting Ensure Success
Fat Rendering: Searing the chicken skin side down first extracts natural oils that serve as the flavorful cooking base for the vegetables and rice.
The Barrier Method: Toasting the dry rice in hot fat creates a protective coating around each grain, preventing them from bursting and turning mushy during the simmer.
Bottom Up Flavor: Scraping the bottom of the pan after adding liquid releases the "fond" (browned bits), which acts as a concentrated, natural bouillon for the entire dish.
Residual Heat Finish: Letting the pot sit off the heat for 5 minutes allows the steam to redistribute, ensuring the top layer of rice is just as tender as the bottom.
| Thickness | Internal Temp | Rest Time | Visual Cue |
|---|---|---|---|
| 1 inch (standard thigh) | 165°F (74°C) | 5 mins | Juices run clear when pierced |
| 1.5 inches (large thigh) | 165°F (74°C) | 8 mins | Meat pulls away from bone |
| 0.75 inch (small thigh) | 165°F (74°C) | 3 mins | Skin is fully opaque and crisp |
Choosing the right cut of meat is the first step toward a successful dinner. While some people prefer white meat, using bone in, skin on thighs is the smartest move here because they are nearly impossible to overcook. The bone adds depth to the stock as it simmers, and the skin provides the fat needed to toast the rice properly. If you're looking for a different profile entirely, you might enjoy exploring a Chicken Korma recipe which uses similar one pot principles but with a creamy, spiced nut base.
Component Analysis of the Perfect Pot
| Ingredient | Science Role | Pro Secret |
|---|---|---|
| Chicken Thighs | Primary fat source | Pat them bone dry with paper towels before searing to prevent steaming the skin. |
| Long Grain Rice | Structural starch | Rinse until the water is clear to remove excess surface starch that causes clumping. |
| Turmeric | Natural coloring agent | Bloom it in the hot oil for 60 seconds to unlock its earthy aroma and vibrant hue. |
| Low Sodium Stock | Controlled hydration | Always use low sodium so you can control the final saltiness without overshooting the mark. |
Understanding how these elements interact is the difference between a "good" meal and one that people ask for every week. For instance, the acidity in the yellow onion helps break down some of the proteins in the chicken while it sautés, leading to a more tender final bite.
The celery and carrots don't just add nutrition; they provide a structural crunch and a subtle sweetness that balances the savory chicken stock.
The rice is perhaps the most temperamental part of the whole process. Using long grain white rice is essential because it has a lower starch content compared to short grain varieties like arborio. This means the grains will stay separate and fluffy rather than sticking together like a risotto. If you want to see how different grains behave with similar aromatics, you should look at how it's handled in a Saffron Infused Chicken dish, where the floral notes of saffron change the texture profile entirely.
Essential Ingredients and Smart Substitutions
To get the best results, stick to the quantities in the official recipe list. However, I know life happens and sometimes the grocery store is out of what you need. Here is how to swap things out without ruining the dinner.
- 7 bone in, skin on chicken thighs: The gold standard for flavor.
- Substitute: 4 large chicken breasts (bone in). Why this? Maintains moisture better than boneless during the 20 minute simmer.
- 1.5 cups long grain white rice: Provides the fluffiest texture.
- Substitute: Jasmine rice. Why this? Similar cook time but adds a subtle floral aroma to the kitchen.
- 2.25 cups low sodium chicken stock: The liquid foundation.
- Substitute: Vegetable stock or water with bouillon. Why this? Works in a pinch, though chicken stock offers the richest mouthfeel.
- 1 tsp dried thyme: Adds an earthy, woodsy backbone.
- Substitute: Dried oregano or rosemary. Why this? Changes the herb profile but keeps that classic "roast chicken" vibe.
- 1/2 tsp turmeric: For that iconic golden color.
- Substitute: Saffron threads (a pinch). Why this? Much more expensive but offers a more complex, luxury flavor profile.
- 1 cup frozen sweet peas: For a pop of color and sweetness.
- Substitute: Frozen edamame or chopped spinach. Why this? Adds green nutrition without requiring extra cooking time or pans.
| Original Ingredient | Substitute | Why It Works |
|---|---|---|
| Extra Virgin Olive Oil | Ghee or Butter | High smoke point and adds a richer, nutty base to the rice. |
| Yellow Onion | Shallots (3 large) | Provides a more delicate, garlicky sweet flavor that melts into the grains. |
| Garlic Cloves | Garlic Powder (1 tsp) | Note: Use only if fresh is unavailable; it lacks the pungent "hit" of fresh. |
When you're choosing your rice, remember that brown rice will not work as a direct 1:1 swap here. Brown rice requires significantly more liquid and about double the cooking time, which would turn your chicken into dry, stringy threads.
If you absolutely must use brown rice, you'll need to increase the stock by half a cup and simmer for at least 45 minutes, adding the chicken back into the pot halfway through the process.
Recommended Equipment for Best Results
You don't need a professional kitchen to make a world class one pot chicken and rice recipe, but having the right heavy bottomed pot is a total game changer. I personally use a 6 quart enameled cast iron Dutch oven (like a Le Creuset or Lodge).
The thick walls hold onto heat like a pro, which means once you get that simmer going, it stays consistent even if your stove is a bit finicky. If you use a thin stainless steel pot, you run a much higher risk of the rice scorching on the bottom before the top is cooked.
A tight fitting lid is the other non negotiable tool. We are essentially creating a steam chamber. If steam escapes through a loose lid, your rice will end up crunchy and underdone.
If your lid has a little wiggle room, you can place a piece of aluminum foil over the pot before putting the lid on to create a tighter seal. It’s a classic grandma trick that works every single time.
Finally,, grab a sturdy wooden spoon or a silicone spatula. You’ll need it to scrape up the "fond" after you pour in the stock. Those little brown bits stuck to the bottom of the pan are concentrated flavor, and leaving them behind is a culinary crime!
A flat edged wooden spoon is perfect for getting into the corners of the pot to make sure nothing stays stuck and burns during the long simmer.
step-by-step Cooking and Finishing Guide
- Prep and Season. Pat the 7 chicken thighs dry with paper towels. Season both sides heavily with the 1 tsp kosher salt and 1/2 tsp cracked black pepper. Note: Dry skin is the only way to get a true "shatter" crunch.
- The Initial Sear. Heat 1 tbsp olive oil in your pot over medium high. Place chicken skin side down. Sear for 6–8 minutes until deep mahogany. Do not move them until they release naturally from the pan. Flip and cook 2 more minutes, then remove to a plate.
- Sauté the Aromatics. Lower heat to medium. Toss in the diced onion, carrots, and celery. Cook for 5 minutes until the onions look glassy. Use the moisture from the veggies to start loosening the browned bits on the bottom.
- Bloom the Spices. Stir in the 3 minced garlic cloves, 1 tsp thyme, and 1/2 tsp turmeric. Stir for 60 seconds until the aroma fills the room. The turmeric will turn the oil a brilliant orange.
- Toast the Rice. Pour in 1.5 cups of dry rice. Stir constantly for 2 minutes. You want every grain coated in that flavored chicken fat until the edges look slightly translucent.
- Deglaze and Nest. Pour in 2.25 cups of chicken stock. Scrape the bottom of the pan vigorously. Nestle the chicken thighs back into the rice, skin side UP. Wait for a full rolling boil.
- The Gentle Simmer. Cover with your tight lid and drop the heat to the lowest possible setting. Simmer for 18–20 minutes without lifting the lid. Resist the urge to peek!
- The Steam Rest. Remove the pot from the heat. Keep it covered. Let it sit for 5 minutes. This is where the rice finishes its "velvety" transformation.
- The Final Fold. Remove the lid. Pour in 1 cup of frozen peas. Gently fluff the rice with a fork, moving the peas through. The residual heat will cook them in about 30 seconds.
- Garnish and Serve. Sprinkle with 2 tbsp fresh parsley. Serve directly from the pot so everyone can see the beautiful colors.
Chef's Tip: If you want an even crispier skin at the end, pop the whole pot under the broiler for 2 minutes after the rice is done. Just keep a close eye on it so the rice doesn't dry out!
Resolving Common One Pot Texture Issues
Why Your Rice Is Mushy
This is usually caused by two things: too much liquid or over stirring. If you add more than the 2.25 cups of stock recommended, the rice will absorb it all and lose its structure. Also, once you cover the pot, do not touch it.
Stirring rice while it simmers releases starch, which turns the whole thing into a gummy paste.
Why Your Rice Is Crunchy
If the rice is still hard after 20 minutes, your lid likely isn't tight enough, allowing the steam to escape. It could also mean the heat was too high, evaporating the liquid before the rice could absorb it.
If this happens, add 2 tablespoons of hot stock, put the lid back on, and let it sit on the warm burner for another 10 minutes.
Solving the Scorched Bottom
A burnt bottom usually means your "low" heat setting is actually still quite high. Every stove is different. If your burner runs hot, you might need a "heat diffuser" or simply to move the pot to a smaller burner for the simmering stage.
However, some people actually love the "socarrat" (the crispy rice at the bottom), so as long as it isn't black and bitter, it might be a happy accident!
| Problem | Root Cause | Solution |
|---|---|---|
| Greasy Rice | Too much oil or fat | Only use 1 tbsp oil; if the chicken releases a ton of fat, spoon some out before adding veggies. |
| Bland Flavor | Not enough salt | Ensure you salt the chicken AND use a high-quality stock. A splash of lemon juice at the end helps! |
| Underdone Veggies | Carrots cut too thick | Ensure carrots are diced to 1/4 inch rounds so they soften at the same rate as the rice. |
Common Mistakes Checklist
- ✓ Forgot to pat the chicken dry (results in rubbery skin instead of crispy).
- ✓ Rushed the onion sauté (raw onions make the rice taste sharp rather than sweet).
- ✓ Peeled the lid off too early (lost the steam needed to finish the grain).
- ✓ Used cold stock (slows down the boiling process and can lead to uneven cooking).
- ✓ Crowded the pan during searing (the chicken will steam instead of brown).
Adapting the Recipe for Every Diet
This recipe is naturally gluten-free and dairy-free, making it a fantastic "safe" dish for dinner parties where you might not know everyone's dietary needs. But you can definitely tweak it to fit specific lifestyles.
If you're going for a "Healthy One Pot Chicken and Rice" vibe, you can use skinless thighs to reduce the total fat content, though you'll lose some of that deep flavor. In that case, add an extra tablespoon of olive oil to compensate for the missing chicken fat when sautéing the vegetables.
For a low carb version, I’ve had success swapping the white rice for cauliflower rice. However, the technique changes completely! You won't need the chicken stock for simmering. Instead, you'll sear the chicken, sauté the veggies, then toss in the cauliflower rice at the very end just to warm it through.
It won't have the same "fluffy" texture, but it hits those same savory notes perfectly.
If you’re cooking for a smaller crowd, you can easily halve this recipe. Use a smaller pot (3 quart) and reduce the cooking time by about 5 minutes. On the flip side, if you're doubling it for a big Sunday lunch, use a massive wide braiser.
Just remember that salt and spices shouldn't be strictly doubled; start with 1.5x the amount and taste as you go.
| Method | Time | Texture | Best For |
|---|---|---|---|
| Standard Pot | 55 min | Fluffy & Balanced | Every day family dinner |
| Pressure Cooker | 25 min | Softer & Moist | Last minute emergencies |
| Oven Baked | 65 min | Very Crispy Edges | Hands off weekend cooking |
Guidelines for Storage and Waste Reduction
Storage: This dish is even better the next day as the spices continue to meld. Store leftovers in an airtight container in the fridge for up to 4 days. When reheating, add a tiny splash of water or stock to the bowl before microwaving to help "re steam" the rice and keep it from drying out.
Freezing: You can freeze this for up to 3 months. I recommend freezing it in individual portions. To reheat from frozen, let it thaw in the fridge overnight, then warm it in a skillet over low heat with a lid on to preserve the moisture.
Zero Waste Tips: Don't throw away those parsley stems! Chop them finely and sauté them right along with the celery and carrots for extra flavor. If you have leftover bones after eating, toss them into a freezer bag.
Once the bag is full, you can make your own homemade chicken stock for the next time you make this recipe. Also, if you find yourself with a handful of leftover rice but no chicken, it makes a killer base for a quick fried rice the next morning with a fried egg on top.
Perfect Pairings for a Complete Meal
Since this is a "complete" meal in one pot, you don't need anything else, but a few sides can really round it out. A crisp, acidic green salad with a lemon vinaigrette is the perfect counterpoint to the rich, savory rice.
The brightness of the lemon cuts through the chicken fat and cleanses the palate between bites.
If you want something a bit more substantial, roasted broccoli or charred green beans are fantastic. You can even toss them with a little garlic and red pepper flakes to add a bit of heat.
For a more "fusion" feel, serving this alongside some warm naan bread is always a hit in my house it’s perfect for scooping up those last few stray grains of golden rice.
Honestly, sometimes the best pairing is just a simple bowl of Greek yogurt or a dollop of sour cream on the side. The cool, creamy texture against the warm, spiced rice is a combination I learned from my travels, and it’s something I now do every single time.
It adds a velvety finish that makes the whole meal feel a bit more "chef y" with zero extra effort.
Common Kitchen Rice Misconceptions Debunked
One of the biggest myths is that you should always rinse your rice until the water is perfectly clear. While it helps, you don't need to spend 20 minutes doing it! Three quick rinses are usually enough to get rid of the excess dust that causes stickiness.
The goal is to reduce clumping, not to remove every single molecule of starch.
Another classic mistake is thinking that "more heat equals faster rice." In reality, rice is a game of patience and thermodynamics. High heat will just boil off your water too fast, leaving the center of the grain hard and the outside mushy. Keep it on the lowest setting possible once that lid goes on.
Your patience will be rewarded with perfectly individual grains that don't stick together.
Finally, people often think you have to use "fancy" stock for a good result. While homemade is great, a decent store-bought low sodium stock is perfectly fine. The real flavor comes from the "Maillard reaction" you create when you sear that chicken and the aromatics you sauté in the pan.
You are building the flavor yourself, so don't feel guilty about using a shortcut for the liquid!

Recipe FAQs
Can I cook rice and chicken together in one pot?
Yes, this is the ideal method for flavor absorption. By cooking the rice in the rendered chicken fat and stock, the grains become incredibly savory while the chicken thighs remain juicy.
Can you cook raw chicken and rice at the same time?
Yes, provided you sear the chicken first. Searing the skin for 6 8 minutes ensures proper texture, and nesting the chicken back into the stock allows it to finish cooking safely alongside the rice during the 18 20 minute simmer.
Can you put uncooked rice in a crockpot with chicken?
No, this recipe is specifically designed for stovetop Dutch oven cooking. Crockpots generally lack the high heat required to properly toast the rice grains in fat before simmering, which is a crucial step for achieving the right texture; if you prefer this technique, apply your garlic butter chicken base flavors to a slow cooked method instead.
How long to cook one pot of chicken and rice in the oven?
Use the stovetop method instead for the best results. This recipe requires 18 20 minutes of simmering on the stovetop followed by a 5-minute rest to ensure the rice is perfectly steamed and the chicken reaches an internal temperature of 165°F.
How to toast rice for better flavor?
Stir the dry long grain rice in the pot for 2 full minutes after sautéing the aromatics. Ensure every grain is coated in the rendered fat and aromatics until they become slightly translucent or fragrant.
How to ensure the chicken skin stays crispy?
Pat the chicken skin completely dry with paper towels before seasoning. Only place the chicken in the pot once the olive oil is shimmering, and do not move the thighs until they release naturally from the surface after 6 8 minutes.
How to finish the dish properly?
Remove the pot from the heat and let it sit, covered, for 5 minutes. This critical rest allows the steam to finish cooking the rice evenly before you stir in the frozen peas and fluff with a fork.
One Pot Chicken And Rice
Ingredients:
Instructions:
Nutrition Facts:
| Calories | 481 kcal |
|---|---|
| Protein | 28.4 g |
| Fat | 19.2 g |
| Carbs | 44.1 g |
| Fiber | 3.2 g |
| Sugar | 3.1 g |
| Sodium | 685 mg |
