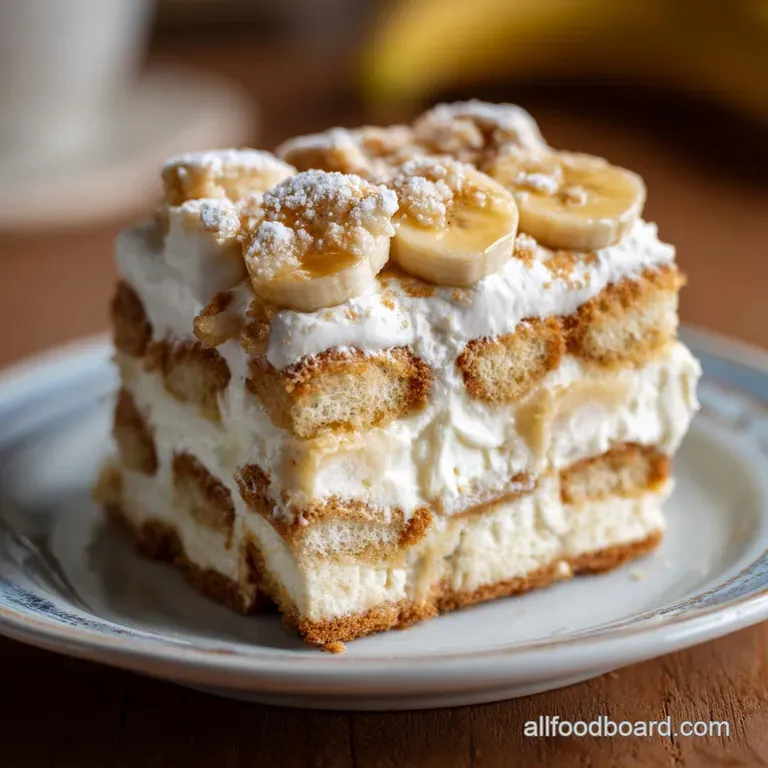
Layered Banana Pudding: Creamy and Stabilized
- Time:25 minutes active + 4 hours chilling = 4 hours 50 mins total
- Flavor/Texture Hook: Velvety cream with cake like wafers
- Perfect for: Family gatherings and potluck success
- Decadent Layered Banana Pudding Recipe
- Why This Southern Dessert Works
- Essential Ingredients and Smart Swaps
- Tools for Easy Pudding Success
- Step-by-Step Layering and Assembly
- Fixes for Common Pudding Problems
- Flavor Variations and Creative Twists
- Storage and Zero Waste Tips
- Presentation and Perfect Pairings
- Recipe FAQs
- 📝 Recipe Card
Decadent Layered Banana Pudding Recipe
We've all been there. You scoop into a bowl of banana pudding expecting a cloud like dream, only to find a watery, graying mess where the cookies are still crunchy and the bananas have turned into mush. It’s heart breaking, honestly.
I remember my first attempt for a family barbecue; I rushed the chilling process and ended up serving what looked like a sad, beige soup. The flavors were okay, but the texture was a total disaster.
The fix isn't complicated, but it does require patience. This Layered Banana Pudding relies on a specific ratio of heavy cream to pudding and a mandatory resting period. That rest is where the magic happens.
It’s when the moisture from the pudding migrates into those vanilla wafers, turning them from brittle cookies into something that mimics the texture of a light sponge cake. If you skip the chill time, you’re just eating wet cookies and cream.
This version is the targeted fix for every soggy, unstable pudding you’ve ever had. We aren't using pre made whipped topping here because it lacks the structural integrity needed for a tall, impressive dessert. Instead, we’re beating heavy cream into stiff peaks and folding it into a condensed milk base.
The result is a dessert that looks like it came from a high end bakery but costs only a few dollars to put together.
Why This Southern Dessert Works
Understanding how these simple ingredients interact makes you a much better cook. It isn't just about mixing things in a bowl; it’s about managing moisture and air to create that signature velvety mouthfeel.
- Cold Saturation: Ice cold water prevents the instant pudding starch from clumping, ensuring a silky base.
- Fat Stabilization: High fat heavy cream creates a sturdy lattice of air bubbles that won't collapse under the weight of the bananas.
- Starch Migration: The cookies absorb liquid slowly over 4 hours, which softens them while keeping the pudding thick.
- Enzymatic Control: Slicing the bananas just before assembly and sealing them between layers of cream limits oxygen exposure.
| Method | Total Time | Final Texture | Best For |
|---|---|---|---|
| Traditional Baked | 1 hour 30 mins | Custardy and warm | Winter comfort |
| No Bake Layered | 4 hours 45 mins | Light and cake like | Summer parties |
| Quick Individual | 30 minutes | Crunchy and soft | Instant cravings |
This table helps you decide which route to take. If you want that classic Southern feel where the cookies are soft, the No Bake Layered method in this recipe is your best bet. It allows for the best flavor development without the risk of weeping that often happens with baked meringues.
| Ingredient | Science Role | Pro Secret |
|---|---|---|
| Heavy Cream | Structure provider | Chill your bowl and beaters first |
| Condensed Milk | Sweetener and thickener | Whisk until fully emulsified with water |
| Instant Pudding | Fast acting stabilizer | Let it rest 15 minutes before folding |
| Bananas | Flavor and bulk | Use bananas with small brown spots |
Essential Ingredients and Smart Swaps
Getting the right ingredients is half the battle. I always reach for the full fat versions of everything here. This isn't the place for skim milk or low-fat substitutes; the water content in those will make your pudding runnier than a leaky faucet.
- 14 oz sweetened condensed milk: This provides the backbone of the sweetness and a rich, milky flavor.
- 1.5 cups ice cold water: Cold is key to keeping the pudding mix from setting too fast and becoming lumpy.
- 3.4 oz instant vanilla pudding mix: This acts as the thickener and stabilizer.
- 3 cups heavy whipping cream: This is what makes the pudding airy and light.
- 1 tsp pure vanilla extract: Adds depth and that "homemade" aroma.
- 11 oz vanilla wafer cookies: I prefer the classic brands because they hold their shape better during the softening process.
- 6 large ripe bananas: Look for bright yellow fruit with just a few speckles for the best sugar content.
| Original Ingredient | Substitute | Why It Works |
|---|---|---|
| Vanilla Wafers | Graham Crackers | Similar honey notes. Note: Softens faster than wafers. |
| Heavy Cream | Coconut Cream | High fat for whipping. Note: Adds strong coconut flavor. |
| Instant Pudding | Cook and-Serve | Requires cooling. Note: Results in a denser, more custard like base. |
If you find yourself with extra bananas after this, you might enjoy making some Classic Banana Nut Muffins for breakfast the next day. It’s a great way to use up the rest of the bunch so nothing goes to waste in your kitchen.
Tools for Easy Pudding Success
You don't need a professional kitchen, but a few specific items make this much easier. A large glass bowl is my favorite for the pudding base because you can see if you've missed any dry spots of powder at the bottom.
For the cream, a stand mixer is a luxury, but a hand mixer works perfectly fine. Just make sure your bowl is large enough, as 3 cups of heavy cream will expand significantly as you whip air into it. You’ll also need a flexible silicone spatula. This is non negotiable for the folding step.
If you use a spoon, you’ll knock out all the air you just worked so hard to put into that cream, and your Layered Banana Pudding will be flat.
Finally, choose your serving vessel. A 9x13 dish is the classic family style choice, but a glass trifle bowl makes for a stunning presentation where you can see every single layer of cookie, banana, and cream.
step-by-step Layering and Assembly

- Combine 14 oz sweetened condensed milk and 1.5 cups ice cold water in a large bowl. Note: Whisk until the mixture is uniform and pale.
- Sprinkle 3.4 oz instant pudding mix over the liquid and whisk for 2 minutes. Wait for the mixture to thicken.
- Cover the pudding base and refrigerate for 15 minutes. Note: This allows the starches to fully hydrate.
- Beat 3 cups heavy cream and 1 tsp vanilla extract in a cold bowl. Stop when stiff peaks form.
- Fold the chilled pudding into the whipped cream with a spatula. Stir until no yellow streaks remain.
- Place a layer of 11 oz vanilla wafers in the bottom of your dish. Note: Fill the gaps with broken cookies.
- Add a layer of 6 sliced bananas on top of the wafers. Make sure the bananas are evenly spread.
- Spread a third of the pudding mixture over the fruit. Cover the bananas completely to prevent browning.
- Repeat the layers until all ingredients are used. Finish with a smooth cream layer.
- Refrigerate for 4 hours. The pudding is ready when cookies are soft.
Fixes for Common Pudding Problems
Even simple recipes can have hiccups. The most common issue people report is the pudding being too thin. This usually happens because the whipped cream wasn't beaten enough or the folding was too aggressive.
Why Your Pudding Is Runny
If your pudding looks more like milk than a dessert, your cream likely didn't reach stiff peaks. Stiff peaks mean when you lift the beaters, the cream stands straight up without curling over. If it's already mixed, the only fix is to let it chill longer, though it may never be quite as fluffy as intended.
Why Your Bananas Are Brown
Bananas turn brown when exposed to air. To prevent this, make sure every slice is fully submerged or covered by the pudding mixture. The cream acts as a physical barrier against oxygen. Also, don't slice your bananas an hour before you start; do it right as you are building the layers.
| Problem | Root Cause | Solution |
|---|---|---|
| Lumpy Pudding | Mixing too slowly | Whisk pudding mix vigorously for full 2 minutes |
| Flat Cream | Over folding | Use a "cut and fold" motion with a spatula |
| Soggy/Mushy | Too much fruit moisture | Use ripe but firm bananas, not overripe black ones |
Common Mistakes Checklist
- ✓ Ensure the water is truly ice cold before mixing with condensed milk.
- ✓ Chill your metal bowl and beaters in the freezer for 10 minutes before whipping cream.
- ✓ Don't skip the 15 minute rest for the pudding mix; it needs time to set.
- ✓ Press plastic wrap directly onto the surface of the pudding to prevent a skin from forming.
- ✓ Resist the urge to serve early; that 4 hour chill is mandatory for cookie texture.
Flavor Variations and Creative Twists
If you want to move away from the classic, there are plenty of ways to shake things up. For a more modern feel, some people like to add a layer of salted caramel between the bananas and the cream. It adds a salty punch that cuts through the sweetness of the condensed milk.
If you are a fan of different textures, you can look into a Banana Pudding Lasagna which uses a different base structure but keeps those familiar flavors. Another trick I love is to toast the vanilla wafers in the oven at 180°C for 5 minutes before layering. It brings out a nuttier, deeper flavor that makes the whole dish feel a bit more "adult."
Making a Lighter Version
You can reduce the sugar slightly by using unsweetened almond milk in place of the water, though the set will be a bit softer. I wouldn't recommend using a sugar-free pudding mix unless you absolutely have to, as the aftertaste can be quite prominent in such a simple dish.
The Chocolate Twist
Swap the vanilla wafers for chocolate sandwich cookies or chocolate wafers. You can also use a chocolate instant pudding mix, but keep the heavy cream and bananas the same. It tastes like a frozen chocolate banana treat and is always a hit with kids.
Storage and Zero Waste Tips
Storing this pudding is straightforward, but it has a shelf life. It’s best eaten within 48 hours. After that, the bananas will start to release liquid, and the cream will begin to lose its airy structure. Always keep it covered with plastic wrap or in an airtight container in the fridge.
Do not freeze this pudding. The heavy cream and pudding mixture will separate when thawed, leaving you with a grainy, watery mess that is unappealing. This is definitely a "fresh is best" kind of dessert.
For a zero waste approach, don't throw away those banana peels! You can soak them in water for 24 hours to create a nutrient rich "tea" for your houseplants. Also, if you have broken wafers at the bottom of the bag, crush them into a fine dust and use them as a decorative sprinkle on top of the final pudding layer.
It adds a nice bit of visual interest and ensures every crumb is used.
Presentation and Perfect Pairings
When it comes to serving, presentation can make a huge difference. If you used a 9x13 dish, you can scoop it out with a large spoon into bowls. For a cleaner look, use a sharp knife to cut squares, though the first piece is always a bit of a sacrificial lamb.
I love to top the final dish with a few extra wafer crumbs and a sprig of fresh mint right before serving. The green against the pale yellow looks beautiful. If you’re hosting a dinner, this pudding pairs exceptionally well with a strong, dark roast coffee.
The bitterness of the coffee balances the rich, creamy sweetness of the dessert perfectly.
Remember that this is a heavy, indulgent treat. Serve it in smaller portions than you think people want; they can always come back for seconds! It’s the kind of dish that brings out the kid in everyone, reminding us of church socials and summer afternoons on the porch. Enjoy every velvety bite!

Recipe FAQs
How are you supposed to layer banana pudding?
Start by creating a base of vanilla wafers in your dish, add a layer of sliced bananas, then spread a portion of the pudding mixture on top. Repeat this cycle until you run out of components, ending with a final layer of pudding to seal the structure.
What layer do you start with for banana pudding?
Place a solid layer of vanilla wafers at the very bottom of your trifle bowl or 9x13 dish. This allows the cookies to soak up the flavors and moisture from the pudding base as it sits in the refrigerator.
Is it true that banana pudding is the oldest dessert in the United States?
No, this is a common misconception. While it is a quintessential Southern staple, historical records indicate many other baked goods and puddings predate the widespread appearance of banana pudding recipes in the early 20th century.
What can you put in banana pudding to make it thicker?
Ensure you whisk the instant pudding mix into the liquid for the full 2 minutes and allow it to chill for at least 15 minutes to fully hydrate the starches. If you enjoyed mastering the proper homemade thickening technique here, apply that same patience to ensure the pudding base is stable before folding in the whipped cream.
How long should the pudding set in the refrigerator?
Refrigerate the fully assembled dish for exactly 4 hours. This specific window is essential for the vanilla wafers to soften to the right texture and for the entire dessert to set into a sliceable, cohesive structure.
Can I freeze the pudding to make it last longer?
No, you should never freeze this dessert. The heavy cream and pudding base will separate upon thawing, resulting in a watery, grainy texture that ruins the quality of the dish.
How do I know when the heavy cream is whipped enough?
Stop beating once you achieve stiff peaks that hold their shape on the whisk attachment. If you keep beating past this point, the fat will begin to separate and the cream will turn into butter.
Layered Banana Pudding

Ingredients:
Instructions:
Nutrition Facts:
| Calories | 417 kcal |
|---|---|
| Protein | 4.7 g |
| Fat | 23.2 g |
| Carbs | 49.2 g |
| Fiber | 1.4 g |
| Sugar | 33.4 g |
| Sodium | 313 mg |
