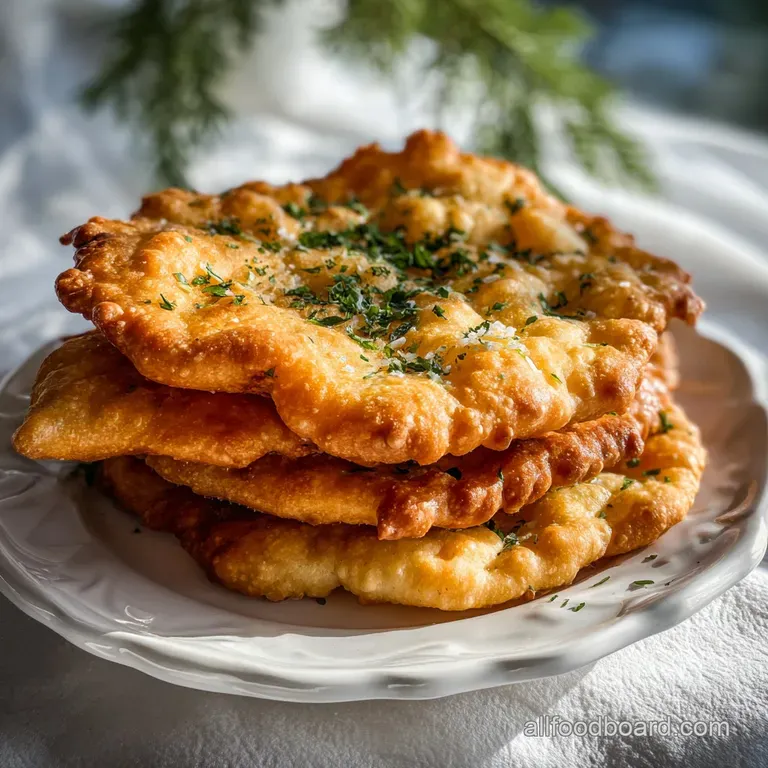
Fry Bread
- Time: Active 15 minutes, Passive 40 minutes, Total 55 minutes
- Flavor/Texture Hook: Shatter crisp exterior with a cloud like, velvety center
- Perfect for: Family taco nights, hearty winter stews, or a quick sweet treat
- How to Create the Fluffiest Golden Fry Bread at Home
- Why This Puffy Dough Hits Every Comfort Food Craving
- Planning Your Timeline for the Best Soft Fluffy Results
- Essential Pantry Staples for a Traditional Style Batch
- The Right Tools for Achieving a Shatter Crisp Crust
- Mastering the Stretch and Fry for Cloud Like Texture
- Avoiding Heavy Dough and Greasy Results Every Time
- Transforming Your Rounds Into Savory Tacos or Sweets
- Practical Storage and Reheating Tips for Maximum Longevity
- The Best Pairings for a Hearty Family Feast
- Myths About Making Fried Dough
- Adjusting the Batch for Your Needs
- Fry Bread FAQs
- 📝 Recipe Card
How to Create the Fluffiest Golden Fry Bread at Home
There is nothing quite like the sound of raw dough hitting hot oil. It starts with a sharp hiss, followed by a rhythmic bubbling as the bread begins to puff and swell like a golden balloon. I remember the first time I tried to make a homemade fry bread recipe in my own kitchen.
I was so impatient that I skipped the resting period, and let me tell you, I ended up with something closer to a hockey puck than a piece of bread. It was heartbreaking, but it taught me everything I know now about why patience is the secret ingredient here.
We are going to walk through the process of making this easy fry bread recipe so you never have to deal with dense or greasy results again. Whether you grew up eating these at community gatherings or you are just looking for the ultimate vessel for your favorite toppings, this method is foolproof.
We are looking for that specific texture where the crust crackles when you tear it, but the inside stays soft enough to soak up honey or taco juices.
The beauty of this dough is its simplicity. You likely have every single thing you need in your pantry right now. We are going to focus on the technique - specifically how you handle the dough and how you manage the temperature of your oil.
Trust me on this, once you nail the temperature, you'll be cranking out professional quality rounds that will have your family hovering over the stove before the first batch is even done.
Why This Puffy Dough Hits Every Comfort Food Craving
The magic of a good Navajo fry bread recipe lies in the balance of moisture and air. Most people think the oil does all the work, but it actually starts with the chemical reaction between the baking powder and the warm milk.
When those two meet, they create tiny pockets of carbon dioxide that stay trapped within the gluten structure. When that dough hits the hot oil, those pockets expand rapidly, giving you that iconic bubbly surface.
- Maillard reaction
- The sugars and proteins in the milk react with the high heat of the oil, creating a complex, savory crust.
- Starch gelatinization
- As the dough fries, the flour's starches absorb the milk's moisture and set into a soft, stable interior.
- Gluten relaxation
- Allowing the dough to rest prevents "snap back," ensuring the bread stays thin and light rather than thick and bready.
| Method | Time | Texture | Best For |
|---|---|---|---|
| Stovetop Frying | 2-3 mins per side | Shatter crisp exterior, airy middle | Traditional Navajo fry bread texture |
| Oven Baking | 12-15 mins | Soft, roll like, less crispy | Lower fat alternative, similar to a flatbread |
| Air Fryer | 6-8 mins | Chewy and browned, not as bubbly | Quick individual portions with minimal cleanup |
Getting the right texture depends entirely on how much you work the dough. If you over knead, you'll end up with a tough Indian tacos recipe frybread that fights back when you bite it. We want to mix just until the flour disappears, then let the ingredients get to know each other during the rest.
This rest period is non negotiable because it allows the flour to fully hydrate, which is what gives us that velvety crumb.
Planning Your Timeline for the Best Soft Fluffy Results
When you are planning to make this quick fry bread recipe, it helps to think of it in three distinct phases: the mix, the rest, and the sizzle. You can't rush the rest, but the actual frying happens in a flash.
If you are serving a crowd, I usually get the dough resting while I prep the taco toppings or simmer the chili. This way, the bread is the very last thing to hit the table, ensuring it stays at its peak crispiness.
| Servings | Ingredient Adjustments | Pan Size | Cook Time |
|---|---|---|---|
| 4 people | 1.5 cups flour, 1/2 tbsp baking powder | 10 inch skillet | 8 minutes |
| 8 people | 3 cups flour, 1 tbsp baking powder | 12 inch cast iron | 15 minutes |
| 16 people | 6 cups flour, 2 tbsp baking powder | Large Dutch oven | 30 minutes |
If you find yourself in a rush, you can shorten the rest to 20 minutes, but you'll notice the dough is a bit harder to stretch. It will want to shrink back toward the center. If that happens, just give it another 5 minutes of peace and quiet on the counter.
The dough is the boss here, and it will tell you when it is ready to be fried.
Essential Pantry Staples for a Traditional Style Batch
You don't need fancy flour or specialty fats to make this work. In fact, using basic all purpose flour is actually better because it has the right protein content to stay tender. I’ve seen some people try to use bread flour, but that usually makes the bread too chewy.
Stick to the basics for that authentic soft fluffy fry bread feel.
- 3 cups all purpose flour: This provides the structure without being too heavy.
- 1 tablespoon baking powder: This is your primary leavening agent for those big bubbles. Why this? It provides an immediate lift when the dough hits the hot oil.
- 1 teaspoon fine sea salt: Essential for flavor; without it, the bread tastes flat and dull.
- 1 cup warm whole milk: The fat in whole milk creates a much softer crumb than water. Why this? Warm liquid activates the baking powder faster and relaxes the gluten.
- 1 tablespoon melted shortening: This adds just enough fat to the dough to keep it supple.
- 2 cups neutral oil for frying: Use something with a high smoke point like canola or vegetable oil.
| Original Ingredient | Substitute | Why It Works |
|---|---|---|
| Whole Milk | Warm Water | Makes a leaner, slightly crustier bread. Note: Lacks the richness of milk. |
| Shortening | Melted Lard | Lard adds a traditional, slightly savory depth. Note: Very authentic for many recipes. |
| Fine Sea Salt | Kosher Salt | Use 1.5 teaspoons if using coarse kosher salt. Note: Dissolves well in the warm milk. |
Using warm milk instead of cold is a trick I learned from my grandmother. Cold liquid shocks the fats and makes the dough harder to work with. By keeping everything around room temperature or slightly warmer, the dough becomes much more cooperative.
It's a small change that makes a massive difference in the final yield.
The Right Tools for Achieving a Shatter Crisp Crust
You don't need a deep fryer for this, and honestly, a heavy skillet is usually better. I almost always reach for my cast iron skillet because it holds heat so well. When you drop cold dough into hot oil, the temperature of the oil naturally dips.
Cast iron acts like a heat battery, keeping that sizzle consistent so the bread doesn't soak up too much grease.
- Cast iron skillet (12 inch): This is the gold standard for even heat distribution.
- Large mixing bowl: Give yourself plenty of room to mix without flour flying everywhere.
- Tongs or a slotted metal spoon: For flipping the bread safely without splashing hot oil.
- Wire cooling rack: Placing the finished bread on a rack instead of a paper towel prevents the bottom from getting soggy.
- Digital thermometer: To ensure your oil stays between 350°F and 375°F.
Chef's Tip: If you don't have a thermometer, stick the end of a wooden spoon into the oil. If it bubbles steadily around the wood, you're ready to fry.
If you are a fan of making your own breads, you might also enjoy my Homemade French Bread recipe for your next dinner. Both recipes rely on understanding how dough responds to heat, though the methods are totally different!
Mastering the Stretch and Fry for Cloud Like Texture
- Combine dry ingredients. Whisk the 3 cups of all purpose flour, 1 tablespoon of baking powder, and 1 teaspoon of salt in a large bowl. Note: This ensures the leavening is evenly distributed so you don't get one flat bread and one giant puff.
- Add the liquids. Pour in the 1 cup of warm milk and 1 tablespoon of melted shortening.
- Mix into a shaggy ball. Use a fork or your hands to bring the dough together until no dry streaks of flour remain.
- Knead very lightly. Turn the dough onto a floured surface and knead 3 to 5 times. Note: Stop as soon as it forms a smooth ish ball; over kneading leads to toughness.
- Let the dough rest. Cover the bowl with a clean kitchen towel and let it sit for 30 to 40 minutes.
- Divide and shape. Pinch off a golf ball sized piece of dough and pat it into a flat disc.
- Stretch the dough. Gently pull the edges until the disc is about 1/4 inch thick and 5 to 6 inches wide.
- Heat the oil. Pour 2 cups of neutral oil into your skillet and heat until it reaches 350°F or a pinch of flour sizzles instantly.
- The first fry. Carefully slide one piece of dough into the oil. Cook for 1 to 2 minutes until the bottom is deep golden brown.
- Flip and finish. Use tongs to flip the bread and cook for another 1 minute until puffed and golden on both sides. Drain on a wire rack.
To Ensure a Cloud Like Interior
The secret to that airy middle is all in the stretch. As you pull the dough, try to make the center slightly thinner than the edges. This creates a natural "bowl" shape that puffs up beautifully. If the center is too thick, it might stay a bit doughy while the outside gets too dark.
For Maximum Puffy Bubbles
When you place the dough in the oil, use your tongs to gently press the center down for a split second. This forces the hot oil over the top surface immediately, which kickstarts the steam production inside the dough. You'll see those gorgeous bubbles form almost instantly.
Avoiding Heavy Dough and Greasy Results Every Time
The biggest heartbreak in making homemade fry bread is ending up with a greasy, heavy mess. This usually happens for one of two reasons: the oil isn't hot enough, or the dough was handled too much. When oil is too cool, the dough absorbs the fat rather than searing against it.
It's the difference between a crisp shell and a sponge.
Why Your Bread Stays Flat
If your bread isn't puffing, your baking powder might be expired. Baking powder loses its "oomph" over time, especially in humid kitchens. Another culprit could be the oil temperature. If the oil is too hot, the outside of the bread sets before the inside has a chance to expand.
To Prevent a Raw Middle
If the outside is dark but the inside is gummy, your oil is definitely too hot. Aim for a medium high heat. You want the bread to take at least 60 seconds to turn golden. If it happens in 20 seconds, turn the heat down immediately and let the oil cool for a minute before the next batch.
| Problem | Root Cause | Solution |
|---|---|---|
| Greasy Texture | Oil temperature too low | Heat oil to 350°F before adding dough. |
| Tough/Chewy | Over kneaded dough | Mix until just combined; do not overwork. |
| No Bubbles | Old baking powder | Test powder in hot water; it should fizz. |
Common Mistakes Checklist:
- ✓ Never skip the 40 minute rest period; it's essential for a tender bite.
- ✓ Don't overcrowd the pan; fry only one or two pieces at a time to keep oil temp stable.
- ✓ Avoid using a rolling pin; hand stretching preserves the delicate air pockets.
- ✓ Check your oil temp between every single batch.
- ✓ Use warm milk, not boiling or cold, to keep the yeast/leavening happy.
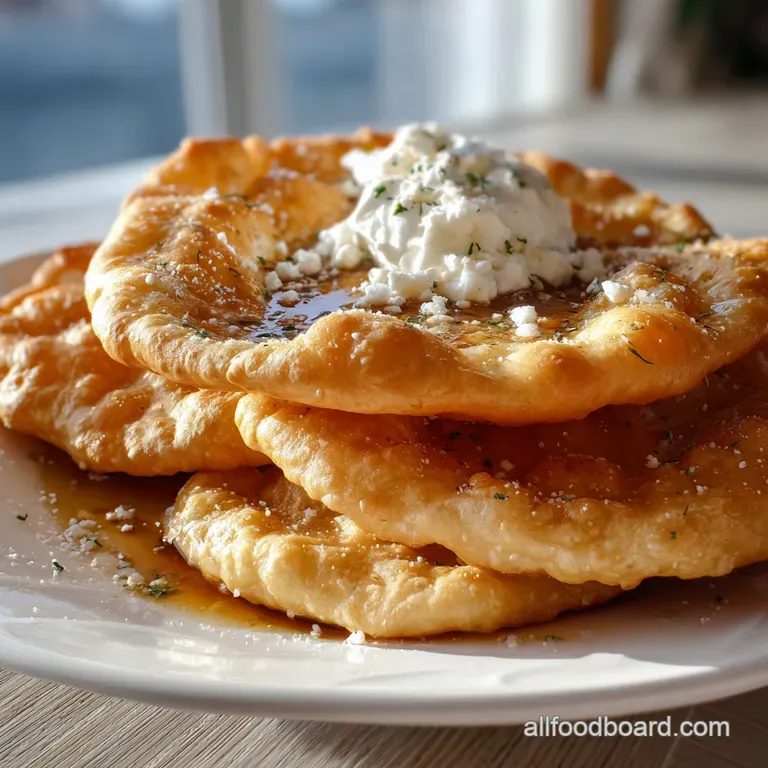
Transforming Your Rounds Into Savory Tacos or Sweets
One of the reasons I love this fry bread recipe so much is how versatile it is. In my house, we usually do a "build your own" night. I'll make a big batch of the bread, and then everyone chooses their own adventure. If you've never had "Indian Tacos," you are missing out on one of life's greatest pleasures.
For Traditional Fry Bread Tacos
Pile the warm bread with seasoned ground beef, pinto beans, shredded lettuce, chopped tomatoes, and a mountain of sharp cheddar cheese. The bread is sturdy enough to hold all that weight, which is why it's so much better than a standard tortilla. If you want a similar sturdy base for other dishes, you might look at The Homemade French recipe for ideas on bread bowls.
For a Quick Sweet Treat
While the bread is still piping hot, dredge it in a mixture of cinnamon and sugar. Or, do what I do and just slather it in honey and a little bit of butter. The honey sinks into those little nooks and crannies created by the bubbles, making every bite a sticky, sweet delight.
It’s basically a rustic doughnut, and it’s impossible to eat just one.
Practical Storage and Reheating Tips for Maximum Longevity
Fry bread is definitely at its best about three minutes after it comes out of the oil. However, life happens, and sometimes you have leftovers. The trick to keeping it "fresh" is all about how you handle the moisture. If you seal it in a plastic bag while it's still warm, it will turn into a soggy mess.
- Storage: Once completely cool, store in an airtight container at room temperature for up to 2 days. For longer storage, keep it in the fridge for up to 5 days.
- Freezing: You can freeze fried bread! Wrap each piece individually in plastic wrap, then place in a freezer bag. They stay good for up to 3 months.
- Reheating: Avoid the microwave! It turns the bread rubbery. Instead, pop them in a 350°F oven for 5 minutes or use a dry skillet over medium heat until they crisp back up.
- Zero Waste: If you have leftover dough that you didn't fry, you can keep it in the fridge for 24 hours. If the bread gets too stale to eat plain, cut it into triangles, fry them again until very crisp, and use them as "croutons" for a taco salad.
The Best Pairings for a Hearty Family Feast
If you aren't turning these into tacos, they make an incredible side dish. Think of them like a more decadent version of a dinner roll. Because they have that slightly salty, fried exterior, they pair beautifully with anything that has a bit of "liquidy" sauce to soak up.
I love serving these alongside a thick, smoky venison stew or a classic beef chili. The soft interior of the bread acts like a sponge for the broth. If you're looking for more bread inspiration to pair with soups, check out The Sturdy Homemade recipe for a different way to serve your favorites.
- For a brunch
- Serve with scrambled eggs, chorizo, and a drizzle of hot honey.
- For a dessert bar
- Provide bowls of powdered sugar, berry compote, and whipped cream.
- For a snack
- Just a simple side of whipped honey butter.
Myths About Making Fried Dough
There are a lot of old wives' tales about frying dough that can actually lead you astray. Let's clear a few things up so you can cook with confidence.
Myth: You need yeast for a good "puff." Actually, baking powder provides a much more consistent and faster lift for this specific style of bread. Yeast yields a more bread like, "bready" texture, whereas baking powder gives you those thin, crispy bubbles we're looking for in a true fry bread.
Myth: Adding more oil to the pan makes the bread greasier. It's actually the opposite. If you have too little oil, the dough touches the bottom of the pan, which is hotter than the oil itself, causing it to burn or absorb grease unevenly.
Having enough oil (about 1 to 2 inches) allows the dough to float, ensuring even heat distribution and a cleaner fry.
Myth: You have to use lard for it to be "authentic." While lard is traditional in many regions, vegetable shortening or even butter can produce a fantastic result.
The "authenticity" comes from the care you put into the stretching and the temperature control, not just the specific fat used in the dough.
Adjusting the Batch for Your Needs
Sometimes you just want one or two pieces for yourself, and other times you're feeding the whole neighborhood. Adjusting this recipe is fairly straightforward as long as you keep the ratios in mind.
Scaling Down (Making 4 servings): Cut all ingredients exactly in half. Use a smaller 8 inch skillet to save on oil. Since you're working with less dough, the resting time can be shortened slightly to 25 minutes as the smaller mass hydrates faster.
Scaling Up (Making 16-20 servings): When doubling the recipe, don't just double the salt and baking powder blindly. Use 1.5x the salt and baking powder to avoid a chemical aftertaste.
You will need to fry in batches, so keep your oven on its lowest setting (170°F) with a wire rack inside to keep the finished pieces warm and crispy while you finish the rest.
| Target Yield | Flour Amount | Liquid Amount | Notes |
|---|---|---|---|
| Small Batch (4) | 1.5 cups | 1/2 cup milk | Perfect for a solo lunch or couple. |
| Standard (8) | 3 cups | 1 cup milk | The "sweet spot" for most families. |
| Large Party (20) | 7.5 cups | 2.5 cups milk | Fry in two pans simultaneously to save time. |
Right then, I think you're ready to get frying. Just remember: keep that oil hot, let the dough rest, and don't be afraid to get your hands a little messy during the stretching phase. It’s one of those recipes that gets better every single time you make it. Let me know how yours turns out!

Fry Bread FAQs
What exactly is fry bread?
It's a simple unleavened flatbread. Traditionally made by Native Americans, it's fried until puffed and golden, resulting in a crispy exterior and soft interior.
Why did Native Americans eat fry bread?
It originated from necessity and available ingredients. During periods of forced relocation and rationing, Native Americans adapted to using government issued flour, sugar, salt, and lard to create a staple food.
Why is fry bread unhealthy?
It's typically deep fried and made with refined ingredients. The frying process absorbs a significant amount of oil, and the dough often uses white flour and sugar, contributing to high calorie and carbohydrate content.
What's the best way to fry bread?
Maintain oil temperature between 350-375°F. This ensures the bread cooks evenly and crisps up without becoming greasy. If you enjoyed mastering temperature control here, see how the same principle applies to achieving a perfect sear in our The Ultimate Homemade French Fries Crispy Perfection recipe.
Can fry bread be made healthier?
Yes, with modifications. Substituting whole wheat flour for white flour, using less oil for pan-frying instead of deep frying, or baking it can reduce fat and increase fiber content.
What is the texture of fry bread?
It's a contrast of crispy and soft. The exterior should be shatteringly crisp, while the interior remains light, airy, and slightly chewy, creating a delightful textural experience.
How do I get my fry bread to puff up?
Ensure your baking powder is fresh and oil is hot. Baking powder provides the lift, and sufficiently hot oil causes the dough to expand rapidly. If you liked learning about leavening agents, explore how they work in our The Ultimate Fluffy Garlic Butter Bread Rolls My FailProof Homemade Recipe for another fluffy bread creation.
Fry Bread

Ingredients:
Instructions:
Nutrition Facts:
| Calories | 318 kcal |
|---|---|
| Protein | 5.9 g |
| Fat | 15.8 g |
| Carbs | 37.5 g |
| Fiber | 1.3 g |
| Sugar | 1.6 g |
| Sodium | 548 mg |
