Easy Homemade Pancake Syrup Recipe
- Time: Active 5 minutes, Passive 10 minutes, Total 15 minutes
- Flavor/Texture Hook: Glossy, buttery, and deeply caramel toned
- Perfect for: Sunday brunch or emergency pantry saves
- Master the Art of Balanced Syrup Viscosity
- Essential Quick Facts and Serving Details
- Choosing the Best Pantry Staples for Flavor
- The Simple Tools for Liquid Gold
- Step by Step to Glossy Breakfast Topping
- Preventing Sugar Crystals and Scorched Pots
- Flavor Variations and Smart Ingredient Adjustments
- Scaling the Recipe for Crowds
- Debunking Syrup Myths
- Best Practices for Long Term Syrup Storage
- Creative Ways to Use Your Homemade Batch
- Recipe FAQs
- 📝 Recipe Card
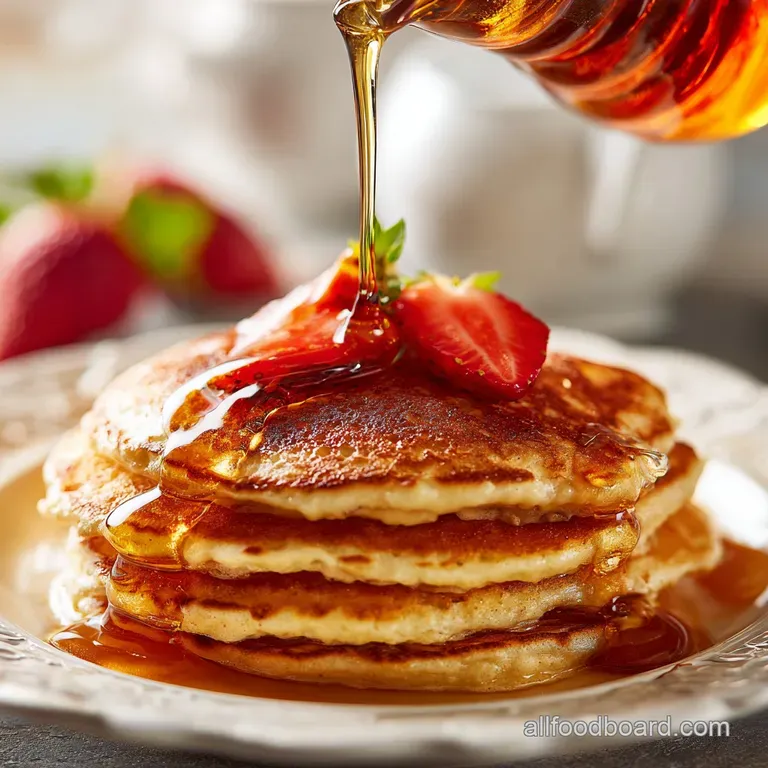
The smell of melting butter and toasted sugar hitting a warm pan is basically my love language. Last Saturday, I was halfway through flipping a stack of blueberry flapjacks when I realized the maple syrup bottle was bone dry.
Instead of running to the store in my pajamas, I raided the baking cabinet and pulled out the sugar and vanilla.
That's how I rediscovered this gem. It's thick, glossy, and has that nostalgic flavor that makes you want to lick the plate. We aren't just making sugar water here; we're creating a rich, buttery emulsion that actually stays on the pancake instead of soaking straight through to the plate.
Trust me, once you see that golden liquid bubbling in the pot, you'll never go back to the "fake" stuff in the plastic squeeze bottle.
It's brilliant because it takes less time to make than the actual pancakes do. Most people think you need fancy maple trees or a chemistry degree to get the right consistency, but it's all about how you handle the simmer.
I’ve made the mistake of boiling it too long and ending up with candy, and I've also pulled it off too early and had a watery mess. We're going for that "perfect pour" where it coats the back of a spoon like heavy cream.
Master the Art of Balanced Syrup Viscosity
- Sucrose Inversion: Heating granulated sugar with water and a tiny bit of corn syrup prevents crystals from reforming, ensuring a silky texture even after it cools in the fridge.
- Surface Tension: The addition of cold butter at the very end lowers surface tension, creating a velvety mouthfeel that carries the vanilla flavor across your palate.
- Molecular Bond: Simmering for exactly ten minutes allows the water molecules to evaporate just enough to concentrate the sugars without reaching the "hard ball" candy stage.
- Maillard Reaction: Using brown sugar introduces molasses, which reacts with the heat to create complex, toasted notes that mimic the depth of expensive maple varieties.
| Method | Total Time | Texture | Best For |
|---|---|---|---|
| Stovetop Simmer | 15 minutes | Thick and velvety | Traditional pancakes and waffles |
| Quick Microwave | 5 minutes | Thinner and light | Rapid morning emergencies |
| Slow Steep | 30 minutes | Infused and complex | Spiced or fruit flavored variations |
This stovetop method is the gold standard for a reason. While the microwave is fast, it doesn't give the sugars enough time to properly meld and thicken into that iconic glossy finish. If you're looking for a thinner sweetener for something like iced coffee, you might prefer a Sweet Simplicity recipe instead. However, for a stack of hot cakes, the stovetop simmer is non negotiable for getting that clingy, rich body.
Essential Quick Facts and Serving Details
| Component | Science Role | Pro Secret |
|---|---|---|
| Brown Sugar | Flavor & Color | Pack it tightly to ensure you get the full molasses hit for that amber hue. |
| Corn Syrup | Crystallization Guard | This is the "insurance policy" that keeps your syrup smooth and prevents it from turning into a brick. |
| Butter | Emulsification | Stir it in at the very end off heat for a gloss that won't separate. |
Getting the consistency right depends on the balance between your sugars and the water. This recipe is designed to be shelf stable for a short time but is best kept in the fridge. When you reheat it, the fats in the butter will loosen up again, returning it to its original glory.
Chef's Tip: Freeze your butter for 10 minutes before adding it to the hot syrup. Grating the cold butter into the liquid helps it emulsify instantly without needing a whisk.
Choosing the Best Pantry Staples for Flavor
- 1 cup granulated white sugar (200g): Why this? Provides the structural sweetness and helps the syrup clear during the simmer.
- 1 cup packed brown sugar (200g): Why this? Adds depth, color, and a hint of molasses for a traditional flavor.
- 1 cup water (240ml): Why this? The essential base that dissolves the sugars into a cohesive liquid.
- 1 tablespoon pure vanilla extract (15ml): Why this? Adds that floral, cozy aroma that distinguishes homemade from store-bought.
- 1 pinch salt (0.5g): Why this? A tiny bit of salt cuts through the heavy sweetness and wakes up the vanilla.
- 1 tablespoon light corn syrup (15ml): Why this? Prevents the sugar from recrystallizing while it sits in your pantry or fridge.
- 1 tablespoon butter (14g): Why this? Provides a rich mouthfeel and a professional looking glossy sheen.
| Original Ingredient | Substitute | Why It Works |
|---|---|---|
| White Sugar | All Brown Sugar | Adds more molasses depth but yields a much darker, heavier syrup. |
| Corn Syrup | Honey | Provides the same anti crystallization effect with a natural floral note. |
| Butter | Coconut Oil | Maintains the glossy sheen while being dairy-free, adds a tropical hint. |
Using the right sugar is the foundation of this whole thing. While you can use all white sugar if you're in a pinch, you'll lose that gorgeous amber color that makes it look like real maple. I always tell my friends that the brown sugar is where the soul of the recipe lives.
The Simple Tools for Liquid Gold
You don't need much, but a heavy bottomed saucepan is your best friend here. Cheap, thin pans tend to have hot spots that can scorch the sugar before it even has a chance to dissolve. A 2 quart pot is usually the sweet spot it gives the syrup enough room to bubble up without overflowing.
I also recommend using a heat resistant silicone spatula instead of a metal spoon. It lets you scrape the sides and bottom effectively to make sure no sugar is left behind to burn.
Since we're dealing with hot sugar, which is basically "culinary lava," make sure your storage jar is tempered glass so it won't crack when you pour the hot liquid in.
step-by-step to Glossy Breakfast Topping
1. Dissolving the Foundation
Combine 1 cup granulated white sugar, 1 cup packed brown sugar, 1 cup water, and 1 tablespoon light corn syrup in your saucepan. Stir these together over medium heat until the grains have completely vanished.
Note: Starting with a stir ensures the sugar doesn't sit on the bottom and scorch.
2. The Controlled Simmer
Bring the mixture to a gentle boil. Once it starts bubbling, stop stirring immediately and let it cook for 10 minutes until the liquid looks glossy and slightly reduced. Note: Agitating the syrup now can encourage crystals to form on the sides of the pot.
3. Monitoring the Texture
Watch for the bubbles to change from small and frantic to larger, slower "lazy" bubbles. This is the visual cue that the water has evaporated enough to leave behind a concentrated syrup.
4. Flavor and Fat
Remove the pan from the heat entirely. This is crucial because high heat can actually dull the flavor of your vanilla.
5. The Flavor Infusion
Stir in 1 tablespoon pure vanilla extract and 1 pinch salt. The mixture will hiss slightly as the extract hits the hot liquid, releasing a wonderful aroma.
6. The Butter Finish
Add 1 tablespoon butter to the hot liquid. Stir gently until the butter has completely melted into a golden streak. Note: The residual heat is enough to melt the fat without breaking the emulsion.
7. Cooling and Thickening
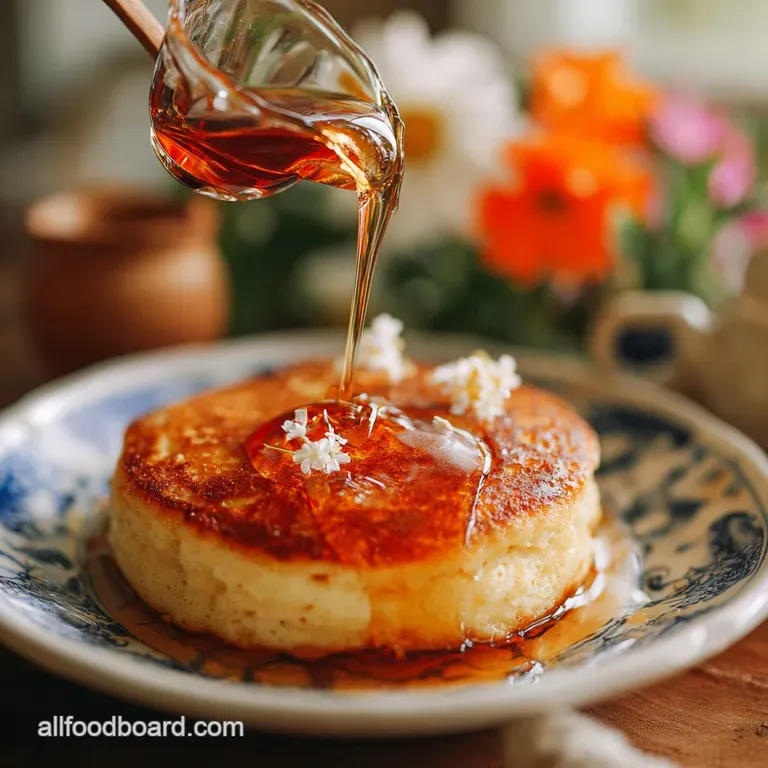
Let the syrup sit in the pan for 5 minutes. You'll notice it thickens significantly as the temperature drops, turning from a thin liquid into a velvety pour.
8. Transfer and Storage
Carefully pour the mixture into a clean glass jar. Let it cool to room temperature before sealing the lid to prevent condensation from thinning your hard work.
Preventing Sugar Crystals and Scorched Pots
Why It Becomes Grainy
If your syrup feels like sandpaper on your tongue, it’s because the sugar molecules have bonded back together into crystals. This usually happens if you stir the pot once it starts boiling or if there were undissolved sugar grains clinging to the sides of the pan.
| Problem | Root Cause | Solution |
|---|---|---|
| Gritty Texture | Stirring during the simmer | Add a splash of water and reheat without stirring to redissolve. |
| Too Watery | Not enough simmer time | Boil for another 2-3 minutes to evaporate excess liquid. |
| Burned Flavor | Heat was too high | Start over; sugar burns quickly once it hits a certain temperature. |
Fixing Thin Runny Syrup
If the syrup runs off your pancakes like water, you simply didn't let enough moisture evaporate. This is a common worry, especially because the syrup looks thinner when it's piping hot. Always give it that 5 minute rest period off the heat to see the true consistency before deciding to boil it more.
Preventing Pot Boil Overs
Sugar syrup expands significantly when it reaches a boil. If your pot is too small, you'll have a sticky mess on your stovetop in seconds. Using a pot that is at least three times the volume of your liquid is a smart move to keep things contained.
- ✓ Use a heavy bottomed pot to prevent localized hot spots.
- ✓ Don't stir once the simmer starts to avoid crystal formation.
- ✓ Add vanilla off heat so the flavor profile doesn't evaporate.
- ✓ Wipe down the sides of the pan with a wet pastry brush if sugar clings.
- ✓ Let the syrup rest for 5 minutes before judging the thickness.
Flavor Variations and Smart Ingredient Adjustments
Maple and Corn Substitutes
If you don't have corn syrup, don't sweat it. You can use honey or even agave nectar. The goal is to introduce an "inverted sugar" that blocks the white sugar from crystallizing. It might change the flavor slightly, but it will keep that texture silky smooth. This pairs beautifully with my Homemade Pancake recipe when you want that full "from scratch" experience on a budget.
Warm Cinnamon Spice Variation
For a cozy autumn vibe, add a cinnamon stick to the pot during the 10 minute simmer. The heat will extract the oils from the bark, infusing the whole batch with a warm, spicy glow. Just fish the stick out before you pour the syrup into your jar.
You can even add a pinch of nutmeg or cloves if you're feeling adventurous.
Adding Bright Fruit Notes
I've had great success adding a teaspoon of lemon juice or a handful of smashed raspberries to the mix. If you use fresh fruit, make sure to strain the syrup through a fine mesh sieve at the end to keep that glossy, clear appearance. It's a fantastic way to use up those last few berries in the fridge.
Scaling the Recipe for Crowds
- Cutting the batch in half: This works perfectly. Use a smaller saucepan and reduce the simmer time by about 2-3 minutes, as the smaller volume will evaporate faster.
- Doubling or Tripling: If you're hosting a big brunch, you can easily double the ingredients. However, only increase the salt and vanilla by 1.5x to avoid overpowering the base.
- Liquid adjustments: When doubling, you might find you need 5-10% less water to achieve the same thickness in the same amount of time.
| Servings | Sugar Total | Water Amount | Butter Needed |
|---|---|---|---|
| 8 People | 1 cup total | 0.5 cup | 0.5 tbsp |
| 16 People | 2 cups total | 1 cup | 1 tbsp |
| 32 People | 4 cups total | 2 cups | 2 tbsp |
Debunking Syrup Myths
One big misconception is that you need "special" sugar to make a good syrup. While some people swear by cane sugar, standard granulated white sugar from the grocery store works exactly the same way. The chemistry of the sucrose doesn't change based on the brand name.
Another myth is that you can't fix a "broken" or grainy syrup. People think once it's crystallized, it's garbage. In reality, you just need to add a tablespoon of water, put it back on the heat, and let those crystals melt down again. It's almost impossible to truly ruin this unless you actually burn the sugar black.
Best Practices for Long Term Syrup Storage
This syrup will stay fresh in the fridge for up to 4 weeks if stored in an airtight glass container. Because of the butter content, it will thicken up quite a bit when cold. When you're ready to eat, just pop the jar in the microwave for 20-30 seconds or set it in a bowl of warm water to bring it back to a pourable state.
For zero waste, if you have leftover syrup that's starting to crystallize after a month, don't toss it! It makes an incredible glaze for roasted carrots or a sweetener for oatmeal. You can even use it in place of sugar in cookie recipes like a The Golden Standard recipe for a deeper, more caramel like crumb.
Creative Ways to Use Your Homemade Batch
While pancakes are the obvious choice, this syrup is a workhorse in the kitchen. I love drizzling it over vanilla bean ice cream with a sprinkle of sea salt. The butter in the syrup creates a "sundae sauce" vibe that's much more sophisticated than plain sugar.
It's also a secret weapon for glazing bacon brush it on during the last 5 minutes of baking for a sweet and salty crust that shatters when you bite into it.
If you're feeling fancy, use it as a sweetener for your morning latte. The vanilla and brown sugar notes are basically a homemade version of those expensive coffee shop syrups. It dissolves instantly in hot coffee, giving you a velvety latte without the artificial aftertaste of store-bought creamers.
Honestly, once you have a jar of this in the fridge, you'll find yourself reaching for it more often than you'd expect. It's the ultimate pantry multitasker.

Recipe FAQs
How to make DIY Pancake syrup?
Combine sugars, water, and corn syrup first. Heat the mixture over medium heat, stirring until all grains dissolve completely. Once boiling, simmer, unstirred, for exactly 10 minutes until glossy, then remove from heat and stir in vanilla and butter off the heat.
What is a substitute for syrup on pancakes?
Yes, several pantry items work in a pinch. You can use thinned honey, melted fruit preserves, or even a simple powdered sugar glaze if you are desperate. For a richer, slightly salty topping, try a thin homemade Homemade Sweet Soy Sauce Glaze recipe if you have savory options nearby.
How to make a fast simple syrup?
Combine equal parts sugar and water in a saucepan. Heat over medium heat, stirring constantly until the sugar is completely dissolved and the mixture is clear. Do not let it boil vigorously if you only need a thin sweetener.
What is the simple syrup formula?
The standard ratio is 1:1 for basic sweetness. Mix one part sugar to one part water by volume or weight for a standard thin syrup consistency used in cocktails or coffee. If you mastered the technique of controlling heat and dissolution here, you can apply that same temperature precision to the Proper Crunch recipe for different results.
Why did my homemade syrup turn grainy after cooling?
No, this means the sugar recrystallized during cooling. You likely stirred the mixture while it was boiling, which encourages crystal formation, or you didn't use enough corn syrup as an anti crystallization agent.
Add a tablespoon of water and reheat slowly without stirring to try and melt the crystals back into suspension.
How long should I boil homemade pancake syrup?
Simmer for precisely 10 minutes after reaching a steady boil. This duration allows enough water to evaporate so the sugars concentrate into a glossy, clingy syrup without reaching the hard candy stage. Over boiling leads to a thick, hard texture when it cools down.
Can I use only brown sugar for this recipe?
Yes, but the flavor and texture will change significantly. Using all brown sugar will result in a darker, more intensely molasses flavored syrup that is slightly heavier than the intended version. You might need to slightly reduce the water content if you notice it's too thin.
Easy Homemade Pancake Syrup
Ingredients:
Instructions:
Nutrition Facts:
| Calories | 108 kcal |
|---|---|
| Protein | 0.0 g |
| Fat | 0.7 g |
| Carbs | 25.8 g |
| Fiber | 0.0 g |
| Sugar | 25.1 g |
| Sodium | 22 mg |
