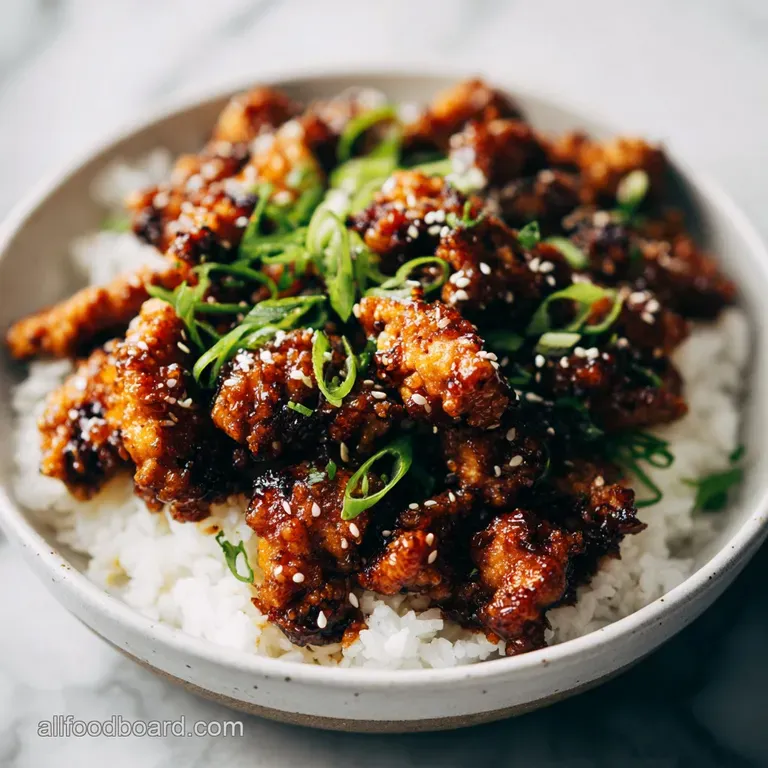
Easy Sesame Chicken Recipe: Crispy & Saucy

- Time: Active 15 mins, Passive 20 mins, Total 35 mins
- Flavor/Texture Hook: Shatteringly crisp chicken with a rich, velvety sesame sauce
- Perfect for: A quick weeknight dinner that feels like takeout, but is so much better
- Make-ahead: Sauce can be prepped up to 2 days ahead
- Ditching the Soggy, Uninspired Chicken: My Easy Sesame Chicken Recipe Fix
- The Secret to Seriously Crisp Chicken
- Quick Decision on Your Chicken Method
- Decoding the Deliciousness: Ingredient Deep Dive
- Minimal Tools for Maximum Flavor: Equipment Needed
- Your Path to Perfectly Glazed Chicken: Key Steps
- Avoiding Kitchen Disasters with Your Easy Sesame Chicken
- Recipe FAQs
- 📝 Recipe Card
Ditching the Soggy, Uninspired Chicken: My Easy Sesame Chicken Recipe Fix
You know that feeling when you're craving takeout sesame chicken, but you make it at home and it's just... soggy? Or the sauce is either too watery or cloyingly sweet, missing that perfect balance? I've been there so many times.
I remember one Tuesday night, after a long day, I tried yet another recipe, promising crispy chicken, only to pull it out of the skillet looking limp and sad, barely holding onto its dull, gummy coating. My kids took one look and asked if we could just order pizza. Ouch.
That sad skillet of chicken became my nemesis, but also my obsession. I was determined to crack the code for truly crisp, flavorful, homemade sesame chicken that could stand up to any restaurant version, without needing a deep fryer or a culinary degree.
I experimented with different coatings, cooking oils, and sauce ratios until I found the simple, foolproof method that transforms everyday chicken into golden, shatteringly crisp bites, all coated in a rich, glossy sauce that hits every note: sweet, savory, and a hint of tang.
This isn't just an easy sesame chicken recipe; it's the easy sesame chicken recipe.
The Secret to Seriously Crisp Chicken
You might be wondering how we get that lovely crispness without deep frying, or how the sauce becomes so perfectly glossy. It's all about a few simple principles that boost flavor and texture.
- Dry Chicken First: Water is the enemy of crispiness! Patting the chicken thoroughly dry before coating is the absolute first step to ensure a delicate, crunchy crust forms, rather than a steamy, soft one. This allows the coating to adhere properly.
- The Cornstarch Egg Duo: The egg wash provides a sticky surface for the cornstarch to cling to, and the cornstarch itself is magic. It creates a thin, light, and incredibly crisp coating when pan-fried. It also acts as a barrier, keeping the chicken juicy inside.
- Batch Cooking for Airflow: Overcrowding the skillet drops the oil temperature and steams the chicken instead of frying it. Cooking in batches ensures each piece gets enough space to develop that coveted golden brown, crunchy exterior.
- The Slurry's Velvety Touch: The cornstarch slurry added to the sauce isn't just for thickening. It creates a beautiful, glossy, almost translucent finish, giving the sauce that desirable restaurant quality sheen and velvety texture that clings perfectly to every piece of chicken.
Quick Decision on Your Chicken Method
Deciding how to cook your chicken is key to success, and while my recipe focuses on the skillet for that classic sear, an air fryer is a great alternative if you want to minimize oil.
| Method | Time (Chicken Only) | Texture | Best For |
|---|---|---|---|
| Skillet | 15 mins | Golden brown, crispy | Classic sear, developing fond for sauce base |
| Air Fryer | 18-20 mins (total) | Evenly crisp, lighter | Less oil, hands off cooking after initial prep |
| Baking | 20-25 mins | Crispy chewy, less intense crunch | Larger batches, completely hands off cooking |
Decoding the Deliciousness: Ingredient Deep Dive
Every ingredient in this homemade sesame chicken recipe plays a crucial role in building layers of flavor and texture. It's all about understanding their specific contributions.
| Original Ingredient | Science Role | Pro Secret |
|---|---|---|
| Chicken (Breast/Thigh) | Protein source, carries flavor | Note: Thighs stay juicier, breasts are leaner. Cutting into uniform 1 inch pieces ensures even cooking. |
| Cornstarch (Coating) | Crisp coating, moisture barrier | Note: A thin, even layer is key. Too much makes it gummy; too little won't be crispy. Marinating coated chicken briefly allows starch to hydrate slightly. |
| Soy Sauce (Low Sodium) | Umami, saltiness, color | Note: Low sodium is important because you can always add salt, but you can't take it away. Balances other sweet and tangy notes. |
| Honey / Brown Sugar | Sweetness, caramelization, body | Note: Honey adds a more floral, complex sweetness and gloss; brown sugar offers a deeper, molasses note. Both contribute to the sauce's rich color and adherence. |
| Rice Vinegar | Acidity, balance | Note: Essential for cutting through the richness and sweetness, providing a bright counterpoint. Don't skip this; it's what prevents the sauce from being cloying. |
| Toasted Sesame Oil | Aromatic, nutty flavor | Note: Added at the end to preserve its delicate, toasted aroma. Cooking it for too long will diminish its distinct taste. |
| Fresh Ginger & Garlic | Aromatic base, pungent freshness | Note: Fresh is truly best here. Grating the ginger instead of mincing releases more flavor. Don't burn them when making the sauce base; a gentle sauté is all you need for an aromatic infusion. |
| Cornstarch (for Slurry) | Thickener, creates glossy texture | Note: Always whisk into cold water first to prevent lumps. Add slowly to simmering sauce until desired thickness is reached. It creates that beautiful, translucent sheen. |
Your Shopping List for a Brilliant Easy Sesame Chicken Recipe
Here's everything you'll need for this quick sesame chicken recipe. Remember, quality ingredients make a difference, especially with the aromatics!
For the Crispy Chicken
- 1 lb boneless, skinless chicken breasts or thighs, cut into 1 inch pieces Why this? Uniform pieces cook evenly and crisp up better.
- ½ cup cornstarch Why this? Essential for that light, shatteringly crisp coating.
- 1 large egg Why this? Helps the cornstarch adhere perfectly to the chicken.
- ½ teaspoon salt Why this? Seasons the chicken from the inside out.
- ¼ teaspoon black pepper Why this? Adds a subtle warmth and spice.
- 2 tablespoons neutral oil (like vegetable, canola, or grapeseed) for pan frying Why this? High smoke point is crucial for crisp frying without burning.
For the Ultimate Sesame Sauce
- ¼ cup low sodium soy sauce Why this? Provides the savory base without making it too salty.
- ¼ cup honey or brown sugar Why this? Balances the saltiness and adds a rich, glossy sheen.
- 2 tablespoons rice vinegar Why this? Crucial for cutting through richness and providing tang.
- 1 tablespoon toasted sesame oil Why this? Delivers that signature nutty, aromatic sesame flavor.
- 1 tablespoon fresh ginger, grated Why this? Adds a bright, pungent warmth that's classic for this dish.
- 2 cloves garlic, minced Why this? Foundation of flavor, provides depth and aroma.
- 1 teaspoon Sriracha or chili garlic sauce (optional, for a hint of heat) Why this? Just a touch wakes up all the flavors without making it overly spicy.
- 1 tablespoon cornstarch (for thickening the sauce) Why this? Creates a velvety, glossy, and thick sauce that coats the chicken beautifully.
- 2 tablespoons water (for cornstarch slurry) Why this? Dissolves the cornstarch for a lump free sauce.
For Garnish
- 1 tablespoon toasted sesame seeds Why this? Adds texture, nutty flavor, and visual appeal.
- 2 green onions, sliced (white and green parts) Why this? Fresh, crisp counterpoint and vibrant color.
Minimal Tools for Maximum Flavor: Equipment Needed
You really don't need much to whip up this quick sesame chicken recipe. That's part of its charm!
- Cutting Board and Sharp Knife: For preparing the chicken and aromatics.
- Medium Bowl: For coating the chicken.
- Shallow Dish: For dredging the chicken in cornstarch.
- Small Whisk: Essential for making a lump free sauce and slurry.
- Measuring Cups and Spoons: For accurate ingredient ratios.
- Large Non Stick Skillet or Pan: My absolute favorite for this because it ensures even cooking and prevents sticking, which is crucial for crispy chicken. A good cast iron skillet also works wonders for developing a deep crust.
- Tongs or Slotted Spoon: For handling the chicken and tossing it in the sauce.
- Small Cup: For making the cornstarch slurry.
Your Path to Perfectly Glazed Chicken: Key Steps
Follow these steps for a homemade sesame chicken recipe that will become a family favorite. It's about precision and timing!
Prepare the Chicken for Golden Perfection
- Dry and Coat: Pat chicken pieces thoroughly dry with paper towels. Note: This is non negotiable for crispiness! In a medium bowl, whisk the egg with ½ teaspoon salt and ¼ teaspoon black pepper. Add the chicken pieces and toss to coat. In a separate shallow dish, add the 60g (½ cup) cornstarch. Dredge the egg coated chicken pieces in the cornstarch, ensuring an even, thin coating. Set aside to marinate for at least 15 minutes. Note: This brief marination allows the cornstarch to absorb some moisture, creating a more stable coating.
Craft the Aromatic Sesame Sauce
- Whisk the Sauce: While the chicken marinates, whisk together the 60ml (¼ cup) low sodium soy sauce, 60ml (¼ cup) honey (or brown sugar), 2 tablespoons rice vinegar, 1 tablespoon toasted sesame oil, 1 tablespoon grated fresh ginger, 2 cloves minced garlic, and 1 teaspoon Sriracha (if using) in a small bowl. Set aside. Note: Tasting the sauce now allows you to adjust sweetness or heat before cooking.
Pan Sear to Crispy Excellence
- Sear the Chicken: Heat 2 tablespoons of neutral oil in a large non stick skillet or pan over medium high heat. Once hot and shimmering, add the chicken pieces in a single layer, working in batches if necessary to avoid overcrowding. Note: Overcrowding lowers the pan temperature and leads to steaming, not searing. Cook for 3-4 minutes per side, until golden brown, crispy, and cooked through (internal temperature 165°F). Remove the cooked chicken from the skillet and set aside on a plate. This is one of your precision checkpoints!
Combine and Glaze for a Restaurant Finish
Thicken the Sauce: Reduce the heat to medium. Pour the prepared sesame sauce into the same skillet (no need to clean, those brown bits are flavor!). Bring to a gentle simmer. In a small cup, whisk together 1 tablespoon of cornstarch with 2 tablespoons of water to create a slurry.
Slowly whisk the cornstarch slurry into the simmering sauce. Continue to whisk gently until the sauce thickens and becomes glossy, about 1-2 minutes. Note: Whisk constantly to prevent lumps and ensure even thickening. This 1-2 minute whisking is your second precision checkpoint.
Coat and Serve: Return the pan seared chicken to the skillet with the thickened sauce. Toss gently to coat all the chicken pieces evenly. Serve immediately, garnished with toasted sesame seeds and sliced green onions. Enjoy with rice or your preferred side.
Avoiding Kitchen Disasters with Your Easy Sesame Chicken
Even with a simple recipe, things can sometimes go sideways. Here are common problems and how to tackle them so your sesame chicken recipe is always a hit.
Why Your Chicken Isn't Crispy
The biggest complaint people have is rubbery or soggy chicken. This almost always comes down to moisture and overcrowding.
| Problem | Root Cause | Solution
## Ditching the Soggy, Uninspired Chicken: My Easy Sesame Chicken Recipe Fix You know that feeling when you're craving takeout sesame chicken, but you make it at home and it's just... soggy? Or the sauce is either too watery or cloyingly sweet, missing that perfect balance? I've been there so many times. I remember one Tuesday night, after a long day, I tried yet another recipe, promising crispy chicken, only to pull it out of the skillet looking limp and sad, barely holding onto its dull, gummy coating. My kids took one look and asked if we could just order pizza. Ouch. That sad skillet of chicken became my nemesis, but also my obsession. I was determined to crack the code for truly crisp, flavorful, homemade sesame chicken that could stand up to any restaurant version, without needing a deep fryer or a culinary degree. I experimented with different coatings, cooking oils, and sauce ratios until I found the simple, foolproof method that transforms everyday chicken into golden, shatteringly crisp bites, all coated in a rich, glossy sauce that hits every note: sweet, savory, and a hint of tang. This isn't just an easy sesame chicken recipe; it's the easy sesame chicken recipe. ## The Secret to Seriously Crisp Chicken You might be wondering how we get that lovely crispness without deep frying, or how the sauce becomes so perfectly glossy. It's all about a few simple principles that boost flavor and texture. Dry Chicken First: Water is the enemy of crispiness! Patting the chicken thoroughly dry before coating is the absolute first step to ensure a delicate, crunchy crust forms, rather than a steamy, soft one. This allows the coating to adhere properly. The Cornstarch Egg Duo: The egg wash provides a sticky surface for the cornstarch to cling to, and the cornstarch itself is magic. It creates a thin, light, and incredibly crisp coating when pan-fried. It also acts as a barrier, keeping the chicken juicy inside. Batch Cooking for Airflow: Overcrowding the skillet drops the oil temperature and steams the chicken instead of frying it. Cooking in batches ensures each piece gets enough space to develop that coveted golden brown, crunchy exterior. The Slurry's Velvety Touch: The cornstarch slurry added to the sauce isn't just for thickening. It creates a beautiful, glossy, almost translucent finish, giving the sauce that desirable restaurant quality sheen and velvety texture that clings perfectly to every piece of chicken. ## Quick Decision on Your Chicken Method Deciding how to cook your chicken is key to success, and while my recipe focuses on the skillet for that classic sear, an air fryer is a great alternative if you want to minimize oil. | Method | Time (Chicken Only) | Texture | Best For | | :---------- | :------------------ | :---------------------- | :------------------------------------------- | | Skillet | 15 mins | Golden brown, crispy | Classic sear, developing fond for sauce base | | Air Fryer | 18-20 mins (total) | Evenly crisp, lighter | Less oil, hands off cooking after initial prep | | Baking | 20-25 mins | Crispy chewy, less intense crunch | Larger batches, completely hands off cooking | ## Decoding the Deliciousness: Ingredient Deep Dive Every ingredient in this homemade sesame chicken recipe plays a crucial role in building layers of flavor and texture. It's all about understanding their specific contributions. | Original Ingredient | Science Role | Pro Secret | | :--------------------------- | :------------------------------------ | :------------------------------------------------------------------------------------------------------------------------------------------------------------------------------------------------------------------------------------------------------------------------------------------------------------------------------------------------------------------------------------------------------------------------------------------- | | Chicken (Breast/Thigh) | Protein source, carries flavor | Note: Thighs stay juicier, breasts are leaner. Cutting into uniform 1 inch pieces ensures even cooking. | | Cornstarch (Coating) | Crisp coating, moisture barrier | Note: A thin, even layer is key. Too much makes it gummy; too little won't be crispy. Marinating coated chicken briefly allows starch to hydrate slightly. | | Soy Sauce (Low Sodium) | Umami, saltiness, color | Note: Low sodium is important because you can always add salt, but you can't take it away. Balances other sweet and tangy notes. | | Honey / Brown Sugar | Sweetness, caramelization, body | Note: Honey adds a more floral, complex sweetness and gloss; brown sugar offers a deeper, molasses note. Both contribute to the sauce's rich color and adherence. | | Rice Vinegar | Acidity, balance | Note: Essential for cutting through the richness and sweetness, providing a bright counterpoint. Don't skip this; it's what prevents the sauce from being cloying. | | Toasted Sesame Oil | Aromatic, nutty flavor | Note: Added at the end to preserve its delicate, toasted aroma. Cooking it for too long will diminish its distinct taste. | | Fresh Ginger & Garlic | Aromatic base, pungent freshness | Note: Fresh is truly best here. Grating the ginger instead of mincing releases more flavor. Don't burn them when making the sauce base; a gentle sauté is all you need for an aromatic infusion. | | Cornstarch (for Slurry) | Thickener, creates glossy texture | Note: Always whisk into cold water first to prevent lumps. Add slowly to simmering sauce until desired thickness is reached. It creates that beautiful, translucent sheen. | ### Your Shopping List for a Brilliant Easy Sesame Chicken Recipe Here's everything you'll need for this quick sesame chicken recipe. Remember, quality ingredients make a difference, especially with the aromatics! For the Crispy Chicken 1 lb boneless, skinless chicken breasts or thighs, cut into 1 inch pieces Why this? Uniform pieces cook evenly and crisp up better. ½ cup cornstarch Why this? Essential for that light, shatteringly crisp coating. 1 large egg Why this? Helps the cornstarch adhere perfectly to the chicken. ½ teaspoon salt Why this? Seasons the chicken from the inside out. ¼ teaspoon black pepper Why this? Adds a subtle warmth and spice. 2 tablespoons neutral oil (like vegetable, canola, or grapeseed) for pan frying Why this? High smoke point is crucial for crisp frying without burning. For the Ultimate Sesame Sauce ¼ cup low sodium soy sauce Why this? Provides the savory base without making it too salty. ¼ cup honey or brown sugar Why this? Balances the saltiness and adds a rich, glossy sheen. 2 tablespoons rice vinegar Why this? Crucial for cutting through richness and providing tang. 1 tablespoon toasted sesame oil Why this? Delivers that signature nutty, aromatic sesame flavor. 1 tablespoon fresh ginger, grated Why this? Adds a bright, pungent warmth that's classic for this dish. 2 cloves garlic, minced Why this? Foundation of flavor, provides depth and aroma. 1 teaspoon Sriracha or chili garlic sauce (optional, for a hint of heat) Why this? Just a touch wakes up all the flavors without making it overly spicy. 1 tablespoon cornstarch (for thickening the sauce) Why this? Creates a velvety, glossy, and thick sauce that coats the chicken beautifully. 2 tablespoons water (for cornstarch slurry) Why this? Dissolves the cornstarch for a lump free sauce. For Garnish 1 tablespoon toasted sesame seeds Why this? Adds texture, nutty flavor, and visual appeal. 2 green onions, sliced (white and green parts) Why this? Fresh, crisp counterpoint and vibrant color. ### Clever Swaps for Your Easy Weeknight Sesame Chicken Sometimes you don't have exactly what the recipe calls for, and that's totally fine! Here are some smart substitutions that won't compromise the spirit of this easy sesame chicken. | Original Ingredient | Substitute | Why It Works | | :------------------ | :----------------------------------- | :-------------------------------------------------------------------------------------------------------------------------------------------------------------------------------------------------------------------------------------- | | Chicken Breast | Pork tenderloin or shrimp | Note: Pork tenderloin will cook similarly, but may need a minute or two more per side. Shrimp cooks much faster (1-2 mins per side), so adjust accordingly. | | Honey / Brown Sugar | Maple syrup or agave nectar | Note: Maple syrup adds a distinctive flavor, while agave nectar is a neutral sweetener. Adjust to taste as their sweetness levels can vary slightly. | | Rice Vinegar | Apple cider vinegar or white vinegar | Note: Apple cider vinegar offers a slightly fruitier tang. White vinegar is sharper, so you might want to use a tiny bit less or balance with a touch more sweetener to prevent the sauce from tasting too acidic. | | Sriracha | Red pepper flakes or a pinch of cayenne | Note: Red pepper flakes will add visual heat and a milder spice. Cayenne pepper is more potent, so use sparingly and taste as you go. | | Cornstarch (coating) | Potato starch | Note: Potato starch behaves very similarly to cornstarch, yielding an excellent crispy crust. Avoid: Wheat flour; it won't give you the same shatteringly crisp texture. | | Toasted Sesame Oil | Regular sesame oil + a tiny pinch of toasted sesame seeds | Note: Regular sesame oil has less intense flavor. Adding a few toasted sesame seeds (if you have them) can help replicate that nutty aroma. It won't be exactly the same, but it gets the job done. | | Low sodium Soy Sauce | Tamari or Coconut Aminos | Note: Tamari is a gluten-free alternative with similar flavor. Coconut Aminos offer a soy free option, but are less salty and slightly sweeter, so adjust seasoning. This is great for a healthy sesame chicken recipe adaptation. | ## Minimal Tools for Maximum Flavor: Equipment Needed You really don't need much to whip up this quick sesame chicken recipe. That's part of its charm! Cutting Board and Sharp Knife: For preparing the chicken and aromatics. Medium Bowl: For coating the chicken. Shallow Dish: For dredging the chicken in cornstarch. Small Whisk: Essential for making a lump free sauce and slurry. Measuring Cups and Spoons: For accurate ingredient ratios. Large Non Stick Skillet or Pan: My absolute favorite for this because it ensures even cooking and prevents sticking, which is crucial for crispy chicken. A good cast iron skillet also works wonders for developing a deep crust. Tongs or Slotted Spoon: For handling the chicken and tossing it in the sauce. Small Cup: For making the cornstarch slurry. ## Your Path to Perfectly Glazed Chicken: Key Steps Follow these steps for a homemade sesame chicken recipe that will become a family favorite. It's about precision and timing! ### Prepare the Chicken for Golden Perfection 1. Dry and Coat: Pat chicken pieces thoroughly dry with paper towels. Note: This is non negotiable for crispiness! In a medium bowl, whisk the egg with ½ teaspoon salt and ¼ teaspoon black pepper. Add the chicken pieces and toss to coat. In a separate shallow dish, add the 60g (½ cup) cornstarch. Dredge the egg coated chicken pieces in the cornstarch, ensuring an even, thin coating. Set aside to marinate for at least 15 minutes. Note: This brief marination allows the cornstarch to absorb some moisture, creating a more stable coating. ### Craft the Aromatic Sesame Sauce 2. Whisk the Sauce: While the chicken marinates, whisk together the 60ml (¼ cup) low sodium soy sauce, 60ml (¼ cup) honey (or brown sugar), 2 tablespoons rice vinegar, 1 tablespoon toasted sesame oil, 1 tablespoon grated fresh ginger, 2 cloves minced garlic, and 1 teaspoon Sriracha (if using) in a small bowl. Set aside. Note: Tasting the sauce now allows you to adjust sweetness or heat before cooking. ### Pan Sear to Crispy Excellence 3. Sear the Chicken: Heat 2 tablespoons of neutral oil in a large non stick skillet or pan over medium high heat. Once hot and shimmering, add the chicken pieces in a single layer, working in batches if necessary to avoid overcrowding. Note: Overcrowding lowers the pan temperature and leads to steaming, not searing. Cook for 3-4 minutes per side, until golden brown, crispy, and cooked through (internal temperature 165°F). Remove the cooked chicken from the skillet and set aside on a plate. This is one of your precision checkpoints! ### Combine and Glaze for a Restaurant Finish 4. Thicken the Sauce: Reduce the heat to medium. Pour the prepared sesame sauce into the same skillet (no need to clean, those brown bits are flavor!). Bring to a gentle simmer. In a small cup, whisk together 1 tablespoon of cornstarch with 2 tablespoons of water to create a slurry. Slowly whisk the cornstarch slurry into the simmering sauce. Continue to whisk gently until the sauce thickens and becomes glossy, about 1-2 minutes. Note: Whisk constantly to prevent lumps and ensure even thickening. This 1-2 minute whisking is your second precision checkpoint. 5. Coat and Serve: Return the pan seared chicken to the skillet with the thickened sauce. Toss gently to coat all the chicken pieces evenly. Serve immediately, garnished with toasted sesame seeds and sliced green onions. Enjoy with rice or your preferred side. ## Avoiding Kitchen Disasters with Your Easy Sesame Chicken Even with a simple recipe, things can sometimes go sideways. Here are common problems and how to tackle them so your sesame chicken recipe is always a hit. ### Why Your Chicken Isn't Crispy? The biggest complaint people have is rubbery or soggy chicken. This almost always comes down to moisture and overcrowding. Your "no frying" sesame chicken should still be super crispy! | Problem | Root Cause | Solution | | :------------------ | :----------------------------------------- | :-------------------------------------------------------------------- | | Soggy chicken | Chicken wasn't dry; pan overcrowded; oil not hot enough | Pat chicken aggressively dry; cook in batches; ensure oil is shimmering before adding chicken. | | Coating falls off | Too much moisture; not enough coating; chicken handled too much | Dry chicken thoroughly; ensure a thin but even cornstarch coat; let rest 15 mins after coating. | | Rubber like chicken | Overcooked; pieces too large | Cook just until golden and 165°F internal; cut chicken into uniform 1 inch pieces. | ### My Sauce is Too Thin/Thick! Sometimes, the sauce doesn't quite hit that perfect velvety consistency. This is usually an easy fix! | Problem | Root Cause | Solution | | :--------------- | :--------------------------------------- | :-------------------------------------------------------------------------------------------------------------------------------------------------------------------------------------------------------------------------------------------------- | | Sauce too thin | Not enough cornstarch slurry added; not simmered long enough | Make another small slurry (1 tsp cornstarch + 1 tbsp cold water) and whisk into simmering sauce, 30 seconds at a time, until desired thickness. | | Sauce too thick | Too much cornstarch slurry; over simmered | Whisk in a tablespoon of warm water or chicken broth at a time until it reaches a pourable, glossy consistency. | | Sauce tastes raw | Ginger/garlic not cooked; sauce not simmered long enough to meld | Ensure ginger/garlic are gently cooked briefly in step 4 before adding liquid ingredients. Simmer the sauce for at least 1-2 minutes to cook out raw cornstarch flavor. | ### Common Mistakes Checklist for Perfect Sesame Chicken Here's a quick cheat sheet to make sure your homemade sesame chicken recipe turns out fantastic every single time. ✓ Pat chicken completely dry before coating (prevents steaming and ensures crispness). ✓ Don't skip the 15 minute rest after coating the chicken (allows cornstarch to hydrate). ✓ Preheat your skillet for a full 2-3 minutes before adding oil, then let oil shimmer before adding chicken. ✓ Don't overcrowd the pan - work in batches to keep the oil hot and encourage browning. ✓ Whisk cornstarch into cold water for your slurry before adding to the hot sauce (prevents lumps!). ✓ Toss chicken gently in the sauce just before serving to maintain crispiness. ## Make It Your Own: Scaling & Variations This recipe is super adaptable. Whether you're feeding a crowd or just yourself, or want to add a twist, here's how to customize your easy sesame chicken. ### Scaling Your Sesame Chicken Scaling Up (For More Servings): If you're doubling this recipe for more than 4 servings, I highly recommend cooking the chicken in smaller batches. Don't try to cram it all in one pan, or you'll lose that crisp texture. You might also need a larger skillet. For the sauce, you can simply double all ingredients. Scaling Down (For Fewer Servings): For 2 servings, halve all ingredients. You can still use a regular sized skillet, but make sure the chicken isn't spread too thin. Keep an eye on the sauce thickness, as it may thicken a bit faster with smaller quantities. This is great for a solo "easy weeknight sesame chicken" meal! ### Delicious Variations & Adaptations Get creative with your easy sesame chicken. These twists will keep your family friendly meal exciting. For a Spicy Kick: Increase the Sriracha to 2 teaspoons, or add a pinch of red pepper flakes with the ginger and garlic in the sauce. For extra heat, finely slice a fresh red chili and toss it in at the end. For an Air Fryer Sesame Chicken Recipe: Skip the oil in the skillet for the chicken. After dredging, lightly spray the chicken pieces with cooking oil spray. Air fry at 375°F (190°C) for 15-20 minutes, shaking the basket halfway through, until golden and cooked through. Then proceed with the sauce in a skillet as usual. This is a great "sesame chicken no frying" option! gluten-free Adaptation: Simply swap out the low sodium soy sauce for tamari (ensure it's certified gluten-free). The cornstarch is naturally gluten-free, so you're all set. Veggie Boost: Stir fry some broccoli florets, bell pepper strips, or snow peas in a separate pan for 3-4 minutes until tender crisp. Add them to the chicken and sauce right before serving for a complete "healthy sesame chicken recipe". Honey Sesame Chicken Recipe: While this recipe already uses honey, you can lean into that flavor even more by using only honey (no brown sugar) and adding a tiny drizzle of extra honey right before serving. ## Quick Fix for Your Sesame Chicken Recipe Sometimes you need to make a quick call in the kitchen. Here's a "decision shortcut" to help you tailor your dish instantly. If you want maximum crispiness, air fry the chicken. If you want a richer, stickier sauce, use brown sugar instead of honey. If you want to add more vegetables, stir fry them separately and add at the very end. ## Preservation Secrets: Storing Your Homemade Sesame Chicken This easy sesame chicken recipe makes for fantastic leftovers, perfect for meal prep throughout the week! ### Storage Once cooked and tossed in the sauce, any leftover sesame chicken should be stored in an airtight container in the refrigerator for up to 3-4 days. The chicken will lose some of its initial crispness as it sits in the sauce, but the flavor will still be wonderful. ### Freezing You can freeze leftover sesame chicken, but I generally don't recommend it if you're prioritizing the texture. The chicken coating can become quite soft and the sauce might separate slightly when thawed. If you do freeze it, place it in an airtight, freezer safe container for up to 1 month. Thaw overnight in the refrigerator before reheating. ### Reheating For best results, reheat leftover sesame chicken in a skillet over medium heat, stirring gently, until warmed through. This can help to re crisp the chicken slightly, though it won't be as shatteringly crisp as fresh. You can also microwave it, but the chicken will remain softer. ### Zero Waste Tips Green Onion Scraps: Don't toss the root ends of your green onions! Place them in a small glass of water on your windowsill and watch them regrow. You can snip off the green tops again and again. Ginger Skins: While often discarded, ginger skins can be added to broths or teas for a subtle spicy kick. Store them in a bag in the freezer. Leftover Sauce: If you happen to have a tiny bit of sauce left over (unlikely!), it's fantastic tossed with steamed vegetables or even as a marinade for a quick stir fry the next day. ## Perfect Complements for Your Easy Sesame Chicken This quick sesame chicken recipe is a meal in itself, but it pairs beautifully with a few simple sides to round out your plate and make it feel truly special, like a meal from your favorite local spot. ### Fluffy Jasmine Rice Steamed jasmine rice is the classic accompaniment. Its delicate fragrance and soft texture are the perfect canvas for the bold flavors of the sesame chicken and its glossy sauce. You can also serve it with brown rice for a wholesome twist on this healthy sesame chicken recipe. ### Garlic Sautéed Green Beans For a fresh, vibrant green, quickly sauté some green beans with a bit of garlic and a splash of soy sauce. They add a lovely crunch and a boost of nutrients that balance the richness of the chicken. ### Easy Homemade Chicken Korma While not a direct pairing, if you're looking for another fantastic, easy chicken recipe that captures international flavors, my [Korma for 4 Servings recipe](https://allfoodboard.com/recipes/easy chicken-korma meal/) is another family friendly option that uses similar minimal tools and delivers amazing flavor. It's a different kind of warmth, but equally satisfying. ### Steamed Broccoli with a Hint of Lemon Simple steamed broccoli florets offer a clean, slightly bitter counterpoint to the sweet and savory chicken. A squeeze of fresh lemon juice over the broccoli adds a bright finish. ### Crunchy Asian Slaw For something a little lighter and tangy, a quick homemade Asian slaw with shredded cabbage, carrots, and a sesame ginger vinaigrette is a fantastic choice. It provides a crisp, refreshing contrast that makes the entire meal pop. If you enjoyed crafting this sauce, you'll love making your own dressings. For another saucy favorite, my [Sticky Glazed Homemade Sauce recipe](https://allfoodboard.com/recipes/sticky teriyaki-chicken stir-fry/) also features a homemade sauce that's just as addictive!

Recipe FAQs
What ingredients are in easy sesame chicken?
Core components include: Chicken pieces, egg, cornstarch, soy sauce, honey (or brown sugar), rice vinegar, toasted sesame oil, grated ginger, minced garlic, and optional Sriracha. Garnish requires sesame seeds and green onions.
What's the secret to crispy sesame chicken?
Pat the chicken thoroughly dry before coating. This crucial first step removes surface moisture, which allows the cornstarch coating to adhere properly and fry, rather than steam, when it hits the hot oil.
Should I add sesame seeds to chicken before or after cooking?
Always add sesame seeds after cooking. They are used purely as a garnish; adding them before coating or frying will cause them to burn quickly in the hot oil.
What makes sesame chicken taste so good?
The sauce balances sweet, savory, and tangy elements beautifully. The combination of honey (sweet), soy sauce (savory/umami), and rice vinegar (acid) creates that signature addictive flavor profile.
How to ensure the coating sticks properly to the chicken?
Toss the coated chicken pieces in cornstarch, then let them rest for 15 minutes. This resting period allows the cornstarch to hydrate slightly, forming a better bond with the egg wash before frying.
How long can I store leftover sesame chicken?
Store leftovers in an airtight container for up to 3 or 4 days in the refrigerator. While the coating softens in the sauce, the flavor remains excellent, much like how robust sauces preserve flavor in dishes like our Chicken and Egg Noodle.
Can I use chicken thighs instead of breasts?
Yes, chicken thighs work very well and add extra richness. Thigh meat has slightly more fat, which keeps it very moist during the pan-frying process. If you are looking for other methods using chicken parts, review the techniques needed for Classic BBQ Chicken Sliders.
Crispy Sesame Chicken Recipe

Ingredients:
Instructions:
Nutrition Facts:
| Calories | 449 kcal |
|---|---|
| Protein | 42 g |
| Fat | 14 g |
| Carbs | 37 g |
