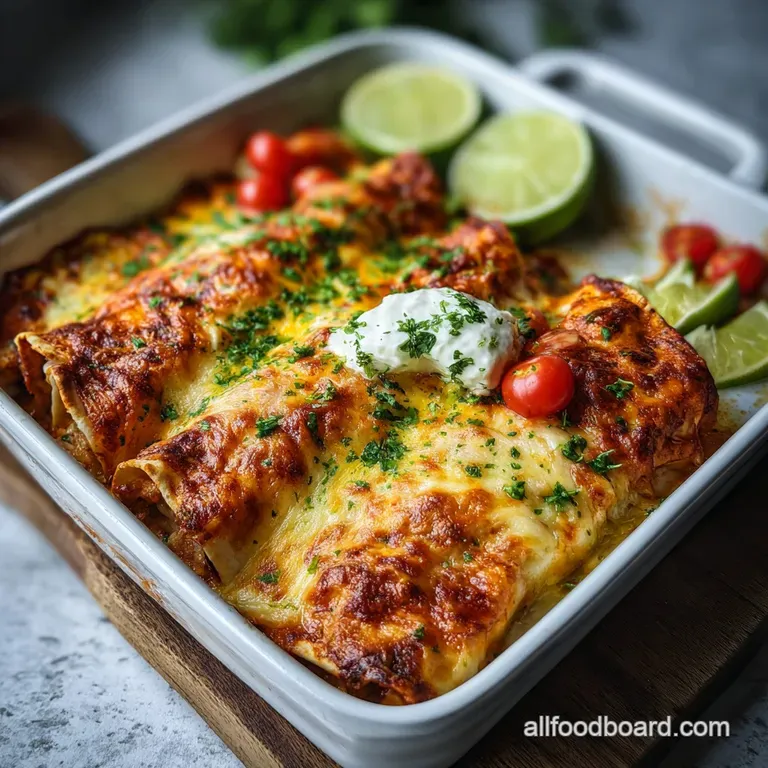
Cheesy Chicken Enchiladas: Velvety White Sauce
- Time: Active 20 minutes, Passive 25 minutes, Total 45 minutes
- Flavor/Texture Hook: Velvety white sauce with gooey cheese
- Perfect for: Stress free family dinners or crowd-pleasing meal prep
- Making Simple and Creamy Cheesy Chicken Enchiladas
- The Science of the Emulsion
- Stovetop Versus Oven Cooking
- Ingredient Role and Component Breakdown
- Everything Needed for the Recipe
- Necessary Kitchen Tools List
- Simple Steps for Perfect Results
- Solving Common Preparation Problems
- Adjusting Portions for Larger Groups
- Exposing Traditional Enchilada Myths
- Smart Storage and Leftover Tips
- Serving and Enjoying Your Meal
- High in Sodium
- Cheesy Chicken Enchiladas FAQs
- 📝 Recipe Card
Making Simple and Creamy Cheesy Chicken Enchiladas
The first time I attempted this dish, I remember the sizzle of the tortillas hitting the oil and that sharp, earthy aroma of cumin filling my small apartment kitchen. I was so excited to dive in, but I made a classic beginner mistake. I rushed the sauce and didn't let the flour cook out enough.
The result was a bit grainy, but even then, the way the Monterey Jack cheese pulled into long, stretchy ribbons made my family ask for seconds before they even finished their first plate. It was a mess, but a comforting one that taught me the importance of a smooth roux.
Since that evening, I've tweaked the process to ensure every single bite is as unctuous and satisfying as possible. We are talking about a dish where the tortillas stay intact, the chicken remains juicy, and the sauce doesn't separate into an oily puddle.
It's the kind of meal that makes the whole house smell like a cozy bistro. You'll find that by following these reliable steps, you can create something that feels like a weekend project but actually fits into a hectic Tuesday night schedule.
We're going to focus on a few key techniques today that really set these Cheesy Chicken Enchiladas apart from the standard casserole. Instead of just dumping ingredients into a pan, we'll build layers of flavor.
From the way we handle the diced mild green chiles to the specific ratio of Sharp Cheddar, every choice is designed to give you a result that's far better than anything from a box. Trust me, once you see how that sauce bubbles and browns in the oven, you won't go back to the pre made stuff.
The Science of the Emulsion
Protein Stability: The sour cream is added at the very end of the sauce making process to prevent the lactic acid from curdling when it hits the high heat. Starch Gelatinization: Cooking the butter and flour into a roux ensures the chicken broth thickens into a stable structure that won't soak into the tortillas and make them soggy.
Chef's Tip: For the most velvety texture, grate your cheese from a block. Pre shredded cheese is coated in potato starch or cellulose to prevent clumping in the bag, which often stops it from melting smoothly into the sauce.
Stovetop Versus Oven Cooking
While we are using the oven for this specific bake, some people prefer a faster stovetop method. If you are looking for a quicker version with a slightly different texture, you might enjoy learning How to Make recipe which uses a skillet for a one pot feel. Both methods have their merits depending on how much time you have.
| Method | Time | Texture | Best For |
|---|---|---|---|
| Oven Bake | 45 minutes | Crispy edges, browned cheese | Traditional family dinner |
| Stovetop | 25 minutes | Softer tortillas, very saucy | Quick weeknight hunger |
| Air Fryer | 15 minutes | Extra crunchy exterior | Small batches or leftovers |
Choosing the right method depends on your texture preference. The oven provides that classic "casserole" finish where the cheese on top gets slightly golden and chewy, whereas the stovetop keeps everything very moist and tender.
If you have the extra 20 minutes, the oven really helps the flavors of the smoked paprika and cumin meld into the chicken filling.
Ingredient Role and Component Breakdown
Understanding what each part does helps you become a more intuitive cook. We aren't just adding fat and flour for fun; we are creating a vehicle for all that zesty chile flavor to ride on.
| Ingredient | Science Role | Pro Secret |
|---|---|---|
| Sour Cream | Provides acidity and fat | Use full fat for the most stable, creamy sauce |
| Green Chiles | Cuts through the richness | Don't drain them completely; the juice adds a punch |
| Butter & Flour | Thickening agent (Roux) | Cook until it smells nutty to avoid a raw flour taste |
Using low sodium chicken broth is another sneaky trick I love. It allows us to control the seasoning with our 0.5 tsp salt and 0.25 tsp black pepper without the dish becoming an absolute salt bomb. This is especially important when you consider the salt already present in the Sharp Cheddar cheese.
Everything Needed for the Recipe
- 3 cups cooked chicken breast, shredded: This is the heart of the dish. Why this? Shredded texture holds more sauce than cubes.
- 12 medium flour tortillas: The vessel for our filling. Why this? Flour stays softer than corn in white sauce.
- 2 cups Monterey Jack cheese, freshly shredded: Our primary melter. Why this? High moisture content for a gooey stretch.
- 1 cup Sharp Cheddar cheese, freshly shredded: For a bit of bite. Why this? Adds depth that Jack cheese lacks.
- 1 cup full fat sour cream: The creamy base. Why this? Essential for that signature tangy finish.
- 2 cups low sodium chicken broth: To build the volume of the sauce.
- 3 tbsp unsalted butter & 3 tbsp all purpose flour: To create the roux.
- 4 oz diced mild green chiles: For that classic Southwestern flair.
- 1 small yellow onion & 2 cloves garlic: The aromatic foundation.
- Spices: 1 tsp ground cumin, 1 tsp smoked paprika, 0.5 tsp salt, 0.25 tsp black pepper, 1 pinch cayenne pepper.
- 0.25 cup vegetable oil: For lightly softening the tortillas.
If you find yourself with extra chicken and want something with a completely different profile, you might try a Caprese Stuffed Chicken recipe for another night. It uses some of the same basic prep skills but offers a fresh Italian twist that my family loves during the summer months.
Necessary Kitchen Tools List
You don't need a professional kitchen to make these work. In fact, keeping it simple usually yields the best results. A standard 9x13 inch baking dish is your best friend here. It provides enough surface area for the 12 tortillas to sit snugly without being so crowded that they don't cook through.
A medium saucepan is required for whisking the sauce. I suggest using a whisk rather than a spoon to ensure there are no lumps in your flour and butter mixture. You'll also need a large mixing bowl to combine your chicken, onions, and spices.
Finally,, a small skillet is helpful for the quick oil dip of the tortillas, though you can skip this if you're in a massive rush, even if the texture won't be quite as "shatter crisp" on the edges.
Simple Steps for Perfect Results
- Prep the filling. Combine the 3 cups shredded chicken with the diced onion, minced garlic, cumin, smoked paprika, salt, and the 4 oz diced green chiles in a bowl. Note: Mixing them first ensures every bite is seasoned.
- Make the roux. Melt 3 tbsp butter in a saucepan over medium heat, then whisk in 3 tbsp flour. Cook for 2 minutes until bubbly and smelling nutty.
- Build the sauce. Slowly pour in the 2 cups chicken broth, whisking constantly. Simmer until the liquid coats the back of a spoon.
- Finish the creaminess. Remove the pan from heat and whisk in the 1 cup sour cream, black pepper, and cayenne. Note: Off heat prevents the sour cream from breaking.
- Softener the tortillas. Heat 0.25 cup oil in a small skillet and dip each tortilla for 5 seconds per side. Wait for the tortilla to become pliable and slightly translucent.
- Assemble the rolls. Place a portion of chicken and a sprinkle of Monterey Jack inside a tortilla, then roll it tightly.
- Arrange in pan. Lay the rolls seam side down in the baking dish. Note: This keeps them from unfurling while they bake.
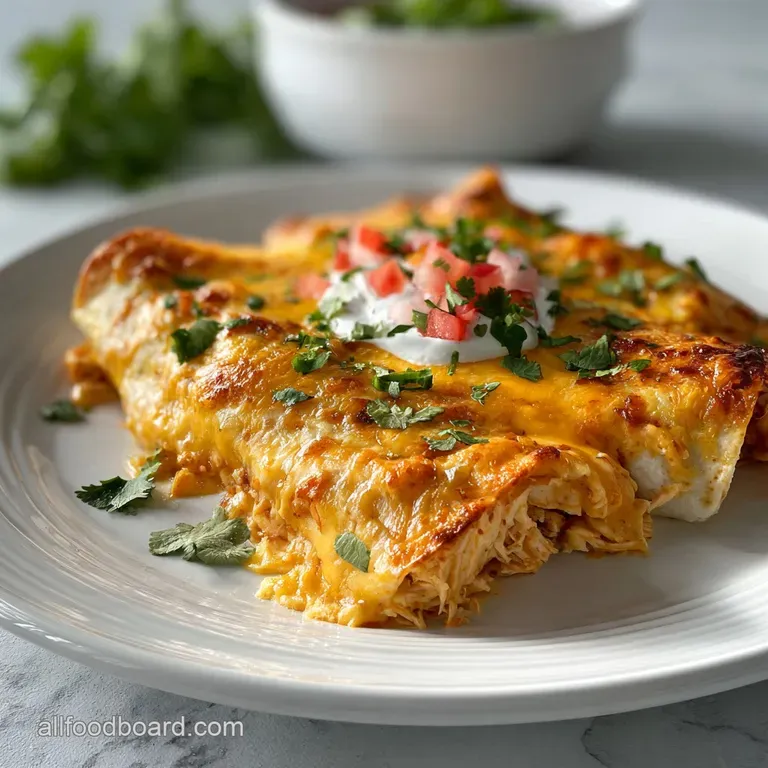
- Sauce and cheese. Pour the creamy sauce over the center of the enchiladas, leaving the tips slightly exposed. Top with the remaining Monterey Jack and the 1 cup Sharp Cheddar.
- Bake the dish. Place in a preheated 350°F (175°C) oven for 25 minutes. Bake until the edges are sizzling and the cheese is molten.
- Rest before serving. Let the pan sit for 5 minutes. Observe as the sauce thickens and stabilizes for easier scooping.
Solving Common Preparation Problems
Even the most practiced cooks run into issues with sauce consistency or tortilla texture. Usually, these problems stem from temperature control or moisture management. If your sauce looks a bit thin when you first pull it out of the oven, don't panic.
It often just needs a few minutes of "carryover" time to set up properly.
Sauce Separation and Curdling
If you notice your sauce looks "broken" or oily, it usually means the heat was too high when the sour cream was added. Sour cream is a delicate emulsion of fat and water. When it gets too hot too fast, the proteins tighten and squeeze out the fat.
To fix this next time, always pull the saucepan off the burner for at least 30 seconds before whisking in the dairy.
Tortilla Disintegration and Mushiness
Flour tortillas are like sponges. If you don't give them a quick fry in oil first, they will absorb all the liquid from the sauce and turn into a paste. The oil creates a light barrier that helps the tortilla maintain its structure while it bakes.
| Problem | Root Cause | Solution |
|---|---|---|
| Grit in sauce | Raw flour in roux | Cook butter/flour for full 2 mins before adding broth |
| Soggy bottom | Excessive sauce underneath | Only put a very thin layer of sauce on the pan bottom |
| Dry chicken | Overcooked breast meat | Use rotisserie chicken or thigh meat for better fat content |
Common Mistakes Checklist
- ✓ Always whisk the broth into the roux gradually to prevent lumps from forming.
- ✓ Don't skip the "rest" period after baking; it’s essential for the structural integrity of the rolls.
- ✓ Avoid low-fat or fat free sour cream, as they lack the stabilizers needed for over high heat baking.
- ✓ Ensure your oven is fully preheated to 350°F before the pan goes in to get that perfect cheese melt.
- ✓ Pat the diced green chiles slightly dry if they seem excessively watery.
Adjusting Portions for Larger Groups
If you're hosting a big family gathering, scaling these Cheesy Chicken Enchiladas is fairly straightforward. For doubling the recipe, you’ll need two 9x13 inch pans. Don't try to stack them in one pan or the middle won't cook through. When doubling the sauce, be careful with the spices.
Salt and cayenne don't always need a full double; start with 1.5 times the amount and taste before adding the rest.
If you are cooking for just two people, you can easily halve the ingredients and use a smaller 8x8 inch square baking dish. Reducing the bake time by about 5 minutes is usually necessary for smaller pans.
For the egg wash or small binder quantities often found in other recipes, you'd beat the egg and use half, but here we are lucky because the sauce is very forgiving to scale down.
Exposing Traditional Enchilada Myths
One big myth is that you must use corn tortillas for "authentic" enchiladas. While corn is traditional in red sauce recipes, flour tortillas have become a beloved staple for creamy, white sauce versions because they hold up so well to the heavier dairy.
Another misconception is that the "spicier the better" for the filling. In reality, the creamy sauce is meant to be a soothing contrast to the mild heat of the chiles, not a fire breathing challenge.
Another common myth is that you need to drench the entire dish in sauce. If you cover every millimeter of the tortilla, you lose those wonderful crispy bits at the ends. Leaving the tips of the tortillas exposed allows them to get a bit of a "crunch" which provides a fantastic texture contrast to the silky interior.
It’s that play between the velvety sauce and the firm tortilla edges that makes this dish so addictive.
Smart Storage and Leftover Tips
You can keep these in the fridge for up to 3 days. I actually think they taste even better the next day because the spices in the chicken have more time to mingle. When reheating, avoid the microwave if possible. It tends to make the flour tortillas a bit rubbery.
Instead, pop a portion back into the oven or a toaster oven at 350°F for about 10 minutes until the cheese is bubbling again.
For zero waste, don't throw away the bones if you roasted a whole chicken for this recipe! You can simmer them with onion scraps and celery ends to make a homemade stock for the next time you make this sauce.
If you have leftover filling, it makes a killer grilled cheese sandwich or a topping for a quick taco salad the next afternoon.
Serving and Enjoying Your Meal
When it comes to serving, I love to lean into the "freshness" factor. A big handful of chopped cilantro or some sliced green onions adds a bright pop of color against the white sauce.
If you want a bit more acidity, a squeeze of fresh lime juice right before you take a bite can really cut through the richness of the Monterey Jack and sour cream.
- If you want more crunch: Broil the pan for the final 2 minutes of baking.
- If you want a lighter meal: Serve alongside a crisp green salad with a citrus vinaigrette.
- If you want a kick: Add a finely diced jalapeño to the onion and garlic sauté.
This dish is a crowd pleaser because it feels like a big, warm hug in food form. Whether you are feeding picky toddlers or hungry teenagers, the combination of melted cheese and creamy sauce is universally loved.
It’s a recipe that has seen me through many busy weeks, and I hope it becomes a reliable favorite in your home too. Just remember to breathe, enjoy the process, and don't forget to scrape those crispy cheese bits off the side of the pan!

High in Sodium
1085 mg mg of sodium per serving (47% % of daily value)
The American Heart Association recommends limiting sodium intake to about 2,300mg per day for most adults.
Tips to Reduce Sodium in Your Chicken Enchiladas
-
Broth Swap-30%
Use homemade or no-sodium chicken broth. Many store-bought broths are very high in sodium.
-
Cheese Choice-15%
Select low-sodium or naturally lower sodium cheeses such as Swiss, fresh mozzarella, or goat cheese, and reduce the amount of cheese used overall. Buy a block of cheese instead of pre-shredded.
-
Chile Control-10%
Rinse the canned green chiles thoroughly before use to remove excess sodium, or use fresh roasted green chiles. You can also use a smaller amount.
-
Salt Smarts-25%
Reduce the added salt by half, or eliminate it entirely. Taste and adjust seasonings as needed. The other ingredients provide sodium already.
-
Chicken Check-15%
Ensure the cooked chicken breast used is not pre-seasoned with salt or sodium containing ingredients during cooking or purchased pre-cooked.
-
Flavor Boost
Enhance the flavor with fresh herbs and spices! Experiment with other flavors like oregano, more garlic, or chili powder.
Cheesy Chicken Enchiladas FAQs
Can I use pre-shredded cheese for these enchiladas?
No, it's best to shred your own cheese. Pre-shredded cheese contains anti caking agents that prevent it from melting smoothly and can result in a less gooey texture.
Why is my enchilada sauce lumpy or grainy?
This is usually due to an improperly cooked roux. The flour needs to cook with the butter for at least two minutes until it smells nutty to eliminate that raw flour taste and ensure a smooth sauce base.
How do I prevent my flour tortillas from becoming mushy?
Quickly dip each tortilla in hot oil before filling. This creates a protective layer that helps the tortilla hold its shape and prevents it from absorbing too much sauce, maintaining a better texture.
What's the best way to reheat leftover enchiladas?
Avoid the microwave if possible; an oven or toaster oven is better. Reheating at 350°F (175°C) for about 10 minutes until the cheese is bubbly will help preserve the tortilla's texture.
Can I make these enchiladas ahead of time?
Yes, you can assemble them and refrigerate before baking. Just add a few extra minutes to the baking time, and try not to let them sit for more than 24 hours before baking to prevent the tortillas from getting too soggy.
Is it true that corn tortillas are more authentic for enchiladas?
No, this is a common misconception when it comes to creamy white sauce enchiladas. While corn tortillas are traditional for red sauce enchiladas, flour tortillas hold up exceptionally well to rich, dairy based sauces like the one in this recipe.
How do I get a crispier topping on my enchiladas?
Pop the dish under the broiler for the final 2 minutes of baking. This will give the cheese a beautiful golden brown color and some delightful crispy edges, adding a great textural contrast.
Cheesy Chicken Enchiladas
Ingredients:
Instructions:
Nutrition Facts:
| Calories | 798 calories |
|---|---|
| Protein | 45.8 g |
| Fat | 45.2 g |
| Carbs | 51.4 g |
| Fiber | 3.1 g |
| Sugar | 4.2 g |
| Sodium | 1085 mg |
