Pancake Mix
- Time: Active 10 minutes, Passive 15 minutes, Total 25 minutes
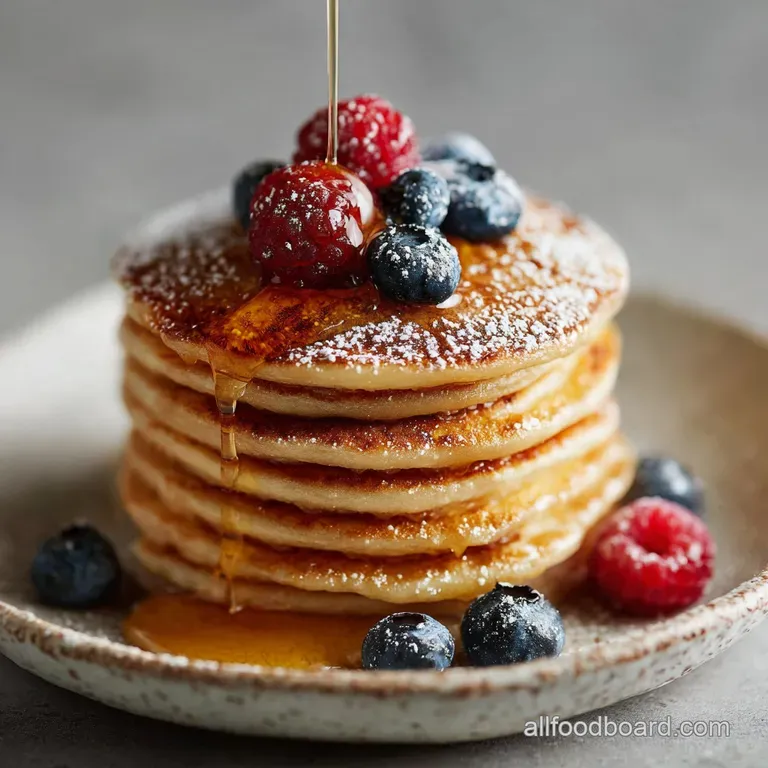
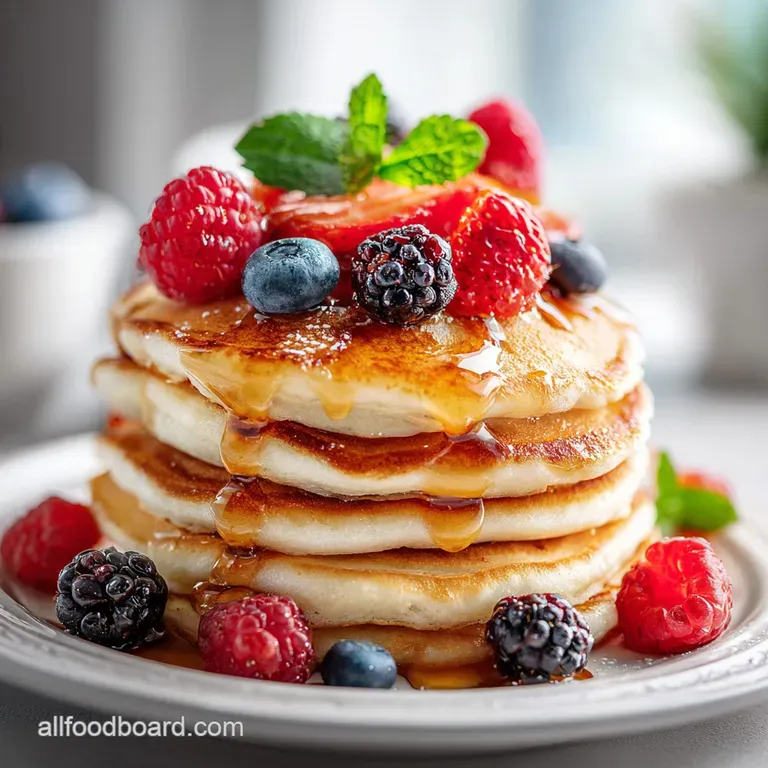
- Flavor/Texture Hook: Golden mahogany crust with a velvety, aerated center
- Perfect for: Busy weekday mornings and large family brunch gatherings
- Why This Pantry Staple Beats Every Boxed Brand Out There
- Critical Batch Metrics for Efficient Sunday Morning Meal Prep
- The Core Components Required for a Perfect Pantry Batch
- Essential Tools for Mixing and Griddling Your Breakfast Stack
- The Precise Path from Dry Mixing to Golden Brown Stacks
- Fixing Texture Flaws and Avoiding Common Batter Blunders
- Creative Ways to Customize Your Basic Pantry Pancake Base
- Ensuring Freshness with the Best Storage and Reheating Methods
- The Best Toppings and Sides for Your Breakfast Feast
- Very High in Sodium
- Pancake Mix FAQs
- 📝 Recipe Card
Why This Pantry Staple Beats Every Boxed Brand Out There
That violent sizzle when cold batter hits a hot, buttered skillet is the siren song of a good morning. We've all been there, standing in front of the pantry at 7:00 AM only to realize the yellow box is empty, or worse, the "just add water" stuff tastes like cardboard.
I spent years settling for mediocre flapjacks until I realized that a DIY mix isn't just cheaper, it's actually the secret to that restaurant style "shatter" on the edges.
This recipe is born from dozens of flat, rubbery failures in my own kitchen. I used to think all flour was the same, but the way we handle the dry components here changes everything. We're creating a base that stays fresh, reacts instantly to moisture, and yields a stack so light it practically floats off the plate.
It's a small victory for home cooks who want quality without the gourmet price tag.
Most people don't realize that store-bought mixes often sit on shelves for months, meaning the leavening agents are already losing their punch. By making this yourself, you control the potency of the rise.
We're going for a specific ratio that ensures the middle stays velvety while the outside gets that gorgeous, lacy texture. Trust me, once you smell this browning in your pan, you'll never look at a pre made box the same way.
The Science of Why it Works
Leavening Synergy: The combination of baking powder and baking soda creates a double action rise that expands instantly upon heat contact. Maillard Reaction: The granulated sugar reacts with the proteins in the flour and milk to create deep golden browning and complex toasted flavors.
Chef's Tip: Freeze your dry mix for 20 minutes before adding the wet ingredients. The cold temperature keeps the melted butter from fully emulsifying into the flour, creating tiny steam pockets for a flakier texture.
| Method | Cook Time | Texture | Best For |
|---|---|---|---|
| Cast Iron Skillet | 15 minutes | Shatter crisp edges | Classic diner feel |
| Electric Griddle | 12 minutes | Even, soft browning | Large family batches |
| Non Stick Pan | 15 minutes | Velvety and uniform | Beginners and low-fat |
Choosing the right vessel changes the outcome of your morning. While a griddle is efficient for feeding a crowd, I personally swear by a heavy cast iron pan for that specific, buttery crunch on the perimeter of the cake.
Critical Batch Metrics for Efficient Sunday Morning Meal Prep
Efficiency is the name of the game when you're half asleep and reaching for the coffee. This mix is designed to be a "set it and forget it" pantry addition. You spend ten minutes whisking once, and you're rewarded with weeks of instant breakfast.
It's the ultimate shortcut for busy families who don't want to sacrifice the taste of a scratch made meal.
I've found that the key to consistency is keeping the dry mix in a truly airtight container. Humidity is the enemy of the baking powder here. If you live in a particularly damp climate, throwing a small food grade silica packet into the jar can keep the mix from clumping.
We want it to stay as light and powdery as fresh snow so it incorporates seamlessly when the milk and eggs join the party.
When you're ready to cook, the ratios are simple. This recipe isn't just about the dry mix; it's about the harmony between the pantry staples and the fresh dairy. We are aiming for a batter that is thick enough to hold its shape but thin enough to spread slightly into a perfect circle.
If you've ever had pancakes that look like lumpy islands, you'll appreciate the fluid, silky nature of this specific formula.
| Servings | Dry Mix Quantity | Milk Required | Eggs |
|---|---|---|---|
| 3 People (1 Batch) | 2 cups | 1.5 cups | 1 Large |
| 6 People (2 Batches) | 4 cups | 3 cups | 2 Large |
| 9 People (3 Batches) | 6 cups | 4.5 cups | 3 Large |
Adjusting the batch size is straightforward, but always remember to whisk your dry mix before measuring. Over time, the heavier salt and sugar can settle at the bottom of the jar, and you want a balanced scoop every single time.
The Core Components Required for a Perfect Pantry Batch
The beauty of this recipe lies in its simplicity. We are using 6 cups of all purpose flour as our foundation. This provides the necessary gluten structure to hold those air bubbles without becoming tough.
I've tried using bread flour in a pinch, but it makes the pancakes far too chewy stick to the all purpose for that tender, melt in-your mouth experience.
To that, we add 0.5 cup granulated sugar. This isn't just for sweetness; sugar helps with the "tenderizing" of the crumb by interfering with gluten development. It also ensures that the pancakes brown beautifully at lower temperatures. The leavening is a heavy lift: 6 tablespoons of baking powder and 2 teaspoons of baking soda. This might seem like a lot, but remember, this is for a massive batch of mix. For another great way to use your pantry staples, you might want to look at My Homemade Pancake recipe for different ratio ideas.
Finally, we round it out with 2 teaspoons of fine sea salt. Never skip the salt! It balances the sugar and makes the grain flavor of the flour actually pop. When you're ready to make a fresh batch, you'll whisk 2 cups of this mix with 1.5 cups whole milk, 3 tablespoons melted unsalted butter, 1 large egg, and 1 teaspoon vanilla extract.
The vanilla is my personal "must have" for that nostalgic aroma that fills the whole house.
| Ingredient | Science Role | Pro Secret |
|---|---|---|
| Baking Powder | Primary Leavening | Use aluminum free to avoid a metallic aftertaste |
| Granulated Sugar | Caramelization | Whisk with dry flour to prevent clumping |
| Fine Sea Salt | Flavor Enhancer | Use fine grain so it dissolves instantly in batter |
Each ingredient serves a specific purpose in the chemistry of the bowl. While it's tempting to swap things out, keeping these ratios exact ensures the pH balance stays perfect for that sky high rise we are looking for.
Sourcing the Ingredients
- 6 cups all purpose flour: (Substitute: White whole wheat flour for a nuttier, denser cake) Why this? Provides the structural framework and protein for the rise.
- 0.5 cup granulated sugar: (Substitute: Coconut sugar for a lower glycemic, caramel like flavor) Why this? Aids in browning and keeps the crumb soft.
- 6 tablespoons baking powder: (Substitute: 2 tbsp cream of tartar + 1 tbsp baking soda for DIY version) Why this? The main engine for aeration and height.
- 2 teaspoons baking soda: (Substitute: Skip if using buttermilk, but the rise will be less aggressive) Why this? Reacts with acidic components for instant bubbles.
- 2 teaspoons fine sea salt: (Substitute: Kosher salt, but use 3 teaspoons) Why this? Sharpens all other flavors and controls sweetness.
- 1.5 cups whole milk: (Substitute: Oat milk for a creamy, dairy-free alternative) Why this? Provides the hydration and fat for a velvety texture.
- 3 tablespoons unsalted butter, melted: (Substitute: Neutral oil like avocado oil) Why this? Adds richness and creates a tender crumb.
- 1 large egg: (Substitute: 1/4 cup applesauce for a vegan friendly binder) Why this? Acts as the "glue" that holds the air bubbles together.
- 1 teaspoon vanilla extract: (Substitute: Almond extract for a cherry like scent) Why this? Adds that essential "bakery" aroma.
Essential Tools for Mixing and Griddling Your Breakfast Stack
You don't need a high end lab to make great pancakes, but a few specific tools make the process much smoother. I personally love using a large glass balloon whisk. It's better than a fork because it incorporates air into the dry mix as you combine the flour and leavening.
If you're making the big batch, use the largest bowl you have 6 cups of flour takes up more space than you'd think!
For the actual cooking, a 12 inch cast iron skillet is my "holy grail" tool. It holds heat like nothing else, which means once you find the "sweet spot" on your stove, the pan stays at that temperature.
If you use a thin aluminum pan, you'll find yourself constantly adjusting the dial as the pan overshoots or cools down too fast. A simple offset spatula or a wide silicone turner is also vital for getting under the pancake without deflating the air bubbles we worked so hard to create.
Chef's Tip: Use a mechanical ice cream scoop (the kind with the trigger) to portion your batter. This ensures every pancake is exactly the same size, which means they all finish cooking at the same time. No more guessing if the big one in the middle is done!
The Precise Path from Dry Mixing to Golden Brown Stacks
- Sift the flour. Measure 6 cups of all purpose flour into a massive mixing bowl. Note: Sifting prevents "pockets" of dry flour in your final batter.
- Combine the leavening. Add 6 tablespoons baking powder, 2 teaspoons baking soda, 0.5 cup sugar, and 2 teaspoons fine sea salt to the flour.
- Whisk the dry base. Use a large whisk to stir the mixture for at least 60 seconds until the powders are completely indistinguishable.
- Store the mix. Transfer the dry mixture to an airtight jar or container. Note: This stays fresh at room temperature for up to 3 months.
- Prepare the wet base. In a separate medium bowl, whisk together 1.5 cups whole milk, 1 large egg, and 1 teaspoon vanilla extract.
- Incorporate the butter. Slowly drizzle in 3 tablespoons of melted (but cooled) unsalted butter while whisking the milk mixture.
- Create the batter. Measure 2 cups of your DIY dry mix and gently fold it into the wet ingredients until just combined with visible lumps.
- Rest the batter. Let the mixture sit for 5 to 10 minutes. Note: This allows the flour to hydrate and the leavening to start bubbling.
- Preheat the skillet. Place your pan over medium low heat and add a tiny bit of butter until it sizzles and foams slightly.
- Griddle the cakes. Pour 1/4 cup of batter per pancake and cook until bubbles form on the surface and edges look set. Flip and cook for another 1-2 minutes.
Fixing Texture Flaws and Avoiding Common Batter Blunders
The biggest mistake I see people make is over mixing. We've been conditioned to want "smooth" batters, but with pancakes, lumps are your friends. If you whisk until the batter is perfectly smooth, you've developed too much gluten. This results in a pancake that feels more like a piece of chewy bread than a fluffy cloud. If you want that extreme height, you might enjoy trying this CloudBusting Fluffy Pancakes recipe which uses a similar "gentle touch" philosophy.
Another common issue is temperature control. If your pancakes are dark brown on the outside but raw in the middle, your heat is too high. Cast iron takes a while to warm up, so give it a good 5 minutes on low medium before you drop the first bit of batter.
If the butter burns and turns black immediately, wipe the pan out and start over at a lower setting. You want a gentle "hiss," not a violent scream when the batter hits the surface.
Why Your Pancakes Are Flat
If your pancakes look like crepes rather than fluffy discs, your leavening agent might be expired. Baking powder loses its "lift" over time, especially if the container wasn't sealed tight. Another culprit is a batter that's too thin.
If you measured your milk too generously, the bubbles won't have enough structure to hold onto, and they'll just pop and deflate.
| Problem | Root Cause | Solution |
|---|---|---|
| Rubbery Texture | Over mixing the batter | Fold gently; leave visible lumps in the bowl |
| Uneven Browning | Pan was not preheated | Wait 5 mins for pan to reach steady temp |
| Metallic Taste | Old baking powder | Use fresh, aluminum free baking powder |
Common Mistakes Checklist
- ✓ Never use a blender or electric mixer for pancake batter (it ruins the air bubbles).
- ✓ Don't flip the pancake more than once; it makes them tough and flat.
- ✓ Ensure the melted butter is not boiling hot when adding it to the egg (it will scramble).
- ✓ Avoid pressing down on the pancake with your spatula after the flip.
- ✓ Always do a "test" pancake (the first one is usually the "chef's snack" anyway).
Creative Ways to Customize Your Basic Pantry Pancake Base
Once you've mastered the basic mix, the world is your oyster. Or your blueberry. My kids love it when I toss a handful of fresh berries into the batter, but here’s the trick: don't mix them into the bowl. Sprinkle the fruit directly onto the wet side of the pancake after you've poured it onto the griddle.
This prevents the berries from bleeding and turning your whole batch of batter purple or grey.
For a savory twist, try adding some finely grated cheddar and chopped chives. It sounds wild, but a savory pancake served with a side of crispy bacon and a drizzle of spicy honey is a complete "game changer" for weekend brunch.
If you're looking for a more dessert style treat, a tablespoon of Dutch process cocoa powder added to the dry mix can turn these into chocolate velvet pancakes.
Adjusting for Dietary Needs
- dairy-free: Swap the whole milk for unsweetened almond or soy milk and use melted coconut oil instead of butter.
- gluten-free: Use a 1:1 gluten-free flour blend (like King Arthur's Measure for Measure). The texture will be slightly grainier, but the lift will still be impressive.
- Protein Boost: Replace 1/2 cup of the flour with a neutral flavored protein powder. You may need an extra tablespoon of milk as protein powder absorbs more moisture.
| Variation | Added Ingredient | Flavor Profile |
|---|---|---|
| Cinnamon Roll | 1 tsp Cinnamon | Warm, spicy, and nostalgic |
| Lemon Poppyseed | Zest of 1 Lemon | Bright, citrusy, and crunchy |
| Pecan Pie | 1/4 cup Toasted Pecans | Nutty, rich, and earthy |
Ensuring Freshness with the Best Storage and Reheating Methods
The beauty of this pancake mix is its shelf life. Because we aren't adding any fats or liquids until the day we cook, the dry mix can sit in a cool, dark pantry for up to 3 months. I use a large half gallon Mason jar with a tight fitting lid.
If you notice any clumping, just give the jar a good shake before you measure it out. It's the ultimate "emergency" breakfast for when the house is full of guests.
If you happen to have leftover cooked pancakes, don't throw them away! They freeze beautifully. I usually make a double batch on Sundays and freeze half for the kids to pop in the toaster during the week.
It’s way better than the frozen ones from the grocery store and takes exactly the same amount of time to heat up.
- Fridge Storage: Store leftover cooked pancakes in an airtight container for up to 3 days.
- Freezer Storage: Layer cooked pancakes between pieces of parchment paper and store in a heavy duty freezer bag for up to 2 months.
- Zero Waste Tip: If you have a small amount of leftover dry mix that isn't enough for a full batch, use it as a light breading for "oven fried" chicken or as a thickener for a sweet fruit cobbler topping.
The Best Toppings and Sides for Your Breakfast Feast
A stack of pancakes is only as good as what you put on top of it. While maple syrup is the classic choice, I’m a huge fan of "fancied up" butter. Whip some room temperature butter with a splash of maple syrup and a pinch of flaky salt.
It creates this velvety, salty sweet spread that melts into every nook and cranny of the pancake.
If you want a full spread experience, serve these alongside some thick cut peppery bacon or homemade breakfast sausage. The saltiness of the meat cuts through the sweetness of the syrup perfectly. For a fresher side, a simple fruit salad with mint and lime juice provides a bright contrast to the rich, buttery cakes.
My personal favorite way to eat these? A thin layer of peanut butter between each pancake in the stack, topped with sliced bananas and just a tiny drizzle of honey. It’s hearty, filling, and feels like a real treat.
No matter how you serve them, the fact that you made the mix from scratch makes every bite taste just a little bit better. It’s about taking those few extra minutes to create something real for the people you love.
Everything from the "shatter" of the crust to the soft, steamy center tells a story of a morning well spent. Give this mix a permanent spot in your pantry you won't regret it.

Very High in Sodium
1206 mg mg of sodium per serving (52% of daily value)
The American Heart Association recommends limiting sodium intake to about 2,300mg per day for most adults. This recipe is significantly higher than recommended.
Tips to Reduce Sodium in Your Recipe
-
Reduce Salt by Half-25%
Start by reducing the amount of fine sea salt by half. Taste as you go and adjust to your preference. This small change can make a big difference!
-
Baking Soda Alternative-15%
Consider using a sodium free baking powder alternative. Research and test to ensure optimal rise and flavor.
-
Low-Sodium Milk Options-5%
Look for lower sodium milk alternatives. While milk isn't a major sodium contributor, every little bit helps when dealing with such a high sodium content.
-
Unsalted Butter is Key
You are already using unsalted butter, which is excellent. Ensure you continue using unsalted butter to control the sodium levels.
-
Flavor with Herbs & Spices
Enhance the flavor of your recipe with sodium free herbs and spices like pepper, garlic powder, onion powder, or dried herbs to compensate for the reduced salt.
Pancake Mix FAQs
How do I make a pancake mix?
Whisk dry ingredients together. Combine all-purpose flour, granulated sugar, baking powder, baking soda, and fine sea salt in a large bowl and stir thoroughly until no streaks remain. Store this dry mix in an airtight container for future use.
What do you put in pancake mix?
Flour, leavening, sugar, and salt form the base. A standard pancake mix contains all-purpose flour for structure, baking powder and baking soda for lift, granulated sugar for sweetness and browning, and salt to enhance flavor. You'll add wet ingredients like milk, eggs, and butter when ready to cook.
Is pancake mix better with water or milk?
Milk provides a richer, more tender pancake. While water works in a pinch, milk adds fat and protein, contributing to a creamier texture and a more golden brown crust. For a truly decadent treat, consider our Fluffy Buttermilk Pancakes With Tangy Lift.
What are the three ingredients for pancakes?
Flour, liquid, and leavening are essential. At their core, pancakes require a base of flour for structure, a liquid like milk or water to form the batter, and a leavening agent (like baking powder) to make them rise and become fluffy.
These fundamental elements create the characteristic pancake texture.
How do I store homemade pancake mix?
Store in an airtight container at room temperature. Ensure the mix is completely dry and free from moisture before sealing it in a jar or airtight bag. Properly stored, your homemade pancake mix can last for up to 3 months.
Can I add things to my pancake mix?
Yes, customization is easy! You can whisk in ingredients like cocoa powder for chocolate pancakes, cinnamon and nutmeg for spiced flavors, or even finely grated cheese for a savory twist. If you enjoyed mastering the art of dry mix creation here, see how similar ingredient synergy works in The Golden Standard Homemade Moist Yellow Cake Recipe From Scratch.
Why are my pancakes flat?
Likely expired leavening or an over mixed batter. Baking powder and baking soda lose their potency over time, so ensure yours are fresh. Overmixing develops the gluten too much, leading to tough, flat pancakes instead of fluffy ones. Aim for a batter with visible lumps when just combined.
Pancake Mix

Ingredients:
Instructions:
Nutrition Facts:
| Calories | 469 kcal |
|---|---|
| Protein | 12.3 g |
| Fat | 17.3 g |
| Carbs | 63.5 g |
| Fiber | 1.8 g |
| Sugar | 14.4 g |
| Sodium | 1206 mg |
