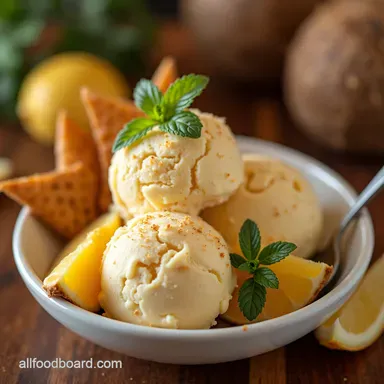
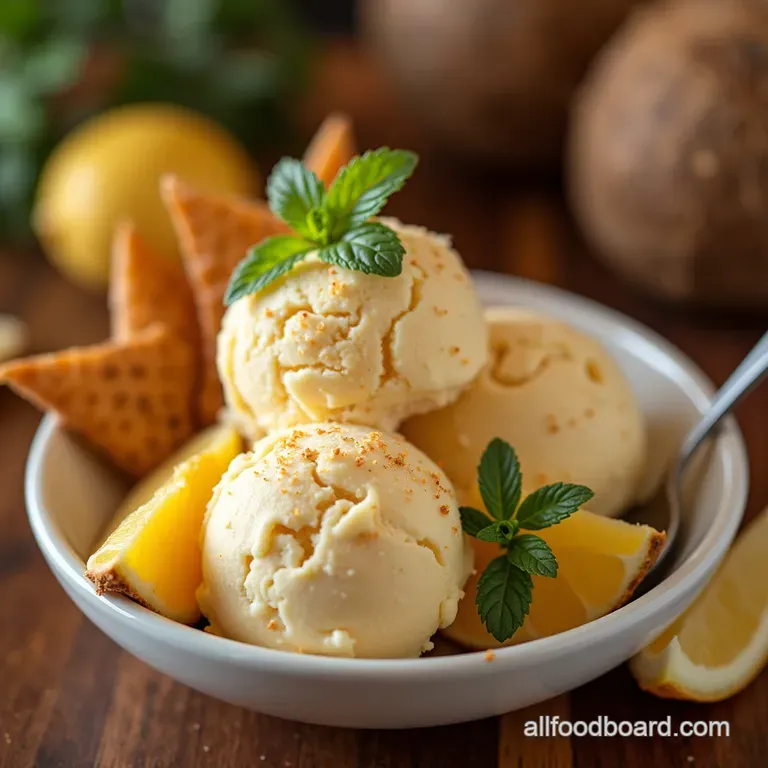
The Tropical Trainers Dream Nochurn Coconut Protein Ice Cream Low Sugar
- Ditch the Dairy: Unveiling Your New Favorite Guilt-Free Dessert
- Why This Coconut Protein Ice Cream Recipe Reigns Supreme
- Assembling the Building Blocks for Richness
- Essential Kitchen Gear for Perfect Protein Ice Cream
- The Seamless Path to Frozen Perfection
- Mastering the Freeze Cycle Without an Ice Cream Maker
- Maximizing Flavor and Longevity: Pro Kitchen Hacks
- Understanding the Nutritional Payoff
- Recipe FAQs
- 📝 Recipe Card
Ditch the Dairy: Unveiling Your New Favorite Guilt Free Dessert
For anyone dedicated to fitness or mindful eating, the craving for classic, comforting desserts can often feel like an unwelcome adversary. We all love the luxurious experience of a perfectly churned ice cream, but the standard versions are usually loaded with saturated fats and refined sugars that don't align with our goals.
Enter the solution that bridges the gap between decadent flavour and nutritional responsibility: Coconut Protein Ice Cream . This creation isn't just a compromise; it’s an upgrade.
By harnessing the natural creaminess of tropical coconut and integrating high-quality protein sources, we craft a frozen delight that satisfies deeply while actively supporting muscle recovery and satiety. Prepare to rethink everything you thought you knew about Homemade High Protein Ice Cream .
Why This Coconut Protein Ice Cream Recipe Reigns Supreme
This particular Coconut Protein Ice Cream Recipe is designed for maximum impact with minimal fuss. Forget complicated custard bases or specialized machinery; this is a straightforward process yielding results that mimic the silkiest commercial offerings.
It’s an exciting entry into the world of Healthy Protein Ice Cream Maker Recipes , even though we’re skipping the machine entirely.
The Secret to Ultra Creamy, No-Churn Texture
The magic behind achieving that enviable, scoopable texture without churning lies in two primary components: air and fat. We introduce air by whipping cold heavy cream until stiff peaks form.
Simultaneously, we leverage the high fat content of full fat canned coconut milk which must be thoroughly chilled overnight to provide structure and luxurious mouthfeel. When combined with protein powder, this mixture freezes beautifully, resisting the formation of large ice crystals.
This is the core technique for any successful Creami Protein Ice Cream Recipe that skips the churning step.
Fitness Goals Meet Flavor Goals: The Perfect Balance
This recipe is intelligently balanced to support an active lifestyle. With a substantial protein boost derived from the powder, each serving aids in muscle repair post workout. We utilize liquid sweeteners, such as stevia or a touch of maple syrup, allowing precise control over sugar intake.
The result is a Vanilla Protein Ice Cream Recipe base that is rich, satisfying, and perfectly calibrated for your macros.
A Tropical Escape in Every Spoonful
Beyond the nutritional benefits, the flavour profile is simply intoxicating. Utilizing coconut milk provides an inherent, subtle sweetness and a subtle tropical undertone that elevates the standard Protein Ice Cream Recipe .
It feels indulgent, like a vacation treat, rather than a restrictive dietary item. It genuinely stands out among standard Coconut Ice Cream Recipes because of its dense, high protein payload.
Assembling the Building Blocks for Richness
To craft this exceptional Coconut Milk Protein Ice Cream , ingredient quality is paramount. We are looking for texture and flavour harmony. You will start by chilling one 13.5 oz can of full fat coconut milk overnight; this step is non-negotiable as we need the hardened cream that separates from the water.
Alongside this, ensure you have one cup of very cold heavy whipping cream ready. For the protein component, use approximately one cup (around 100g) of high-quality vanilla or unflavoured protein powder ideally a casein blend for superior texture.
Flavour depth is enhanced by one teaspoon of pure vanilla extract and a minuscule pinch of sea salt to amplify all the other notes. Finally, sweeten to your preference; this could mean a couple of drops of liquid monk fruit or perhaps two tablespoons of maple syrup, depending on your dietary mandates.
Essential Kitchen Gear for Perfect Protein Ice Cream
While specialized machinery isn't required, having the right tools ensures success when preparing this Ninja Creami Coconut Protein Ice Cream alternative.
Selecting Your Superior Protein Powder
The choice of powder directly impacts the final consistency. Whey isolates can sometimes lead to a slightly icier texture, whereas casein proteins or blends containing casein (which absorb liquid exceptionally well) deliver that dreamy, thick mouthfeel we are aiming for.
Experimentation here can yield personalized results for your perfect Coconut Protein Ice Cream .
The Power Duo: Coconut Milk and Natural Sweeteners
As mentioned, the coconut milk must be the full fat variety, and it absolutely must be chilled until the cream solidifies. When it comes to sweetening, remember that cold dulls sweetness perception.
You must taste the un-frozen base mixture and adjust the sweetener slightly higher than you think you need that small adjustment makes all the difference once fully frozen.
Must Have Tools: Blender Integrity and Container Choice
While a powerful blender is great for smoothies, for this particular recipe, the main workhorse is an electric hand mixer or a stand mixer fitted with a whisk attachment. This is crucial for incorporating the maximum amount of air into the creams, which provides lift and prevents the final product from being dense.
For freezing, select a freezer safe, relatively shallow container, like a standard loaf pan, which allows for faster and more even freezing than a deep tub.
Related Recipes Worth Trying
- Ground Beef Cottage Cheese Pasta Bake Quick High Protein — Meet your new favourite weeknight meal the Ground Beef Cottage Cheese Pasta Bake This creamy casserole is packed with protein and flavoura hearty lasagne...
- Homemade Cranberry Swirl Custard Ice Cream Recipe — Master a truly decadent Homemade Cranberry Ice Cream This custard base recipe balances tart cranberry ripple perfectly Get the foolproof steps
- Spiced Gingerbread Cheesecake with Salted Caramel Drizzle — Forget dry crusts This showstopping recipe guides you through making perfect Christmas cheesecake recipes with a crisp gingerbread base and creamy filling A...
The Seamless Path to Frozen Perfection
Our goal is to combine the components gently and then manage the lengthy freeze time correctly. After whipping the cold heavy cream and the separated, chilled coconut cream into stiff peaks, you gently fold in the dry protein powder mixture in three stages.
Folding, rather than stirring aggressively, is vital for preserving the air bubbles you just created. Once the vanilla and sweetener are just incorporated, scrape this airy mixture into your chosen container. Press plastic wrap directly onto the surface before sealing the lid.
This prevents freezer burn and ice crystal formation on the exposed surface. Transfer this container immediately to the deepest, coldest part of your freezer for a minimum of six to eight hours, though overnight yields the best results.
Mastering the Freeze Cycle Without an Ice Cream Maker
Achieving the correct final texture is the last hurdle in this Coconut Protein Ice Cream Recipe . Since we haven't used a traditional churner, a little post freezing intervention can be necessary depending on your freezer's temperature fluctuations.
Step 1: Achieving Peak Smoothness Through Blending
If you own a high powered machine designed for processing frozen desserts, this is where you shine. For the best scoopable texture, break the semi frozen block into chunks and run it through your device using the "Respin" or "Ice Cream" setting.
This redistributes the small ice crystals and smooths out any slight graininess, giving you an immediate, perfectly textured dessert.
Step 2: The Initial Chill and Scrape Protocol
If you are proceeding without specialized machinery, the most important step happens right before serving. Remove your firmly frozen Coconut Protein Ice Cream from the freezer and let it temper on the counter for a solid 5 to 10 minutes.
This slight softening is what transforms it from rigid block to perfectly scoopable heaven.
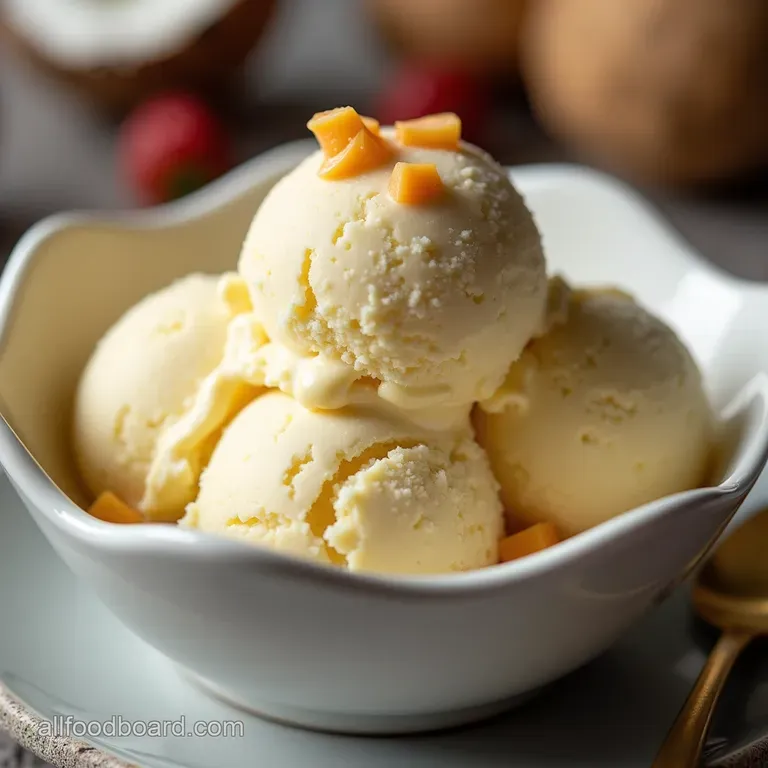
Step 3: Finalizing Your Coconut Protein Ice Cream Texture
For those who prefer to keep things simple, if the surface seems slightly hard after tempering, use a sturdy spoon to aggressively scrape the top layer back and forth. This simple mechanical action breaks up any surface ice and aerates the top layer, mimicking a light churn and making your Coconut Protein Ice Cream ready for immediate enjoyment.
Maximizing Flavor and Longevity: Pro Kitchen Hacks
One fantastic variation involves folding in two tablespoons of toasted, unsweetened coconut flakes right before the final freeze. The heat treatment brings out an intense, nutty flavour that pairs beautifully with the vanilla protein base.
Another professional trick for long term storage is adding one tablespoon of high proof vodka or clear rum to the base mixture before freezing; the alcohol acts as a natural antifreeze, keeping the texture softer for longer periods without affecting the flavour profile significantly.
Understanding the Nutritional Payoff
This dessert provides robust macronutrient support. For a serving size yielding about four portions, you can expect approximately 250 to 300 calories, driven primarily by healthy fats from the coconut, balanced by a significant protein hit of around 18 to 22 grams.
This makes it an excellent post workout meal replacement or a truly guilt free evening snack.
Flavor Twists: Beyond Basic Vanilla and Coconut
While the vanilla base is superb, consider enhancing this recipe further. For a deep chocolate twist, substitute the vanilla powder with chocolate protein powder and fold in two tablespoons of unsweetened cocoa powder during the mixing stage.
Alternatively, for a citrusy bright note, stir in the zest of one lime and one tablespoon of fresh lime juice after the protein has been folded in a fantastic, refreshing take on Coconut Ice Cream Recipes .
Troubleshooting: Avoiding the Rock Solid Freeze Pitfall
If your final product emerges too hard, it’s almost always due to one of three things: not enough fat content in the coconut milk, over mixing the whipped cream (which deflates the air), or using a protein powder that is too dense.
If it’s too hard, simply let it temper longer on the counter or use the scraping technique mentioned above.
Optimal Storage Solutions for Freshness
Always store your Coconut Protein Ice Cream in an airtight container. For the absolute best results over weeks or months, press a piece of plastic wrap directly onto the surface of the ice cream before sealing the lid.
This barrier prevents any environmental moisture from migrating to the surface and forming undesirable ice crystals.
Calorie Breakdown Per Serving: Transparency Matters
It is crucial to remember that the final nutrition will hinge entirely on your choice of sweetener and protein powder. Assuming the use of a lower carb sweetener, the primary caloric drivers will be the coconut fat and the protein powder itself.
Always check your specific powder's label, but generally, this recipe keeps sugars low (3-5g) while delivering high protein, making it a smart choice for dedicated health enthusiasts seeking a fantastic Creami Protein Ice Cream Recipe experience.
Recipe FAQs
My Coconut Protein Ice Cream turned out super icy, what did I do wrong?
Ah, that’s a common pickle! The main culprit is usually moisture. Make sure you only scoop the solid, thick cream off the top of the fully chilled coconut milk can, leaving the watery liquid behind.
Also, make sure you are folding in the dry protein powder gently to keep all the air you whipped into the cream; that trapped air is what keeps it scoopable, not rock solid!
Can I use whey protein isolate instead of the suggested protein powder for this Coconut Protein Ice Cream?
You absolutely can try, but be aware that isolates can sometimes absorb liquid differently and lead to a slightly chalkier or denser result. If you do use whey isolate, you might need to add a teaspoon more of liquid sweetener or a splash of milk/water to ensure it blends smoothly.
Casein or a casein blend generally gives the best, creamiest no-churn results.
How long can I store this homemade ice cream? Will it last until the next bank holiday?
Because this recipe doesn't use commercial stabilizers, it's best eaten within 1 to 2 weeks for optimal texture. Be sure to press plastic wrap directly onto the surface before putting the lid on, which stops those dreaded freezer burn crystals from forming.
If it gets too hard, just let it sit on the counter for 5 10 minutes before serving it'll soften up a treat!
I don't have an electric mixer; can I make this by hand?
Bless your arm! Yes, you can, but it will take some elbow grease, much like kneading dough for your Sunday roast bread. You’ll need a very sturdy whisk and about 10 to 15 minutes of vigorous, consistent whisking to get the heavy cream to stiff peaks.
Make sure your bowl and cream are absolutely freezing cold to give yourself the best chance of success.
What are the best additions or mix-ins for this tropical flavour?
To ramp up that holiday vibe, try folding in toasted macadamia nuts or some finely diced, drained pineapple right before freezing. For a slightly more decadent version, a swirl of melted 85% dark chocolate mixed in near the end creates a lovely 'magic shell' effect when frozen.
Just remember, the more you add, the more you might need to slightly increase the sweetener!
Nochurn Coconut Protein Ice Cream