Korean Ground Beef Bowl
- Time: Active 5 mins, Passive 10 mins, Total 15 mins
- Flavor/Texture Hook: Sizzling, caramelized beef with a velvety, spicy sweet glaze
- Perfect for: High speed weeknight dinner or meal prep for busy professionals
- Science of Perfect Searing and Glazing
- Essential Metrics for Quick Weeknight Dinners
- Sourcing Components for Deep Flavor Profiles
- Selecting Tools for High Heat Cooking
- Step-By-Step Guide to Maximum Umami
- Solving Common Texture and Taste Issues
- Simple Swaps for Healthier Alternatives
- Proper Cooling and Reheating Techniques
- Creative Ways to Plate Your Bowl
- Critical Sodium Level
- Recipe FAQs
- 📝 Recipe Card
Close your eyes and imagine the sound of cold beef hitting a white hot skillet. That immediate sizzle isn't just noise; it's the start of something incredible. I remember the first time I tried to recreate the flavors I'd found in a Seoul street market.
I failed miserably because I treated the meat like I was making a bolognese. It was gray, steamed, and honestly quite boring.
That’s a mistake you won't make today. We're going for those crispy, charred bits that cling to the rice and a sauce that’s so glossy it looks like lacquer. Most people struggle with ground beef feeling "heavy" or one note, but we're going to fix that with a sharp hit of ginger and the fermented funk of gochujang.
This is the ultimate solution for those nights when you're staring at the fridge at 6:00 PM with zero motivation. It’s faster than ordering a delivery and infinitely more satisfying.
By the time your rice cooker clicks over to "warm," you’ll have a bowl of food that looks and tastes like it came from a professional kitchen. Let's get into the mechanics of why this works.
Science of Perfect Searing and Glazing
The secret to this dish lies in the chemistry of heat. We aren't just cooking the meat; we are transforming its molecular structure to create new flavor compounds.
- Maillard Reaction: High heat rearranges amino acids and sugars on the beef's surface, creating hundreds of different flavor molecules and that signature brown crust.
- Sugar Caramelization: As the brown sugar heats, it breaks down and molecules reform into complex, nutty, and slightly bitter structures that balance the salty soy sauce.
- Emulsification: The combination of rendered beef fat and the starch in the gochujang creates a thick, glossy coating that clings to every morsel of protein.
When we talk about deep flavor, we are really talking about these reactions happening simultaneously. If your pan isn't hot enough, the beef releases its moisture too quickly and boils in its own juices. This results in a rubbery texture rather than the shatter-crisp edges we want.
Essential Metrics for Quick Weeknight Dinners
Before we start the heat, let's look at the benchmarks that ensure success every single time. Precision matters when the cooking window is this narrow.
| Metric | Target Value | Why It Matters |
|---|---|---|
| Beef Fat Ratio | 90/10 Lean | Enough fat for flavor without making the rice bowl greasy |
| Skillet Surface Temp | 375°F - 400°F | Ensures immediate searing and prevents the meat from steaming |
| Aromatics Prep | Grated/Microplaned | Increases surface area for maximum fragrance release in seconds |
Chef's Tip: Freeze your fresh ginger for 15 minutes before grating. It makes the fibers much easier to break down, giving you a smooth paste rather than a stringy mess.
Similar to how you'd manage temperatures in a Ground Beef Dinner Recipes like cottage pie, managing the moisture here is key. If you find your meat is releasing too much liquid, simply push it to the sides and let the center of the pan evaporate the water before continuing.
Sourcing Components for Deep Flavor Profiles
The magic of a Korean Ground Beef Bowl is in the contrast between the rich fat of the beef and the bright, fermented notes of the condiments.
- 1 lb Lean Ground Beef (90/10): The backbone of the dish.
- 1 tbsp Toasted Sesame Oil: Provides a nutty base note and a high smoke point for the initial sear.
- 3 cloves Garlic, grated: Use fresh; the pre peeled stuff in jars loses its "bite."
- 1 tbsp Fresh Ginger, grated: Adds a floral heat that cuts through the sugar.
- 1/4 cup Soy Sauce: This is our primary salt source and provides the deep brown color.
- 1/4 cup Light Brown Sugar, packed: The molasses content helps with the sticky glaze consistency.
- 1.5 tbsp Gochujang (Korean chili paste): A fermented powerhouse that adds thick body and a complex, funky spice.
- 1 tsp Red Pepper Flakes: For a clean, sharp heat that hits the back of the throat.
- 3 cups Cooked Jasmine Rice: The perfect fluffy canvas for the sauce.
- 2 Green Onions, thinly sliced: Added at the end for crunch and a fresh, oniony finish.
- 1 tsp Toasted Sesame Seeds: For texture and visual appeal.
| Ingredient | Science Role | Pro Secret |
|---|---|---|
| Gochujang | Emulsifier | Never boil it too long or the delicate fermented notes turn bitter. |
| Sesame Oil | Flavor Carrier | Add half at the start and a tiny splash at the very end for aroma. |
| Brown Sugar | Hygroscopic Agent | It pulls moisture from the beef to help create a concentrated syrup. |
One mistake I made early on was substituting regular chili paste for gochujang. Don't do it. Gochujang has a unique sweetness and thickness from fermented soybeans and glutinous rice that you just can't replicate with Sriracha or sambal oelek.
Selecting Tools for High Heat Cooking
The right equipment acts as a force multiplier in the kitchen. For this recipe, heat retention is the name of the game.
- Cast Iron Skillet: A 12 inch Lodge or similar pan is king. It holds heat better than stainless steel, ensuring the beef sears rather than stews.
- Microplane Grater: Essential for the garlic and ginger to create a paste that melts into the sauce.
- Wooden Spatula: Use one with a flat edge to scrape up the "fond" (the brown bits) from the bottom of the pan.
- Rice Cooker: Consistency is key here; you want fluffy, separate grains of jasmine rice.
If you are deciding between different cooking methods, here is how the stovetop approach compares to using an oven.
| Feature | Stovetop (Skillet) | Oven (Roasting Pan) |
|---|---|---|
| Texture | Crispy edges, moist interior | Evenly cooked, less caramelization |
| Speed | 10 minutes | 20-25 minutes |
| Control | Active stirring for glaze | Set and forget |
While the oven is great for hands off cooking, the stovetop is the only way to get that authentic "street food" char that makes a Mongolian Beef Recipe or this Korean bowl so addictive.
step-by-step Guide to Maximum Umami
Follow these steps closely to ensure your beef stays tender while the sauce becomes thick and velvety.
- Prep the aromatics. Grate 3 cloves of garlic and 1 tbsp of ginger into a small bowl. Note: Mixing them early allows the flavors to meld before they hit the heat.
- Heat the skillet. Place your skillet over medium high heat and add 1 tbsp toasted sesame oil until it wisps with smoke.
- Sear the beef. Add 1 lb ground beef to the pan. Do not stir for 3 minutes until the bottom is deeply browned.
- Break it up. Use your spatula to crumble the meat into small pieces. Note: Keep the pieces slightly irregular for varied texture.
- Infuse the aromatics. Stir in the grated garlic and ginger. Cook for 1 minute until the kitchen smells incredible.
- Build the sauce. Pour in 1/4 cup soy sauce, 1/4 cup brown sugar, and 1.5 tbsp gochujang.
- Add the heat. Sprinkle in 1 tsp red pepper flakes. Stir constantly to melt the sugar and incorporate the paste.
- Reduce and glaze. Simmer for 2-3 minutes until the sauce bubbles and thickens into a dark, shiny coating.
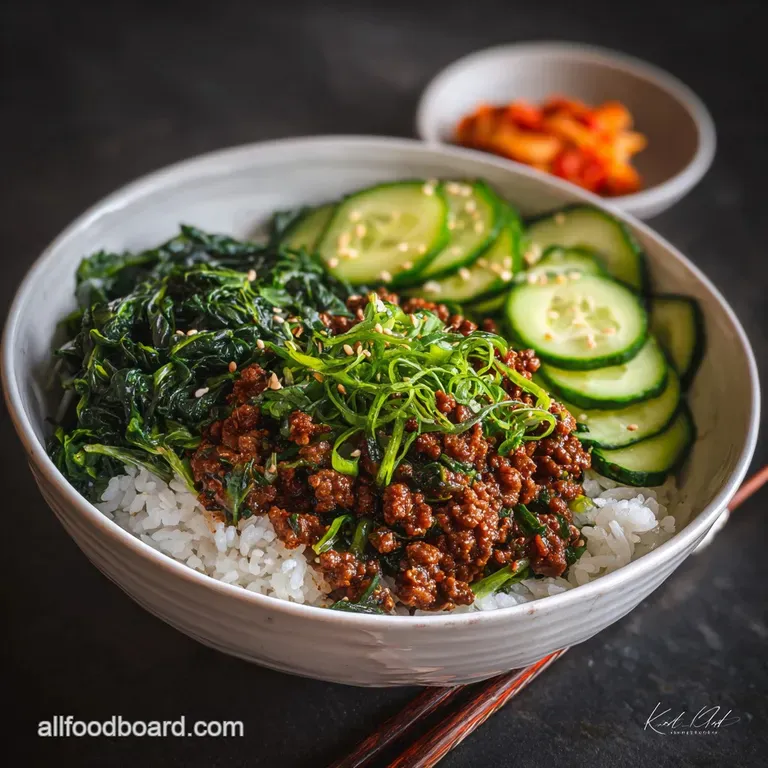
- Garnish and serve. Spoon the beef over 3 cups of hot jasmine rice.
- Final touches. Top with sliced green onions and 1 tsp toasted sesame seeds.
Chef's Tip: If the sauce feels too thick, add one tablespoon of water at a time. It will loosen the glaze without diluting the bold flavors we've worked so hard to build.
Solving Common Texture and Taste Issues
Even the best cooks run into trouble sometimes. Usually, it's a matter of heat management or ingredient ratios.
Why Your Beef is Dry
If the meat feels like chewing on pebbles, you likely overcooked it before adding the liquid. Ground beef is thin; it only needs that initial sear and then a quick simmer in the sauce. Once the pink is gone and you have some crust, move straight to the sauce.
Why Your Sauce is Greasy
If you see a pool of oil at the bottom of the bowl, you didn't drain enough fat or your heat was too low. Fat should be an ingredient, not a puddle.
| Problem | Root Cause | Solution |
|---|---|---|
| Too Salty | Over reduced soy sauce | Add a squeeze of lime juice or a teaspoon of rice vinegar. |
| Pale Meat | Pan was overcrowded | Cook in two batches to maintain high surface temperature. |
| Burnt Sugar | Heat was too high | Add the sugar and soy together to buffer the temperature. |
If you want a different experience, like the slow cooked richness of a Cook Ground Beef recipe, you'd focus more on fat emulsification, but for this bowl, we want that quick, sharp reduction.
Simple Swaps for Healthier Alternatives
This recipe is incredibly flexible. Whether you're cutting carbs or looking for a different protein, these swaps work without sacrificing the soul of the dish.
- Ground Turkey or Chicken: Use 1 lb of ground poultry. Note: Add an extra teaspoon of sesame oil as turkey is much leaner than beef.
- Cauliflower Rice: A fantastic low carb base. Sauté it separately with a little garlic and salt.
- Coconut Aminos: Swap the soy sauce 1:1. It’s naturally sweeter, so you might want to reduce the brown sugar by half.
- Honey: Use 3 tbsp of honey instead of brown sugar for a more floral sweetness.
| Original Ingredient | Substitute | Why It Works |
|---|---|---|
| Jasmine Rice (3 cups) | Quinoa (3 cups) | Adds a nutty flavor and significantly more fiber. |
| Gochujang (1.5 tbsp) | Sriracha + Miso (1:1) | Miso provides the funk, Sriracha provides the heat. |
| Ground Beef (1 lb) | Plant Based Mince (1 lb) | Mimics the texture; absorbs the bold sauce perfectly. |
Decision Shortcut: If you want extra crunch, serve this in large butter lettuce leaves like a wrap. If you want maximum spice, double the gochujang and red pepper flakes.
If you want more vegetables, stir in two cups of small broccoli florets during the sauce reduction.
Proper Cooling and Reheating Techniques
This is one of those rare dishes that actually tastes better the next day as the aromatics continue to infuse into the beef.
- Fridge: Store in an airtight container for up to 4 days. Keep the rice and beef in separate containers if possible to prevent the rice from getting mushy.
- Freezer: The cooked beef freezes beautifully for up to 3 months. Let it cool completely, then flat pack it in a freezer bag to save space.
- Reheating: Use a microwave for 1-2 minutes with a damp paper towel over the bowl to steam the rice. Or, for best results, toss it back in a hot skillet with a tiny splash of water to revive the glaze.
Zero Waste Tip: Don't throw away the white parts of the green onions! Sauté them with the garlic and ginger at the beginning for a deeper onion flavor, and save the green tops for the final garnish.
Also, if you have leftover sauce in the pan, deglaze it with a little water and pour it over steamed vegetables tomorrow.
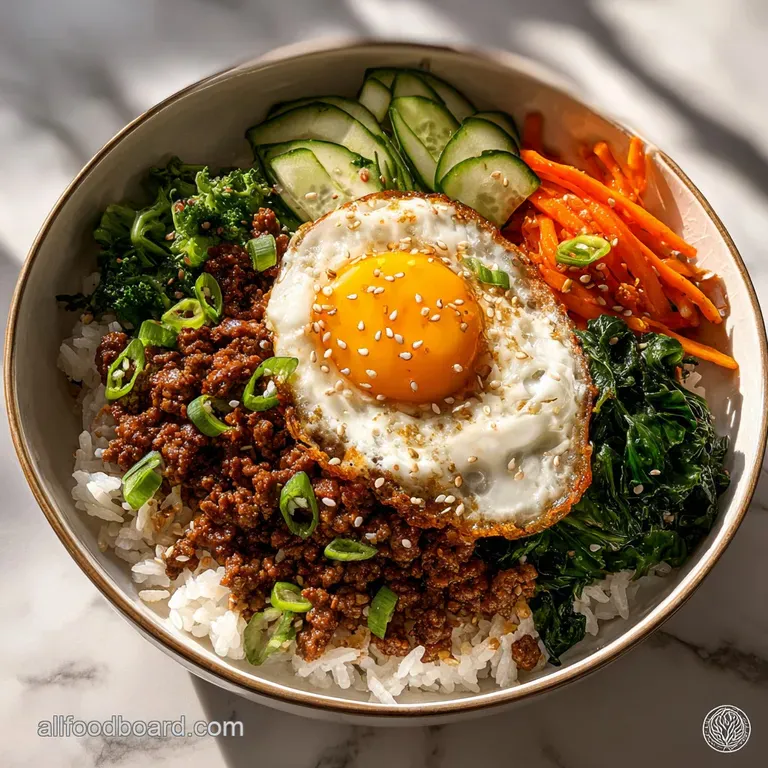
Creative Ways to Plate Your Bowl
Presentation is part of the experience. To channel that global travel vibe, think about how you layer the components.
Don't just dump the meat on top of the rice. Place the rice on one side of a wide, shallow bowl. Nestle the beef next to it, then add a few vibrant sides. A pile of quick pickled cucumbers or a handful of shredded red cabbage adds the bright, acidic contrast that makes the rich beef pop.
A soft boiled egg with a jammy yolk is a classic addition. When you break the yolk, it mixes with the spicy beef sauce to create a rich, creamy coating that is absolutely divine. For another twist, try serving the beef over crispy fried noodles instead of rice for a textural contrast that will remind you of the best street stalls in Asia.
The beauty of the Korean Ground Beef Bowl is its adaptability. Whether you're eating it standing up at the kitchen counter or serving it for a casual Friday night with friends, it delivers a punch of flavor that belies its simple preparation.
Trust the heat, don't skimp on the ginger, and enjoy the fragrances that fill your home.

Critical Sodium Level
1420 mg mg of sodium per serving (62% % of daily value)
The American Heart Association recommends limiting sodium intake to no more than 2,300mg per day for most adults. This recipe exceeds that limit.
Sodium Reduction Tips for this Recipe
-
Low-Sodium Soy Sauce-25%
Replace the regular soy sauce with a low-sodium soy sauce. This simple swap can significantly reduce the sodium content without sacrificing flavor. Look for varieties labeled 'reduced sodium' or 'light'.
-
Reduce Gochujang-15%
Gochujang, while flavorful, is often high in sodium. Reduce the amount used by half (0.75 tbsp) and adjust to taste, or use a low-sodium alternative if available.
-
Leaner Ground Beef-10%
While 90/10 is lean, consider using even leaner ground beef (e.g., 93/7 or 95/5) and drain thoroughly after cooking. This further reduces fat and can slightly lower sodium content.
-
Unsalted Rice-10%
Ensure the jasmine rice is cooked without any added salt. Many people add salt to the cooking water, which significantly increases the sodium content of the dish.
-
Fresh is Best-5%
Make sure you're using freshly grated garlic and ginger instead of jarred versions, which can sometimes contain added salt.
-
Flavor Boost
Enhance the flavor profile with sodium free herbs and spices. Consider adding a dash of black pepper, a pinch of dried thyme, or a squeeze of fresh lime juice for added zing without sodium.
Recipe FAQs
What is the best type of ground beef to use for this Korean Ground Beef Bowl?
A 90/10 lean to fat ratio is ideal. This provides enough fat for flavor and moisture without making the final dish too greasy. Using leaner beef might require adding a little extra oil to prevent dryness.
How can I get the beef extra crispy and caramelized?
Ensure your skillet is screaming hot before adding the beef. Avoid overcrowding the pan, as this steams the meat instead of searing it, and let the beef brown undisturbed for a few minutes before breaking it up.
Can I make the sauce for this Korean Ground Beef Bowl ahead of time?
Yes, the sauce mixture can be prepared up to 3 days in advance. Store it in an airtight container in the refrigerator. This makes assembly even quicker for busy weeknights.
What is gochujang and can I substitute it?
Gochujang is a fermented Korean chili paste with a unique sweet and savory flavor profile. While you can substitute with a mix of Sriracha and miso for a similar funk and heat, it won't be exactly the same. If you enjoyed mastering the flavor balancing in this recipe, see how we achieve depth in our Proper Good Ground Beef Tacos A Classic Done Right.
How can I make this Korean Ground Beef Bowl lower in carbs?
Serve the beef mixture over cauliflower rice instead of traditional jasmine rice. Sautéing the cauliflower rice with a little garlic and salt provides a great base that absorbs the sauce well.
My sauce seems too thick, how can I adjust it?
Add water, one tablespoon at a time, until the desired glaze consistency is reached. This will loosen the sauce without diluting the bold flavors you've built.
How long does this Korean Ground Beef Bowl last in the refrigerator?
Cooked beef and rice can be stored separately in airtight containers for up to 4 days. Reheating in a skillet with a splash of water is recommended to revive the glaze and keep the texture pleasant.
Korean Ground Beef Bowl
Ingredients:
Instructions:
Nutrition Facts:
| Calories | 458 kcal |
|---|---|
| Protein | 27.2 g |
| Fat | 14.8 g |
| Carbs | 52.4 g |
| Fiber | 1.2 g |
| Sugar | 16.5 g |
| Sodium | 1420 mg |
