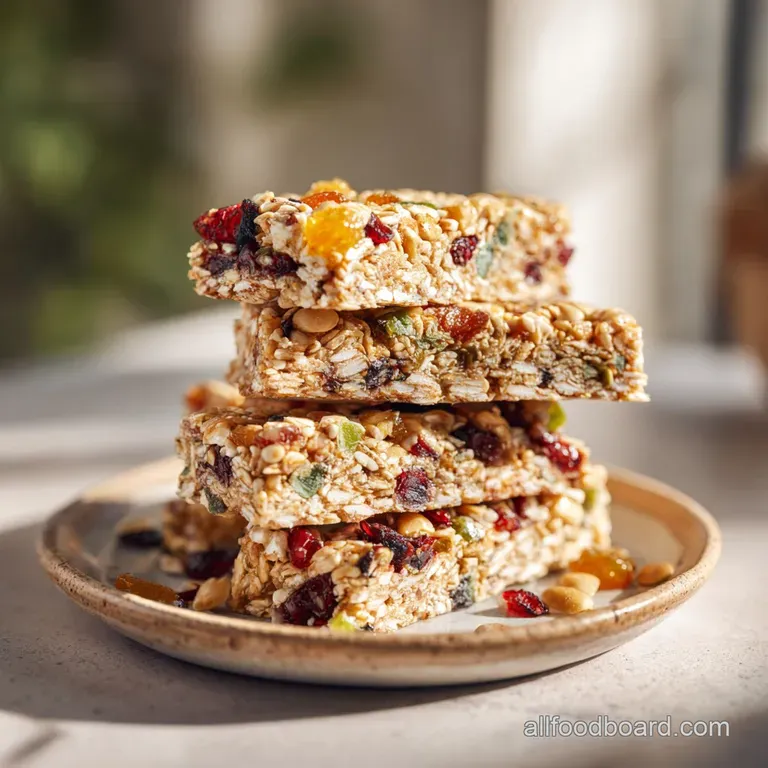
Homemade Protein Bars: Fudgy and Nutritious
- Time: Active 10 minutes, Passive 30 minutes, Total 40 minutes
- Flavor/Texture Hook: Sumptuous, velvety nut butter base with a snap of dark chocolate
- Perfect for: Post yoga nourishment, rustic hiking snacks, or a mid afternoon energy lift
- Why Most Homemade Protein Bars Texture Fails You
- The Secret To A Fudgy And Cohesive Bite
- Curating The Finest Pantry Elements For Your Snack
- The Rustic Toolkit For A Perfectly Pressed Slab
- Bringing Your Handmade Protein Bars To Life
- Common Errors To Sidestep For Better Protein Bars
- Adjusting The Batch Size
- Breaking Down Snack Myths
- Preserving The Freshness Of Your Protein Bars
- Elegant Ways To Enjoy Your Flour Dusted Snacks
- Recipe FAQs
- 📝 Recipe Card
Why Most Homemade Protein Bars Texture Fails You
We have all been there standing in the kitchen with a mouthful of what feels like sweetened sawdust. I remember my first attempt at making a batch of "healthy" snacks; I followed a random recipe, and the result was so brittle I could have used them to shim a wobbly table.
The culprit is almost always a lack of proper hydration for the dry protein powder, which acts like a tiny, thirsty sponge. If you don't saturate those particles correctly, they will pull moisture from your palate, leaving you reaching for a glass of water after every single bite.
This recipe is the targeted fix for that gritty, rubbery misery we've all endured.
The secret to a truly artisanal snack lies in the ratio of viscous fats to dry starches. Instead of relying on chemical emulsifiers, we use the natural oils in creamy nut butters to coat each grain of oat flour. This creates a barrier that prevents the bar from drying out, even after a few days in the fridge.
When I started treating these more like a rustic shortbread or a flour dusted pastry rather than a "supplement," the texture shifted from "tolerable" to something I actually looked forward to eating. It is about the craft of the press and the patience of the chill.
By focusing on high-quality ingredients like 70% dark chocolate and pure vanilla extract, we move away from that artificial, metallic aftertaste that plagues so many commercial options. You aren't just making a meal replacement; you are crafting a small, dense piece of culinary art.
The following methods ensure that every bite is cohesive, satisfying, and reminiscent of a decadent fudge rather than a dry brick of oats. We are going for a velvety mouthfeel that holds its shape but yields softly when you bite into it.
The Secret To A Fudgy And Cohesive Bite
The Hydration Threshold: When you add the almond milk one tablespoon at a time, you are slowly waking up the fibers in the oat flour and flaxseed without drowning them. This allows the protein powder to incorporate smoothly into the fats rather than clumping into dry, sandy pockets.
The Compression Principle: Applying significant force when pressing the mixture into the pan isn't just about looks; it is about structural integrity. By removing air pockets, you force the natural sugars and oils to interlock, creating a bar that won't crumble in your gym bag.
Cold Crystallization: The 30 minutes in the refrigerator allows the honey and nut butter to solidify around the dry ingredients. This "set" phase is what creates that distinct snap when you finally slice through the slab with a sharp knife.
| Thickness | Internal Temp | Rest Time | Visual Cue |
|---|---|---|---|
| 1 inch | Room Temp | 30 minutes | Surface feels firm, not tacky |
| 0.5 inch | Room Temp | 20 minutes | Edges look matte and set |
| 1.5 inch | Room Temp | 45 minutes | Heavy resistance when pressed |
Just as structural integrity is the defining feature of my Pecan Bars recipe, these snacks rely on the perfect marriage of binders and dry elements. Without the right pressure, you simply have a bowl of very expensive granola.
| Ingredient Component | Role in the Slab | Pro Secret |
|---|---|---|
| Oat Flour | Structural foundation | Toast lightly first for a rustic, nutty aroma |
| Nut Butter | Primary lipid binder | Use "drippy" natural butter for better distribution |
| Honey/Maple | Viscous adhesive | Warm it slightly for 10 seconds to make mixing easier |
| Flax/Chia Seeds | Secondary moisture lock | Grinding them fresh releases oils that help binding |
Curating The Finest Pantry Elements For Your Snack
- 2 cups (180g) certified gluten-free oat flour: This provides a soft, cake like base. Why this? Oat flour has a natural sweetness and superior moisture absorption compared to almond flour.
- Substitute: Almond flour (use 2.5 cups as it is less absorbent).
- 1 cup (120g) whey or plant based protein powder: The muscle of the recipe. Why this? Whey creates a fudgier texture, while plant based (pea/rice) offers a heartier chew.
- Substitute: Collagen peptides (will result in a much stickier, chewier bar).
- 1/4 cup (30g) ground flaxseed or chia seeds: For omega-3s and binding. Why this? These seeds act as a "glue" when they come into contact with the almond milk.
- Substitute: Ground hemp hearts for a more buttery, nutty finish.
- 1/2 tsp (3g) sea salt: To balance the sweetness. Why this? Salt heightens the profile of the dark chocolate and nut butter.
- Substitute: Flaky Maldon salt sprinkled on top after pressing.
- 1 cup (250g) creamy natural peanut butter or almond butter: The main fat source. Why this? Natural versions lack stabilizers, allowing for a better "melt in-mouth" feel.
- Substitute: Sunflower seed butter for a completely nut free alternative.
- 1/3 cup (115g) honey or pure maple syrup: Our natural sweetener. Why this? The stickiness of honey is superior for bars that won't fall apart.
- Substitute: Brown rice syrup for a less sweet, even stickier hold.
- 3 tbsp (45g) unsweetened almond milk: The hydration agent. Why this? It provides enough liquid to bind without adding unnecessary fat or calories.
- Substitute: Cold brew coffee for a subtle caffeine kick and mocha flavor.
- 1/3 cup (50g) 70% dark chocolate chips: For the "reward" factor. Why this? High cocoa content means less sugar and a more intense flavor profile.
- Substitute: Cacao nibs if you want a purely rustic, sugar-free crunch.
- 1 tsp (5g) pure vanilla extract: The aromatic bridge. Why this? It rounds out the flavors and masks any "chalky" notes from the protein.
- Substitute: Almond extract (use only 1/4 tsp as it is very potent).
The Rustic Toolkit For A Perfectly Pressed Slab
To achieve that professional, clean cut look, you don't need fancy machinery, but a few specific items will make your life much easier. I always reach for a sturdy silicone spatula one that doesn't flex too much when you're working through a thick, heavy dough.
A flimsy spoon will simply bend under the weight of the nut butter and honey. You want something that can really scrape the bottom of the bowl and fold the chocolate chips into the thickest parts of the mixture.
The most important tool in your arsenal, however, is the 8x8-inch baking pan. I prefer a metal one with sharp, 90 degree corners rather than rounded glass edges. This ensures that your end pieces are just as beautiful and uniform as the center cuts. To go with this, you'll need parchment paper.
Don't just grease the pan; the parchment acts as a sling, allowing you to lift the entire slab out at once. This prevents the "first bar crumble" that happens when you try to dig a square out of a corner with a knife.
For The Perfect Chewy Not-Chalky Texture
Using a flat bottomed glass to press the dough is a total game changer. I used to use my hands, but the heat from my palms would melt the chocolate chips prematurely, making a muddy mess. A heavy glass or even the bottom of a smaller measuring cup allows you to apply even, cold pressure.
This packs the ingredients tightly together, creating that dense, professional grade texture we're after.
Bringing Your Handmade Protein Bars To Life
- Whisk together 2 cups oat flour, 1 cup protein powder, 1/4 cup flaxseeds, and 1/2 tsp sea salt in a large bowl. Note: Using a whisk ensures the salt and flax are evenly distributed before the wet ingredients arrive.
- Make a well in the center and pour in 1 cup nut butter, 1/3 cup honey, and 1 tsp vanilla.
- Stir the mixture with a sturdy spatula until a thick, crumbly dough forms.
- Add the 3 tbsp almond milk one tablespoon at a time, mixing thoroughly between each.
- Continue mixing until the dough holds its shape when pinched between your fingers.
- Fold in 1/3 cup dark chocolate chips until they are scattered evenly throughout.
- Transfer the mixture to a parchment lined 8x8-inch pan.
- Press the dough into the corners and use a flat bottomed glass to pack it down until the surface is smooth and extremely firm.
- Chill in the refrigerator for 30 minutes until the slab feels solid to the touch.
- Lift the parchment paper out, place on a cutting board, and slice into 12 even bars using a long, sharp knife.
Common Errors To Sidestep For Better Protein Bars
The biggest mistake I see people make is being impatient with the almond milk. If you dump all three tablespoons in at once, you risk turning your bars into a sticky paste that will never set. Different protein powders have different absorption rates whey is usually less thirsty than pea protein.
By adding it slowly, you maintain control over the "damp sand" consistency that is crucial for a bar that is firm but moist.
Another common pitfall is under pressing. If you don't use enough force, your bars will simply disintegrate when you try to eat them on the go. You want to press down with almost your full body weight (safely, of course!). Think of it as creating a sedimentary rock of nutrition.
If you see air pockets when you slice into them, you'll know you need to be more aggressive with the flat bottomed glass next time.
Why Your Protein Bars Are Falling Apart
This usually stems from a lack of "adhesive." If your nut butter was too dry (the stuff at the bottom of the jar often is), it won't have enough oil to coat the flour.
| Problem | Root Cause | Solution |
|---|---|---|
| Bars are crumbly | Not enough liquid or pressure | Add 1 tsp more honey and press harder |
| Bars are too sticky | Too much liquid added | Mix in 2 tbsp extra oat flour to absorb moisture |
| Chocolate melted | Added while mixture was warm | Ensure nut butter is room temp before folding chips |
Adjusting The Batch Size
Scaling Down (Small Batch)
If you only want 6 bars, halve everything but be careful with the egg (if you were using one, though this recipe is egg free!). For this specific recipe, use a smaller 4x6 loaf pan. Reduce the chill time slightly to 20 minutes, as the smaller mass will cool faster.
Scaling Up (Bulk Prep)
When doubling for 24 bars, use a 9x13 pan. I suggest only increasing the salt and vanilla by 1.5x to avoid overpowering the other flavors. When working with such a large amount of dough, it is easier to use a stand mixer with a paddle attachment on low speed to ensure the nut butter is fully incorporated without wearing out your arm.
| Fresh Homemade | Shortcut (store-bought) | Flavor Impact |
|---|---|---|
| Natural Nut Butter | Stabilized PB | Fresh has a cleaner, saltier finish |
| Hand Pressed | Machine Extruded | Hand pressed is much more tender and less "rubbery" |
| Dark Choc Chips | Chocolate Coating | Chips provide bursts of flavor rather than a waxy shell |
If you are building a healthy snack rotation alongside my Beef Jerky recipe, these bars provide the perfect sweet and fat heavy balance to the lean, savory protein of the jerky.
Breaking Down Snack Myths
One pervasive myth is that you must bake protein bars to make them "safe" or to set them. In reality, baking often dries out the protein powder, leading to that rubbery, unappealing texture. Cold setting preserves the integrity of the healthy fats in the nut butter and keeps the oats tender.
Another misconception is that "more protein is always better." If you exceed the 1 cup threshold in this recipe without increasing the binders, you will end up with a bar that tastes like a scoop of dry powder. Balance is the key to a snack you actually enjoy eating, rather than one you just tolerate for the macros.
Preserving The Freshness Of Your Protein Bars
Storage: These bars should be kept in an airtight container in the refrigerator. Because they lack artificial preservatives and rely on natural oils, they will soften at room temperature. In the fridge, they will stay fresh and fudgy for up to 10 days.
Always place a piece of parchment paper between layers to prevent them from fusing into one giant block.
Freezing: These are excellent for long term meal prep. Wrap individual bars in plastic wrap or wax paper, then place them in a freezer safe bag. They will keep for up to 3 months.
The beauty of this recipe is that they don't freeze rock solid; you can actually eat one straight from the freezer for a texture that resembles a cold candy bar.
Zero Waste Tip: Don't throw away the crumbs that inevitably fall off when you slice the bars! Collect those "protein sprinkles" and keep them in a small jar in the fridge. They make an incredible topping for Greek yogurt or a rustic addition to a morning bowl of oatmeal.
You can even roll the leftover scraps into small "energy bites" if the slab didn't cut perfectly.
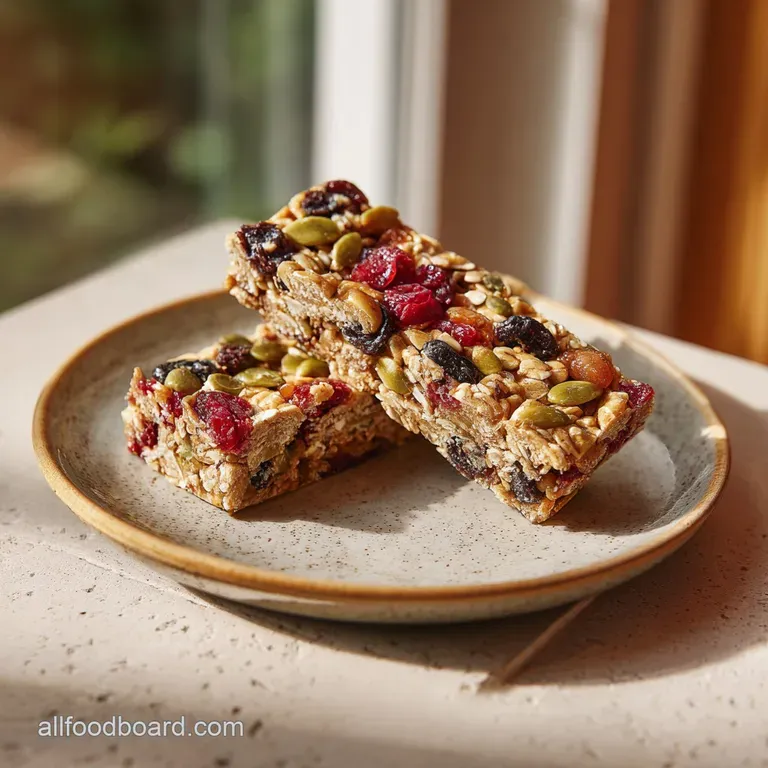
Elegant Ways To Enjoy Your Flour Dusted Snacks
While these are designed for on the-go convenience, they can be served quite beautifully if you're hosting a post workout brunch or a casual gathering. Arrange the bars on a wooden board or a slate platter to lean into that rustic, handmade aesthetic.
A light dusting of extra oat flour or a few flakes of sea salt on top gives them a professional, "pastry shop" finish that signals quality to your guests.
For a more decadent experience, try serving a bar alongside a hot cup of espresso or a dark roast coffee. The heat from the drink slightly softens the fats in the bar, making it even more melt in-your mouth.
If you want to go the extra mile, a small dollop of Greek yogurt and a few fresh raspberries on the side turns this simple snack into a balanced, high protein dessert that feels far more indulgent than its nutritional profile suggests.
If you find yourself with extra dark chocolate, you can melt it down and drizzle it in thin, artistic lines across the top of the chilled slab before slicing. This creates a beautiful "shatter" effect when you bite into it, adding another layer of sensory precision to your homemade treats.
Remember, we eat with our eyes first even when it's "just" a protein bar.

Recipe FAQs
What is the healthiest protein bar to eat?
Choose bars with whole food ingredients and minimal added sugars. Homemade versions like these are generally superior because you control the quality of the nut butter and avoid the artificial preservatives found in many commercial snacks.
Are protein bars actually good for you?
Yes, when used as a supplemental snack rather than a meal replacement. They are convenient for fueling muscle recovery, but you should always check the label for hidden sweeteners or fillers that don't align with your health goals.
Which bars are good for diabetics?
Prioritize bars with high fiber and healthy fats to mitigate blood sugar spikes. Focus on recipes that use natural binding agents like nut butter and flaxseed, which slow down glucose absorption compared to sugar heavy processed alternatives.
Are protein bars good for surgery recovery?
Yes, they provide the essential amino acids needed for tissue repair. High protein, nutrient dense snacks help maintain muscle mass during downtime, provided they are easy to digest and free from inflammatory additives.
How to achieve a dense, fudgy texture?
Press the mixture into your pan with significant force using a flat bottomed glass. Compressing the dough is the secret to eliminating air pockets; if you enjoy mastering the craft of structural integrity here, you might also like the soft flatbread rolling technique used in other dough based recipes.
Is it true that I should add more liquid if the dough seems dry?
No, this is a common misconception. Add almond milk only one tablespoon at a time, mixing thoroughly between additions; adding too much liquid at once will result in a soggy bar rather than the intended firm, pastry like consistency.
How to ensure the chocolate chips stay evenly distributed?
Fold the chips in gently only after the dough has reached a damp sand consistency. Adding them too early while mixing the nut butter and oat flour can lead to them getting crushed or unevenly dispersed throughout the mixture.
Homemade Protein Bars
Ingredients:
Instructions:
Nutrition Facts:
| Calories | 281 kcal |
|---|---|
| Protein | 15.6 g |
| Fat | 14.2 g |
| Carbs | 26.3 g |
| Fiber | 3.0 g |
| Sugar | 11.8 g |
| Sodium | 115 mg |
