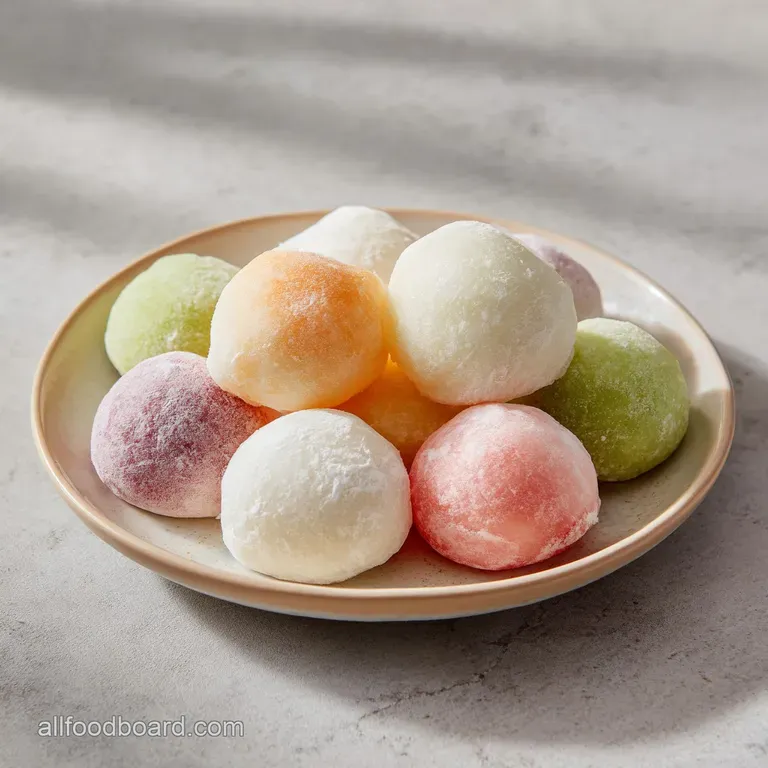
Authentic Homemade Mochi Ice Cream
- Time: Active 20 minutes, Passive 5 minutes, Total 25 minutes
- Flavor/Texture Hook: Silky, elastic dough meets vibrant frozen cream
- Perfect for: Impressive dinner parties or late night cooling treats
- Master the Chewy Mochi Ice Cream
- Bold Textures and Nostalgic Flavors
- Precise Timings and Metric Specs
- Essential Ingredients for Silky Dough
- Necessary Tools for Success
- Step-by-Step Assembly Instructions
- Fixes for Common Mochi Problems
- Dynamic Flavor Profile Variations
- Maintaining Freshness and Elasticity
- Serving Your Frozen Treats
- Recipe FAQs
- 📝 Recipe Card
Master the Chewy Mochi Ice Cream
Forget everything you know about traditional wagashi being a labor intensive chore that requires a wooden mallet and a team of experts. Most people assume that achieving that signature "bouncy" texture in Mochi Ice Cream requires hours of steaming and precise temperature control, but honestly, that is a total myth.
I remember standing in a humid street market in Harajuku, watching a vendor whip up these vibrant little bombs with such speed it made my head spin. I realized then that the secret isn't in the equipment, it is in how you handle the starch.
We are diving into a method that uses the microwave to gelatinize rice flour in record time, giving us that stretchy, translucent skin that makes these so addictive. There is something deeply nostalgic about the first bite of a mochi bomb - the way the fine starch coating hits your tongue before you shatter through the chewy barrier into a cold, creamy core.
It is a sensory collision that feels like a trip back to my favorite Tokyo back alleys, where bold flavors and dynamic textures are the local currency.
This is not a recipe for those who want a "rustic" or "simple" dessert, we are going for high impact, global flavor profiles that look like they came out of a high end boutique. We've all seen the store-bought versions that have sat in a freezer for months, developing a weirdly chalky skin that tastes like the cardboard box it came in.
This homemade version is a revelation, providing a freshness that ensures the dough remains supple and the fragrances of green tea or mango remain vibrant.
Bold Textures and Nostalgic Flavors
The magic of this dish lies in the structural integrity of the rice dough against the melting filling. It is a masterpiece of engineering disguised as a snack.
- Instant Starch Gelatinization: High frequency waves in the microwave cook the rice flour from the inside out, creating an elastic matrix in minutes.
- Sugar Hydration: Sugar acts as a humectant, grabbing onto water molecules to keep the dough from becoming brittle when it hits sub zero temperatures.
- Dusting Barrier: A heavy coating of cornstarch prevents the sticky dough from adhering to surfaces while allowing it to slide over the frozen cream during the sealing phase.
- Thermal Shielding: The density of the glutinous rice skin provides a brief window of insulation, preventing the ice cream from turning into a puddle the moment you touch it.
Fresh versus Shortcut Mochi Skin
| Method | Texture Profile | Time Commitment | Final Result |
|---|---|---|---|
| Fresh Microwave | Translucent, ultra stretchy | 5 minutes | Professional, shop style quality |
| Stovetop Steam | Thick, slightly gummy | 20 minutes | Dense and harder to roll thin |
| Pre made Wrap | Dry, often brittle | 0 minutes | Tastes like preservative heavy starch |
Mochi dough must be rolled to exactly 1/8 inch thickness. If it is too thick, the chewiness becomes a workout for your jaw; too thin, and the ice cream will burst through like a leaky faucet.
We are aiming for that sweet spot where the dough feels like a soft earlobe - elastic, resilient, and ready to hug the frozen filling.
Precise Timings and Metric Specs
To get this right every single time, you have to respect the numbers. This isn't a "dash of this" type of situation.
| Ingredient | Role in Recipe | Pro Secret |
|---|---|---|
| Shiratamako | Provides the structural "bounce" | Use a wet spatula to stir; it prevents the dough from sticking and tearing |
| Granulated Sugar | Keeps the dough soft while frozen | Don't reduce the amount or the mochi will turn into a rock in the freezer |
| Ice Cream | The flavor and temperature core | Use premium brands with low air content for a denser, more velvety bite |
The 180ml of water is non negotiable. Too much and you have a slurry that never sets; too little and you'll end up with a dry, crumbly mess that refuses to stretch. I once tried to eyeball the water and ended up with something that looked like wall paste.
Trust the metrics, use a scale if you have one, and you'll be rewarded with that perfect, glossy finish.
Essential Ingredients for Silky Dough
You need specific components to pull this off. Do not try to swap the rice flour for standard AP flour, or you will be very disappointed with the outcome.
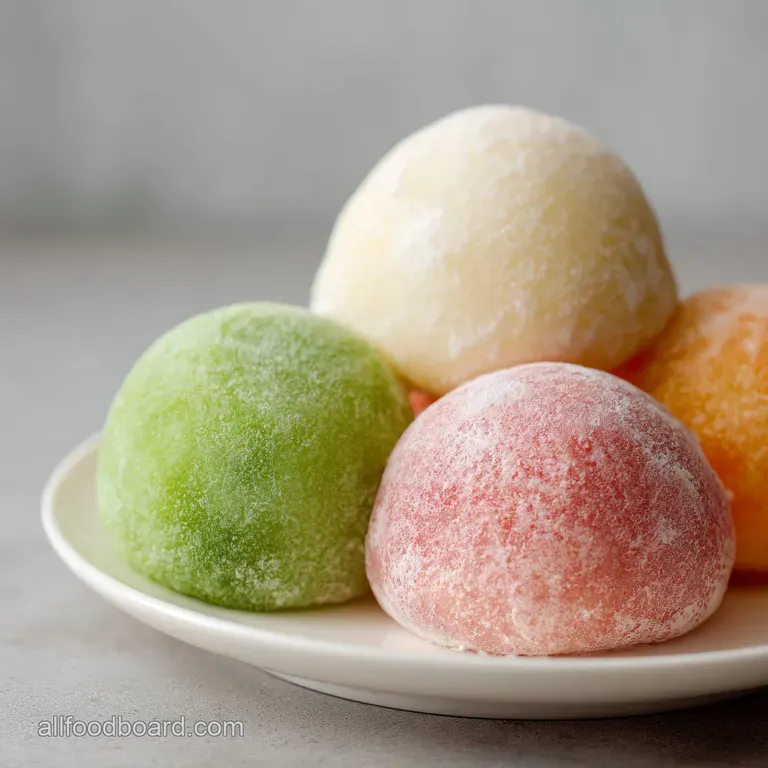
- 1 pint premium ice cream: Choose strawberry, green tea, or mango for bold, dynamic color and fragrance.
- 100g shiratamako or mochiko: This is glutinous rice flour. Why this? It contains high amylopectin levels, which creates the essential "mochi" stretch and chew.
- 50g granulated sugar: Why this? Sugar interferes with starch recrystallization, keeping the dough supple even when frozen solid.
- 180ml water: Clean, filtered water ensures the delicate rice flavor remains untainted.
- 1/2 cup cornstarch or potato starch: Why this? It acts as a dry lubricant, essential for handling the incredibly sticky dough.
Component Substitution Table
| Original Ingredient | Substitute | Why It Works |
|---|---|---|
| Shiratamako | Mochiko | Similar glutinous properties. Note: Mochiko is finer but slightly less bouncy. |
| Granulated Sugar | Powdered Sugar | Dissolves instantly. Note: May slightly alter the final texture density. |
| Cornstarch | Potato Starch | High starch content. Note: Potato starch is traditional and slightly more "silky" to the touch. |
Chef's Tip: If you want a deep, earthy flavor, substitute 10ml of the water with highly concentrated matcha tea. It gives the dough a vibrant emerald hue and a sophisticated bitterness that cuts through the sweet ice cream.
Necessary Tools for Success
You don't need a kitchen full of gadgets, but a few specific items will make your life significantly easier. I highly recommend using a silicone spatula; wood or metal will just become a permanent home for the sticky dough.
- Microwave safe glass bowl: Essential for even heating without melting the container.
- Muffin tin: This is your molding station to ensure every sphere is uniform.
- Plastic wrap: Your best friend for preventing sticking and keeping the mochi airtight.
- Silicone spatula: The only tool that can handle the aggressive stickiness of hot rice dough.
- Rolling pin: To achieve that precise 1/8 inch thickness.
- 2.5 inch round cutter: Keeps your circles consistent for easy sealing.
Before you even touch the rice flour, make sure your muffin tin is lined and ready. The assembly phase is a race against the clock, and you don't want to be fumbling with plastic wrap while your ice cream is melting onto the counter.
step-by-step Assembly Instructions
- Line a muffin tin with plastic wrap. Scoop approximately 2 tablespoons of ice cream into each well, forming spheres. Freeze for at least 2 hours until rock hard and frosty.
- In a microwave safe glass bowl, whisk together the glutinous rice flour, sugar, and water until smooth and free of lumps. Cover loosely with plastic wrap.
- Microwave on high for 1 minute. Stir with a wet silicone spatula until the edges start to look translucent.
- Microwave for another 1 minute, then stir again until the dough is translucent and matte. Note: It should look like thick, heavy taffy at this stage.
- Dust a work surface generously with cornstarch. Roll the hot dough to 1/8 inch thickness until it covers the entire work area evenly.
- Cut into circles using a 2.5 inch cutter and refrigerate for 15 minutes to cool until firm but still flexible.
- Place one frozen ice cream scoop in the center of a dough circle. Pinch the edges to seal until the seam disappears into the dough.
- Wrap tightly in plastic wrap and return to the freezer immediately until the shape is set and solid.
The dough needs to be cool before it touches the ice cream. If you try to wrap a hot piece of mochi around a frozen scoop, you'll end up with a milky soup inside a sticky mess. Patience during the cooling phase is what separates the pros from the amateurs.
Fixes for Common Mochi Problems
Working with glutinous rice can be intimidating the first time around. It is essentially edible glue until it is properly dusted and cooled.
Why Your Dough Is Too Sticky
If your dough feels like it is permanently bonded to your fingers, you likely didn't cook it long enough or didn't use enough starch. The microwave times are exact, but microwave power varies. You want that matte finish. If it's still glossy and runny, it needs another 30 seconds.
Why the Dough Cracks
This usually happens if the dough gets too cold or if you didn't use enough sugar. Sugar keeps the water molecules from forming large ice crystals, which causes the "shattering" or cracking effect. If your dough is cracking while you roll it, it might have dried out on the surface - keep it covered!
| Problem | Root Cause | Solution |
|---|---|---|
| Dough is runny | Under cooked starch | Microwave in 30 second bursts until matte |
| Mochi is tough | Too much flour/Not enough water | Add 1 tsp of water and stir vigorously while hot |
| Ice cream melts fast | Dough was too warm | Ensure dough is refrigerated for at least 15 mins before assembly |
Common Mistakes Checklist
- ✓ Never skip the pre freeze step; the ice cream must be "rock hard" before wrapping.
- ✓ Use a wet spatula to stir the dough; water is the only thing mochi won't stick to.
- ✓ Don't be shy with the cornstarch; you can always brush the excess off later.
- ✓ Work with only one scoop of ice cream at a time, keeping the rest in the freezer.
- ✓ Seal the mochi tightly; air pockets lead to ice crystals and freezer burn.
Dynamic Flavor Profile Variations
Once you master the base dough, the world is your oyster. You can incorporate powders directly into the flour mixture before adding water to change the color and flavor of the skin itself.
Chocolate Mochi Flavors
For a decadent twist, add 10g of high-quality cocoa powder to your dry ingredients. This creates a dark, velvety skin that pairs perfectly with vanilla or salted caramel filling. If you are a fan of rich, cocoa heavy treats, this version is a must try. For another decadent treat, try my No Bake Chocolate Cream Pie which uses similar cooling techniques to set the filling.
Vibrant Mango and Fruit Options
Use a mango sorbet for a dairy-free center and add a drop of orange food coloring to the dough. The fragrance of the mango combined with the chewy rice is a classic Southeast Asian street food pairing that feels incredibly bright and refreshing.
You can even finely zest a lime into the starch dusting to add a zingy aroma the moment the mochi hits your lips.
Matcha and Green Tea Sophistication
This is the quintessential Japanese version. Use 5g of culinary grade matcha powder in the dough. The bitterness of the tea provides a beautiful balance to the sweet granulated sugar. It creates a dynamic flavor profile that feels grown up and sophisticated.
Maintaining Freshness and Elasticity
Storage is where most people fail. Mochi is a living thing, in a sense - the starch is constantly trying to realign and get hard.
- Fridge: Do not store these in the fridge. The cold temperature (but not freezing) will cause the starch to retrogress, making the dough tough and gritty within hours.
- Freezer: Keep them wrapped individually in plastic wrap, then place them in an airtight container or a heavy duty freezer bag. They will stay fresh for up to 2 weeks.
- Zero Waste: If you have leftover mochi dough scraps, don't throw them away! Roll them into tiny balls, boil them for 2 minutes, and toss them into a bowl of sweet red bean soup or over a dish of Classic Tiramisu for a fun texture contrast.
Serving Your Frozen Treats
You cannot eat mochi ice cream the second it comes out of the freezer. Well, you can, but you'll be biting into a brick.
The Five Minute Rule
The secret to that "melt in-your mouth" texture is letting the mochi sit at room temperature for about 5 minutes before serving. This allows the outer skin to soften and regain its elasticity while the ice cream remains solid but starts to turn creamy.
You'll know it's ready when the skin gives slightly under gentle pressure from your thumb.
Pairing with Warm Beverages
I love serving these alongside a steaming cup of roasted hojicha or a sharp espresso. The contrast between the freezing dessert and the hot drink is a total palate cleanser. It’s that play of temperatures that makes the experience so dynamic.
If you’re hosting a dinner, plating three different colored mochi (matcha, strawberry, and mango) on a dark slate board creates a stunning visual that looks like a collection of edible jewels.
Scaling the Production
If you want to make a massive batch for a party, do not just double the microwave time. Work in batches of 100g of flour. If you put too much dough in the microwave at once, the center won't cook while the edges turn to rubber. For a crowd of 24, make two separate batches of dough.
It only takes 5 minutes, so it's better to keep the quality high. When scaling down for a solo treat, you can halve the recipe easily, just use a smaller bowl so the dough doesn't spread too thin and dry out in the microwave.

Recipe FAQs
What is mochi ice cream made of?
It consists of premium ice cream wrapped in a sweet, chewy dough. The outer layer is a mixture of glutinous rice flour (shiratamako or mochiko), granulated sugar, and water, dusted with cornstarch to prevent sticking.
Is it true mochi is healthier than standard ice cream?
No, this is a common misconception. While the portion sizes are typically smaller, the mochi shell adds extra carbohydrates and sugar to the calorie count of the ice cream itself.
How are you supposed to eat mochi ice cream?
Let the mochi sit at room temperature for two to three minutes before eating. This allows the dough to soften just enough to become chewy while the ice cream inside relaxes from its rock hard state.
What does mochi taste like?
It features a unique contrast between a soft, chewy, neutral sweet dough and a creamy, flavored center. The texture is distinctively elastic, creating a satisfying chew that complements the smooth temperature of the ice cream.
How to keep the dough from sticking while rolling?
Dust your work surface and your rolling pin generously with cornstarch. If you enjoyed working with the high hydration dough in our Classic Pastry Scones, you will find this dusting technique essential for managing the sticky, elastic nature of the rice flour dough.
Why must the ice cream be rock hard before wrapping?
Soft ice cream will melt instantly upon contact with the warm, freshly cooked dough. You must freeze the scoops for at least 2 hours to ensure they maintain their sphere shape during the assembly process.
How to fix lumps in the dough?
Whisk the glutinous rice flour, sugar, and water together until completely smooth before the first microwave interval. If you notice lumps after the first minute of heating, stir vigorously with a wet silicone spatula until the mixture becomes uniform.
Homemade Mochi Ice Cream

Ingredients:
Instructions:
Nutrition Facts:
| Calories | 114 calories |
|---|---|
| Protein | 1.5g |
| Fat | 3.8g |
| Carbs | 18.4g |
| Fiber | 0.2g |
| Sugar | 9.8g |
| Sodium | 15mg |
