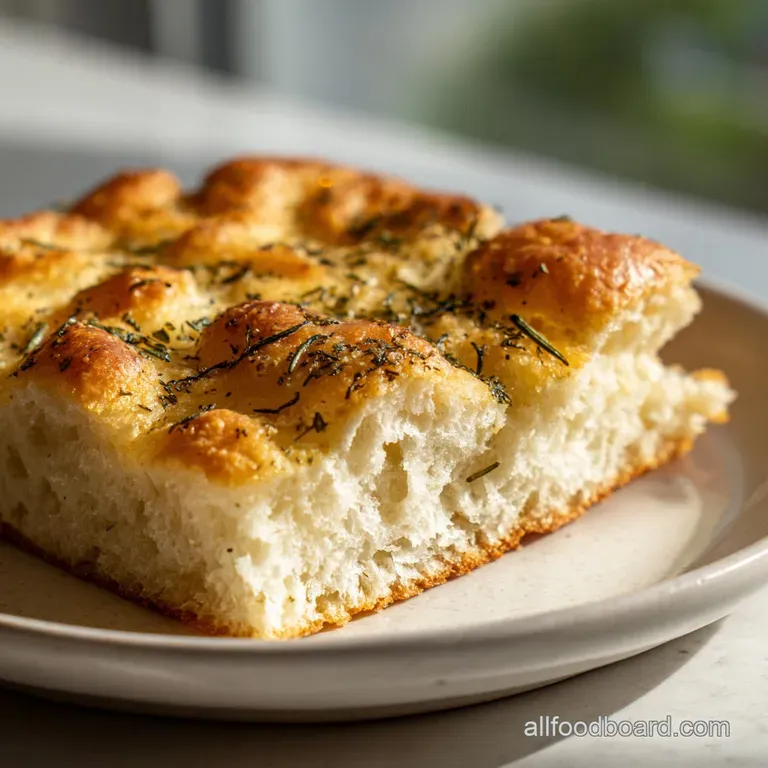
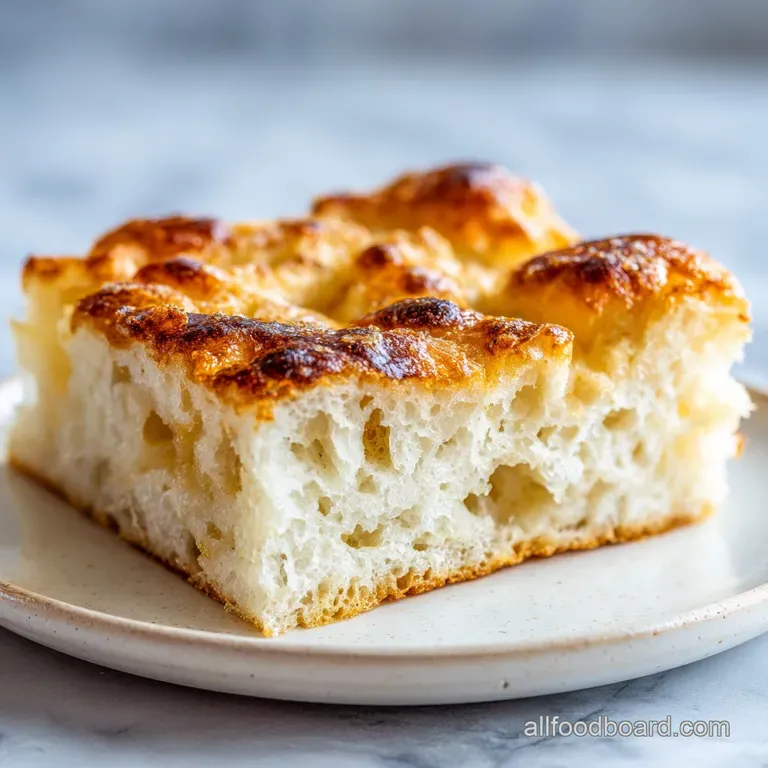
Homemade Focaccia: Airy Fluffy Texture
- Time: Active 40 minutes, Passive 3 hours 20 mins, Total 4 hours
- Flavor/Texture Hook: Airy, salt kissed crumb with a distinct olive oil sizzle
- Perfect for: Weekend hosting or a cozy family dinner side
- Mastering Your Golden Homemade Focaccia
- Vital Stats and Timing Guide
- Exploring the Essential Ingredients
- Essential Tools for Better Baking
- Detailed Steps for Best Results
- Avoiding Common Mistakes and Pitfalls
- Adaptations for Different Dietary Needs
- Storing Your Bread Properly
- Creative Serving and Pairing Options
- Recipe FAQs
- 📝 Recipe Card
Mastering Your Golden Homemade Focaccia
I still remember the first time I tried making bread. It was a disaster, a literal brick of flour that could have doubled as a doorstop. But then I discovered the magic of high hydration doughs, and everything changed.
The first time I pulled this specific focaccia out of the oven, the aroma of toasted rosemary and shimmering olive oil filled my tiny kitchen, and I knew I'd finally cracked the code.
You don't need to be a professional baker to get that iconic, dimpled texture and the satisfying crunch of sea salt against a soft, airy center. It is all about patience and letting the water do the heavy lifting. We are skipping the intense manual labor here.
Instead, we are focusing on a few simple folds and a very wet dough that creates those massive, beautiful bubbles we all crave.
This recipe is designed to be approachable even if you've never touched yeast before. We are going to use basic pantry staples to create something that looks like it came from a high end Italian bakery.
Trust me, once you hear that first "shatter" when you slice into the crust, you'll never go back to store-bought bread again. Let's get into what makes this dough behave so perfectly.
Vital Stats and Timing Guide
The Physics of the Bubble: High water content creates steam during baking, which inflates the gluten structure into large, airy pockets. The olive oil acts as a heat conductor, essentially frying the bottom of the bread for maximum crunch.
- Gluten Alignment: Folding the dough instead of kneading it allows the protein strands to strengthen gently without becoming tough.
- Enzymatic Breakdown: A longer room temperature rise helps the yeast break down starches into complex sugars, improving the golden color of the crust.
- Osmotic Balance: The honey provides immediate fuel for the yeast, ensuring a vigorous rise even with the high salt content.
- Conductive Frying: The heavy coating of oil in the pan creates a "convection" effect at the base, ensuring the bottom is just as crispy as the top.
| Servings | Pan Size | Cook Time | Visual Cue |
|---|---|---|---|
| 6 people | 9x9 inch square | 18 minutes | Light golden edges |
| 12 people | 9x13 inch rectangle | 20 minutes | Deep bronze and firm |
| 18 people | Half sheet pan | 25 minutes | Mahogany crust, airy center |
The timing for this bread is flexible, but the temperature of your water is the one thing you shouldn't eyeball. If it's too hot, you'll kill the yeast; too cold, and you'll be waiting until next Tuesday for it to rise. Aim for exactly 100°F for the best start.
Exploring the Essential Ingredients
Choosing the right flour is the biggest hurdle for most home cooks. While you can technically use all purpose flour, bread flour has a higher protein content that supports the massive bubbles we want. It's the difference between a flat pancake and a lofty, pillowy loaf.
| Ingredient | Science Role | Pro Secret |
|---|---|---|
| Bread Flour | Structural Integrity | Use a scale for accuracy; volume measurements vary too much. |
| Instant Yeast | Carbon Dioxide Production | Mix it directly with flour to avoid clumping in the water. |
| Honey | Yeast Catalyst | Provides a subtle floral note that balances the salty brine. |
| Extra Virgin Olive Oil | Moisture and Crispness | Use the good stuff here; the flavor is very prominent in the crust. |
For the liquid, I always recommend filtered water. Chlorine in tap water can sometimes inhibit yeast growth, though it is usually fine for a quick bake. If you find yourself out of bread flour, you can use the same technique in my Soft Flour Tortillas recipe for a different kind of flatbread fix.
Base Focaccia Dough Elements
- 500g bread flour Why this? Higher protein levels create the strongest gluten network for bubbles.
- 400g warm water (filtered, 100°F) Why this? 80% hydration ensures a moist, open crumb.
- 7g instant yeast Why this? No proofing required, it works faster in high moisture doughs.
- 10g honey Why this? Feeds the yeast and helps with the Maillard browning reaction.
- 10g fine sea salt Why this? Enhances flavor and regulates the fermentation rate.
- 30g extra virgin olive oil Why this? Adds richness and prevents the dough from sticking.
The Salt Brine Topping
- 1 tbsp sea salt Why this? Essential for creating those salty "pools" on the surface.
- 1 tbsp water Why this? Helps the salt dissolve and keeps the dimples moist during baking.
- 5g fresh rosemary, chopped Why this? Classic aromatic that pairs perfectly with the olive oil.
- 2g flaky sea salt Why this? Provides a delicate crunch and beautiful finish.
Essential Tools for Better Baking
You don't need a fancy stand mixer for this recipe, though a KitchenAid can make the initial mixing easier. A large glass bowl is my go to because I can see the bubble development through the sides. It's incredibly satisfying to see those tiny pockets of air forming as the dough ferments.
Chef Tip: Use a metal 9x13 inch baking pan for the best crust. Glass doesn't conduct heat as quickly as metal, which can lead to a paler, softer bottom. If you only have glass, move the rack to the lowest position in your oven.
A plastic dough scraper is also a lifesaver. Since this dough is very sticky, trying to handle it with just your fingers can be a mess. The scraper allows you to fold and move the dough while keeping your hands relatively clean. If things get too messy, just oil your hands!
Detailed Steps for Best Results
- Combine dry ingredients. Whisk 500g bread flour, 7g instant yeast, and 10g fine sea salt in a large bowl. Note: This ensures the yeast and salt are evenly distributed before adding liquid.
- Add liquids. Mix 400g warm water (100°F) and 10g honey until dissolved, then pour into the flour. Note: The honey provides immediate energy for the yeast.
- Mix the shaggy dough. Use a sturdy spoon to stir until no dry flour remains. It will look lumpy and very sticky.
- Perform stretch and folds. Every 30 minutes for 1.5 hours, wet your hands and pull the edge of the dough up and over the center. Repeat 4 times per session.
- Initial rise. Cover the bowl and let it sit in a warm spot for about 1 hour 30 mins until doubled in size and jiggly.
- Prep the pan. Pour 30g olive oil into a 9x13 inch pan, ensuring the bottom and sides are heavily coated. Note: Don't skimp here; the oil "fries" the bottom of the bread.
- Transfer and rest. Gently tip the dough into the pan. Do not force it to the corners. Let it rest for 45 minutes until it naturally spreads to the edges.
- Dimple the surface. Whisk the salt and water brine. Oil your fingers and press deep into the dough until you feel the bottom of the pan. Pour the brine and rosemary over the top.
- Final bake. Place in a preheated 425°F (220°C) oven. Bake for 20 minutes until the top is deep golden and the oil is sizzling.
- Cool and serve. Remove from the pan immediately and place on a wire rack. Note: This prevents the bottom from steaming and becoming soggy.
Avoiding Common Mistakes and Pitfalls
The most common issue I see is people being afraid of the stickiness. This isn't a pizza dough that you can easily knead on a counter. It is meant to be wet. If you add more flour, you lose the airy texture. Embrace the mess, use plenty of oil on your hands, and trust the process.
Handling the Sticky Dough
If the dough feels unmanageable, don't reach for the flour. Instead, let it rest for another 10 minutes. Time allows the flour to fully hydrate, which naturally makes the dough feel more cohesive.
You can also try the "slap and fold" technique, which builds strength quickly without adding dry ingredients.
| Problem | Root Cause | Solution |
|---|---|---|
| Dough won't stretch | Too cold or not enough rest | Let it sit at room temp for 15 mins before stretching again. |
| No bubbles forming | Dead yeast or cold water | Ensure water is 100°F and check the yeast expiration date. |
| Bottom is soggy | Steamed in the pan | Transfer to a wire rack immediately after removing from the oven. |
Another trick is to check your oven temperature. Many home ovens run cold. A true 425°F is necessary to get that instant "oven spring" that creates the bubbles. If your bread looks pale after 20 minutes, leave it in longer! Color is flavor. For a great side pairing, this bread goes beautifully with a fresh Homemade Coleslaw recipe if you are serving it alongside grilled meats.
- ✓ Use a digital scale for ingredients to ensure the 80% hydration ratio.
- ✓ Never skip the 45 minute pan rest; it's vital for a light texture.
- ✓ Oil your fingers thoroughly before dimpling to prevent tearing the dough.
- ✓ Use fresh rosemary rather than dried for a better aromatic experience.
- ✓ Check the bottom of the bread; it should be as golden as the top.
Adaptations for Different Dietary Needs
If you are looking to save a bit of money, you can swap the bread flour for all purpose flour. Just keep in mind that the bread will be slightly denser and might not hold onto the air bubbles as well. It’s a smart move for a budget friendly weeknight version, but for a special occasion, stick to the bread flour.
| Original Ingredient | Substitute | Why It Works |
|---|---|---|
| Honey (10g) | Sugar (10g) | Provides the same sweetness and yeast fuel for less cost. |
| Bread Flour (500g) | All Purpose Flour (500g) | Lower protein results in a softer, slightly denser crumb. |
| Fresh Rosemary | Dried Oregano | Shelf stable alternative that still offers great earthy flavor. |
For those looking for more fiber, you can replace 100g of the bread flour with whole wheat flour. You might need to add an extra 10-20g of water, as whole wheat is more absorbent. The result will be nuttier and heartier, though a bit less airy.
Storing Your Bread Properly
Focaccia is best eaten within hours of baking. The high oil content means the crust is at its peak "shatter" level right out of the oven. If you have leftovers, store them in an airtight bag at room temperature for up to 2 days.
Don't put it in the fridge, as the cold air will cause the starch to recrystallize and make the bread go stale faster.
For longer storage, this bread freezes beautifully. Slice it into squares, wrap them tightly in plastic wrap, and place them in a freezer bag for up to 2 months. To reheat, pop a frozen slice directly into a 350°F (180°C) oven or a toaster oven for 5-8 minutes until the crust is revived and the center is warm.
Zero waste tip: If your focaccia does go stale, don't throw it out! It makes the most incredible croutons or breadcrumbs. Simply cube the bread, toss with a little more oil, and bake until rock hard. You can also use it for a savory bread pudding or as the base for a Panzanella salad.
Creative Serving and Pairing Options
This bread is a meal in itself, but it truly shines when used as a vessel for other flavors. My favorite way to eat it is as a massive sandwich. Slice a large square in half horizontally, then fill it with prosciutto, fresh mozzarella, and a handful of arugula. The oil from the bread acts as a natural condiment.
Chef Tip: To get a truly professional finish, brush a little extra olive oil over the bread the moment it comes out of the oven. It will soak into the crust and give it a beautiful sheen.
If you are serving this for a party, create a dipping station. A small bowl of balsamic vinegar mixed with high-quality olive oil and a pinch of red pepper flakes is simple but effective. You can also top the dough with thin slices of potato, caramelized onions, or even grapes and honey for a sweet and salty twist. It pairs excellently with a Cashew Butter recipe spread if you want something creamy and rich on the side.

Recipe FAQs
What is the secret to making good focaccia?
The high water content (hydration) and a long rest time. A wet dough allows large air bubbles to form during fermentation, leading to the signature airy crumb. Trust the stickiness and let time do the kneading for you.
Can you make quick focaccia?
No, rushing the bulk fermentation severely impacts texture. While active work time is low (40 mins), the dough needs at least 3 hours total, including resting, to develop flavor and structure. Shorter proofing results in a dense loaf.
Is focaccia easy or hard to make?
It is easy, provided you don't overwork the dough. The difficulty lies in trusting the wet, sticky nature of the high hydration dough. Mastering the gentle folding technique here is essential, similar to how you handle the wet dough in our Classic Tiramisu Recipe for the mascarpone base.
How unhealthy is focaccia?
It is moderately calorie dense due to high oil and carbohydrates. Focaccia uses significant olive oil, which contributes healthy fats but increases the caloric load. It is best enjoyed in moderation as a rich accompaniment.
How do I prevent my focaccia from becoming soggy on the bottom?
Transfer it immediately to a wire rack after baking. The excessive oil in the pan will steam the bottom crust if left sitting in residual heat. This technique ensures the base stays crispy, just like when you pull out perfectly fried items.
How do I ensure my dimples are deep and hold the salt brine?
Oil your fingertips heavily and press firmly until you hit the bottom of the pan. You must fully release the dough's gas pocket tension at that spot to create a deep depression that captures the brine. Don't be afraid to use pressure.
What is the correct water temperature for activating the yeast?
Use water heated precisely to 100°F (38°C). This temperature optimally feeds the instant yeast without shocking or killing it, ensuring a vigorous rise for your high hydration dough. If you master this temperature control here, you'll excel at tempering chocolate, like in our Homemade Chocolate Peppermint recipe.
Homemade Focaccia Airy Crispy

Ingredients:
Instructions:
Nutrition Facts:
| Calories | 178 kcal |
|---|---|
| Protein | 5.3 g |
| Fat | 2.8 g |
| Carbs | 32.1 g |
| Fiber | 1.2 g |
| Sugar | 0.9 g |
| Sodium | 780 mg |
