The Ghoulishly Good Eyeball Brownies Fudgy Freaky
- Unveiling the Secrets Behind This Spooky-Good Dessert
- Why These Fudgy Bites Outshine Standard Chocolate Treats
- Gathering Your Ghoulish Components: The Essential Checklist
- Step-by-Step Mastery: Crafting the Ultimate Fudgy Squares
- The Final Terrifying Touch: Applying the Eyeball Accents
- Maximizing Deliciousness: Next-Level Baking Suggestions
- Storage Secrets and Serving Suggestions for Maximum Impact
- Recipe FAQs
- 📝 Recipe Card
Unveiling the Secrets Behind This Spooky Good Dessert
Welcome, fellow culinary adventurers, to a bake that perfectly marries deep, decadent chocolate with a dash of delicious dread! We are diving headfirst into crafting Eyeball Brownies .
These aren’t just any squares of chocolate goodness; they are intensely fudgy, boast that coveted, paper thin crinkle top, and are crowned with a garnish that is guaranteed to make your guests do a double take.
Forget dry, cakey disappointments; we are aiming for the ultimate, gooey interior that melts right on your tongue. This recipe uses simple techniques to achieve maximum richness, making the assembly of the frightening Brownies with Eyes shockingly easy for any skill level.
Why These Fudgy Bites Outshine Standard Chocolate Treats
What elevates these Halloween Treats Brownies above the everyday standard is the intentional textural contrast. We are using a specific ratio of sugar to fat, combined with melted butter rather than softened butter, which locks in moisture and results in that signature dense, satisfying chewiness.
While many recipes yield a cake like result, our approach focuses purely on the Fudgy Eyeball Brownies experience. They offer profound chocolate comfort, making them an ideal centerpiece for any gathering looking for truly memorable Creepy Desserts For Halloween .
The Allure of Edible Horror: Setting the Scene
Part of the fun here is the theatrical element. These Halloween Eyeball Brownies are designed to be startling yet incredibly tasty. The contrast between the intensely dark, rich base and the unsettlingly realistic (but sweet) candy eye creates that perfect moment of playful horror.
They work brilliantly as standalone Halloween Party Dessert Ideas For Adults or as part of a larger, themed spread where appearance matters just as much as flavour.
Achieving Peak Crinkle Top Perfection on Your Eyeball Brownies
That shimmering, delicate crust on a perfect brownie is the holy grail, and achieving it is simpler than you think. It relies on properly dissolving the sugar into the melted fats and eggs.
By vigorously whisking the sugars into the slightly cooled melted butter, and then whipping the eggs in thoroughly, we create a structure that puffs slightly during baking and then collapses upon cooling, resulting in that perfect, glossy crackle over the deep chocolate foundation.
A Quick Look at the Delicious Deception
Our mission is simple: create a profoundly rich 8x8 inch batch yielding 16 squares, featuring a base that needs about 20 minutes of active work, followed by a necessary hour of cooling before we apply the finishing flourishes.
The structure is built around high-quality cocoa powder and extra chocolate chips folded in for pockets of molten sweetness. The real magic happens when we transform humble marshmallows into gruesome, staring orbs ready to adorn our Eyeball Brownies Recipe .
Gathering Your Ghoulish Components: The Essential Checklist
To execute this phenomenal bake successfully, you need to ensure your pantry is stocked with the right components. We aren’t just throwing ingredients together; we are layering flavours and textures to ensure the fudginess shines through, even under the spooky façade of the Halloween Brownie Decorations .
Having everything measured out before you start the melting process will keep your workflow smooth.
The Chocolate Foundation: What You Need for Richness
For the base, richness is key. We start with one full cup of unsalted butter , cut into cubes for easy melting. This is combined with one and a half cups of granulated sugar for structure and that signature crust, balanced by half a cup of packed light brown sugar to guarantee moisture and chewiness.
You will need four large eggs , preferably at room temperature, along with a teaspoon of vanilla for depth. For the dry elements, one cup of all-purpose flour must be accurately measured alongside three quarters of a cup of high-quality unsweetened cocoa powder —don't skimp here, as this is where the deep flavour originates.
Finally, for true decadence, we incorporate one cup of semi sweet chocolate chips folded in at the end.
Essential Kitchenware for Flawless Batch Preparation
The right tools prevent sticking and ensure even heat distribution. A sturdy 8x8 inch metal baking pan is crucial, paired with a good layer of parchment paper that extends over the sides this creates a "sling" that allows you to lift the entire cooled slab out cleanly.
You’ll need a heavy bottomed saucepan for gently melting the butter, a whisk for emulsifying the sugars and eggs, and a reliable rubber spatula for gently folding in the flour mixture without deflating the air you’ve incorporated.
Premium Pointers for Selecting Your Candy 'Orbs'
The eyes themselves require three simple items: sixteen large marshmallows as the white base, white candy melts or thick icing to serve as the adhesive and the whites of the eyes, and your pre-made edible candy eyeballs .
When selecting these store-bought eyes, check for vibrant iris colours and clear pupils; the more realistic they look, the more effective your final Eyeball Brownies will be!
Related Recipes Worth Trying
- Ghoulishly Good Eyeball Cake Pops Recipe Vanilla Bean Core — Create stunning Halloween Eyeball Cake Pops with a moist vanilla bean core These spooky desserts are easy to decorate Get the foolproof recipe here
- Ghoulishly Good Spooky Eyeball Truffles Recipe — Learn how to make these surprisingly simple Spooky Eyeball Truffles Rich dark chocolate meets a detailed creepy decoration for the ultimate Halloween...
- The Proper Fudgy CrinkleTop Brownies Recipe — Learn how to make the best brownie recipe everdeeply chocolatey fudgy brownies with that glorious crackly top Foolproof technique inside
step-by-step Mastery: Crafting the Ultimate Fudgy Squares
This process is divided into three clear phases: building the batter, baking it perfectly, and finally, the chilling required before decoration. Follow these steps meticulously, especially around mixing times, to guarantee success.
The Final Terrifying Touch: Applying the Eyeball Accents
The transformation from a simple chocolate square to one of the most striking Creepy Desserts For Halloween happens in this final stage. Precision in cooling and decorating ensures the presentation is as sharp as the taste.
Melting Down Magic: Preparing the Chocolate Batter
Begin by preheating your oven to 350° F ( 175° C) and preparing that 8x8 pan with the parchment sling. Over very low heat, melt the cubed butter.
Once melted, remove it from the heat source immediately and whisk in both the granulated and brown sugars until the mixture is fully incorporated and has a slightly glossy sheen. Next, whisk in your four room temperature eggs one at a time, ensuring each is blended before adding the next, followed by the vanilla.
In a separate bowl, whisk together your flour, cocoa powder, and salt. Gently fold the dry mixture into the wet ingredients using a spatula remember, stop folding the instant the last streaks of flour disappear to avoid developing tough gluten strands. Finally, fold in those extra chocolate chips.
Baking Dynamics: Achieving the Ideal Center Consistency
Scrape the thick, rich batter into your prepared pan and spread it evenly. Slide it into the preheated oven for 30 to 35 minutes. The key indicator for fudginess is the toothpick test: insert a toothpick about an inch from the centre; it should come out bearing moist, fudgy crumbs, not wet, dripping batter.
If it comes out totally clean, you’ve gone too far and are heading toward a cakey texture.
Cooling Protocol: Ensuring Clean Slicing for Your Eyeball Brownies
Patience now is absolutely non-negotiable. Once out of the oven, let the pan cool on a wire rack for at least one full hour. If you attempt to slice these beauties while they are warm, the internal structure will collapse, and you’ll end up with a delicious but messy pile instead of neat Eyeball Brownies .
Once fully cooled, use the parchment sling to lift the entire block out and place it on a cutting board before slicing into 16 uniform squares.
Assembly Line of the Macabre: Placing the Gaze
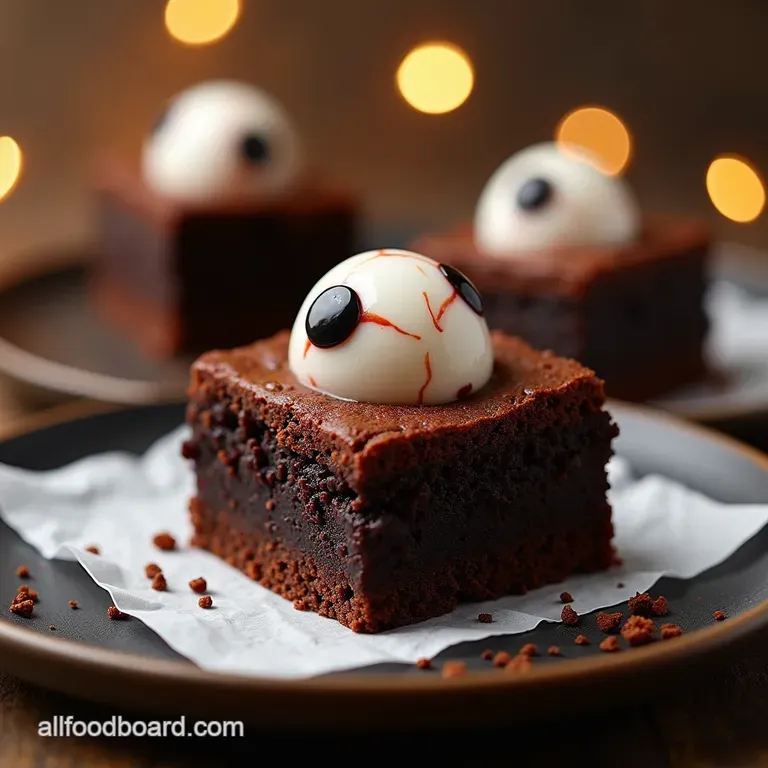
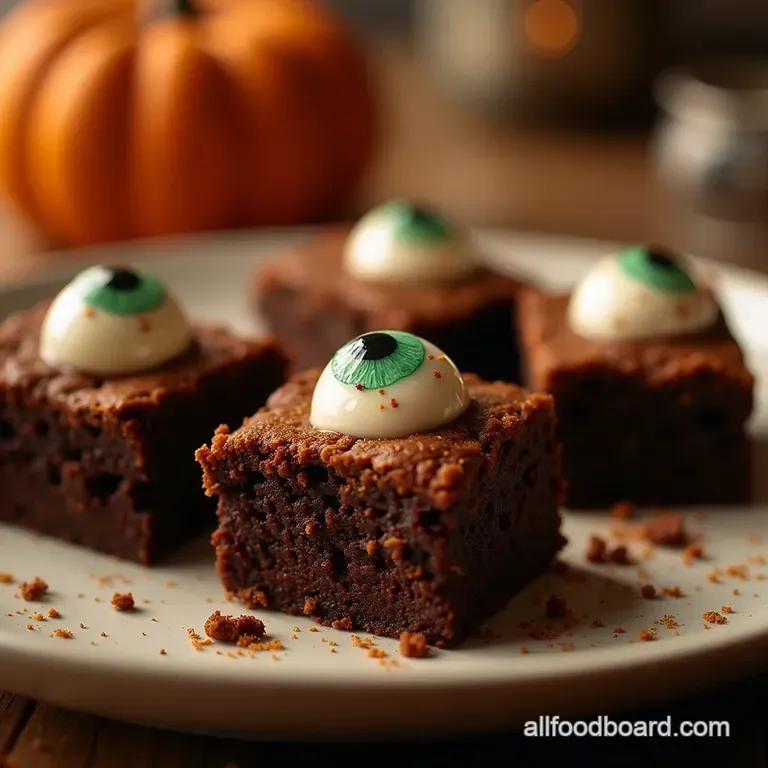
While the brownies cool, prepare your topping components. Melt the white candy melts gently until smooth. Take a tiny dab of this melted white chocolate this acts as your gruesome adhesive and place it near the centre of the top of each cooled brownie square. Immediately press one marshmallow onto this dab.
Once the marshmallow is seated, apply a smaller dot of white chocolate onto the top of the marshmallow and gently place the edible candy eyeball onto that final dollop. Allow these adhesive spots to firm up slightly before serving.
Maximizing Deliciousness: Next Level Baking Suggestions
To truly elevate these frightful squares beyond standard fare, consider these thoughtful additions to enhance the overall sensory experience of your Fudgy Eyeball Brownies .
Pro-Tips for Enhancing Chocolate Depth (Beyond the Basics)
To deepen the chocolate profile, substitute a tablespoon of the milk/water typically used in coffee with a tablespoon of strong brewed espresso or instant espresso powder dissolved in hot water when mixing the wet ingredients.
This doesn't make the brownie taste like coffee, but it dramatically intensifies the perceived bitterness and depth of the cocoa. Also, always ensure your salt measurement is precise; salt is the ultimate chocolate amplifier.
Alternative Spooky Decorations and Themed Variations
If you want to go beyond the simple eyeball look, consider using thin strands of red or purple coloured icing, piped finely with a small tip, radiating out from the iris to mimic bloodshot veins this adds incredible detail to your Halloween Brownie Decorations .
Alternatively, for a different aesthetic, use green candy melts to create a slime effect drizzled over the top instead of the marshmallow base.
Storage Secrets and Serving Suggestions for Maximum Impact
How you store and present these unique treats will dictate their lasting appeal after the initial spooky shock wears off.
Shelf Life and Refrigeration Guidelines
Because these are so fudgy and moist, they maintain their texture best when stored at room temperature in an airtight container for up to three days. If your kitchen is very warm, you can refrigerate them, but always bring them back to room temperature for about 20 minutes before serving; chilling can stiffen the fudgy centre too much.
For the best experience among all Halloween Treats Brownies , aim to decorate them the day you plan to serve them for the freshest look.
Pairing Suggestions: What to Drink with Your Frightful Delights
These intensely rich Eyeball Brownies demand a beverage that can cut through the density. The classic pairing remains a tall glass of cold milk, but for adult gatherings, consider a robust, slightly fruity Cabernet Sauvignon, or perhaps a dark stout beer.
The slight bitterness and roast notes in the stout mirror the deep cocoa flavour beautifully.

Recipe FAQs
How do I make sure my Eyeball Brownies have that famously crinkly top?
Ah, the elusive crinkle! That's the holy grail of fudgy brownies. The trick lies in the sugar. After you melt your butter, vigorously whisk the granulated and brown sugars into it until the mixture looks glossy this dissolves the sugar perfectly.
Don't rush this step; it’s what creates that signature shiny crust when it bakes.
Can I make these Eyeball Brownies ahead of time, or do they need eating right away?
They are actually better the next day! Fudgy brownies need time for the flavours to settle and the texture to firm up properly, which makes cutting them much cleaner. Store them tightly wrapped at room temperature for up to four days, or pop them in the fridge if your kitchen is particularly warm.
My marshmallows are sliding off the brownies; how do I get the candy eyeballs to stick properly?
Patience, young baker! The key is to wait until the "glue" (your melted white chocolate or icing) is tacky but not completely hardened. Apply a small dot of the melted white chocolate onto the cooled brownie surface, then press the marshmallow gently onto that spot before adding the eyeball.
It acts like cement once it sets.
Are these brownies very difficult, or are they suitable for a beginner cook?
Fear not, they are quite straightforward definitely beginner friendly! The brownie base relies on the classic melt and-stir method, so there's no complicated creaming involved.
The only slightly tricky bit is ensuring you don't overbake them to keep them fudgy, and carefully placing the decorations, which is just a bit of fun!
I’m worried about them being too sweet with all that chocolate and candy; can I adjust the sweetness?
That’s a valid concern; they are certainly decadent! To cut through the richness, use high-quality unsweetened cocoa powder for the base, as it provides deep flavour without extra sugar. For a real palate cleanser, serve them with a tart raspberry coulis or a strong cup of black coffee.
Fudgy Eyeball Brownies

Ingredients:
Instructions:
Nutrition Facts:
| Calories | 516 kcal |
|---|---|
| Protein | 5.4 g |
| Fat | 15.6 g |
| Carbs | 34.9 g |
| Fiber | 2.7 g |
| Sodium | 63 mg |
