Easy Homemade Bread: a Simple Loaf for Beginners
- Time: Active 15 minutes, Passive 18 hours 45 mins, Total 19 hours
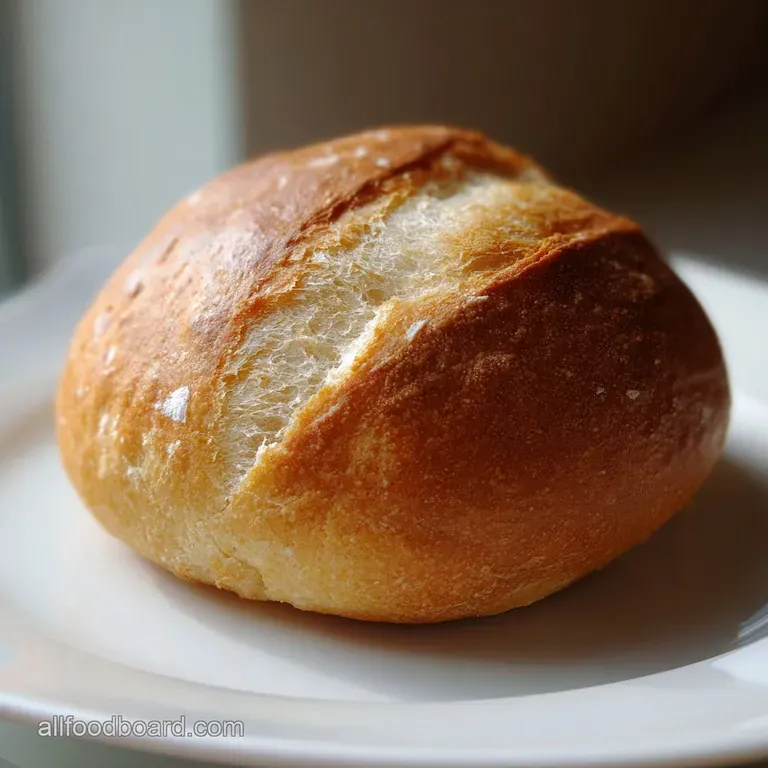
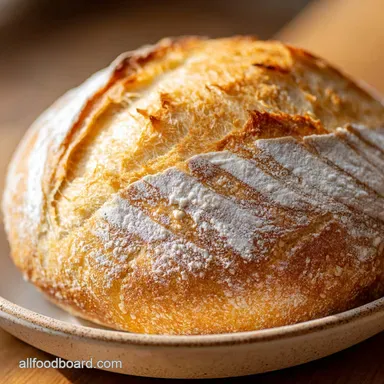
- Flavor/Texture Hook: A rustic, flour dusted exterior with a velvety, honeycombed interior
- Perfect for: Slow weekend mornings or impressive dinner party centerpieces
- The Science of Time in a Simple Bread Recipe
- Defining the Perfect Crumb and Crust Performance
- Selecting the Right Elements for Your Dough
- Essential Tools for Achieving a Rustic Loaf
- The Step-By-Step Journey to Your First Loaf
- Rescuing Your Dough from Common Baking Mishaps
- Scaling Your Production for Larger Gatherings
- Creative Twists for a Personalized Bread Recipe
- Myths Regarding No Knead Baking
- Preserving That Just Baked Freshness and Texture
- Perfect Pairings for a Warm Flour Dusted Slice
- Recipe FAQs
- 📝 Recipe Card
The Science of Time in a Simple Bread Recipe
There is a specific, quiet magic that happens in a kitchen when flour and water meet time. I remember the first time I pulled a Dutch oven lid away to reveal a loaf that looked like it belonged in a Parisian window. The steam billowed out, carrying that yeasty, cereal sweet aroma that hits you right in the chest.
It was not just a loaf of bread, it was a moment of pure, rustic artistry that I had created with my own hands.
You do not need a culinary degree or a heavy duty mixer to achieve this. This bread recipe is about patience rather than power. By letting the dough sit for half a day, the enzymes go to work, breaking down starches and building a gluten network that no amount of kneading could ever replicate.
The result is a loaf that sings as it cools, the crust crackling and snapping in the cold air of the kitchen.
The payoff here is immense compared to the effort required. You spend maybe fifteen minutes of actual work, and the rest is just waiting for nature to take its course. It is the perfect entry point for anyone who has felt intimidated by the complexity of artisanal baking.
We are going to strip away the fluff and focus on the tactile beauty of the process.
Long Fermentation: Time allows the gluten to align naturally through a process called autolysis, creating a strong yet supple structure without kneading.
High Hydration: The 75 percent hydration ratio ensures a moist interior and promotes the large, irregular bubbles characteristic of high end bakery loaves.
Thermal Mass: Using a preheated Dutch oven mimics the intense, radiant heat of a professional masonry oven, which is essential for that signature shatter crisp crust.
Enzymatic Activity: The extended rest period allows for the development of organic acids, which provide a depth of flavor that a quick rise bread simply cannot match.
While many people assume the oven is the only way to bake bread, there are distinct differences in how heat is applied to the dough. Understanding these helps you appreciate why the Dutch oven method is the gold standard for this specific crumb.
| Method | Heat Distribution | Crust Quality | Best For |
|---|---|---|---|
| Preheated Dutch Oven | Radiant and enclosed steam | Shatter crisp and thick | Rustic, artisanal loaves |
| Open Oven Rack | Dry, circulating heat | Thinner, softer crust | Soft rolls or sandwich loaves |
| Heavy Stovetop Skillet | Direct bottom heat only | Very thick base, pale top | Flatbreads or English muffins |
The enclosed environment of the Dutch oven is the secret weapon here. It traps the moisture escaping from the dough, creating a self steaming chamber that keeps the surface of the loaf supple for longer.
This allows the bread to expand fully before the crust sets, resulting in a much lighter and airier finished product.
Defining the Perfect Crumb and Crust Performance
The chemistry of baking is often treated like a secret, but it is actually quite intuitive once you see how each element behaves under heat. This component analysis breaks down exactly what is happening inside your glass bowl and eventually, your oven.
| Component | Scientific Role | Pro Secret |
|---|---|---|
| Bread Flour | Protein scaffolding | High protein (12 percent plus) is non negotiable for a tall rise |
| Instant Yeast | Carbon dioxide production | A tiny amount (1g) prevents a "yeasty" aftertaste during long sits |
| Sea Salt | Fermentation regulator | Tightens gluten strands and prevents the yeast from over working |
| Cool Water | Hydration and activation | Use filtered water at 18°C to keep the fermentation slow and steady |
Using a small amount of yeast is counter intuitive for some, but it is the key to success. In a Simple bread recipe for beginners, we often want speed, but here, we want quality. The slow pace ensures the gas bubbles are small and evenly distributed at first, then they expand beautifully during the over high heat bake.
Selecting the Right Elements for Your Dough
Every ingredient in this list serves a structural purpose. When you are looking for an easy homemade bread recipe, the quality of your base materials will dictate the final texture of your loaf.
- 400g Bread Flour: High protein content is vital. Why this? It provides the structural strength needed to hold the air bubbles during the long rise.
- 8g Fine Sea Salt: Essential for flavor and texture. Why this? It controls the yeast's pace and strengthens the dough's protein bonds.
- 1g Instant Yeast: A tiny but mighty amount. Why this? Slow fermentation creates superior flavor and a more digestible crumb.
- 300g Cool Water (18°C): The medium for all reactions. Why this? Accurate hydration ensures the dough is wet enough to create steam but firm enough to hold shape.
| Original Ingredient | Substitute | Why It Works |
|---|---|---|
| Bread Flour | All Purpose Flour | Lower protein creates a softer, less chewy crumb. Note: Reduce water by 10g. |
| Sea Salt | Table Salt | Use slightly less by volume as table salt is denser. |
| Instant Yeast | Active Dry Yeast | Must be bloomed in water first. Note: Adds 10 minutes to prep time. |
| Cool Water | Room Temp Beer | Adds malty notes and bubbles. Note: Alcohol can slightly slow yeast activity. |
Choosing the right flour is the most important decision you will make. While all purpose flour can work in a pinch, it often lacks the "muscle" to support the high hydration of this Dutch oven bread recipe. If you decide to experiment with something like a Moist Applesauce Bread, you'll find that different flours change the moisture absorption entirely.
Essential Tools for Achieving a Rustic Loaf
You do not need a kitchen full of gadgets, but a few specific items will make the process seamless. The heavy pot is the most critical piece of the puzzle because of its ability to hold and radiate high heat.
- Large Glass Bowl: Allows you to see the fermentation progress and bubble formation through the sides.
- Wooden Spoon: Perfect for mixing the "shaggy mass" without overworking the dough too early.
- Dutch Oven (approx. 5-7 quarts): Cast iron or enameled cast iron both work beautifully to trap steam.
- Parchment Paper: Prevents the dough from sticking to the hot pot and makes the transfer much safer.
- Plastic Wrap or Bowl Cover: Essential for keeping the moisture in during the 12 to 18 hour rest.
Chef's Tip: If you don't have a Dutch oven, you can use any heavy, oven safe pot with a tight fitting lid. If the lid isn't perfectly snug, place a layer of aluminum foil over the pot before putting the lid on to ensure no steam escapes during the first 30 minutes of baking.
The step-by-step Journey to Your First Loaf
The beauty of this process is the transformation from a sticky, unappealing mess into a golden, architectural masterpiece. Follow these steps closely, focusing on the visual cues rather than just the clock.
- Whisk the dry base. In a large glass bowl, whisk together the 400g bread flour, 8g fine sea salt, and 1g instant yeast until perfectly combined.
- Hydrate the mixture. Pour in the 300g of cool water and stir with a wooden spoon until no dry flour remains and a shaggy, sticky mass forms.
- Initiate long fermentation. Cover the bowl tightly with plastic wrap and let the dough rest at room temperature (20-22°C) for 12 to 18 hours until the surface is dotted with bubbles and it has doubled in size.
- Prepare the surface. Turn the fermented dough onto a lightly floured surface, handling it gently to keep as much air inside as possible.
- Shape the boule. Fold the edges of the dough toward the center several times to form a rough ball.
- Execute the final proof. Place the dough seam side down on a piece of parchment paper, cover with a clean kitchen towel, and let it rest for about 30 to 60 minutes.
- Preheat the chamber. Place your empty Dutch oven into the oven and preheat to 230°C. Note: This ensures the bread starts cooking the moment it hits the pot.
- Transfer with care. Carefully lift the parchment paper and dough, dropping it into the scorching hot Dutch oven.
- Bake with steam. Cover the pot and bake for 30 minutes until the structure is set and the bread has fully risen.
- Develop the crust. Remove the lid and continue baking for 15 minutes until the crust is deep mahogany and the internal temperature reaches 98°C.
Rescuing Your Dough from Common Baking Mishaps
Even with a simple bread recipe, things can go sideways. Most issues stem from temperature fluctuations or flour quality. Understanding the "why" behind a failure is the fastest way to becoming a confident baker.
Fixing a Dense, Heavy Loaf
If your bread comes out more like a brick than a cloud, the culprit is usually under fermentation or dead yeast. If your kitchen is cold, the 12 to 18 hour window might need to be pushed toward the longer end. The dough must be jiggly and full of visible air pockets before it goes into the oven.
Managing a Sticky, Unmanageable Dough
High hydration dough is supposed to be sticky, but it should not be liquid. If you find it impossible to shape, your flour might have a lower protein content than expected, or you may have measured the water by volume instead of weight. Always use a digital scale for accuracy.
| Problem | Root Cause | Solution |
|---|---|---|
| Pale, Soft Crust | Oven temperature too low or lid kept on too long | Ensure a full 230°C preheat and remove lid for final 15 mins. |
| Bottom of Loaf Burnt | Dutch oven too close to the heating element | Place a baking sheet on the rack below the Dutch oven to deflect heat. |
| Crumb is Gummy | Cutting into the bread while still hot | Let the loaf cool completely for 2 hours to let the starches set. |
Common Mistakes Checklist
- ✓ Never skip the preheating step for the Dutch oven (it needs a full 30 minutes).
- ✓ Resist the urge to add extra flour when shaping; a little stickiness is good.
- ✓ Ensure your yeast is fresh; if in doubt, test it in a small amount of warm water first.
- ✓ Do not rush the cooling process, as the bread continues to cook internally.
- ✓ Use a sharp blade or kitchen shears to score the top if you want a specific "ear" or pattern.
Scaling Your Production for Larger Gatherings
If you are making this for a holiday or a big family dinner, you might want to double the recipe. However, bread math is not always linear. When you double the ingredients to make two loaves, keep the yeast at the original 1g per loaf to maintain that slow, flavor developing pace.
- Halving the Recipe: You can make a mini loaf with 200g of flour. Use a smaller pot (like a 2 quart) and reduce the initial covered baking time by 5 minutes.
- Doubling the Recipe: Mix 800g of flour, 16g salt, 2g yeast, and 600g water. It is easier to ferment this in one large bowl and then split the dough into two balls during the shaping phase.
- Batch Baking: If you only have one Dutch oven, keep the second loaf in the fridge during the final proof of the first one to prevent over proofing while you wait for the pot to become available again.
| Desired Result | Ingredient Adjustment | Technique Change |
|---|---|---|
| Extra Sour Flavor | 18+ hour ferment | Use the fridge for the last 6 hours of fermentation. |
| Softer Crust | Add 20g of melted butter | Brush the crust with butter immediately after removing from oven. |
| Quicker Rise | Use 3g of yeast | Use warm water (35°C) and ferment for only 3-4 hours. |
Creative Twists for a Personalized Bread Recipe
Once you have mastered the basic white loaf, the variations are endless. Adding inclusions can turn a simple bread recipe for beginners into a signature dish.
Creating an Italian Herb and Cheese Bread
Fold in 50g of grated Parmesan and 1 tablespoon of dried oregano or rosemary during the shaping phase. The cheese will melt into the crumb, creating savory pockets, while the herbs will perfume the entire house as it bakes.
Experimenting with Grains and Seeds
You can replace up to 100g of the bread flour with whole wheat or rye flour for a more rustic, nutty flavor. Adding a handful of toasted sunflower seeds or flaxseeds adds a delightful crunch that contrasts beautifully with the soft interior.
Infusing Flavors with Aromatics
Roasted garlic cloves or caramelized onions can be folded into the dough during the final shaping. This creates a deeply aromatic loaf that is perfect for dipping into olive oil or serving alongside a hearty soup.
Myths Regarding No Knead Baking
One common misconception is that "yeast needs sugar to grow." While sugar provides immediate fuel, yeast is perfectly capable of breaking down the complex carbohydrates in flour. In a slow fermented bread recipe, adding sugar is unnecessary and can actually lead to a crust that browns too quickly before the inside is done.
Another myth is that "you must knead dough to develop gluten." As we have seen, time and hydration do the heavy lifting for us. When water touches flour, the proteins naturally begin to link up.
By giving them 18 hours, we allow these links to become strong and organized without ever having to get our hands messy with intensive kneading.
Preserving That Just Baked Freshness and Texture
Homemade bread does not have the preservatives of store-bought loaves, so it will go stale faster. However, there are ways to extend its life and reduce kitchen waste.
- Storage: Keep the cooled loaf in a paper bag for the first 24 hours to maintain the crust's texture. After that, move it to an airtight container or beeswax wrap. It will stay fresh at room temperature for about 3 days.
- Freezing: This bread freezes beautifully. Slice the loaf entirely, then freeze the slices in a freezer safe bag for up to 3 months. You can toast individual slices directly from the freezer.
- Zero Waste: Never throw away stale bread! Old crusts are perfect for making homemade croutons or a rustic Panzanella salad. You can also blitz dried pieces into high-quality breadcrumbs that far surpass anything in a canister.
Perfect Pairings for a Warm Flour Dusted Slice
This bread is a versatile companion. Because of its sturdy structure, it is the ideal vessel for soft cheeses like Brie or Camembert. The slightly tangy flavor of the long fermented dough also pairs exceptionally well with salted cultured butter and a drizzle of wildflower honey.
If you are looking for a more substantial meal, use thick slices to accompany a slow cooked beef stew or a creamy tomato bisque. The airy crumb acts like a sponge, soaking up every bit of sauce while the crust remains structural.
For a brunch option, try using the leftovers for French toast; the high protein structure holds up beautifully to the custard soak without becoming mushy.

Recipe FAQs
What is the secret to making good bread?
Patience during the 12 to 18-hour fermentation is the real secret. By allowing the dough to sit at room temperature, you build complex flavors and a gluten structure that traditional kneading simply cannot replicate.
What are the 4 types of bread?
Broadly speaking, you have lean doughs, enriched doughs, sourdough, and quick breads. This recipe falls into the lean category, as it relies only on bread flour, sea salt, yeast, and water to achieve a crisp crust and airy crumb.
How to make homemade bread from scratch?
Whisk your flour, salt, and yeast, then stir in cool water until a shaggy mass forms. Once mixed, let it ferment for up to 18 hours, shape it into a ball, and bake it in a 450°F preheated Dutch oven for 30 minutes covered followed by 15 minutes uncovered.
What is the best bread for heart disease?
Choose varieties made from simple, whole ingredients like those found in this recipe. Avoiding commercial breads with added sugars and preservatives is a great way to control what goes into your daily loaf.
Is it true I need a stand mixer to make bread?
No, this is a common misconception. You can easily create a professional grade structure by hand using a wooden spoon and the long fermentation method described here.
How to get a crispy, bakery style crust?
Bake your loaf inside a preheated Dutch oven at 450°F. The enclosed environment traps steam, allowing the crust to expand before it sets, which is the same principle we use to achieve a perfect texture in our fluffy garlic butter rolls.
How to store homemade bread?
Keep your loaf in a paper bag or a breathable linen cloth at room temperature. Avoid plastic bags, as they will soften the crust and cause the bread to lose its signature shatter crisp exterior within hours.
Easy Homemade Bread
Ingredients:
Instructions:
Nutrition Facts:
| Calories | 146 calories |
|---|---|
| Protein | 5.1 g |
| Fat | 0.6 g |
| Carbs | 29.1 g |
| Fiber | 1.1 g |
| Sugar | 0.1 g |
| Sodium | 314 mg |
