Deliciously Loaded Veggie Sliders: a Plant-Based Treat
- Introduction to Veggie Sliders: A Plant-Based Delicacy
- The Roots of Veggie Sliders
- Why Veggie Sliders Are a Must-Try
- Let’s look into into the Ingredients
- Essential Ingredients Guide for Veggie Sliders
- Mastering the Art of Cooking: The Professional Method
- Pro Tips & Secrets for Epic Veggie Sliders
- Perfect Presentation: Make It Pop!
- Storage & Make-Ahead Tips
- Creative Variations to Spice Up Your Sliders
- Complete Nutrition Guide
- Frequently Asked Questions
- 📝 Recipe Card
Introduction to Veggie Sliders: A Plant Based Delicacy
Oh my gosh, let me tell you about the first time i made veggie sliders ! picture this: it was a lazy saturday afternoon, and my friends were coming over for a bbq.
I started thinking, "what can i make that everyone will love even my friends who think a veggie burger is like a sad lettuce leaf whispering, 'eat me'?" that's when i whipped up these scrumptious veggie sliders.
Seriously, they vanished faster than free pizza at a college dorm party.
These little bites of heaven are not just delicious; they're loaded with flavor and goodness. if you’ve ever thought about swapping those heavy meat filled burgers for something a bit lighter, you’re in for a treat.
These sliders keep it fresh and funky and trust me, even meat lovers will be asking for seconds!
The Roots of Veggie Sliders
Historically, veggie sliders started showing up as part of the health food movement, which has been gaining traction in the u.
S. over the past few decades. with more people focusing on plant based diets, sliders filled with veggies made their grand entrance at those backyard bbqs and casual get-togethers.
Nowadays, they're practically a staple on menus everywhere from hipster cafes in brooklyn to beachside shacks in california. but the best part? you can whip them up right in your own kitchen!
Plus, they take about an hour to prepare and cook, making this an easy finger food option for any occasion, from casual parties to busy weeknights.
When it comes to cost, don’t sweat it! this recipe yields about 12 sliders and the ingredients won’t break the bank.
Think of it as a fun, budget friendly hack to keep everyone happy without sacrificing flavor.
Why Veggie Sliders Are a Must Try
Let me tell you, the health benefits of these veggie sliders are off the charts! packed with protein from quinoa and a rainbow of colorful veggies, they’re not just tasty but also nutritious.
Plus, the good fats from the tahini and the fiber from the veggies make you feel full and satisfied without that post meal food coma.
What’s more, these sliders are versatile enough to star in thanksgiving menu ideas or any potluck. you can serve them as appetizers, and they fit perfectly into the pinwheel sandwiches or tortilla roll ups category ideal for those gatherings where everyone is craving something easy to munch on while gossiping about the latest netflix drama.
Feeling fancy? add a slice of avocado or some herbs for an extra kick! really, the combinations are endless. the beauty of veggie sliders is that they can adapt to any event or theme you’re working with.
Let’s look into into the Ingredients
Alright, now that we’ve got you hooked, let’s get to the good stuff the ingredients! you’re gonna love how easy and accessible these are.
Grab your pantry staples and let’s get to mixing these flavorful treats. as we move into the ingredients section, keep in mind you can mix and match based on what you have on hand, or what’s fresh and in season.
Trust me, once you make these deliciously loaded veggie sliders , you'll have everyone at the table singing their praises.
So, let’s roll up our sleeves and get started on a recipe that’s sure to be a hit!
Essential Ingredients Guide for Veggie Sliders
Alright, my food loving friends! let’s dive into the nitty gritty of making the ultimate veggie sliders . these beauties are not just delicious; they're packed with flavor, and trust me, you’re going to want the right ingredients on your kitchen shelf.
Let’s kick this off with some premium core components .
Premium Core Components
Detailed measurements: don’t worry; we’ll keep it simple! for that solid base of our sliders, you need 1 cup (150g) of cooked quinoa , and we won’t stop there.
We’re talking about 1 cup (150g) finely chopped mushrooms and 1 cup (150g) grated zucchini . oh, and don’t forget that ½ cup (75g) of breadcrumbs ! now if you’re more of a metric kind of person, just flip the numbers.
No biggie, right?
Quality Indicators: When shopping for mushrooms, look for ones that are firm and smooth. Zucchini should be bright green without any blemishes. Freshness matters, folks!
Storage guidelines & shelf life: cooked quinoa can chill in your fridge for about 5-7 days . store mushrooms in a paper bag; plastic will make them slimy eww! breadcrumbs are best kept in a cool, dry place, generally up to 6 months .
Freshness Tips: When selecting veggies, always give them a squeeze. Firmness indicates freshness! Also, if you can, buy seasonal. Yummy zucchini in summer = the best sliders ever!
Signature Seasoning Blend
Now let’s jazz things up with the signature seasoning blend . Flavor is where the magic happens !
Essential Spice Combinations: For those sliders, 1 tsp ground cumin and 1 tsp smoked paprika are your best buddies. They really bring the flavors to life!
Herb Selections: Fresh herbs like basil or cilantro make your sliders sing. Pair them with your spices; it’s like a culinary duet that’ll knock your socks off!
Flavor Enhancers: Want an umami boost? A spoonful of tahini or nut butter goes a long way. Trust me; once you taste this combo, you'll be hooked.
Regional Variations: Feeling adventurous? Try adding a touch of curry powder for an Indian twist or some taco seasoning for that spicy kick. Your taste buds will thank you!
Smart Substitutions
Let’s be real; some days you just don’t have the exact ingredient, and that’s okay!
Common Alternatives: If you’re missing quinoa, use cooked rice or even oats! How about a little flexibility?
Dietary Modifications: Need it gluten-free? Swap out those breadcrumbs for crushed nuts or gluten-free oats! Boom, you're golden.
Emergency Replacements: If you run out of eggs, try a flax egg instead. Combine 1 tbsp ground flaxseed with 2.5 tbsp of water. You won’t even notice the difference!
Seasonal Options: Didn’t have the chance to grab zucchini? Try sweet potatoes in the fall. Just bake them up, and they’ll add a nice sweetness to your slider.
Kitchen Equipment Essentials
Equipment is key in the kitchen! Let’s not overthink this just get the essentials.
Must Have Tools: Grab a mixing bowl and a frying pan. Trust me, you’re gonna need them!
Alternative Equipment Options: No food processor? Chop those veggies by hand. It’s not a race; you'll get your workout in!
Preparation Tips: Always have a sharp knife; it'll make chopping a breeze. Also, keep your workspace clean; it helps with flow!
Storage Solutions: Store your slider mixture in a covered bowl in the fridge if you’re prepping ahead. It'll taste even better the next day!
So there you go! you’re all set with the fundamentals you need to create those divine veggie sliders. feel free to mix and match and get creative with flavors.
After all, it’s your kitchen! and now, let’s roll up those sleeves and jump into the deliciousness of making these sliders!
Mastering the Art of Cooking: The Professional Method
Alright, friends! who's ready to level up their cooking skills? today, we’re diving into the professional cooking method that's all about cooking like a pro in your own kitchen.
Whether you're whipping up delicious veggie sliders for a chill night or planning for that thanksgiving menu, i've got the scoop just for you.
Let's roll!
Essential Preparation Steps
First up, let’s talk about mise en place . sounds fancy, right? it just means having everything in its place. before even turning on the stove, you should chop, measure, and prep all your ingredients.
Trust me, it cuts down on stress, and everything flows smoothly. it’s like getting all your toys out before playtime!
Now, time management this is crucial. you don’t wanna burn your sliders because you're busy chasing after the dog or checking instagram.
Grab a timer! a visual cue like a post-it note with your goal times can help, plus it keeps you honest.
Then there’s organization. are you working with a clean kitchen? clear space makes you feel like you can conquer any recipe.
And let’s not forget about safety! always keep those knives sharp, and wash your hands before and after handling food.
That’s how we avoid chaos in the kitchen!
Step-by-step Process
Now onto the juicy part let’s get down to the nitty gritty of cooking. Simple, clear instructions are your best buddies here!
Prepare Ingredients : Chop up your mushrooms (around 1 cup or 150g ) and zucchini, measure that quinoa (same amount), and set aside.
Mix it Up : In a bowl, combine your cooked quinoa, mushrooms, zucchini, and whatever spices you fancy. Feeling adventurous? Add minced garlic for that awesome pop!
Chill : Cover and toss that mixture in the fridge for 30 minutes to help things gel. I can't stress this enough don't skip this step!
Form Patties : Shape the mixture into tiny patties, about 2 inches wide . They should look like mini burgers, ready to rock!
Cook up : heat your frying pan over medium heat with a little oil. fry those bad boys for about 3- 4 minutes on each side , flipping them when they’re golden brown.
You’ll know they’re done when they smell downright delicious!
Expert Techniques
Now, let’s sprinkle in some expert techniques. a couple of critical steps to watch for: if your sliders are falling apart, you might need more breadcrumbs.
This mix is all about ratios keep those quality checkpoints in mind!
And let’s solve common issues with a little troubleshooting. If those patties are sticking, it could be the heat is too high or miss that oil!
Success Strategies
We’ve all made mistakes, so here’s how to avoid them. Don’t skip the chilling step; your sliders will thank you. Always taste test before serving this ensures quality and prevents major flops.
For perfect results, think about make-ahead options. you can prep your slider mixture a day prior. it’s a lifesaver when you’re busy.
Just store it in the fridge and you’ll thank your past self when it’s time to cook.
Wrapping It All Up
Honestly, mastering these skills takes a bit of practice, but the payoff is huge. your friends will think you’ve been hiding culinary secrets.
Imagine serving them veggie sliders on game night everyone's gonna love you!
So, remember, whether it's tortilla roll ups appetizers or pinwheel sandwiches , it all boils down to how well you prep and execute.
Treat cooking like a fun dance get your steps right, and everything flows!
And there you go! you're all set to cook up a storm! ready to explore more recipes and tips? stay tuned for the next section: additional information.
.. it’s gonna be a good one!
Pro Tips & Secrets for Epic Veggie Sliders
Alright, foodies! Let’s jump into making your veggie sliders unforgettable. Everyone loves a good BBQ or casual hangout, and these sliders will seriously steal the show!
Chef’s Secret Insights
You know what i've found? adding a pinch of love (aka, spices) can elevate the simplest of ingredients. i’m a big fan of smoked paprika; it gives these sliders that extra smokey depth.
Trust me, once you try it, you’ll never look back!
Time Saving Techniques
Cooking should be fun, not a race against the clock! when making these sliders, chop your veggies the night before.
Store them in a ziplock in the fridge, and boom! you’re ready to mix and chill without all the pre-work drama.
Flavor Enhancement Tips
Looking to kick it up a notch? toss in a dash of hot sauce or minced jalapeños for a zesty surprise! mixing in different herbs like cumin or italian seasoning can switch things up too.
The goal is to keep it interesting!
Presentation Advice
Plating isn’t just for fancy restaurants; it’s for your kitchen too! when you stack your sliders, add a fun twist like a toothpick dressed with a cherry tomato and basil leaf on top! your sliders will look instagram ready and taste just as awesome.
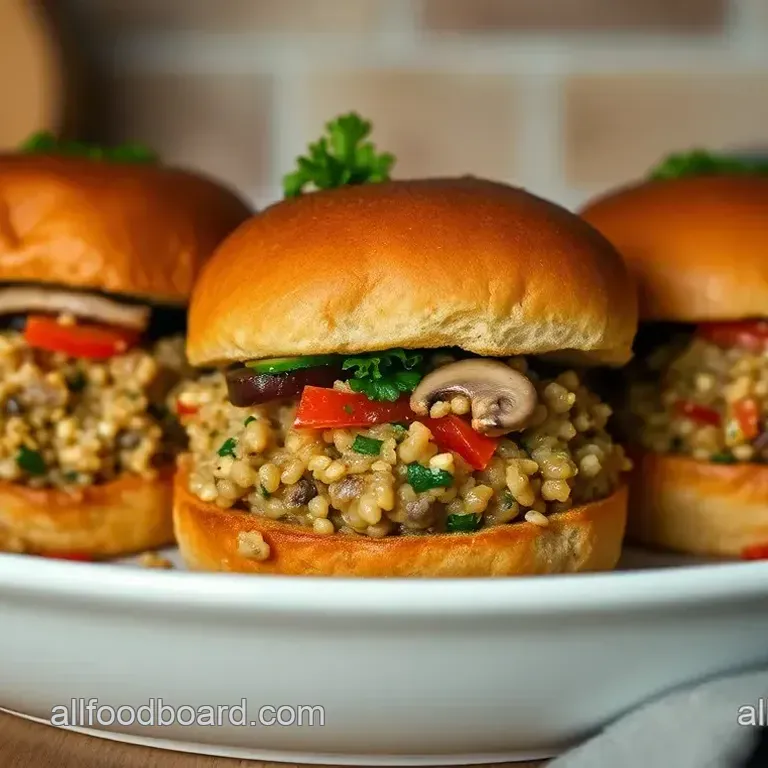
Perfect Presentation: Make It Pop!
So, let’s talk about making those veggie sliders look as good as they taste.
Plating Techniques
Start with a clean, nice looking plate. Arrange your sliders in a crescent; it adds a dynamic shape that’s more visually appealing.
Garnish Ideas
Fresh herbs are your best friends here! Parsley, cilantro, or even a sprinkle of feta on the side can take your presentation from ordinary to “whoa, that looks good!”
Color Combinations
Aim for a mix of colors! if your sliders are brown from frying, pair them with vibrant garnishes think green avocado slices or bright red bell peppers on top.
A burst of color is eye-catching and makes the dish scream, "eat me!"
Visual Appeal Tips
Think about height too! layer your toppings high for a wow factor. seriously, a little height in your plating can transform a basic dish into a masterpiece.
You’ll impress everyone, and your thanksgiving menu ideas just leveled up, my friend!
Storage & make-ahead Tips
If you want to prep ahead, I got you covered.
Storage Guidelines
Store any leftover veggie sliders in an airtight container in the fridge for up to three days . if you’ve got an extra batch, freeze those bad boys just remember to flash freeze them first.
Preservation Methods
When freezing, place parchment paper between each slider to prevent sticking. This tip is a game changer!
Reheating Instructions
When you’re ready to munch, pop them in the oven at 350° f for about 10- 15 minutes .
They’ll be just like fresh! microwaving is tempting, but we want that crispiness, right?
Freshness Duration
These sliders are mighty tasty for about three days. After that, the taste might go south, and nobody wants sad sliders, trust me.
Creative Variations to Spice Up Your Sliders
Why stick to the same old thing? Let your creativity flow!
Flavor Adaptations
Change up the base! Instead of quinoa, try chickpeas for a different texture.
Dietary Modifications
For gluten-free needs, swap regular buns for some crisp lettuce leaves hello, tortilla roll ups appetizers idea!
Seasonal Twists
In summer, throw in some grated corn or fresh herbs. In fall, pumpkin puree instead of tahini adds a seasonal kick!
Regional Variations
Ever tried BBQ style? Add a little BBQ sauce and smoky flavor for a southern twist! Or go Mediterranean with olives and feta so many directions!
Complete Nutrition Guide
Okay, let’s break down how awesome these sliders are for you!
Detailed Breakdown
One slider packs a punch with 220 calories , which makes it an ideal light meal or snack.
Health Benefits
With that quinoa and all those veggies, you’re looking at a good source of protein and fiber . Plus, it's all plant based, so it gets the healthy thumbs up !
Dietary Considerations
These can easily fit in vegetarian, vegan, or even gluten-free diets depending on your tweaks. It’s all about making it work for you!
Portion Guidance
Depending on whether you’re serving them as a main dish or as part of an appetizer spread, portions can vary. For a full meal, especially with sides, aim for three per person.
All in all, making these veggie sliders is like a fun little cooking adventure! they’re simple, fun, and totally customizable.
So roll up those sleeves and get cooking. you’ve got this! your friends and family will be singing your praises, and trust me, you’ll want to make them again and again!
Frequently Asked Questions
What are veggie sliders made of?
Veggie sliders are made from a combination of ingredients like cooked quinoa, finely chopped mushrooms, grated zucchini, bell peppers, and a binding agent such as an egg or a flax egg. Spices and seasonings give them a delightful flavor, making them perfect for everyone, even non-vegetarians!
Can I make veggie sliders ahead of time?
Absolutely! You can prepare the mixture a day in advance and store it in the fridge. Just remember to chill the patties for at least 30 minutes before frying to ensure they hold their shape while cooking!
How do I store leftover veggie sliders?
Store leftover veggie sliders in an airtight container in the fridge for up to 3 days. You can also freeze them, placing parchment paper between layers to avoid sticking, for up to 3 months. Just reheat them in the oven or skillet when you're ready to indulge again!
Can I use something other than breadcrumbs in veggie sliders?
Yes! If you're gluten-free, you can substitute breadcrumbs with ground oats, crushed nuts, or gluten-free bread crumbs. This will give you a similar texture without the gluten, making it a great option for those with dietary restrictions.
How can I make veggie sliders spicier?
If you're looking to spice things up, consider adding diced jalapeños or a dash of hot sauce to the slider mixture. You could also experiment with spicy seasoning blends like taco seasoning or Cajun spice for an extra kick!
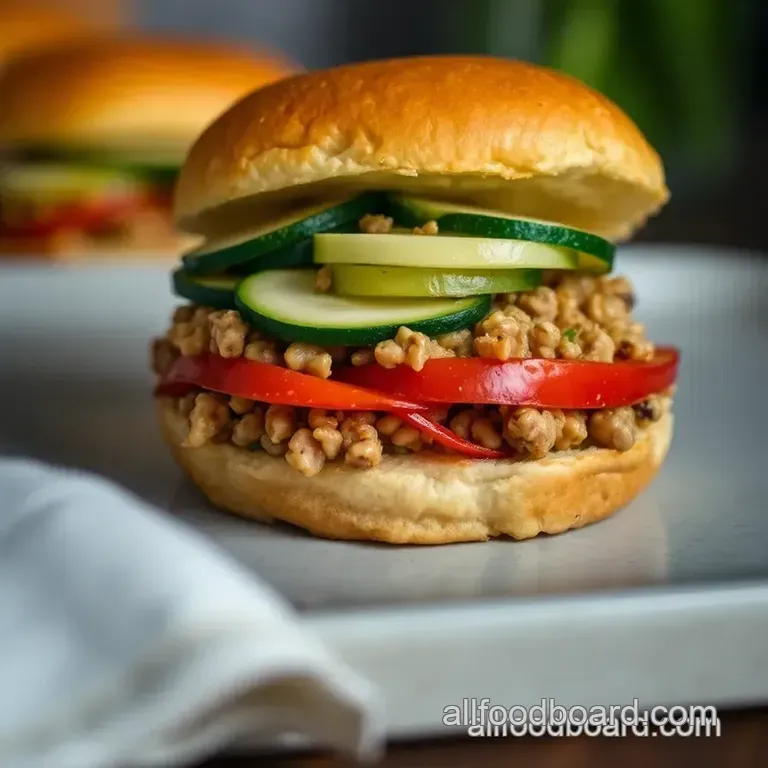
What are some healthy toppings for veggie sliders?
Great toppings include creamy avocado slices, fresh greens like basil or spinach, and light spreads like hummus or aioli. You can also opt for caramelized onions, sliced tomatoes, or even a tangy slaw to add both flavor and texture!
Deliciously Loaded Veggie Sliders A Plant Based

