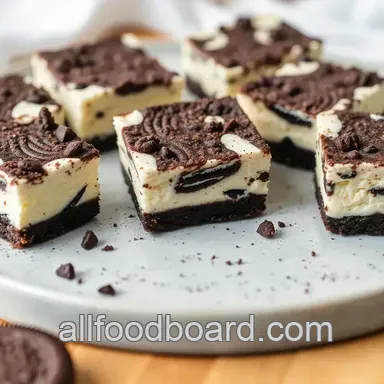
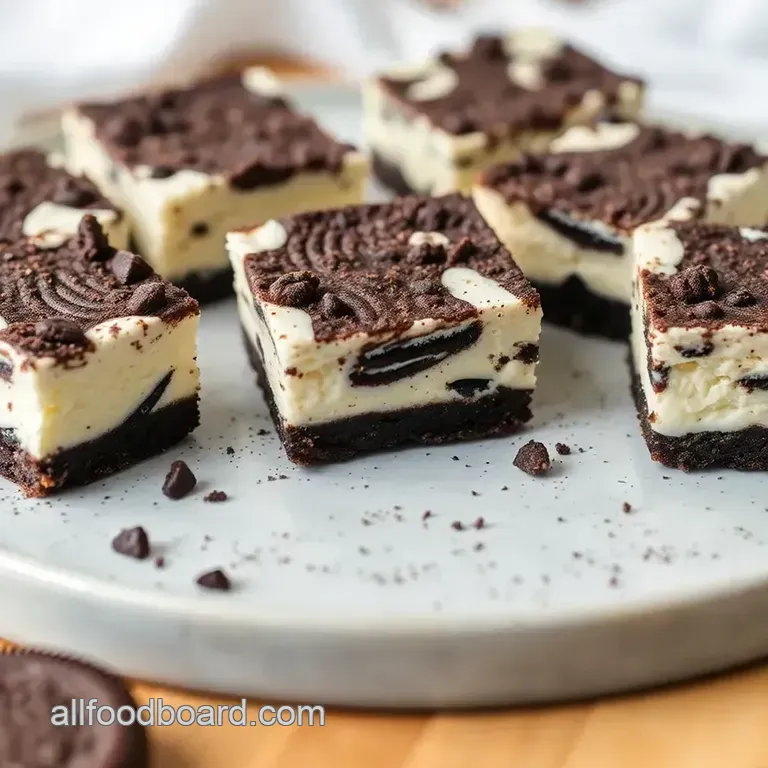
Bake Oreo Cheesecake Cookie Bars Delightfully
- look into into Deliciousness: Bake Oreo Cheesecake Cookie Bars Delightfully
- Your Ultimate Essentials Ingredients Guide
- Mastering Professional Cooking Methods
- Pro Tips & Secrets for Perfect Bake Oreo Cheesecake Cookie Bars Delightfully
- Perfect Presentation of Your Cookie Bars
- Storage & Make-Ahead Tips
- Creative Variations for Your Dessert Adventure
- Complete Nutrition Guide
- Expert FAQ Solutions: Your Questions Answered
- 📝 Recipe Card
look into into Deliciousness: Bake Oreo Cheesecake Cookie Bars Delightfully
Oh my gosh, let me tell you about the first time i tried oreo cheesecake bars . it was my niece’s birthday party, and i was in charge of the sweets.
I had this vision of decadent dessert bars dancing in my head, but what i whipped up was pure magic oreo cheesecake cookie bars.
Close your eyes and imagine the cookie crunch meeting the creamy cheesecake, with that rich chocolatey vibe swirling around. honestly, i still dream about that first bite!
You see, people are all about quick and easy these days, but that doesn’t mean we have to sacrifice taste.
Bake oreo cheesecake cookie bars delightfully is not just a recipe; it’s a memorable experience. it balances the sweetness of oreo dessert recipes with the indulgence of creamy cheesecake, bringing everyone together to share smiles over a plate of these beauties.
A Sweet Slice of History
These cookie bars are inspired by a classic combo that’s been around for ages. cheesecake dates back to ancient greece (seriously!), while oreos have been a beloved american cookie since 1912.
So, when combining these two, we're not just making dessert; we're merging histories. today, these bars are super popular, showing up at potlucks, birthday parties, and cozy nights in with a movie, of course!
Now, about time. prepping these bars takes about 20 minutes (plus a bit of chilling), and the whole thing cooks in 30 minutes .
So, you can get this dessert on the table in a little over an hour. not too shabby, right? just a heads-up, they require a bit of baking know how, but if you can handle a mixing bowl and a spatula, you’ve got this!
Cost wise, let’s talk numbers. you probably have most of the ingredients at home (like butter, sugar, and eggs). the total usual cost is around $15 for the whole batch, and trust me, you yield a hearty 12 bars .
That's a ton of sweet treats for parties or just for those late night cravings on the couch.
Why You’ll Love These Bars
Let’s break down the goodness, shall we? first off, these bars pack a punch on the nutrition side, too. cream cheese, though can be rich, adds a share of calcium.
Plus, who doesn’t love a sweet treat that’s also kind of filling? you can serve these as a celebratory dessert or at casual gatherings, and people will think you're a baking genius!
Here’s the thing i love that they’re a kid-friendly dessert idea too. get your kids involved! let them crush the oreos; you’ll make memories while whipping up this decadent recipe.
It’s the perfect bonding activity.
And if you’re feeling adventurous, there are endless cheesecake variations to explore. want a creamier texture? substituting greek yogurt is a game changer.
Feeling nutty? a bit of peanut butter will bring this to a whole new level.
Ready to Get Started?
So, you’re excited, right? let’s make those layered cookie bars ! whether it’s a special occasion or just a weekend treat you need, these bars are the perfect choice.
Plus, you just might find them to be a hit at any gathering.
Okay, enough chit chat. Let’s hop into the ingredients you'll need to create these delicious cheesecake cookie bars . Trust me; you won’t want to miss out on this amazing recipe!
Your Ultimate Essentials Ingredients Guide
Every good cook knows that the right ingredients can make or break your dish. let’s dive into the premium core components of cooking, so you can feel like a pro in your kitchen.
Whether you're thinking about that sweet bake oreo cheesecake cookie bars delightfully or other decadent dessert recipes, these guidelines will have you covered like a warm blanket.
Premium Core Components
First things first, let’s talk detailed measurements . In the US, we juggle cups and tablespoons, but if you’re reading from the metric side, here’s how it shakes out:
- 1 cup of flour weighs about 120g ,
- 1 stick of butter equals 113g .
When you’re whipping up cookie bar recipes or easy cheesecake desserts, precision is key!
Quality indicators can be your trusty compass too. for example, you want your cream cheese to be nice and creamy not gritty! and those oreos? make sure they have that signature crunch.
If you can’t stop eating them out of the package… well, you’re on the right track.
Storage is another biggie. shelf life matters! most spices keep for about 6 months , while flour is good for up to a year in a cool, dry place.
Keeping an eye on freshness will keep your desserts tasting like they just came from a bakery.
Freshness tips ? Oh, I’ve learned a thing or two: always check for the smell! Herbs shouldn’t smell stale, and if they do, toss them.
Spice It Up: Signature Seasoning Blend
When it comes to that signature seasoning blend , think of a well balanced mix of spices. for your desserts, a combination of cinnamon and nutmeg can elevate your cookies to the next level.
Ever tried pairing mint with chocolate? talk about a flavor explosion! use it in a no-bake oreo cheesecake to surprise your taste buds.
Don’t forget about herb selections for savory or sweet dishes. Basil with strawberries? Thyme in chocolate chip cookie bars? Seriously, it’s a game changer.
Regional variations can also spice things up. If you want that South American flair, try adding a touch of cocoa powder to your layer of creamy cheesecake. Yum!
Smart Substitutions to Rescue Your Recipe
Okay, so what happens when you don’t have that perfect ingredient? Here’s where the smart substitutions come into play.
If you’re out of eggs, you can swap in 1/4 cup of applesauce per egg for a moist, guilt free alternative.
You’ll be all set to create cookie bars that even the pickiest eaters will love!
Got a guest with dietary restrictions? No problem! Use almond milk or coconut cream in place of heavy cream for creamy cheesecake desserts that everyone can enjoy.
Kitchen Equipment Essentials: Get Your Gear On
Jumping to kitchen equipment essentials , let’s be real: you need the right tools to make magic happen. if you’ve got a 9x13 inch baking pan , you’re halfway there! but if you don’t, you can use any baking dish you have on hand.
Your ingredient skills are the star here!
You’ll also want mixing bowls , measuring cups, and a rubber spatula. Oh, and an electric mixer can save you a lot of elbow grease! If you don’t have one, grab a whisk just be ready to put in some work!
Preparation tips ? Remember to let your cream cheese come to room temperature before using it. This makes it easy to blend into a creamy cheesecake filling without lumps.
And speaking of storage, always keep your ingredients organized. Nothing slows down the baking process like searching for that elusive bag of flour!
Now that you’ve got the lowdown on essential ingredients and equipment, you’re totally ready to tackle that incredible Bake Oreo Cheesecake Cookie Bars Delightfully ! Keep these tips handy, and let’s move on to how you can whip this sucker up!
Mastering Professional Cooking Methods
When diving into the world of baked goods, like my all-time favorite, Bake Oreo Cheesecake Cookie Bars Delightfully , knowing some professional cooking methods can really elevate your game! It’s not just about throwing ingredients together, you know? It's a whole performance, and you want to nail it like a pro!
Essential Preparation Steps
Let’s kick things off with mise en place , which is just a fancy french way of saying “everything in its place.
” chop those oreos, measure your flour, and set that softened cream cheese out well ahead of time. having everything ready makes your process smoother and way less chaotic.
Trust me, it's a lifesaver!
Next up is time management . when i first started baking, i often found myself scrambling for ingredients. set yourself a timer for each step.
For instance, while the base is chilling ( 30 minutes), you can clean up or prep your other ingredients! multitasking is key.
Now, let’s talk about organization . keep your counter clear and your ingredients grouped. it makes everything flow so much better.
I usually have everything lined up like a mini assembly line. you’ll move faster, and you won't accidentally forget an ingredient i’ve been there, and it's annoying!
And don’t forget safety! use oven mitts like they’re extensions of your arms. know your cooking surfaces and watch out for things that are hot.
Seriously. one time, i tried moving a boiling pot without gloves, and it was not one of my best moments.
step-by-step Process
Alright, ready to get into the nitty gritty? Here’s a step-by-step on how to launch into making those Oreo cheesecake bars:
- Preheat your oven to 350° F ( 175° C) this is your starting line!
- Prepare your baking pan, lining it with parchment paper for easy removal later.
- In a large bowl, mix your dough. Remember to cream your butter and sugars until fluffy and then add those eggs and vanilla!
- Fold in your chopped Oreos and chocolate chips. Seriously, don't skimp on the chocolate!
- Divide the dough: half at the bottom of the pan, then add your cheesecake filling smooth it out, and remember we’re layering flavors here.
- Spoon the remaining dough on top, and don’t worry too much if it doesn't cover everything completely it will bake and spread a bit.
- Bake for 30 minutes or until it looks golden and smells like heaven!
Watch for the visual cues : you'll want the edges set but the center to still be a tad wobbly. This is where the magic happens as it cools!
Expert Techniques
Now let’s level up! one of the critical steps in baking is the cooling phase . once those bars are out, it’s all about giving them time to set properly.
Since these are cheesecake bars, letting them chill for at least 2 hours is a must! this helps with the whole creamy goodness vibe.
When you dig in, ensure you have the right texture by checking for firmness. if they’re too soft, they might need to chill longer.
And if you find yourself with gooey bars instead of nicely set ones on your first try, don’t sweat it! just adjust your chilling time next time.
Success Strategies
Let’s face it we all mess up sometimes. one common mistake is rushing the chilling phase. i once didn't let my cheesecake bars cool enough before cutting, and it was a delightful, gooey disaster.
So, be patient let those bars cool completely!
Quality assurance is crucial. before serving, check for texture and taste. is it creamy enough? is the chocolate chip flavor strong? and, oh! if you want to switch it up, consider no-bake oreo cheesecake variations.
They're super easy to manage, and you still get that full indulgent flavor without the effort.
To make-ahead, just cool and wrap your bars tightly in plastic wrap. You can store them in the fridge for a few days or freeze them for longer.
And now that you’re equipped with all these professional tips, perhaps you're feeling inspired to dive into more dessert bar recipes , or even explore those creamy cheesecake desserts. You've got this!
Additional Information
Whether you're planning a party or just a sweet night in, mastering the art of baking will serve you so well.
You're one step closer to creating those show stopping oreo cheesecake bars that will impress friends and family alike!
Pro Tips & Secrets for Perfect Bake Oreo Cheesecake Cookie Bars Delightfully
Alright, let’s dive right into it! making the oreo cheesecake bars of your dreams isn’t just about tossing ingredients into a bowl.
Here are some chef secrets to take your cookie bars from “eh” to “whoa!”
First off, room temperature ingredients are your best friend. that means pulling your cream cheese and eggs out well before you start.
Trust me, it makes for a smoother batter. and speaking of batter, when whipping it up, don’t overmix the cheesecake filling.
You want it to be slightly fluffy, but overmixing can lead to cracks. so, mix until just combined!
Now, let’s talk time saving techniques. if you’ve got a busy life (and who doesn’t?), try making your cookie dough the night before.
It’ll chill in the fridge and help enhance those flavors. plus, when you bake it, it’s like saying “hello” to your future self for making the process easier.
Flavor enhancement is next! for that rich, cookie vibe, add a touch of espresso powder to your cookie dough. it elevates the chocolate taste and makes everything feel a tad gourmet.
It’s a game changer!
And don’t underestimate presentation! the way you plate your creamy cheesecake desserts can make all the difference. think about drizzling melted chocolate or caramel over the top right before serving, and maybe sprinkle some crushed oreos for that extra wow factor.
Speaking of sprucing up, how about garnishing with fresh mint leaves? they add freshness and color talk about instagram worthy!
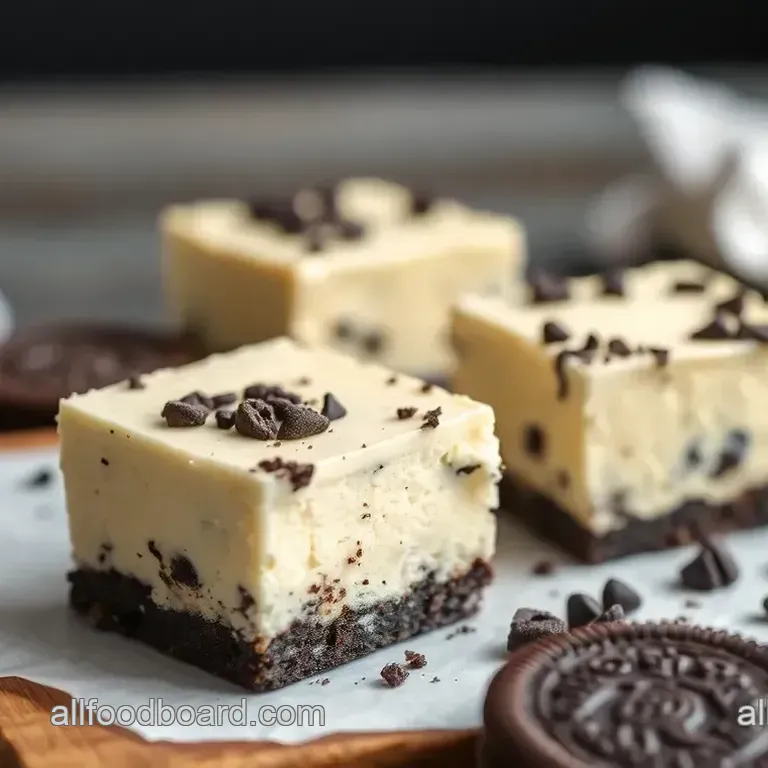
Perfect Presentation of Your Cookie Bars
Now that you've nailed the baking part, let’s get these bars looking as fabulous as they taste! a little plating goes a long way.
For instance, serve these layered cookie bars in neat little squares precision counts. use a sharp knife, dipped in hot water, for clean cuts.
That’s how you show off those beautiful layers!
When it comes to garnishes, think simple and stylish. crushed oreos sprinkled on top, a dollop of whipped cream, or even some seasonal fruit can elevate your presentation game.
As they say, “you eat with your eyes first!” a dash of colorful berries matched with a rich chocolate background? pure genius.
Storage & make-ahead Tips
Saving some cookies for later? oh, i hear ya! these bars can definitely last a bit, but you want to store them right.
Wrap them tightly in plastic wrap or place them in an airtight container, and they’ll chill for about 5-7 days in the fridge .
If you want to keep 'em for longer, think about freezing them. just cut the bars first and then wrap each piece.
They can last up to 3 months in the freezer . when you're ready, let them thaw in the fridge overnight.
Right before digging in, reheat in the microwave for a soft, melty treat in just a few seconds. But hey, who can resist a cold cheesecake cookie bar with a scoop of ice cream, right?
Creative Variations for Your Dessert Adventure
Now let's get creative! you don’t have to stick to plain vanilla. stick with seasonal twists like adding pumpkin spice during the fall or using peppermint oreos for a refreshing kick over the holidays.
If you're feeling adventurous, try a peanut butter swirl to break up the cheesecake flavor. just spoon it in and swirl with a knife easy peasy!
And don’t forget about dietary needs. You can easily swap out regular cream cheese for Greek yogurt if you want a lighter option, or use nut-based creams for a vegan twist!
Complete Nutrition Guide
Okay, let’s address the elephant in the room these delicious layered desserts are rich. a serving of your decadent dessert recipes will sit around 300 calories .
It's hefty, i know, but let’s be real: everything in moderation! and with that rich cream cheese, you’re also getting protein, calcium, and a bit of joy in every bite.
Easy on the portion sizes i suggest cutting those bars into smaller pieces if you’re serving them at a party.
Expert FAQ Solutions: Your Questions Answered
Got questions? of course you do! if your bars come out too dry, it might be an overbake situation. keep an eye on that timer, folks! if the cheesecake filling isn’t setting, a quick pop back in the oven can sometimes help.
Chilling time is also crucial, so don’t skip that step!
Experimenting is key! Try tweaking the recipe with your favorite flavors or fillings. Remember, it’s your dessert world make it yours!
Wrapping It Up
So, there you have it! with tips, tricks, and variations, you’re all set to make these bake oreo cheesecake cookie bars delightfully .
Honestly, i can’t wait for you to experience the pure joy they bring. perfect for parties, family gatherings, or a quiet night with netflix (no judgment here!), these bars can really do it all! enjoy the process, and don’t forget to share with your friends you know they’ll thank you later!
happy baking!
Decadent Oreo Cheesecake Cookie Bars