The Pub Classic Chewy Sturdy Soup Bread Bowls
- Why This Homemade Bread Bowl Recipe Replaces Store-Bought Favorites
- The Secret to an Edible Vessel That Won't Leak
- Essential Components for Sturdy Bread Bowl Dough
- The Baker’s Toolkit: Necessary Equipment for Success
- Step-by-Step Guide to Kneading and First Proofing
- Shaping Your Perfect Edible Soup Container
- Maximizing the Life of Your Artisan Bread Vessels
- Creative Filling Suggestions for Your Freshly Baked Bowl
- Troubleshooting Common Bread Bowl Baking Hiccups
- Recipe FAQs
- 📝 Recipe Card
Why This Homemade Bread Bowl Recipe Replaces store-bought Favorites
There is a distinct pleasure that comes from tearing off a chunk of bread that was baked just hours ago, especially when that bread is engineered to be the perfect serving dish. Many commercially available options, while convenient, often fall short in structure and flavour.
They can be too soft, crumble under the weight of a thick stew, or taste distinctly yeasty without the depth of flavour achieved through a proper, slow rise. Our Bread Bowl Recipe is crafted specifically to address these shortcomings.
We aim for a robust, substantial vessel a true Crusty Bread Bowl —that provides satisfying texture contrast to the creamy contents it holds. This difference between a fragile container and a truly Edible Soup Bowl is what elevates a simple meal into an event.
The Secret to an Edible Vessel That Won't Leak
Creating a Homemade Bread Bowl that stands up to liquid requires a focused approach to gluten development and crust management. The goal isn't just to make bread; it’s to create a barrier.
This involves a combination of precise ingredient ratios, careful kneading to develop strong gluten strands, and strategic baking temperatures. The interior crumb needs to remain soft enough to eat, but the exterior must form a thick, impenetrable shell.
Mastering this balance is the cornerstone of the Best Bread Bowl Recipe .
Crafting the Ultimate Crust: Texture Expectations for Your Bowl
When we talk about the crust, we are aiming for something substantial. It should offer audible resistance when you slice into it, yet yield to a satisfying chew rather than shattering. This deep golden exterior is achieved partly through the use of an egg white wash just before baking.
The wash caramelizes beautifully in the oven, sealing the surface moisture and giving that signature, professional sheen. This thick crust is your primary defence against seepage when serving your favourite Bread Bowl Soup .
Elevating Comfort Food: The Bread Bowl Experience Defined
The experience itself is inherently comforting. Think of a chilly evening and a steaming bowl of thick chowder. If you are serving this in a flimsy cup, you miss the opportunity for that perfect textural interplay.
When you use an artisan style Yeast Bread Bowl Recipe like this one, every scoop includes a piece of perfectly textured bread, transforming the dish from a simple supper into a cohesive, warming experience perfect for those cooler Fall Soup Bread Bowl nights.
A Baker's Promise: Simplicity Meets Showstopper Results
Despite the impressive final product, the foundational steps are surprisingly straightforward. This is not an overnight sourdough requiring esoteric techniques. By activating the yeast correctly and ensuring adequate resting periods, we allow the dough to develop character naturally.
We promise a result that looks like it took all day but utilizes active hands-on time efficiently, proving that show stopping centrepieces don't require undue complexity.
Essential Components for Sturdy Bread Bowl Dough
To achieve the necessary structure for our Bread Bowl for Soup , we rely on a classic, slightly enriched lean dough formula. While the ingredients might seem basic, their quality and measurement are paramount.
We use warm water, precisely heated, to wake up the yeast, alongside a touch of sugar to give it an initial boost. The combination of all-purpose flour provides the necessary structure, while melted butter introduces a richness that prevents the interior crumb from becoming overly dry or tough during the relatively long baking time required for these large loaves.
The Baker’s Toolkit: Necessary Equipment for Success
While you don't need a commercial bakery setup, a few key tools ensure the journey to a perfect Bread Bowl is smooth. Having the right instruments allows you to control the environment around your dough, which is critical for consistent rising and baking performance.
Measuring Precision: Flour, Yeast, and Hydration Ratios
Accuracy in measuring dry ingredients is non-negotiable when baking, especially for yeasted goods. We rely on weight measurements where possible, but if using cups, scooping lightly and leveling off is essential for the approximately 4 cups of flour required.
The water temperature is also a crucial measurement; too hot, and the yeast dies; too cool, and the fermentation stalls. Aiming for 105° F– 115° F ( 40° C– 46° C) guarantees vigorous activity.
Flavor Boosters: Salt, Sweeteners, and Optional Enhancements
Salt is not merely for flavour; it regulates yeast activity and strengthens the gluten network, contributing directly to the final structural integrity of the vessel. The single tablespoon of sugar acts purely as yeast food, ensuring a strong initial rise.
For variations, incorporating herbs or cheese directly into the dough will profoundly change the final taste profile, transforming the basic vessel into a flavour complement for the soup itself.
What You Need: From Stand Mixer to Baking Stone
While you can certainly mix this dough by hand, a stand mixer fitted with a dough hook speeds up the development of gluten, which is vital for the final chewiness. You’ll need a large mixing bowl for the initial rise, and importantly, a sturdy baking sheet lined with parchment paper for the final bake.
While not strictly mandatory, placing the sheet on a preheated baking stone or inverted heavy casserole dish in the oven helps transfer intense heat immediately to the bottom of the loaves, encouraging robust oven spring.
Related Recipes Worth Trying
- The Ultimate Sturdy Homemade Bread Bowls Recipe Foolproof — Forget soggy bottoms These yeast bread bowls bake with a crisp crust perfect for holding thick soups or chili Learn this easy bread bowls from scratch...
- The Best Crusty Bread Bowls Recipe for Hearty Soups — Ditch the storebought versions Master homemade bread bowls with a sturdy crust perfect for holding rich chili or chowder Get the foolproof recipe here
- Hearty Red Lentil Quinoa Bread Recipe GlutenFree — Ditch dull glutenfree loaves This Red Lentil Quinoa Bread is surprisingly moist packed with protein and sturdy enough for toast Get the foolproof recipe here
step-by-step Guide to Kneading and First Proofing
The kneading process is where we build the architecture of the Homemade Bread Bowl . This vigorous working aligns the gluten proteins, creating the stretchy, elastic matrix needed to trap the gases released by the yeast.
If using a stand mixer, about 6 to 8 minutes on medium low speed usually suffices. If kneading by hand, expect a solid 8 to 10 minutes of rhythmic pushing and folding until the dough is smooth and passes the "windowpane test" meaning you can gently stretch a small piece thin enough to see light through it without tearing.
After kneading, the dough must rest in a lightly oiled bowl, covered, allowing it to double in bulk, which typically takes 60 to 90 minutes depending on the warmth of your kitchen.
Shaping Your Perfect Edible Soup Container
Once the dough has successfully completed its first rise, the shaping phase dictates the final form and oven performance of your Crusty Bread Bowl .
Activating the Yeast and Mixing the Dough Base
This initial activation confirms your yeast is viable. Combine the warm water and sugar, then sprinkle the yeast over the top. Wait patiently for 5 to 10 minutes until a thick, bubbly cap forms. This foam confirms the yeast is alive and ready to work its magic on the flour and water mixture.
The Importance of the Slow Rise: Building Structure
The first rise allows the yeast to produce carbon dioxide, creating internal air pockets. The second rise, after shaping, is crucial for the final texture. It should be shorter than the first about 45 to 60 minutes where the loaves become puffy.
If you let them over proof (become too airy), they may collapse in the oven; if under proofed, they will be dense and tough. We are seeking that sweet spot of volume just before they reach their maximum expansion.
Scoring Techniques for Optimal Oven Spring on Your Bread Bowl
Before baking, the loaves are brushed with a lightly whisked egg white. This wash promotes a deep brown colour and a firm exterior. While not essential for structure, a light score a shallow incision made with a very sharp blade on the top surface helps direct where the bread will expand under the intense heat of the oven, preventing uncontrolled bursting.
Baking Temperatures and Achieving That Golden Brown Exterior
Preheat your oven to a steady 400° F ( 200° C). The initial high heat encourages aggressive oven spring. Bake these large rounds for 30 to 35 minutes.
You are looking for a deep, mahogany brown colour, and critically, when tapped on the bottom, the Bread Bowl should sound completely hollow, indicating the moisture has cooked out of the crust, making it sturdy enough for any filling.
Maximizing the Life of Your Artisan Bread Vessels
One of the greatest advantages of using a Homemade Bread Bowl Recipe is the freshness, but these large loaves are excellent candidates for advance preparation. Once fully cooled on a rack, they are ready to use immediately.
The key to longevity lies in the cooling process; never cut into them while warm, as the trapped steam will compromise the structure and make the interior gummy.
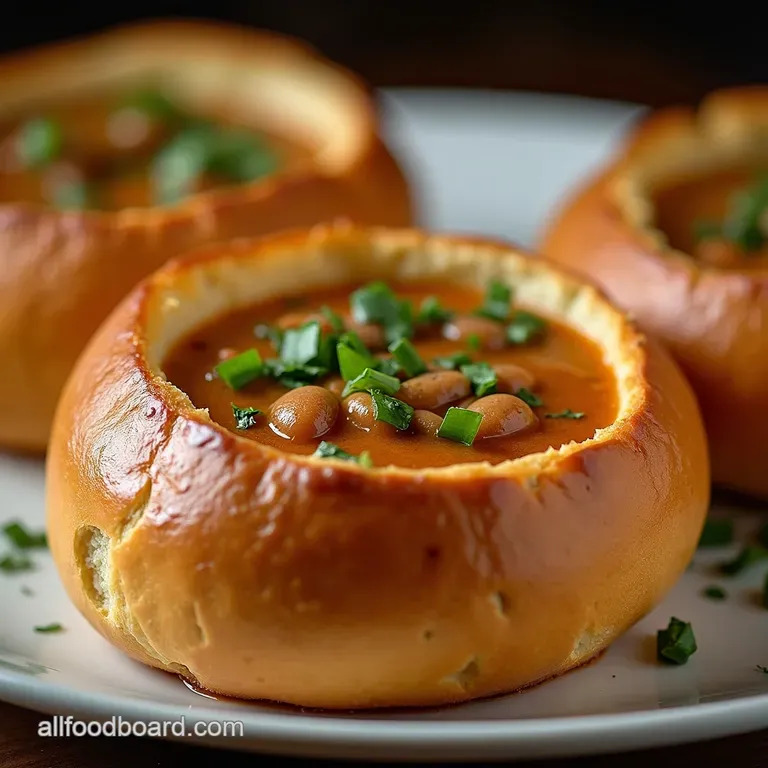
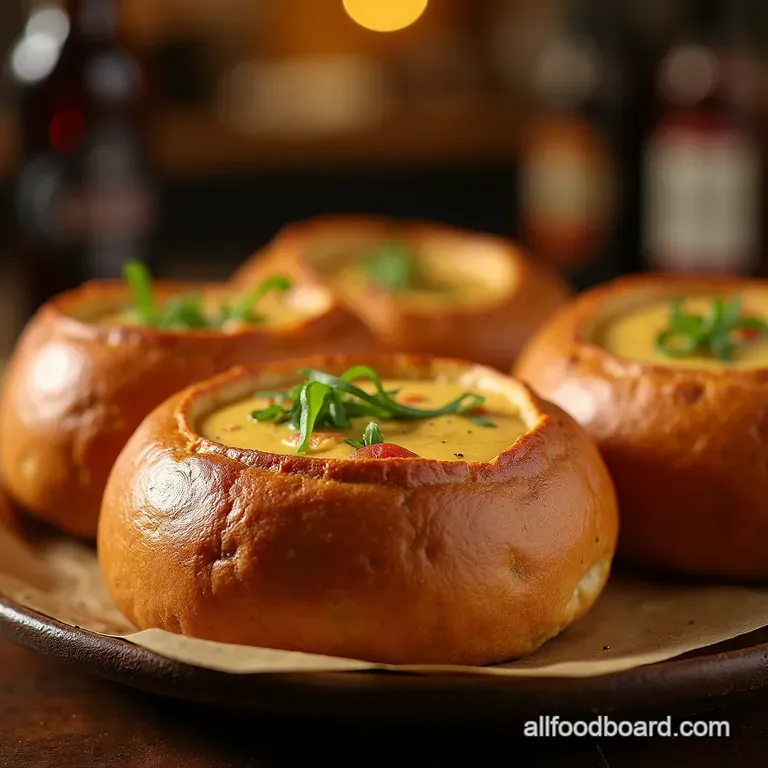
Creative Filling Suggestions for Your Freshly Baked Bowl
The beauty of a sturdy Bread Bowl for Soup is its versatility. While classics like clam chowder or thick chili are obvious choices, don't limit yourself. Consider slow cooked pulled pork or BBQ beans served inside the bread soaks up the sauce beautifully.
For a vegetarian option, a rich, creamy wild mushroom bisque provides an earthy counterpoint to the simple, honest flavour of the yeast bread.
Troubleshooting Common Bread Bowl Baking Hiccups
Even with expert guidance, baking can present surprises. Knowing how to correct common issues ensures you always end up with a serviceable Edible Soup Bowl .
Storage Secrets: Keeping Leftover Bread Bowls Fresh
If you have baked these ahead of time, store them tightly wrapped in plastic wrap at room temperature for up to two days. Freezing is an even better option for longer storage.
Freezing Instructions for Batch Baking Success
These loaves freeze beautifully. Cool them completely, then wrap them tightly in plastic wrap followed by a layer of aluminum foil. They can be frozen for up to three months. To reheat, remove the foil and bake, still wrapped in plastic, at 350° F ( 175° C) for about 15 minutes until warmed through, then unwrap to crisp the crust slightly if desired before hollowing.
Perfect Pairings: Chowders, Chili, and Creamy Soups
For the very best results with your Bread Bowl Soup , match the density of the soup to the sturdiness of the bowl. Very liquid soups might soften the bottom faster than a thick chowder or a chunky stew. Always serve piping hot soup in slightly toasted bread bowls for maximum liquid resistance.
Fixing Dense Dough and Shallow Ovens
If your final Yeast Bread Bowl turns out dense, it almost always relates to under proofing or yeast that wasn't fully activated. If your oven lacks radiant heat from the bottom (resulting in pale bottoms), next time, utilize that preheated baking stone or an inverted metal sheet pan to blast that base heat.

Recipe FAQs
My Bread Bowl dough didn't rise at all! What went wrong?
Ah, the classic baker's panic! This is almost certainly down to your yeast being unhappy; check the temperature of your water if it was too hot (over 120°F), it killed the yeast. Alternatively, if your yeast was past its expiration date, it won't have enough life left in it to make the dough puff up.
Give your yeast packet a good sniff next time!
How do I stop my soup from making the Bread Bowl soggy right away?
You've got two tricks up your sleeve for this one. Firstly, make sure you bake the bowls until they are deep golden brown; a thicker, harder crust holds up much better. Secondly, before filling, brush the inside walls of the hollowed out bowl lightly with melted butter or even a thin layer of melted white chocolate or cream cheese it acts as a waterproof barrier!
Can I bake these Bread Bowls ahead of time, and how should I store them?
Absolutely, they store brilliantly! Once completely cool, wrap the finished, unfilled bread bowls tightly in plastic wrap, and then foil. They will keep well at room temperature for about two days, or you can freeze them for up to three months.
To refresh them, just pop them back in a 350°F oven for 5 8 minutes until the crust is crisp again.
I want to make giant Bread Bowls, but how do I adjust the baking time?
If you’re aiming for bigger bowls than the recipe suggests, you’ll need to account for a longer bake time, as the centre needs more time to cook through properly. Increase the oven temperature slightly (perhaps to 425°F) and plan on an extra 10 to 15 minutes of baking.
They are done when they sound completely hollow when tapped that's the signal!
Is the scooped out bread centre completely wasted?
Perish the thought! Wasting perfectly good bread is sacrilege in a British kitchen! Save every crumb; it's perfect for making crunchy croutons for your next salad, or blend it up for a fantastic breadcrumb topping for baked macaroni cheese.
A little butter and a quick toast turns those soft bits into lovely dipping sticks!
Crusty Soup Bread Bowls 2

Ingredients:
Instructions:
Nutrition Facts:
| Calories | 594 kcal |
|---|---|
| Protein | 15.5 g |
| Fat | 22.7 g |
| Carbs | 65.5 g |
| Fiber | 6.7 g |
| Sodium | 10068 mg |
