The Pub Favourite Ultimate Crusty Bread Bowls for Dipping and Devouring
- Ditching Store-Bought: Why You Need Authentic, Home-Baked Bread Bowls
- The Architecture of Comfort: Defining Our Perfect Edible Vessel
- Gathering Your Essentials: What Makes These Bread Bowls Sing
- The Masterclass in Shaping: Crafting Impenetrable Bread Bowls
- Baking Blueprint: Temperature Tactics for Interior Perfection
- Beyond the Chowder: Creative Uses for Your Homemade Bread Bowls
- Longevity Guide: Storing and Revitalizing Your Baked Creations
- Recipe FAQs
- 📝 Recipe Card
Ditching store-bought: Why You Need Authentic, Home Baked Bread Bowls
There is a profound difference between a bread bowl purchased from a supermarket shelf and one crafted with intention right in your own kitchen. Those pre-made shells often feel dense, lacking character, and possess a structural integrity that struggles mightily against even the mildest soup.
When you commit to making Homemade Bread Bowls , you are not just baking bread; you are engineering the perfect vessel for your favourite comforting meals. We are transforming simple flour and water into an edible, flavourful centerpiece destined to cradle anything from a velvety bisque to a robust, Hearty Chili Recipe .
If you’ve ever longed for that perfect crackle of crust followed by a soft, yielding interior that soaks up broth beautifully, then it's time to master this art.
The Architecture of Comfort: Defining Our Perfect Edible Vessel
The ideal Bread Bowl Soup Recipes partner must balance two opposing forces: a sturdy exterior that prevents premature leakage and an interior crumb tender enough to dunk. Our blueprint achieves this by focusing on high hydration dough handling followed by a specific shaping technique.
This isn't merely a loaf baked in a round shape; it is a structure designed to hold volume. We are aiming for a loaf that boasts a high 'ceiling' after baking, meaning the dough rises upward rather than spreading outward, creating a deep well for filling.
From Dough to Dinner: Elevating the Standard Bread Bowl Experience
When creating Bread Bowls For Soup , the standard approach often overlooks the importance of dough strength. We employ a longer kneading time about 8 to 10 minutes with a stand mixer to develop the gluten network thoroughly.
This strength is the backbone that prevents your bowl from succumbing to moisture absorption too quickly. The result is a bread that offers a satisfying chew and maintains its form even when brimming with a thick chowder.
Why This Recipe Beats Any Pre-Made Container
Pre-made containers are baked quickly, often resulting in a dry, overly dense crumb that lacks the nuanced flavour imparted by time and proper fermentation. Our Easy Bread Bowl Recipe utilizes sugar to feed the yeast, promoting a faster but still flavourful rise, while the inclusion of melted butter adds richness that store-bought versions simply skip.
This attention to detail elevates the entire dining experience.
A Crust That Cracks: Achieving Peak Exterior Texture
The hallmark of any truly great Crusty Bread Bowls lies in its exterior shell. We achieve this coveted texture through two critical steps: the application of an egg wash just before baking and the introduction of steam during the initial bake phase.
This steam keeps the crust supple long enough to expand fully before hardening, resulting in that characteristic, satisfying crackle when you slice into it.
Gathering Your Essentials: What Makes These Bread Bowls Sing
Creating the Best Bread Bowls requires respecting the ingredients. We are using quality flour, active dry yeast, and simple flavor enhancers like sugar and butter. These components, when handled correctly, transform into something magical.
For instance, the small amount of granulated sugar isn't for sweetness in the final product, but rather crucial fuel to ensure a vigorous yeast activation.
Pantry Power: Securing Flawless Dough Components
To begin, ensure your warm water is between 105- 115° F (40- 46° C). Water that is too cool will leave your yeast sluggish, while boiling water will kill it instantly.
We call for 4 cups of All-Purpose or Bread Flour if you can find bread flour, use it, as the higher protein content contributes directly to the chewiness we are seeking. Don't forget the fine sea salt; it's essential not just for taste, but for controlling the rate of fermentation.
The Crucial Hydration Levels for Optimal Crumb Structure
Our recipe calls for 1 ½ cups of water to 4 cups of flour. This ratio results in a manageable, slightly tacky dough that is hydrated enough to produce an open crumb structure, yet firm enough to hold a spherical shape when proofed.
Pay close attention to how the dough feels after kneading; it should be smooth and elastic, not sticky or shaggy.
Tool Kit Check: Essential Gear for Artisan Bowl Creation
While a stand mixer with a dough hook makes the 8 to 10 minutes of kneading significantly easier, this recipe is achievable by hand. You will definitely need baking sheets lined with parchment paper for easy transfer and cooling.
A sharp serrated knife will be crucial later for scoring the tops and, subsequently, for hollowing out the finished loaves without tearing the structural walls.
Yeast Activation Secrets: Ensuring a Robust Rise
The first step involves proving the yeast. Mix the warm water, sugar, and yeast, and wait 5 to 10 minutes. If it becomes foamy and frothy, your yeast is active and ready to work its magic.
If nothing happens, discard that batch and try again with fresh yeast it’s the key indicator that your rise, and subsequently your Bread Bowls Recipe , will succeed.
Related Recipes Worth Trying
- Hearty Red Lentil Quinoa Bread Recipe GlutenFree — Ditch dull glutenfree loaves This Red Lentil Quinoa Bread is surprisingly moist packed with protein and sturdy enough for toast Get the foolproof recipe here
- Easy Red Lentil Flatbread Recipe Quick ProteinPacked — Learn how to make this simple red lentil flatbread recipe Its a quick cooking flatbread thats perfect for scooping up your favourite curry
- Easy Flourless Red Lentil Bread Recipe Naturally GlutenFree — Ditch the shopbought stuff This easy Flourless Red Lentil Bread is hearty proteinpacked and slices beautifully A brilliant gluten-free bread option
The Masterclass in Shaping: Crafting Impenetrable Bread Bowls

Once the initial bulk fermentation has doubled the dough (about 1. 5 hours), the next step is crucial for shaping. Gently deflate the dough and divide it precisely into six equal portions. Each portion must then be tightly shaped into a smooth, round ball.
This tightness, creating surface tension, is non-negotiable for forming sturdy Bread Bowls for Soup . As you place these rounds onto your baking sheet, ensure ample space at least three inches between each one, as they will expand considerably during the second rise.
Baking Blueprint: Temperature Tactics for Interior Perfection
Our baking strategy focuses on high heat to set the exterior quickly while allowing the interior to steam and bake thoroughly. Preheat your oven to a solid 400° F ( 200° C).
Folding Techniques: Developing Strength Without Overworking
While the stand mixer handles the heavy lifting, remember that kneading develops gluten. We want the dough smooth, passing the windowpane test, which signifies strong gluten development.
Overworking beyond this point, however, can lead to a tough final product, so stop as soon as the dough cleans the bowl sides and feels springy.
The Steaming Ritual: How to Achieve That Deep Golden Crust
To emulate professional bakery results and achieve that perfect, deeply browned, crackly crust ideal for Fall Soup Recipes , we introduce steam. Place an empty, shallow metal pan on the bottom rack of the oven while it preheats.
Just before placing the shaped loaves inside, carefully pour about a cup of boiling water into that hot pan to generate a burst of steam. This environment keeps the dough surface moist initially.
Brush the tops with an egg wash and sprinkle with flaky salt before they go into that steamy environment for their 30 to 35-minute bake time.
Hollowing Out Without Ruining the Foundation
After baking, the loaves must cool completely on a wire rack. This setting time solidifies the internal structure. Once cool, use a sharp knife to cut a circle into the top of each loaf, leaving the cut piece attached like a hinged lid.
Carefully scoop out the soft interior bread, leaving a uniform wall about half an inch thick around the sides and bottom. Save that removed bread for homemade croutons!
A Quick Bake Finish for Maximum Structural Integrity
If you plan to fill your bowls with very wet soups, some bakers opt for a quick, optional second bake. After hollowing the bowls, brush the interior cavity lightly with oil or melted butter and bake them empty for another 5 to 7 minutes at 350° F ( 175° C).
This dries out the interior crumb just enough to create an extra moisture barrier against imminent soup filling.
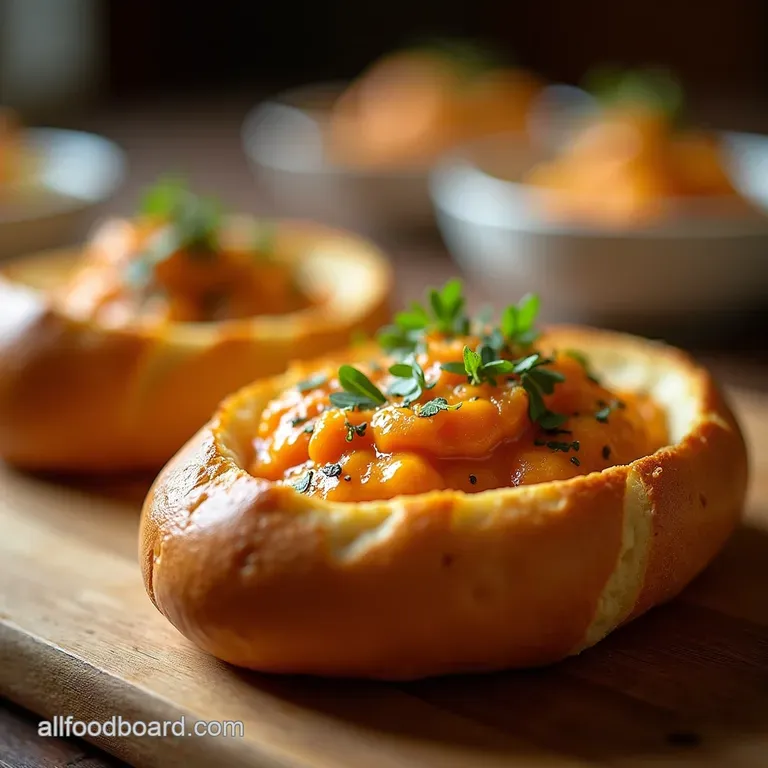
Beyond the Chowder: Creative Uses for Your Homemade Bread Bowls
While these Bread Bowls shine brightest cradling a rich stew or our favourite Hearty Chili Recipe , their utility doesn't end there. They are magnificent as edible serving dishes for thick dips, creamy spinach artichoke dip, or even baked cheese fondue.
The scooped out bread pieces make the world's best croutons or can be processed immediately into fine breadcrumbs for coating chicken or topping casseroles.
Longevity Guide: Storing and Revitalizing Your Baked Creations
One advantage of making your own is knowing exactly how fresh they are. If you aren’t serving them the day you bake them, they store surprisingly well.
Pairing Perfection: The Best Soups and Dips to Contain
For heavy, long simmering dishes like French Onion Soup or Hungarian Goulash, the structure we built will hold up beautifully. For thinner broths, aim to serve immediately or use the quick second bake method mentioned above to enhance interior resistance.
Troubleshooting Common Bread Bowl Failures (Soggy Bottoms Prevented)
The number one failure point is the soggy bottom. This is almost always caused by serving too quickly before the cooling process has fully set the structure, or by using too thin a wall when hollowing. Remember: aim for at least a half inch thickness on the base.
A light brush of melted butter on the interior before filling also acts as a superior sealant.
Freezing Strategy: Preserving Freshness for Later Bowls
If you have made a large batch, you can freeze the baked, unhollowed loaves for up to three months. Wrap them tightly in plastic wrap, then aluminum foil. When ready to use, thaw completely on the counter, then reheat in a 350° F ( 175° C) oven for 10 minutes before hollowing.
Flavor Variations: Infusing Herbs and Cheese into the Dough
To customize your experience, consider enriching the dough before the second rise. Gently fold in one cup of grated Gruyère cheese along with a tablespoon of finely chopped fresh rosemary. This yields an herbaceous, savory loaf that pairs exceptionally well with creamy mushroom soups.
Alternatively, mixing in garlic powder and dried Italian herbs creates a fantastic base for pizza bread bowls.

Recipe FAQs
How do I stop my bread bowls from going soggy when filled with soup?
Ah, the dreaded sogginess that’s a rookie error we won't be making! The key is twofold: first, ensure your bread is completely cooled before hollowing it out, as this sets the crumb structure.
Second, you need a good, sturdy crust, so don't skimp on the egg wash and make sure you bake them until they are deep golden brown.
Can I make these Bread Bowls ahead of time, and how should I store them?
You absolutely can prepare them in advance, which is a lifesaver when hosting. Once baked and fully cooled, store the empty bread bowls in an airtight container at room temperature for up to two days; they'll keep beautifully. Avoid the fridge, as that can actually make the crust go stale faster than leaving them out.
What can I use the scooped out bread for? It seems like a waste!
Waste not, want not! That soft interior bread is prime real estate for flavour boosting. You can easily turn it into fantastic homemade croutons by tossing it with olive oil and herbs, or blitz it up to make some top-notch breadcrumbs for your next casserole topping. Don't let it go to waste!
My dough didn't rise properly; is it because my yeast was knackered?
That's the most common culprit, bless it! If your yeast didn't foam up after 10 minutes in the warm water (Step 1), it was likely dead or the water was too hot and zapped it. Always check your water temperature think bathwater warm, not piping hot and use fresh yeast for reliable results.
Can I make a cheesy or herby version of these Bread Bowls?
Definitely! If you fancy a bit of pizzazz, follow the flavour variation suggestion: incorporate about a cup of grated, flavourful cheese like sharp cheddar or Gruyère, along with some chopped fresh herbs such as rosemary or thyme, right before the first rise finishes.
This adds a lovely savoury dimension to the base.
Do I need to use Bread Flour, or will plain All-Purpose flour do for these Bread Bowls?
While All-Purpose flour will certainly do the trick, Bread Flour is the gold standard here because its higher protein content develops more gluten. This extra gluten gives your finished loaf a chewier texture and a stronger structural integrity, which is exactly what you want when it has to hold a piping hot stew!
Crusty Soup Bread Bowls

Ingredients:
Instructions:
Nutrition Facts:
| Calories | 595 kcal |
|---|---|
| Protein | 11.3 g |
| Fat | 34.9 g |
| Carbs | 49.7 g |
| Fiber | 4.5 g |
| Sodium | 12190 mg |
