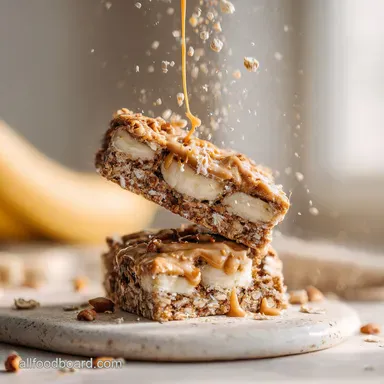
Banana Oatmeal Bar with Peanut Butter

- Time: Active 10 minutes, Passive 25 minutes, Total 35 minutes
- Flavor/Texture Hook: A dense, chewy center with a toasted nutty finish and pops of dark chocolate.
- Perfect for: Busy school mornings, post workout fuel, or a grab-and-go toddler snack.
- Bake Your Best Banana Oatmeal Bar with Peanut Butter
- Cooking Times and Yield Estimates
- The Science of Why it Works
- Ingredient Deep Dive for Quality
- Essential Elements for the Perfect Batch
- Minimal Tools for Fast Kitchen Success
- Step-by-Step Path to Golden Bars
- Solving Common Baking Texture Issues
- Easy Swaps for Varied Dietary Needs
- Keeping Your Snack Bars Fresh Longer
- Scaling the Recipe Up or Down
- Debunking Common Kitchen Myths
- Ideas for the Ultimate Snack Plate
- Recipe FAQs
- 📝 Recipe Card
Bake Your Best Banana Oatmeal Bar with Peanut Butter
Ever have one of those mornings where the alarm feels like a personal attack and the toaster is just too far away? I've been there more times than I care to admit, usually staring at a bunch of spotted bananas that look like they've seen better days. That is exactly how this recipe was born in my kitchen.
Fuel your day the delicious way with this recipe for an energizing banana oatmeal bar, packed with peanut butter for a healthy snack.
It is honestly the most forgiving thing I make. We have all tried those store-bought granola bars that are basically candy bars in disguise, right? This is the opposite. It is a hearty, filling, and genuinely energizing banana oatmeal bar for a healthy snack with peanut butter that doesn't leave you crashing by 10:00 AM.
Plus, your kitchen will smell like a cozy bakery without you having to spend all morning scrubbing flour off the counters.
The beauty of this dish is that it actually gets better as it sits. The first time I made these, I tried to eat them piping hot from the oven, and while the flavor was there, they fell apart. I learned the hard way that a little patience allows the oats to fully hydrate, giving you that perfect "bar" structure.
We're going for a texture that is substantial and velvety, not crumbly or dry. Trust me on this, once you nail the banana to oat ratio, you'll never go back to the boxed stuff.
Cooking Times and Yield Estimates
When we talk about efficiency, this recipe is a gold medalist. You are looking at a very short window from "I'm hungry" to "this smells incredible." Because we aren't dealing with yeast or complex leavening, the clock is on your side.
| Feature | Specification |
|---|---|
| Prep Time | 10 minutes |
| Cook Time | 25 minutes |
| Total Time | 35 minutes |
| Recipe Yield | 12 bars |
Since we are using 180g of oats and about 405g of bananas, the volume is quite consistent. If you use a standard 8x8 inch baking pan, you'll get 12 generous rectangular bars. If you prefer smaller squares for a healthy snack with peanut butter, you can easily slice them into 16 pieces for a lighter bite.
The Science of Why it Works
- Starch Gelatinization: The heat from the oven causes the starches in the 180g of old fashioned rolled oats to absorb the moisture from the bananas, creating a sturdy, chewy structure without needing gluten.
- Emulsification: The natural lecithins in the 125g of creamy natural peanut butter act as a bridge between the water based bananas and the fats, ensuring the bars don't turn out greasy or separated.
- Hygroscopic Retention: The 2 tbsp of honey or maple syrup doesn't just add sweetness; it actually pulls moisture from the air, which helps keep the oatmeal bar for a healthy snack with peanut butter soft even after a few days in the fridge.
Chef Tip: For an extra layer of flavor, toast your 180g of oats in a dry pan for 5 minutes before mixing. It brings out a popcorn like aroma that takes the bars to a professional level.
Ingredient Deep Dive for Quality
| Ingredient | Science Role | Pro Secret |
|---|---|---|
| Old Fashioned Oats | Provides the primary structural matrix through fiber. | Avoid instant oats; they turn into mush and lose the "chew." |
| Overripe Bananas | Acts as both a natural sweetener and a binding humectant. | Use bananas with black spots; they have the highest sugar content. |
| Natural Peanut Butter | Supplies the healthy fats needed for satiety and crumb tenderness. | Stir the jar well to incorporate the oils before measuring. |
Selecting the right components makes all the difference in the final mouthfeel. If your bananas aren't spotted yet, you won't get that deep caramel like sweetness that defines an oatmeal bar for a healthy snack with peanut butter. I once tried making these with "perfect" yellow bananas, and they were bland and starchy.
Wait for the spots!
Essential Elements for the Perfect Batch
- 180g Old Fashioned Rolled Oats: Why this? Provides the essential chewy texture and structural integrity for the bars. (Substitute: Quinoa flakes for a different protein profile)
- 1 tsp Ground Cinnamon: Why this? Enhances the natural sweetness of the bananas without adding extra sugar. (Substitute: Apple pie spice)
- 0.5 tsp Sea Salt: Why this? Balances the fats and sugars, making the chocolate notes pop. (Substitute: Table salt, but use slightly less)
- 0.5 tsp Baking Powder: Why this? Adds just enough lift to prevent the bars from being overly dense. (Substitute: Skip it for a fudgier, flatter bar)
- 3 large overripe Bananas (approx. 405g): Why this? The primary binder and sweetener; essential for moisture. (Substitute: 1.5 cups of unsweetened applesauce, though it will be softer)
- 125g Creamy Natural Peanut Butter: Why this? Adds richness and protein while acting as a fat source. (Substitute: Almond butter or Sunflower seed butter)
- 1 tsp Pure Vanilla Extract: Why this? Provides a classic bakery aroma and rounds out the flavor. (Substitute: Almond extract for a cherry like finish)
- 2 tbsp Honey or Maple Syrup: Why this? Helps with browning and adds a subtle floral sweetness. (Substitute: Agave nectar or brown rice syrup)
- 60g Dark Chocolate Chips: Why this? High cocoa content offers antioxidants and a sophisticated bitterness. (Substitute: Cacao nibs for a crunchier, less sweet version)
- 30g Chopped Walnuts: Why this? Adds a necessary textural contrast to the soft oats. (Substitute: Pecans or pumpkin seeds)
When you're out shopping, look for "Old Fashioned" oats rather than "Quick" or "Instant." The larger flakes hold up better during the 25 minutes of baking, ensuring your energizing banana oatmeal bar for a healthy snack with peanut butter doesn't turn into a tray of baked porridge.
For the peanut butter, the "natural" kind (where the only ingredients are peanuts and salt) works best because it lacks the stabilizers that can make the bars feel waxy.
Minimal Tools for Fast Kitchen Success
One of my favorite things about this recipe is that I don't have to lug out the heavy stand mixer. It is a very low tech process, which is perfect for a lazy Sunday afternoon or a frantic Tuesday morning.
- Large Mixing Bowl: You want something with enough room to mash the bananas vigorously without splashing.
- Sturdy Fork or Potato Masher: Essential for turning those bananas into a smooth puree.
- Silicone Spatula: Great for folding in the oats and making sure you get every last drop of peanut butter out of the bowl.
- 8x8 inch Baking Pan: This size gives you the ideal thickness. If you use a 9x13, the bars will be very thin and might overbake.
- Parchment Paper: This is my "secret" for easy cleanup. I leave a little overhang on the sides so I can just lift the whole block of bars out once they've cooled.
step-by-step Path to Golden Bars

- Prep the oven. Heat your oven to 350°F (175°C) and line your 8x8 pan with parchment paper. Note: Using parchment ensures the bars won't stick to the corners.
- Mash the fruit. In your large bowl, crush the 405g of overripe bananas until they form a smooth, liquid like puree with very few lumps.
- Whisk the liquids. Stir in the 125g of creamy natural peanut butter, 2 tbsp of honey, and 1 tsp of vanilla extract. Note: Stir vigorously until the mixture looks like a thick, velvety caramel.
- Combine the dry ingredients. Add the 180g of oats, 1 tsp of cinnamon, 0.5 tsp of salt, and 0.5 tsp of baking powder directly into the wet mix.
- Fold the base. Use your spatula to mix everything until no dry streaks of oats remain.
- Add the textures. Gently fold in the 60g of dark chocolate chips and 30g of chopped walnuts.
- Transfer to pan. Pour the batter into the prepared pan and smooth the top with your spatula.
- Bake the bars. Place in the center rack and bake for 25 minutes until the edges are golden and the center feels set to the touch.
- Cool completely. Let the pan sit on a wire rack for at least 20 minutes before lifting the parchment. Note: This is the hardest part, but it's crucial for the structural integrity.
- Slice and serve. Cut into 12 bars and enjoy your oatmeal bar for a healthy snack with peanut butter.
While the bars are in the oven, you'll notice the aroma of toasted nuts and warm cinnamon filling the room. That's a sign that the Maillard reaction is doing its thing on the walnuts and the honey. If you're a fan of these flavors, you might also enjoy the warm, comforting vibes of a Classic Banana Bread Recipe when you have extra fruit on hand.
Solving Common Baking Texture Issues
Sometimes things go sideways in the kitchen. Maybe your bananas were extra juicy, or your oven runs a bit hot. Don't panic; most issues with an energizing banana oatmeal bar for a healthy snack with peanut butter are easy to fix.
Why Your Bars Are Crumbly
If your bars are falling apart when you try to pick them up, it usually comes down to two things: either they didn't cool long enough, or the oats didn't have enough moisture to bind.
Next time, try mashing the bananas even more thoroughly to release all their liquid, or add an extra tablespoon of peanut butter to help "glue" things together.
Preventing the "Soggy Center" Syndrome
This usually happens if the bananas were massive or if the oven temp was too low. If the edges are brown but the middle looks wet, tent the pan with foil and bake for another 5 minutes. The foil prevents the top from burning while the internal heat finishes the job.
| Problem | Root Cause | Solution |
|---|---|---|
| Bars are too dry | Overbaking or using quick oats. | Reduce bake time by 3 mins and use old-fashioned oats. |
| Too soft to hold | Not enough "set" time after baking. | Allow to cool in the pan for at least 20 mins. |
| Bitter aftertaste | Too much baking powder or burnt nuts. | Measure leavening carefully and check nuts at 20 mins. |
If you find yourself constantly battling texture issues in the kitchen, it's often helpful to compare different methods. For instance, some people swear by a stovetop version of oat bars, but I find the oven gives a much better depth of flavor.
| Feature | Stovetop Method | Oven Method (This Recipe) |
|---|---|---|
| Texture | Soft, fudge like, can be sticky. | Toasted edges, chewy center, stable. |
| Flavor Profile | Very sweet, simple. | Complex, caramelized, nutty. |
| Effort Level | High (constant stirring). | Low (set and forget). |
One mistake I once made was trying to use "natural" peanut butter that had completely separated. I didn't stir it, so the bottom of the batch was dry and the top was an oily mess. Honestly, don't even bother if you can't get that peanut butter smooth and creamy first!
Easy Swaps for Varied Dietary Needs
This recipe is naturally vegetarian and can easily be made vegan by choosing maple syrup over honey. But what about other restrictions? We can definitely play around with the components without ruining the vibe.
| Original Ingredient | Substitute | Why It Works |
|---|---|---|
| Creamy Peanut Butter | Almond Butter (125g) | Similar fat content. Note: Gives a more subtle, toasted flavor profile. |
| Chopped Walnuts | Pepitas (30g) | Provides crunch. Note: Keeps the recipe nut free if using seed butter. |
| Honey | Maple Syrup (2 tbsp) | Same liquid ratio. Note: Adds a deeper, woody sweetness. |
If you're looking for something even more indulgent, you can swap the walnuts for extra chocolate. For those who love that specific flavor combination, you should check out this Peanut Butter Cup recipe which takes the peanut butter and chocolate duo to a whole new level.
Keeping Your Snack Bars Fresh Longer
Storing these properly is the difference between a sad, soggy snack and a refreshing morning meal. Because of the high moisture content from the bananas, they can't just sit on the counter in a warm kitchen for a week.
- Fridge: Place the bars in an airtight container with pieces of parchment paper between the layers. They will stay fresh and chewy for up to 5 days.
- Freezer: These freeze beautifully! Wrap individual bars in plastic wrap and toss them in a freezer bag. They'll last for 3 months. To eat, just pull one out the night before or microwave for 30 seconds.
- Zero Waste Tip: Don't throw away those over browned banana peels! You can actually soak them in water for 24 hours to create a nutrient rich "tea" for your houseplants. As for the oat crumbs at the bottom of the pan? Sprinkle them over yogurt or a smoothie bowl for an extra bit of crunch.
Scaling the Recipe Up or Down
If you're cooking for a crowd or just trying to use up a single lonely banana, scaling is simple.
- Scaling Down (1/3 Batch): Use 1 banana, 60g of oats, and about 40g of peanut butter. Bake in a small loaf pan. Keep an eye on it around the 18 minute mark, as smaller batches cook faster.
- Scaling Up (Double Batch): Use a 9x13 inch pan. Don't just double the salt and cinnamon I recommend using 1.5x the spices first and tasting the batter. You don't want the cinnamon to overpower the banana.
- Baking Adjustment: When doubling, the bars might be thicker. Lower your oven temperature by 25°F and extend the bake time by about 10 minutes to ensure the middle sets without burning the edges.
Debunking Common Kitchen Myths
- Myth: You must use eggs to bind oatmeal bars.
- Truth: The pectin and starches in mashed bananas, combined with the fats in peanut butter, create a perfectly stable binder. You don't need eggs for this specific texture.
- Myth: "Natural" peanut butter is too runny for baking.
- Truth: While it is thinner at room temperature, it actually incorporates into the batter more evenly than stabilized, sugar laden commercial brands.
- Myth: Steel cut oats work just as well as rolled oats.
- Truth: Steel cut oats will remain rock hard and gritty in this 25 minute bake. Stick to rolled oats for that classic chewy bar feel.
Ideas for the Ultimate Snack Plate
Once your bars are cooled and sliced, how do you serve them? Sure, you can grab one and run out the door, but if you have a minute, you can make it feel like a café experience.
The Pre Workout Stack
Smear a little extra peanut butter on top of a bar and add a few slices of fresh banana. The extra hit of potassium and healthy fats is the perfect fuel before a gym session. It turns a Healthy Snack with Peanut Butter into a more substantial meal.
For a Café Style Breakfast
Warm the bar in the toaster oven for 3 minutes until the chocolate chips just start to glisten. Serve it in a shallow bowl with a splash of cold almond milk or a dollop of Greek yogurt. The contrast between the warm, nutty bar and the cold dairy is incredible.
The Kids' Lunchbox Win
Since these bars are sturdy, they hold up well in a lunchbox. Pair them with some apple slices or carrot sticks. Because they are an oatmeal bar for a healthy snack with peanut butter, they provide enough fiber to keep kids focused through their afternoon classes without the sugar crash of a standard cookie.
Right then, let's crack on! Get those spotted bananas off the counter and into a bowl. Whether you're making these for yourself or your family, I promise they'll become a staple in your rotation. They are simple, reliable, and honestly, just plain good. Happy baking!

Recipe FAQs
Can I make these bars ahead of time?
Yes, absolutely. They are designed to be a make-ahead snack and store well in the refrigerator for up to 5 days.
What is the best way to store banana oatmeal bars?
Store them in an airtight container in the refrigerator. Layering with parchment paper between bars prevents sticking and maintains their chewy texture for up to 5 days.
My bars are crumbly. What did I do wrong?
Your bananas might not have been ripe enough or they didn't cool sufficiently. Ensure bananas are very overripe for maximum binding and mash them thoroughly; always let bars cool completely before slicing.
Can I substitute the peanut butter?
Yes, you can substitute with almond butter or sunflower seed butter. These alternatives offer similar fat content and binding properties, though they will slightly alter the flavor profile.
How to prevent the bars from being too dense or dry?
Use very ripe bananas and avoid overbaking. Overripe bananas provide natural sweetness and moisture, while baking just until the edges are golden and the center is set is key.
Are these bars freezer friendly?
Yes, they freeze very well. Wrap individual bars tightly and store in a freezer bag for up to 3 months; thaw overnight in the refrigerator or microwave for a quick treat.
What kind of oats should I use?
Old-fashioned rolled oats are best for texture. Instant or quick oats can become too mushy, resulting in a less desirable texture compared to the chewy consistency achieved with rolled oats.
Banana Oatmeal Bar With Peanut Butter
Ingredients:
Instructions:
Nutrition Facts:
| Calories | 202 kcal |
|---|---|
| Protein | 5.4 g |
| Fat | 9.5 g |
| Carbs | 26.2 g |
| Fiber | 3.6 g |
| Sugar | 11.8 g |
| Sodium | 118 mg |
