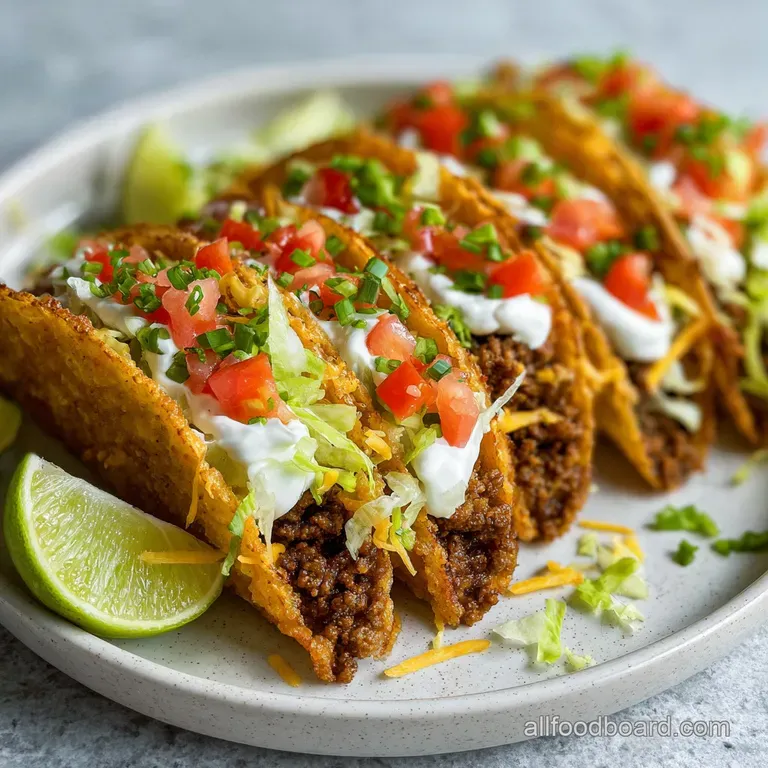
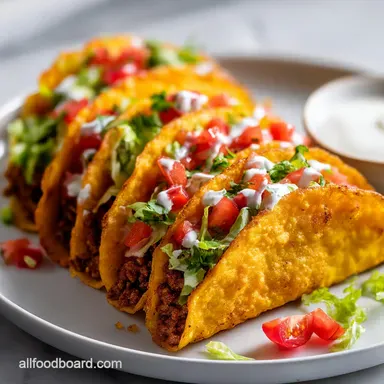
Baked Tacos: Crispy & Cheesy
- Time: Active 15 minutes, Passive 15 minutes, Total 30 minutes
- Flavor/Texture Hook: Shatter crisp corn shells with velvety melted cheddar
- Perfect for: Stress free family dinners or game day hosting
- Master Your Busy Weeknight with these Easy Baked Tacos
- The Engineering of the Perfect Taco Crunch
- Component Analysis for Texture and Flavor
- Essential Grocery Components for the Best Filling
- Necessary Kitchen Tools for an Organized and Fast Prep
- A Step by Step Guide to Assembly and Oven Success
- Professional Kitchen Secrets to Avoid Sogginess and Shell Splits
- Scaling the Recipe for Large Crowds or Solo Dinners
- Debunking Common Myths About Oven Tacos
- Smart Storage Tactics and Ideas for Using Your Leftovers
- The Best Side Dishes and Refreshing Beverage Pairings
- Recipe FAQs
- 📝 Recipe Card
Master Your Busy Weeknight with these Easy Baked Tacos
The first thing you notice isn't the sight, but the sound. It's that specific, hollow "clink" of twelve hard corn shells being nestled into a 9x13 baking dish, standing at attention like little yellow soldiers.
Then comes the scent: a heady mix of minced garlic hitting 1 tablespoon of avocado oil and the savory depth of 1 lb lean ground beef hitting a hot pan. I used to dread taco night because by the time I finished assembling the sixth taco, the first one was already stone cold and the shell had lost its structural integrity.
It was a mess of shattered corn and lukewarm meat.
Everything changed when I realized that the oven wasn't just for reheating it's the ultimate tool for taco fusion. When you bake the shells filled with beef and a generous 2 cups of freshly grated sharp cheddar, the cheese acts as a molten glue.
It bonds the meat to the shell while the dry heat of the oven refreshes the corn, making it more brittle and crisp rather than chewy. This method has saved my sanity during Tuesday night rushes, and honestly, the way the cheese bubbles over the edges of the shells is enough to make anyone a convert.
We're going for that "shatter crisp" experience where the shell breaks exactly where you bite, not into a million pieces in your lap.
I’m going to show you how to pull this off without the dreaded "soggy bottom" syndrome that plagues so many oven recipes. We'll talk about why the order of assembly matters more than the seasoning itself and how to treat your shells so they don't split under pressure.
Trust me, once you see that tray come out of the oven with the cheese sizzling and the shells glowing golden, you won't want to go back to the old assembly line way. Let's get the oven preheated and the beef browning.
The Engineering of the Perfect Taco Crunch
Understanding the physics of a taco shell is the difference between a soggy mess and a professional result. When we bake these, we are essentially performing a secondary "fry" in the oven, which re activates the oils in the corn.
- Hydrophobic Shielding: Placing a layer of cheese between the wet beef and the dry shell creates a fat based barrier that prevents moisture migration.
- Thermal Convection: Propping shells vertically allows hot air to circulate inside the shell, crisping the interior and exterior simultaneously.
- Protein Denaturation: Searing the beef first ensures we've removed excess water, preventing the filling from steaming the shell from the inside out.
- Maillard Reaction: The brief oven stint browns the edges of the cheese, creating complex flavor compounds that raw cheese simply doesn't have.
| Thickness of Filling | Internal Temp | Rest Time | Visual Cue |
|---|---|---|---|
| 1.5 inches | 165°F (Cheese melted) | 3 minutes | Shells turn deep golden amber |
| 1 inch | 160°F | 2 minutes | Cheese edges begin to brown |
| 2 inches | 170°F | 5 minutes | Fat bubbles at the shell base |
Using the right beef to shell ratio is vital for ensuring the heat reaches the center of the filling without burning the top edges of the corn. If you pack them too tight, the middle stays cold while the ends get charred.
Component Analysis for Texture and Flavor
Selecting the right ingredients for your Baked Tacos determines whether the dish feels like a quick snack or a rounded meal. We use 1 lb of lean ground beef (90/10) because it provides enough fat for flavor without leaving a pool of grease at the bottom of your baking dish.
| Ingredient | Science Role | Pro Secret |
|---|---|---|
| Ground Beef (90/10) | Structural Protein | Brown until very dark to maximize umami depth |
| Sharp Cheddar | Emulsified Binder | Grate it yourself; pre shredded has starch that prevents melting |
| Tomato Sauce | Moisture Agent | Use no salt added to control the seasoning profile |
| Avocado Oil | over High heat Lubricant | Its high smoke point prevents the onions from tasting burnt |
The choice of onion also matters; a small yellow onion provides a subtle sweetness when sautéed that balances the saltiness of the 2 tbsp low sodium taco seasoning. When the garlic and onion soften in that avocado oil, they release sugars that caramelize, creating a base that makes the beef taste much richer than it would on its own.
Essential Grocery Components for the Best Filling
Getting the shopping list right is half the battle. You want ingredients that can stand up to 15 minutes of oven heat without wilting or becoming greasy.
- 1 lb lean ground beef (90/10) Why this? Leaner meat prevents the shells from becoming unpleasantly oily.
- 1 tbsp avocado oil Why this? Neutral flavor with a high smoke point for searing.
- 1 small yellow onion, finely minced
- 2 cloves garlic, minced
- 12 hard taco shells Why this? Standard size fits perfectly in a 9x13 dish.
- 2 tbsp low sodium taco seasoning
- 1/2 cup no salt added tomato sauce
- 2 cups sharp cheddar cheese, freshly grated Why this? Sharp cheddar provides a bold contrast to the corn.
- 1 cup shredded romaine lettuce
- 1/2 cup roma tomatoes, seeded and diced
- 1/4 cup fresh cilantro, chopped
- 1/4 cup light Greek yogurt Why this? Provides a tangy, velvety finish similar to sour cream.
| Original Ingredient | Substitute | Why It Works |
|---|---|---|
| Lean Ground Beef | Ground Turkey (93/7) | Similar texture; add 1 tsp oil to keep it moist. |
| Tomato Sauce | Red Enchilada Sauce | Adds a smoky, earthy depth to the beef filling. |
| Sharp Cheddar | Pepper Jack | Same melting point; adds a spicy kick to every bite. |
| Avocado Oil | Grapeseed Oil | Neutral flavor and handles the high heat of browning beef. |
If you find yourself out of taco shells, you can actually use the same filling for the base of a Homemade Mac and recipe for a taco style pasta bake. The flavors of the cumin and chili powder in the seasoning play surprisingly well with a creamy cheese sauce.
Necessary Kitchen Tools for an Organized and Fast Prep
You don't need a professional kitchen, but a few specific items make this recipe much smoother.
- Large Skillet: A heavy bottomed pan, like a cast iron or a stainless steel skillet, is best for getting a good sear on the beef.
- 9x13 Baking Dish: This is the standard size that allows you to fit 12 shells snugly so they support each other and stay upright.
- Box Grater: Since we're avoiding pre shredded cheese, a sturdy grater is essential for that 2 cups of cheddar.
- Chef's Knife: For finely mincing the onion and dicing the roma tomatoes.
Chef's Tip: If your shells are sliding around in the baking dish, crumple up a small piece of aluminum foil and tuck it into the empty spaces at the ends. This acts as a brace to keep the tacos perfectly vertical during the bake.
A step-by-step Guide to Assembly and Oven Success

- Preheat the oven to 400°F. Note: A high temperature is required to crisp the shells quickly before they soften.
- Sauté the onion and garlic in 1 tbsp avocado oil over medium high heat until translucent and fragrant.
- Brown the 1 lb ground beef in the skillet, breaking it into small crumbles.
- Drain any excess fat from the pan. Note: This is the most important step for preventing soggy shells.
- Simmer the beef with 2 tbsp taco seasoning and 1/2 cup tomato sauce for 5 minutes until the sauce has thickened and coats the meat.
- Arrange 12 taco shells in the baking dish, ensuring they are standing upright.
- Layer a small amount of the 2 cups of grated cheese at the bottom of each shell.
- Spoon the beef mixture into the shells, filling them about two thirds of the way.
- Top with the remaining cheese and bake for 10-15 minutes until the cheese is bubbling and the shell edges are toasted.
- Garnish with lettuce, diced tomatoes, cilantro, and a dollop of Greek yogurt just before serving.
The "doneness" cue here is the cheese. You aren't just looking for it to melt; you want to see it start to migrate down into the meat and the edges near the corn shell should look slightly lacy and crisp. When you hear that faint sizzle as you pull the tray out, you know you've hit the mark.
Professional Kitchen Secrets to Avoid Sogginess and Shell Splits
The biggest pitfall with Baked Tacos is the shell breaking or getting soft. To avoid this, I always bake the shells for 3 minutes empty before I even put the meat in. This "par baking" dries out any moisture the shells might have absorbed from the packaging.
Solving Soggy Bottom Issues
If the bottom of your taco feels soft, it’s usually because the meat was too wet. Ensure your tomato sauce has reduced significantly in the skillet. It should look like a thick paste clinging to the beef, not a runny soup.
Also, that first layer of cheese at the bottom of the shell is your best friend it melts into a waterproof floor.
Preventing Unwanted Shell Splitting
Hard shells often split down the middle when you try to stuff them. To prevent this, don't force them open. If a shell is too narrow, just use less filling. The heat of the oven will actually make the shells slightly more flexible for a brief window, but forcing them while cold is a recipe for disaster.
| Problem | Root Cause | Solution |
|---|---|---|
| Shells fall over | Dish is too large | Use foil "snakes" to fill gaps and prop them up. |
| Meat is dry | Overcooked beef | Only simmer until sauce is thick; don't evaporate all liquid. |
| Cheese didn't melt | Low oven temp | Ensure oven is fully preheated to 400°F before baking. |
- ✓ Pat the diced tomatoes dry with a paper towel before topping to avoid extra moisture.
- ✓ Grate the cheese while it's cold, then let it sit at room temperature for 10 minutes for a better melt.
- ✓ Use a small spoon to pack the meat into the corners of the shells.
- ✓ If using flour tortillas instead, use a muffin tin flipped upside down to create "bowls."
- ✓ Always add the cold toppings (lettuce, yogurt) last so they stay refreshing.
Scaling the Recipe for Large Crowds or Solo Dinners
When you need to double this for a party, don't just double the time. Work in batches. You can brown 2 lbs of beef in one large skillet, but you'll need two separate 9x13 dishes to bake 24 tacos. If you try to crowd 24 tacos into a single larger tray, the ones in the middle will never get crispy.
For a solo dinner, you can easily scale this down to 3 or 4 tacos. Since 1 lb of beef is a lot for one person, I suggest browning the whole pound, seasoning it, and then freezing half of the cooked meat for a later date. When you're ready for more, just thaw the meat, stuff your shells, and bake as usual.
It’s a massive time saver for future you.
| Method | Time | Texture | Best For |
|---|---|---|---|
| Standard Oven | 15 minutes | Uniformly crispy | Large family dinners |
| Air Fryer | 6 minutes | Extra crunchy edges | Quick solo meals (3-4 tacos) |
| Toaster Oven | 12 minutes | Soft centered, crisp top | Small batches or dorm cooking |
If you're looking for a different kind of crunch to start your day, you might enjoy the technique of layering fats used in this Homemade Breakfast Biscuits recipe. It's a different kind of "baked" mastery, but the principles of heat and structure are very similar.
Debunking Common Myths About Oven Tacos
There's a common misconception that baking tacos makes the shells "stale." In reality, the dry heat of the oven performs a process called starch retrogradation in reverse, making the corn shells taste fresher and more like they were just fried. Another myth is that you can't use flour tortillas for this.
While the "hard shell" is traditional for this specific bake, you can use soft corn or flour tortillas if you drape them over the rungs of your oven rack first to bake them into a "U" shape.
People also think that you must use high fat beef for flavor. Because we are using 1/2 cup tomato sauce and 2 tbsp of seasoning, we are building a "flavor lacquer" around the meat. The 90/10 lean beef provides plenty of umami without the grease, so don't feel like you're sacrificing taste by choosing the leaner option.
Smart Storage Tactics and Ideas for Using Your Leftovers
Storage: These are best eaten immediately, but you can store leftover meat and cheese separately in the fridge for up to 4 days. I don't recommend storing fully assembled and baked tacos, as the shells will inevitably soften in the refrigerator.
Zero Waste: If you have leftover filling, it makes an incredible topping for baked potatoes or a filling for an omelet the next morning. Leftover shells that have broken can be crushed up and used as a "crouton" for a taco salad.
Even the stems of the cilantro can be finely minced and added to a salsa or a rice dish so nothing goes to waste.
The Best Side Dishes and Refreshing Beverage Pairings
To round out the meal, I love serving these with a side of cilantro lime rice or a simple black bean salad. The richness of the beef and cheese needs something acidic to cut through it. A squeeze of fresh lime juice over the tacos right before that first bite makes all the difference.
If you want a more indulgent side, a small bowl of Mexican street corn (elote) or even a side of chips with a chunky guacamole works beautifully. For beverages, think cold and crisp an iced hibiscus tea or a simple lime sparkling water provides the perfect refreshing contrast to the warm, spicy tacos.
Because the oven does all the hard work, you actually have time to sit down and enjoy the sides with your family rather than standing over the stove. Enjoy the crunch!

Recipe FAQs
Can I use ground turkey instead of beef for baked tacos?
Yes, ground turkey works well. Opt for a blend with at least 7% fat to ensure the filling stays moist. You might want to add an extra teaspoon of oil when sautéing it.
How do I prevent the taco shells from breaking in the oven?
Fill them carefully and don't overstuff. Ensure your shells are standing upright and supported in the baking dish, perhaps by using wadded foil in empty spaces. Avoid forcing them open if they feel too narrow.
What's the best way to ensure the filling isn't too watery?
Drain excess fat and reduce the sauce. After browning the beef, drain all the grease. Then, simmer the beef with the taco seasoning and tomato sauce until the sauce is very thick and coats the meat, preventing a soggy bottom.
Can I make baked tacos ahead of time?
It's best to assemble and bake them just before serving. However, you can prepare the meat filling up to 4 days in advance and store it separately in the refrigerator. Reheat the filling gently before assembling and baking.
What kind of cheese is best for baked tacos?
Sharp cheddar is recommended for its flavor and melting properties. Grating your own cheese from a block is ideal, as pre-shredded cheeses often contain anti caking agents that can affect how smoothly they melt.
How do I reheat leftover baked tacos?
Reheat in the oven for best results. Place any leftover assembled tacos on a baking sheet and warm them in a 350°F (175°C) oven for about 5-8 minutes, or until the shells are crisp and the filling is heated through. Be aware that the shells may not be as crisp as when first baked.
Can I use flour tortillas instead of hard taco shells?
Yes, but the technique changes slightly. For flour tortillas, you can drape them over the rungs of your oven rack to bake them into a "U" shape first. They will have a softer texture than baked hard shells but can still hold the filling well. This technique for shaping dough is similar to how we achieve structure in recipes like Homemade French Bread Crispy Baked in 30 Minutes.
Baked Tacos
Ingredients:
Instructions:
Nutrition Facts:
| Calories | 608 kcal |
|---|---|
| Protein | 39.6 g |
| Fat | 37.5 g |
| Carbs | 28.4 g |
| Fiber | 4.2 g |
| Sugar | 3.1 g |
| Sodium | 645 mg |
