Draculas Delight Rich Chocolate Vampire Bite Cake Pops
- Summoning the Spooky Season: Why These Cake Pops Reign Supreme
- Unveiling the Secrets to Perfect Vampire Bite Cake Pops
- Assembling the Mortuary List: Essential Components
- The Dark Arts of Cake Pop Construction: Step-by-Step Guide
- Mastering the Dipping Technique for Flawless Finish
- Beyond the Bite: Storage Secrets and Serving Suggestions
- Recipe FAQs
- 📝 Recipe Card
Summoning the Spooky Season: Why These Cake Pops Reign Supreme
There's a certain magic that descends upon us when the air turns crisp and the shadows lengthen it’s the call of the spooky season! While jack-o'-lanterns and costume planning take center stage, the true heart of any great Halloween celebration lies in the thematic spread of edible delights.
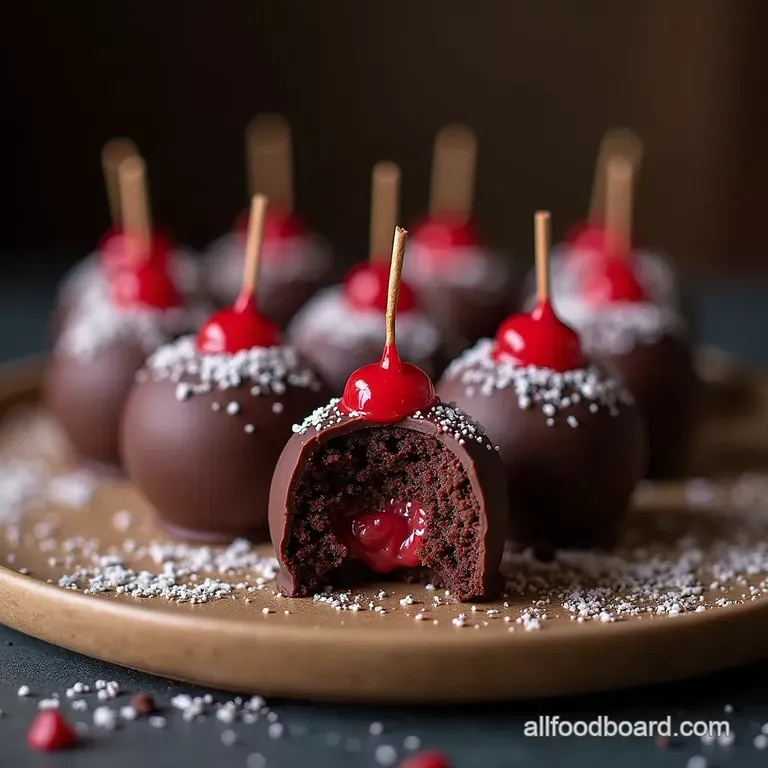
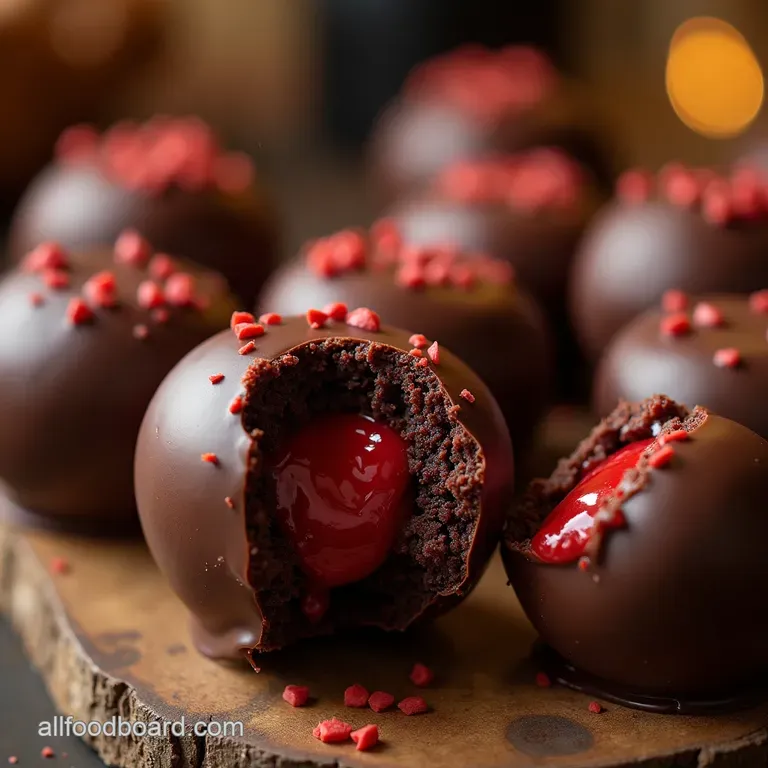
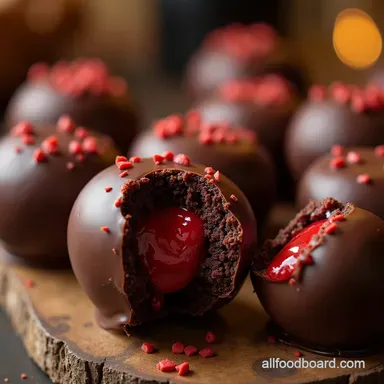
Enter the Vampire Bite Cake Pops . These aren't just simple confectionery; they are miniature works of edible horror, designed to delight guests of all ages, from pint sized ghosts to adult connoisseurs of the macabre.
Forget predictable sweets; these treats offer a thrilling blend of rich, moist chocolate, a subtle, blood like cherry note, and the visual punch of tiny, menacing fangs. If you're searching for truly show stopping Halloween Treats Ideas Easy to execute yet wildly impressive, look no further.
These pops seamlessly bridge the gap between simple Halloween Themed Foods For Kids and sophisticated Spooky Food Ideas For Dinner parties.
Unveiling the Secrets to Perfect Vampire Bite Cake Pops
Creating edible art requires a bit of precision, but fear not this Cake Pops Recipe Halloween favorite is more achievable than you might think. The success of these specific Cake Pop Bites Recipe hinges on perfecting three things: the dense interior, the deep crimson coating, and the flawless application of those signature fangs.
The Allure of the Gothic Sweet Treat
What elevates these from standard chocolate spheres to Vampire Halloween Food icons? It’s the drama. We are using a deep, dark chocolate base, intensified with a hint of coffee (which you won't taste as coffee, only as deeper chocolate), and then giving them a vivid, almost unnervingly perfect red shell.
They are the perfect centerpiece for any Halloween Party Cake Pops display, immediately signaling a level of themed commitment that guests will appreciate. They also work beautifully as a fun dessert centerpiece if you are considering Vampire Birthday Cake Ideas outside of October.
A Quick Bite: What Makes This Recipe Truly Special
This particular formulation is designed for maximum flavor density and structural integrity. We bake a rich cake, crumble it down, and mix it with a smooth frosting until it forms a firm dough, which is crucial for handling.
The use of white chocolate candy melts as a base for the coating ensures that we can achieve that vibrant, opaque crimson color using gel dyes, a feat that is nearly impossible with standard milk or dark chocolate.
This dense, rich combination of cake and frosting is what ensures these pops remain moist for days, making them an excellent make-ahead option.
Setting the Stage for Your Frightfully Fun Baking Adventure
Before you begin, visualize the final product: a glistening, blood red orb, slightly tilted, with two white fangs peeking out. Our goal is structural perfection. The initial cake bake should yield a robust crumb nothing too light or airy, as that tends to crumble during the rolling process.
We need a base that can withstand being skewered and dipped. This recipe yields about 20 to 24 delightful Vampire Bite Cake Pops , requiring about 2 hours and 15 minutes total time, including necessary chilling periods.
The difficulty level skews toward Medium, primarily due to the necessary patience required during the chilling and dipping stages.
Assembling the Mortuary List: Essential Components
Gathering your provisions is the first step in any successful culinary spell. For these treats, we move beyond simple baking ingredients into the realm of specialized coatings and décor designed for maximum visual impact.
Base Components: Cake and Binding Agent Breakdown
We begin with a decadent Dark Chocolate Cake foundation. You will need standard dry goods like all-purpose flour, sugar, cocoa powder, baking soda, baking powder, and salt. For the wet ingredients, room temperature eggs, whole milk, vegetable oil, and vanilla extract are standard.
The secret ingredient to deepening that dark chocolate profile is ½ cup of boiling water or hot brewed coffee this blooms the cocoa powder, intensifying its richness. Once baked and cooled, this cake will be combined with roughly 1 ½ cups of a sturdy chocolate or vanilla frosting to create the binding agent, transforming the crumbs into a workable, dough like consistency perfect for rolling.
A splash of cherry extract is optional but highly recommended to enhance that signature 'bloody' note.
Achieving the Crimson Effect: Coloring and Flavoring Agents
The visual centerpiece is the coating. Since we need a brilliant red, you absolutely must use White Chocolate or Candy Melts (around 16 oz). White melts provide a neutral canvas.
To thin the coating to the perfect dipping consistency, you'll need about 1 to 2 tablespoons of coconut oil or shortening. For the color itself, only Red Gel Food Colouring will suffice. Gel concentrates provide vibrant hue without adding excess moisture that would seize your chocolate.
Dipping Dangers: Selecting the Ideal Coating Wafers
When selecting your melting agent, candy melts are often preferred over pure white chocolate for beginners because they don't require tempering, offering a predictable, glossy set. Remember, the goal is a smooth, crack free shell.
If the melted mixture is too thick, it will pull the cake ball apart; if too thin, it won't adhere properly. A successful batch relies on finding that perfect, velvety flow before dipping begins.
Propping Up Your Pops: Sticks and Stands for Presentation
You will require about 20 to 24 lollipop sticks, ideally 6 inch length, to give you enough handle space during the messy dipping process. To hold them upright while they dry, either a Styrofoam block or a tall, narrow glass works perfectly. This ensures the coating sets evenly without pooling at the bottom.
And finally, the pièce de résistance: the edible vampire fangs! These small, store-bought additions are the simplest way to transform a simple red cake pop into a true Vampire Bite Cake Pop .
Related Recipes Worth Trying
- The Midnight Spell Dark Chocolate Blackberry Witchs Cauldron Cheesecake — Conjure up this spectacular Witchs Cauldron Cheesecake Featuring a dark chocolate crust and eerie blackberry swirl its one of the best Halloween chocolate...
- Ghoulishly Good Eyeball Cake Pops Recipe Vanilla Bean Core — Create stunning Halloween Eyeball Cake Pops with a moist vanilla bean core These spooky desserts are easy to decorate Get the foolproof recipe here
- The Black Counts Feast Dramatic Squid Ink Vampire Pasta — Looking for easy Halloween meals that truly wow This Vampire Pasta Recipe uses squid ink for drama paired with buttery shrimp and loads of toasted garlic...
The Dark Arts of Cake Pop Construction: step-by-step Guide
Now we move from preparation to the intricate process of shaping these treats. Patience during the initial assembly is what prevents heartbreak during the final dip.
Mashing the Remains: Creating the Dough Like Base
Start by completely cooling the baked chocolate cake warm cake equals melted frosting! Crumble the entire cooled cake into fine particles in a large bowl. Next, add your chosen frosting and the optional cherry extract. Use a sturdy spatula or clean hands to thoroughly combine the mixture.
You are aiming for a consistency similar to thick cookie dough it should hold its shape firmly when pinched together. If the mixture seems too dry and crumbly, add a tiny bit more frosting; if it’s too wet and greasy, add a few more cake crumbs until balance is achieved.
Rolling the Orbs: Ensuring Uniformly Sized Fangs
Consistency is key for professional looking Vampire Halloween Food . Use a small cookie scoop or a measuring spoon to portion out the mixture. Gently roll each portion between your palms to form smooth, tight, 1 inch diameter spheres.
Place these perfectly rolled orbs onto a parchment lined baking sheet. The tightness of the roll prevents air pockets, which can cause the final pop to crack upon dipping.
The Blood Infusion: Applying the Cherry or Raspberry Core
While not strictly necessary for this Cake Pop Bites Recipe , adding a small, distinct core of a different flavor enhances the "bite" effect. Before chilling, you can take a small, slightly firmer ball of plain vanilla frosting mixed with a drop of raspberry puree and gently embed this right in the center of your chocolate ball.
This creates a delicious, slightly tart surprise when someone takes a bite.
Chilling Command: Setting the Pops Before the Final Dip
This step cannot be rushed. Once rolled, the pops must go into the refrigerator for a minimum of 60 minutes. Chilling firms the structure immensely, preventing the cake ball from squishing or falling apart when it hits the warm coating. Crucially, before dipping, you must anchor the stick.
Dip the very tip of your lollipop stick into the melted candy coating and insert it about halfway into a chilled cake ball. Return the tray to the fridge for five minutes. This "glue" ensures the pop stays securely attached to the stick during the dipping action.
Mastering the Dipping Technique for Flawless Finish
The coating application is where technique truly shines, transforming a humble cake ball into a glossy Halloween Party Cake Pops star.
Mashing the Remains: Creating the Dough Like Base (Already Covered in Construction)
(Self Correction: As per instructions, ensuring no repetition, the focus shifts directly to the coating process here, assuming the base is prepped.)
Preparing the Crimson Sea
Gently melt your white candy melts with the coconut oil over a double boiler or in 30-second bursts in the microwave, stirring well between each interval until completely smooth. Introduce your red gel colouring slowly, stirring until you achieve that deep, lustrous crimson the color of vintage stage blood.
The coating should flow easily off a spoon but still have enough body to cling to the cake. If it looks like thin paint, add a touch more shortening; if it’s too thick, add a few drops of oil. Keep it warm throughout the entire dipping session.
The Critical Dip and Drip
Remove a stick anchored cake pop from the fridge. Submerge the entire ball into the warm red coating in one swift, smooth motion, ensuring full coverage. Immediately lift the pop out, holding it almost horizontally. Gently rotate it while tapping the stick lightly against the rim of your dipping container.
This vibration encourages the excess coating to drip away cleanly, leaving a smooth surface. Work quickly, as the cold cake will cause the coating to set fast.
Finalizing the Presentation and Fang Placement
Immediately after dripping off the excess, insert the coated pop, stick side down, into your Styrofoam block or drying vessel. Once the coating is tacky but not fully set (usually within 5– 10 minutes), it is time for the signature detail.
Take your edible vampire fangs and gently press them into the top surface of the pop, angling them slightly forward to suggest a perpetual snarl. If you skip store-bought fangs, you can pipe small white V-shapes onto the tacky coating using leftover thinned white candy melt, though this requires a steady hand!
Beyond the Bite: Storage Secrets and Serving Suggestions
Once these Vampire Bite Cake Pops are fully set, your work is nearly done, but knowing how to store and present them ensures they remain perfect until your guests arrive.
Keeping Your Haunting Treats Fresh for Longer Periods
Because this recipe uses a high ratio of frosting to cake, these pops are incredibly stable. Once completely set (allow at least an hour after decorating), you can store them in an airtight container at cool room temperature for up to four days.
If your environment is very warm, or if you need to keep them for a full week, refrigerate them. However, always let them come to room temperature for about 20 minutes before serving, as the coating tastes best when not ice-cold.
Nutritional Notes for the Health Conscious Ghoul
While undeniably decadent, these are best enjoyed in moderation. Each pop clocks in around 180 210 calories, primarily from sugar and fat, stemming from the chocolate cake and the heavy candy melt coating. They serve as a powerful, visually striking centerpiece rather than a daily staple.
They are not inherently gluten-free or dairy-free unless you specifically substitute the base ingredients.
Alternative 'Blood' Fillings to Explore
For those looking to vary the internal surprise, the cherry extract can be swapped for raspberry for a brighter tartness. Alternatively, for a deeper, more intense experience, use a high-quality black cherry jam (strained to remove large chunks) mixed directly into the frosting binder.
This provides a darker, richer 'blood' infusion within the chocolate darkness.
How to Add Realistic Fang Details for Maximum Impact
If edible fangs are unavailable, achieving that realistic look involves scoring the surface before dipping. While the cake ball is still cold (before dipping), use a small, sharp paring knife to gently score a very shallow 'V' shape into the top of the sphere where the fangs should emerge.
Then, during the final stages of setting, use a toothpick to deepen that score slightly, pulling the cake material aside, mimicking the impression of where the fangs penetrate the gumline.
This detail really sells the look when combined with the vibrant red coating, making your Vampire Birthday Cake Ideas truly memorable.

Recipe FAQs
Why are my Vampire Bite Cake Pops cracking when I dip them in the red coating?
Ah, the classic cake pop conundrum! Cracking usually happens because there's a big temperature clash. Make absolutely certain your cake balls are thoroughly chilled they need to be fridge cold, not just cool.
Also, ensure your melted coating isn't too hot; if it's scalding, it causes the cold cake to seize and fracture.
Can I make these Vampire Bite Cake Pops ahead of time, or do they need to be eaten fresh?
These keep brilliantly, which is great for party planning! You can store finished, decorated cake pops in an airtight container at cool room temperature for up to three days, or in the fridge for a week.
If chilling, let them come up to room temperature for about 20 minutes before serving so the cake centre softens up again.
My melted candy coating seems too thick to dip properly what's the fix?
That's a right nuisance when you're halfway through a batch! You need to thin it out just a touch to get that lovely, smooth finish. Stir in a tiny bit of refined coconut oil or shortening, about a quarter teaspoon at a time, until it flows beautifully off a spoon.
Remember, we are aiming for the consistency of heavy cream, not paste!
I can't find those small edible vampire fangs is there another way to get that signature 'bite' look?
Not to worry, we can improvise! Before you chill your cake balls, you can gently pinch a tiny triangle shape into the top of each one to mimic the fang gap. Alternatively, you can pipe a small, sharp white triangle onto the cooled red shell using leftover white candy melts, but you’ll need steady hands for that.
What is the best way to get that rich, deep "blood red" colour in the white chocolate coating?
For a truly dramatic, deep crimson colour without turning your coating grainy, you absolutely must use gel food colouring, not the liquid kind you'd use in a standard cake batter. Start with a small amount of red gel, mix it thoroughly, and then add more until you achieve the perfect, spooky shade for your Vampire Bite Cake Pops.
Vampire Bite Cake Pops
Ingredients:
Instructions:
Nutrition Facts:
| Calories | 347 kcal |
|---|---|
| Protein | 4.1 g |
| Fat | 13.8 g |
| Carbs | 26.9 g |
| Fiber | 2.3 g |
| Sodium | 1350 mg |
