The Proper Fudgy Crinkletop Brownies a Little Bit of Heaven in a Square
- The Proper Fudgy Crinkle-Top Brownies: A Little Bit of Heaven in a Square
- Finding Your Fudgy Fix
- Getting Started: What You Need for Deep Chocolate Flavour
- Core Shopping List
- Flavour Architecture
- Equipment & Smart Prep Moves
- Before You Cook
- Guided Cooking Sequence: Achieving the Crackly Top Brownies
- Save-It Section
- Mastery Notes & Perfect Pairings
- Frequently Asked Questions
- 📝 Recipe Card
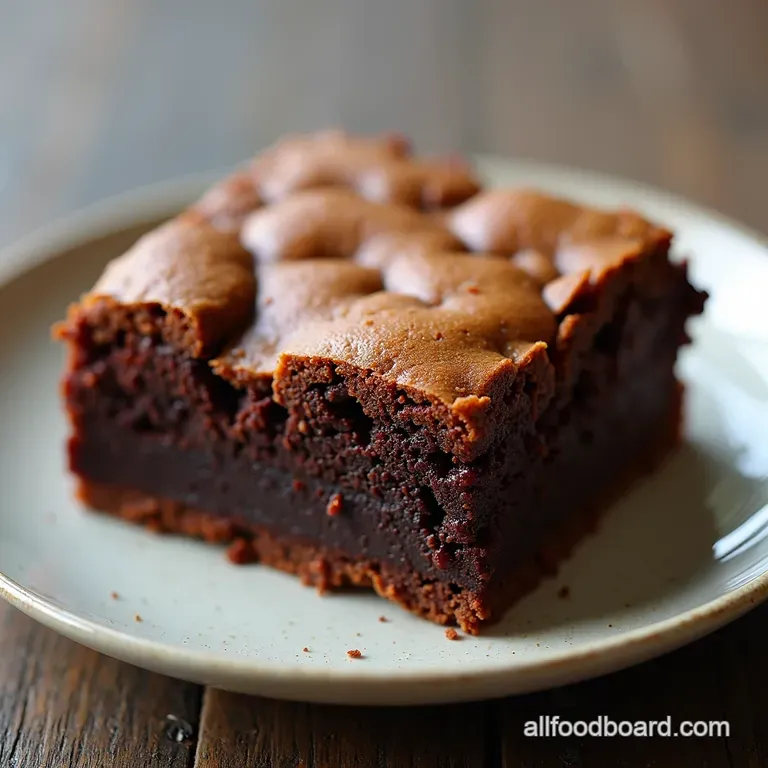
The Proper Fudgy Crinkle Top Brownies: A Little Bit of Heaven in a Square
You know that moment? You pull something out of the oven, and the smell just stops you dead in your tracks? That’s the scent of success when you’re making these Brownies . Forget those dry, sad squares you sometimes find in cafes.
We are going for pure, unadulterated, deeply chocolatey indulgence here.
This isn't just another recipe you scroll past. This is my ticket to making the Best Brownie Recipe Ever consistently. If you’ve ever struggled with cakey results or a dull flavour, stick with me.
Finding Your Fudgy Fix
I know what you’re thinking when you search for this. You want to know: are they truly fudgy? Will I actually get that shiny, crackly top? And most importantly, can I manage this Brownie Recipe without turning my kitchen upside down?
Absolutely, yes, yes, and yes. We nail the fudgy texture by respecting the chocolate ratio, and that famous crackle comes down to one simple trick we'll cover in the steps it’s all about whipping the eggs properly. Loads of other online recipes skim over that bit, but we’re going all in here.
Getting Started: What You Need for Deep Chocolate Flavour
Right, before we get cracking, let’s make sure your cupboard is stocked. We are focusing on making these Brownies From Scratch taste incredible. Quality ingredients matter, especially the chocolate.
We’re using two types of chocolate to build up that flavour profile for our Fudgy Brownie Recipe . Melted dark chocolate gives the chew, and good cocoa powder gives us that deep colour.
Don't use weak cocoa; go for the dark stuff it makes all the difference for How To Make The Best Brownies .
Make sure your butter is ready to go, and have your sugar measured out. We’ll be using both white and brown sugar; the brown adds that essential sticky chewiness that separates a good brownie from a truly great one. Trust me on this one.
Related Recipes Worth Trying
- The Proper Fudgy Brownies From Scratch with Crackly Tops — Looking for the best brownies from scratch This easy recipe guarantees wonderfully fudgy brownies with that soughtafter crackly top Perfect for your next cuppa
- Seriously Fudgy Brownies Recipe Chewy Chocolatey — Craving the ultimate fudgy brownie This recipe delivers intense chocolate flavour and a chewy edge Learn the secrets for moist brownies every time Get...
- The Ultimate Fudgy Brownies with a Perfect Crackle Top — Stop buying those box mixes Learn the simple secret to making homemade brownies that are intensely fudgy inside with that soughtafter shiny crackle top Easy...
Right then, settle in! As a chef, few things bring a smile to my face like a perfectly baked brownie . Forget those dry, crumbly disappointments you sometimes find down at the local shop we're aiming for that fudgy, deeply chocolatey centre with that glorious, crackly top that makes everyone think you’ve been working magic.
This outline is for what I call my "Ultimate Fudgy Crinkle Top Brownies ." It’s a recipe that respects tradition but pulls out all the stops for maximum texture and flavour.
Let’s get this mapped out for what will surely become your Best Brownie Recipe Ever .
Core Shopping List
When you’re putting together the shopping list for these Brownies From Scratch , quality really does count, especially on the chocolate front.
For the chocolate base, you’ll need 1 cup (226g) of unsalted butter. Make sure it’s decent stuff; we are melting it down, so the flavour matters. Pair that with 6 oz (170g) of good dark chocolate I insist on 70% cacao minimum .
If you can find a brand you trust, go for it. For the sugars, we want 1 ¾ cups (350g) of regular white sugar and ½ cup (100g) of light brown sugar, packed nice and tight. The brown sugar is key for that lovely chewiness in the final product.
For the dry team, you'll need 1 cup (120g) of plain flour, levelled properly (don't scoop straight from the bag, or you’ll end up with cakey Brownies !).
Crucially, grab ½ cup (45g) of good unsweetened cocoa powder Dutch-process, if you can find it, gives the darkest colour for those Deeply Chocolatey Brownies .
Flavour Architecture
In any great bake, flavour isn't just luck; it's designed. Our architecture here relies on layering the chocolate notes. The melted dark chocolate provides richness, while the cocoa powder adds that necessary dusty depth.
Don't skip the espresso powder— 1 teaspoon (3g) of instant espresso powder won't make your Brownies taste like coffee, promise. It just makes the chocolate sing louder.
It’s a classic trick for achieving that signature, rich flavour profile often missing in lesser recipes.
If you’re completely out of espresso powder, no sweat. My first substitution path is simply leaving it out entirely. My second, slightly more adventurous swap, is using 1 teaspoon of finely ground black cardamom if you happen to have some in your spice drawer (it adds an amazing smoky depth!).
My original idea? Swap the vanilla extract for 1 teaspoon of high-quality orange zest mixed into the melted butter it brightens the whole thing up beautifully.
Equipment & Smart Prep Moves
You don't need loads of fancy kit for this Brownie Recipe , thank goodness. The main thing is an 8 x 8 inch (20 x 20 cm) square pan.
Crucially, line it with parchment paper, leaving an overhang on two sides this creates a ‘sling’ so you can lift the entire slab out later without hacking at the sides. Life saver, honestly.
My top mise en place tip for How To Make The Best Brownies is managing the egg/sugar stage. Get your eggs to room temperature beforehand; it helps them whip up faster.
Before you even start melting butter, have your dry ingredients pre-sifted into a bowl and your chocolate chopped. When it comes time to fold everything together, you need speed and delicacy to protect that air you’ve built up.
If you’ve got your Crackly Top Brownies ingredients ready to go, that tricky aeration stage becomes the main focus, leading straight to success!
Before You Cook
Right, before we even think about turning the oven on, we need a bit of prep. My mates who try to rush this part always end up with a disaster either flat cakes or rock hard centres. So, listen up!
First off, get your oven sorted. We need it at 350° F ( 175° C) . Unlike some recipes where rivals brag about preheating in five minutes, give yours a good ten, yeah? Especially if you've got an old oven; they lie about the temperature!
Next, we need that parchment paper sling in the tin. If you forget this, getting your Brownies From Scratch out later will be a nightmare. You’ll be fighting that pan like it owes you money!
My big warning here? Texture. If you overmix the flour in, you’re basically making cake, not a fudgy brownie. Keep it light right at the end. Also, if your batter tastes bland when you lick the spoon (don’t lie, you do it too), it means you skimped on the salt or the vanilla.
Add a tiny pinch more salt now, trust me.
Guided Cooking Sequence: Achieving the Crackly Top Brownies
This is where the magic happens. Forget the microwave; we are doing this the proper way to get those sought after Crackly Top Brownies .
Melt Time: Get your butter and chocolate gently melted. If you're using a microwave, use 20-second bursts. It should be glossy and smooth. Crucially, let it cool down until it’s just warm to the touch.
If it’s too hot, it’ll scramble your eggs in the next step!
The Air Injection (The Secret Sauce): This is the step that separates the good bakers from the great ones. Combine your sugars and eggs. You need to whisk this lot by hand or machine for a solid four to five minutes . You are looking for volume.
The mixture should look pale lemon, thick, and when you lift the whisk, it should fall back into the bowl in thick ribbons that hold their shape for a second. That’s the air creating the crackle!
Gentle Fold: Once the chocolate mixture is in, you fold in the dry stuff. Sift your flour and cocoa powder over the top. Now, grab your spatula and fold. I mean gently . Only mix until the flour streaks disappear. If you see even a tiny bit of white powder, stop!
That’s enough. Overworking the batter now makes dense Brownies , not the Fudgy Brownie Recipe we want.
Bake Check: Pop it in the 350° F ( 175° C) oven for 30 to 35 minutes . My test? Stick a skewer in about an inch from the edge.
If it comes out with moist, fudgy crumbs attached not wet batter they are done. If it comes out clean, you've gone too far, mate! Pull them out anyway; residual heat will finish them off.
Save-It Section
Listen, the hardest part of making the Best Brownie Recipe Ever is waiting. But you absolutely must let these cool fully before slicing. Seriously, chill them in the fridge for two hours . They firm up, and you get perfect, non-smushed squares.
You can wrap leftovers tightly in cling film and they’ll be grand at room temperature for three days. Honestly, they taste even better the next day; the flavour gets deeper.
Emergency Fixes (Don't Panic!):
- Too Salty? If you accidentally dumped in too much salt, stir in a tablespoon of unsweetened cocoa powder; it helps mask the sharpness.
- Too Dry When Baking? If they look crusty at 25 minutes, take them out immediately. They are likely overdone. Serve them crumbled over ice cream; nobody will notice!
- Sauce Split (If you added one): If your topping or swirl sauce looks oily, whisk in a tiny splash of cold water or milk until it comes back together.
Making Deeply Chocolatey Brownies from scratch is totally worth the effort. You’ve got this!
Right then, settle in! As a chef, few things bring a smile to my face like a perfectly baked brownie. Forget those dry, crumbly disappointments you sometimes find down at the local shop we're aiming for that fudgy, deeply chocolatey centre with that glorious, crackly top that makes everyone think you’ve been working magic.
This recipe is truly my Best Brownie Recipe Ever .
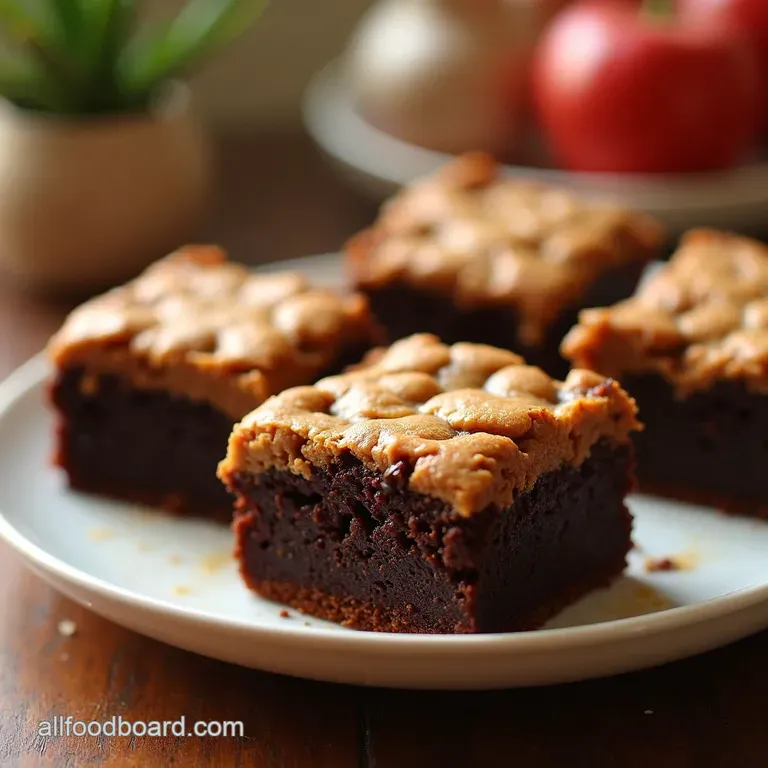
Mastery Notes & Perfect Pairings
Taste & Texture Upgrades
We’re going for serious decadence here. For a chef level finish, dust your cooled Brownies With Cocoa Powder through a fine sieve just before serving it looks professional, dead simple.
Plating wise, forget a plate; serve them warm, slightly soft, with a single perfect fresh raspberry perched on top. If you compare this to those watery recipes that rely only on cocoa powder, you'll notice the depth here. My secret? Using both melted high-quality chocolate and cocoa powder.
It hits harder, creating that rich, Deeply Chocolatey Brownies flavour everyone craves.
Nutrition & Dietary Paths
Look, these aren’t a salad, are we? For the averages, you’re looking at about 330 calories and roughly 20g of fat per square. They aren't low-cal, but they are packed with satisfaction.
If you need to lighten things up, you can reduce the sugar by about 1/4 cup, but I’ll warn you you lose a bit of that crucial chewiness and crust formation. For gluten-free, use a quality 1:1 flour blend instead of the standard AP; the flavour profile stays rock solid.
dairy-free is achievable if you use dark chocolate chips that are clearly marked dairy-free.
Serving & Pairing Ideas
These beauties keep really well, actually. Wrap them tightly; they’ll be grand for three or four days on the counter, but frankly, they are better on day two once they’ve properly set up. To reheat one slightly perfect for that ice cream pairing microwave a square for just 10 seconds.
It brings the fudginess right back. They are brilliant simply served with strong coffee, but if you want to go all out, a shot of good Irish cream liqueur on the side is the business. Honestly, once you master How To Make The Best Brownies like this, you’ll never look back.
Go on, get that oven on!
If you're craving more ideas, explore Quick Easy Brownies My Cheaters OneBowl Recipe , Peanut Butter Swirl Brownies Chewy Gooey Heaven and Banana Bread Brownies The Best Comfort Food Mashup .

Frequently Asked Questions
Why are my brownies coming out dry instead of fudgy like yours?
That’s the bane of a baker's existence! Dryness usually stems from overbaking or not enough fat/sugar for structure. For fudgy results, you absolutely must whip those eggs and sugars for a solid 4-5 minutes to get that aeration, and for goodness sake, pull them out when the skewer still has moist crumbs clinging to it they finish cooking outside the oven.
Remember, they need to cool completely, ideally in the fridge, to set that proper texture.
How do I get that shiny, crinkly top on my brownies?
Ah, the coveted "crinkle top" it’s all down to physics, my friend! That glorious shine appears when the sugar has dissolved completely into the eggs and is whipped into a meringue like state.
When you bake it, the thin layer of sugar on top sets quickly into that delicate crust before the rest of the batter fully rises. Don’t skip that lengthy whisking step, or you’ll end up with a matte finish, which is simply not the done thing for these beauties.
Can I make these brownies ahead of time, and how should I store them?
Absolutely, and I highly recommend it! These brownies improve after resting. Store them tightly wrapped at room temperature for up to three days; they should stay perfectly moist. For longer keeping, you can freeze them in an airtight container for up to three months.
Thaw them on the counter, and they’ll taste as fresh as the day you baked them perfect for when unexpected guests pop round for elevenses.
I don't have dark chocolate; can I substitute it with milk chocolate in the brownie recipe?
You certainly can, but be aware that milk chocolate has much more sugar and less cocoa solids than the 70% dark chocolate we call for. If you substitute, the result will be notably sweeter and softer, likely losing some of that deep, rich flavour profile.
If you must swap, try reducing the granulated sugar in the main recipe by about a quarter cup to try and balance things out.
My pan is 9x13 inches instead of 8x8; what should I do with the baking time for these brownies?
A larger pan means a thinner layer of batter, so they will bake significantly faster don't just look at the clock! For a 9x13 pan, start checking them at about 20 minutes, and they might be done closer to 25-28 minutes total.
Because the batter is spread thinner, you risk overbaking them quickly, so keep a close eye on those edges for signs of setting.
The Proper Fudgy Crinkletop Brownies A Little Bi
Ingredients:
Instructions:
Nutrition Facts:
| Calories | 262 kcal |
|---|---|
| Protein | 3.1 g |
| Fat | 9.6 g |
| Carbs | 36.0 g |
| Fiber | 2.3 g |
| Sodium | 2540 mg |
