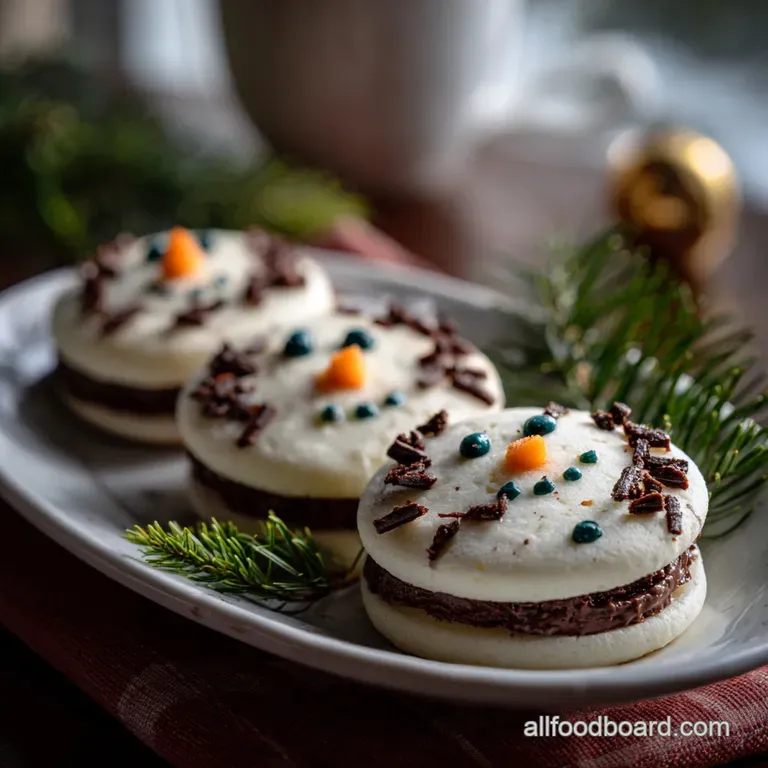
Snowman Oreo Balls Recipe
- Time: Active 25 mins, Passive 45 mins, Total 1 hour 10 mins
- Flavor/Texture Hook: Velvety cream cheese filling inside a snappy, sweet coating
- Perfect for: Holiday cookie swaps, school parties, or a cozy snowy afternoon activity
- Create the Best Snowman Oreo Balls
- Essential Recipe Timing and Specs
- Picking Your Quality Filling Components
- Necessary Equipment for Clean Dipping
- Simple Steps for Success
- Solving Common Dipping Mistakes
- Exciting Flavor Twists to Explore
- Storage and Make Ahead Tips
- Creative Holiday Display Ideas
- Recipe FAQs
- 📝 Recipe Card
Create the Best Snowman Oreo Balls
Honestly, the first time I tried making these, I ended up with what looked like melting charcoal lumps instead of cute winter characters. I didn't chill the dough long enough, and the warm chocolate just turned everything into a gray, streaky mess.
But after a few trials and a lot of messy fingers, I’ve figured out the exact rhythm you need to make these look like they came from a professional bakery.
We've all seen those fancy truffles in boutique shops, but these Snowman Oreo Balls are actually more satisfying because of that nostalgic cookie and cream cheese combo. It’s a recipe that relies on temperature control rather than complex cooking skills.
Once you get the "cold chain" right, you’ll be whipping these out every December without breaking a sweat.
Right then, let's get into the details so your kitchen stays clean and your snowmen stay white. This isn't just about mixing stuff together; it's about managing textures so you get that perfect "shatter" from the white chocolate. Trust me, once you master the dip, you'll be the hero of the office party.
Essential Recipe Timing and Specs
Before we start pulverizing cookies, we need to talk about why this specific ratio works. If you use too much cream cheese, the balls become greasy and won't hold their shape when they hit the warm chocolate. If you use too little, they’ll be dry and crumble before you can even dunk them.
The Science of Why it Works: Lipid Stability: The saturated fats in the cream cheese and coconut oil solidify when chilled, creating a firm structure that resists melting during the dipping process.
Emulsification: Pulse blending the cookie fats with the cream cheese proteins creates a stable ganache like center that stays velvety at room temperature.
| Method | Prep Time | Texture Result | Best For |
|---|---|---|---|
| The Classic Chill | 1 hour 10 mins | Firm, professional snap | Gift boxes and parties |
| The Freezer Flash | 45 mins | Slightly softer center | Immediate family snacking |
| The Room Temp | 30 mins | Messy and very soft | Note: Harder to decorate |
It is much easier to work with a mixture that has had time to rest. If you are looking for more no bake inspiration while your dough chills, you might want to try the technique used in The 3Ingredient Oreo recipe for a simpler version.
Ingredient Deep Dive
| Ingredient | Science Role | Pro Secret |
|---|---|---|
| OREO Cookies | Structural base | Don't remove the cream filling; it acts as a secondary binder. |
| Cream Cheese | Plasticizer | Use the brick style only; tub versions have too much water. |
| Coconut Oil | Viscosity reducer | This thins the chocolate so it coats thinly without clumping. |
Picking Your Quality Filling Components
For the best results, stick to these specific amounts. I’ve tried "eyeballing" it before, and it usually ends in disaster.
- 36 standard OREO cookies (385g): Why this? Provides the cocoa depth and crunchy texture needed for the center.
- 8 oz brick style cream cheese, softened (226g): Why this? The fat content ensures a silky mouthfeel when bitten.
- 16 oz white chocolate melting wafers (450g): Why this? Wafers contain stabilizers that prevent the "blooming" or graying of chocolate.
- 1 tbsp coconut oil (15ml): Why this? Lowers the melting point and adds a beautiful glossy sheen.
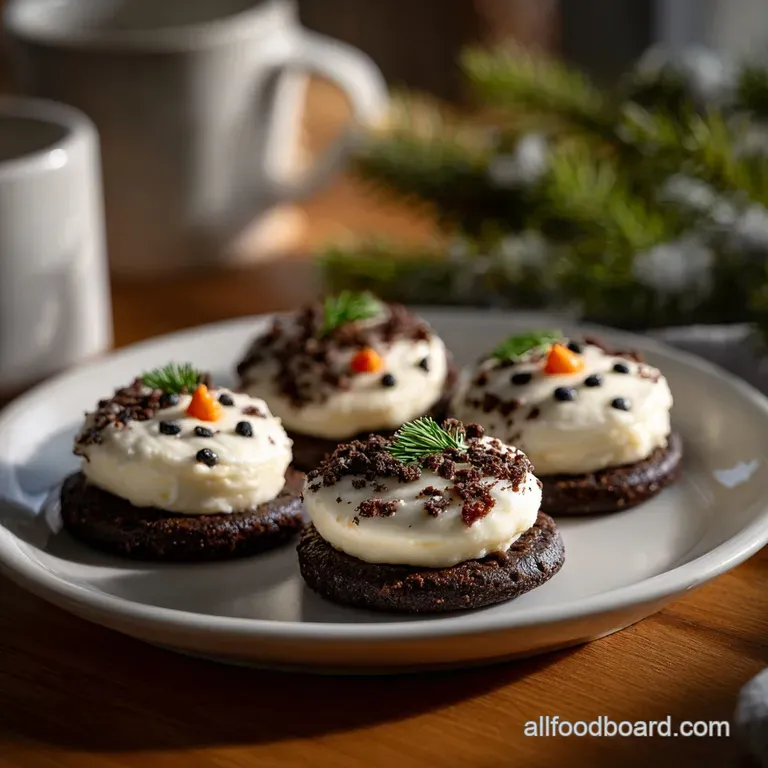
- 36 orange triangle sprinkles: Why this? These create the perfect "carrot nose" look instantly.
- 1 unit black edible ink marker or decorating gel: Why this? Allows for precise coal eyes without the mess of a piping bag.
| Original Ingredient | Substitute | Why It Works |
|---|---|---|
| OREO Cookies | Chocolate Sandwich Cookies | Similar dry to cream ratio. Note: Flavor may be less intense. |
| White Chocolate Wafers | White Chocolate Chips | Can be used, but add 1 extra tsp oil for flow. |
| Orange Sprinkles | Tiny pieces of dried apricot | Natural alternative. Note: Adds a chewy texture. |
One thing I've learned is that the temperature of your cream cheese is non negotiable. If it's too cold, you'll get tiny white lumps in your dark cookie filling. Leave it on the counter for at least an hour before you start.
Necessary Equipment for Clean Dipping
You don't need a high end pastry kitchen, but a few specific tools make this significantly less frustrating. I once tried to roll these by hand without a food processor and let's just say my kitchen looked like a chocolate bomb went off.
- Food Processor: This is vital for getting the cookies into a fine, sand like dust. Large chunks will make your snowmen look lumpy.
- Standard Baking Sheets: You'll need two of these to keep the balls separated while they chill.
- Parchment Paper: Essential for easy removal. If you dip onto a bare plate, they will stick and tear.
- Small Microwave Safe Bowl: A deep, narrow bowl is better for dipping than a wide, shallow one.
- Dipping Tool or Fork: A dedicated chocolate fork is great, but a standard kitchen fork works if you tap off the excess carefully.
Chef's Tip: Freeze your baking sheet for 10 minutes before placing the rolled balls on it. This "shocks" the bottom of the dough and helps them stay perfectly spherical instead of flattening out.
Simple Steps for Success
Let's crack on with the process. Follow these steps closely, especially the chilling parts that's where most people go wrong!
- Pulverize the cookies. Place 36 OREO cookies in a food processor and pulse until they become fine crumbs. Note: No large pieces should remain.
- Incorporate the binder. Add the 8 oz of softened cream cheese to the crumbs. Pulse until a thick, uniform dough forms and pulls away from the sides.
- Sculpt the spheres. Roll the mixture into 1 inch balls. Aim for 36 units.
- Chill the centers. Place the balls on a parchment lined sheet and refrigerate for at least 30 minutes until firm to the touch.
- Melt the coating. Combine 16 oz white chocolate and 1 tbsp coconut oil in a bowl. Microwave in 30 second bursts until smooth and glossy.
- Achieve the white coating. Using a fork, dip each chilled ball into the chocolate. Tap the fork against the bowl until the excess chocolate drips off.
- Add the nose. Immediately place an orange triangle sprinkle in the center before the chocolate sets.
- Set the shell. Return the decorated balls to the fridge for 15 minutes until the coating is hard.
- Bring snowmen to life. Use the black edible ink marker to dot on eyes and a "coal" smile.
- Final rest. Let them sit for 5 minutes at room temperature before serving to soften the center slightly.
If you enjoy the assembly process of these characters, you'll love making the Sweet Salty Snowman recipe which uses a similar festive theme for a snack mix.
Solving Common Dipping Mistakes
The biggest hurdle is usually the chocolate coating. If it's too thick, you'll pull the cookie crumbs into the white chocolate, ruining the "snow" look.
Why Your Snowmen Are Streaky
If you see dark crumbs bleeding into your white chocolate, your cookie balls weren't cold enough or your chocolate was too hot. The heat melts the surface of the ball, mixing the two layers. Always ensure the balls are firm and the chocolate is warm, not boiling.
Why the Chocolate Is Cracking
This usually happens when the balls are too cold (like straight from the freezer) and the chocolate is very hot. The rapid expansion and contraction of the materials cause the shell to "shatter" as it cools.
| Problem | Root Cause | Solution |
|---|---|---|
| Lumpy Coating | Chocolate seized from moisture | Keep all tools bone dry; add a teaspoon of oil to thin. |
| Flat Bottoms | Dough too soft when rolled | Chill the dough for 15 mins before rolling into balls. |
| Yellowing Tint | Overheated chocolate | Use 50% power on microwave and stir frequently. |
Common Mistakes Checklist:
- ✓ Pat your hands dry before rolling to prevent the dough from sticking.
- ✓ Use a toothpick to help slide the ball off the dipping fork.
- ✓ Never add water to your melting chocolate; it will seize instantly.
- ✓ Work in batches, keeping half the balls in the fridge while you dip the first half.
- ✓ Allow the "carrot nose" to be placed while the chocolate is still "tacky" but not runny.
Exciting Flavor Twists to Explore
Once you've nailed the standard Snowman Oreo Balls, you can start playing with the profile. I love adding a little surprise inside for different guests.
Scaling Down (Making 18 balls): Use 18 cookies and exactly 4 oz of cream cheese. Use a smaller bowl for melting chocolate to maintain depth for dipping. Reduce coconut oil to 1.5 teaspoons.
Scaling Up (Making 72 balls): Work in two separate batches for the chocolate. White chocolate can thicken if it sits too long. Only increase spices (like peppermint) to 1.5x the original ratio to avoid overpowering the palate. Use two separate refrigerator shelves to ensure even airflow and cooling.
| Shortcut | Time Saved | Impact on Quality |
|---|---|---|
| store-bought Crumbs | 5 minutes | Slightly drier; may need more cream cheese. |
| Candy Melts | 10 minutes | Very easy to use; slightly more "waxy" flavor. |
| Piping Gel Eyes | 0 minutes | Looks more "glossy" than markers. |
Storage and make-ahead Tips
These are fantastic for planning ahead because they actually taste better after the flavors have "married" for a day or two in the fridge.
Storage: Keep these in an airtight container in the refrigerator for up to 7 days. If you leave them out on a counter in a warm room, the cream cheese can soften too much, making them perishable.
Freezing: You can freeze the undipped balls for up to 2 months. However, once they are dipped in white chocolate, freezing can sometimes cause the shell to sweat or crack upon thawing. If you must freeze the finished product, thaw them slowly in the fridge, not on the counter.
Zero Waste Tip: Don't throw away the leftover white chocolate! Stir in any leftover cookie crumbs or a handful of nuts, spread it on parchment paper, and let it harden for a quick "trash bark" snack.
Creative Holiday Display Ideas
When it comes to serving, presentation is everything. I like to place these on a bed of shredded coconut to look like they are sitting in real snow. It's a simple touch that makes people go "wow" when they walk into the room.
For a real showstopper, try serving these alongside an Oreo Milkshake recipe for a double dose of chocolate and cream goodness. The cold shake pairs perfectly with the rich truffle center.
- For a "Melted" Look
- Don't tap off the excess chocolate. Let it pool at the bottom of the ball to look like a melting puddle.
- For a Rustic Look
- Use pretzel sticks as "arms" by poking them into the sides before the chocolate sets.
- For a Gift
- Place individual snowmen in mini cupcake liners before boxing them up to prevent them from rolling around.
Kitchen Myths Debunked
Myth: You must use a specific brand of cream cheese for it to set. The truth is that any full fat brick cream cheese works. The "brick" part is what matters; "spreadable" versions have air and water whipped in, which prevents the ball from staying firm.
Myth: Sifting the cookie crumbs is necessary. Actually, having a tiny bit of texture is nice. As long as there aren't chunks larger than a pea, the cream cheese will bind everything into a smooth enough paste.
Myth: White chocolate is the same as dark chocolate for melting. White chocolate is much more temperamental because it has a lower burning point. It’s actually a mix of cocoa butter and milk solids, so you must treat it gently with low heat.
These snowmen are such a joy to make once you get the hang of it. Just remember: keep it cold, dip it fast, and don't worry if a few of them have "personality" in their faces. Happy "baking" (without the oven)!

Recipe FAQs
Can I make Snowman Oreo Balls ahead of time?
Yes, they're best made a day or two in advance. This allows the flavors to meld, and they keep well in the refrigerator for up to 7 days.
What is the best way to melt white chocolate for coating?
Melt at 50% power in 20-second intervals, stirring between each. This prevents the delicate white chocolate from scorching or seizing.
Why are my Snowman Oreo Balls developing streaks or gray patches?
This is usually due to the cookie balls not being cold enough or the chocolate being too hot. Ensure the Oreo balls are firm from chilling, and that your melted chocolate is warm, not overheated, to prevent them from melting into each other.
How do I get a smooth, even coating on my Snowman Oreo Balls?
Dip quickly and tap off excess chocolate gently against the bowl. A deep, narrow bowl for melting helps ensure good coverage, and using a dipping tool or fork is essential for managing the chocolate flow.
Can I freeze Snowman Oreo Balls after they've been dipped?
It's not ideal; freezing can cause the white chocolate shell to sweat or crack. The undipped balls can be frozen for up to 2 months, but for finished ones, it's best to refrigerate and thaw slowly.
What causes the white chocolate coating to crack after setting?
This often happens when the balls are too cold (e.g., straight from the freezer) and the chocolate is very hot. The rapid temperature change causes the shell to contract unevenly as it cools, leading to cracks.
Can I substitute regular white chocolate chips for melting wafers?
Yes, but add about an extra teaspoon of coconut oil for flow. Melting wafers contain stabilizers that make them easier to work with and less prone to seizing, but chips can work with a little adjustment.
Snowman Oreo Balls

Ingredients:
Instructions:
Nutrition Facts:
| Calories | 145 kcal |
|---|---|
| Protein | 1.6g |
| Fat | 8.8g |
| Carbs | 15.4g |
| Fiber | 0.4g |
| Sugar | 12.1g |
| Sodium | 60mg |
