The Crème De La Crème Banana Pudding with a Fluffy Baked Meringue

- Elevating a Southern Classic: The Case for Scratch Custard
- The Showstopper Finale: Why Baked Meringue is Essential for the Best Banana Pudding
- Essential Components for the Ultimate Crème Banana Pudding
- Gathering Your Mise en Place: Tools and Ingredients List
- Mastering the Technique: Step-by-Step Guide to the Dessert Layers
- The Crucial Steps: Cooking the Custard and Whipping the Meringue
- Troubleshooting and Expert Tips for Your Next Banana Pudding
- Serving Strategies, Storage, and Flavor Variations
- Recipe FAQs
- 📝 Recipe Card
Elevating a Southern Classic: The Case for Scratch Custard
While many shortcuts exist in the world of comfort food, achieving the title of the Best Banana Pudding Ever requires dedication to the details and that starts exclusively with scratch made custard.
This foundational decision immediately elevates the dessert beyond any version made with instant mixes, transforming simple layers into a rich, decadent spectacle. Our approach focuses on creating a thick, velvety pastry cream, leveraging 2 cups of whole milk and 1 cup of heavy cream, combined with five robust egg yolks.
This preparation ensures a depth of flavor and a luxurious mouthfeel that is the definition of true Homemade Banana Pudding , setting the stage for a spectacular final product worthy of any celebration.
The Showstopper Finale: Why Baked Meringue is Essential for the Best Banana Pudding
The baked meringue topping isn't just an attractive finish; it is integral to the authentic Southern tradition and provides necessary structural and textural contrast. Skipping this step in favor of plain whipped cream loses a critical element of complexity.
Comparing Instant Mix to True Vanilla Bean Custard
The difference between convenience and quality is stark. Instant mixes rely heavily on artificial flavorings and chemical thickeners, resulting in a thin, one-dimensional sweetness. Conversely, our scratch made Vanilla Banana Pudding achieves its profound richness naturally.
By whisking egg yolks and cornstarch into the simmering dairy and finishing the mixture with high-quality vanilla extract and cold butter, we create a stable, creamy emulsion. This meticulous process, including straining the final product, gives the custard that famous, silky texture reminiscent of the highly sought after banana pudding magnolia recipe .
Achieving the Perfect Balance of Soft and Crisp Textures
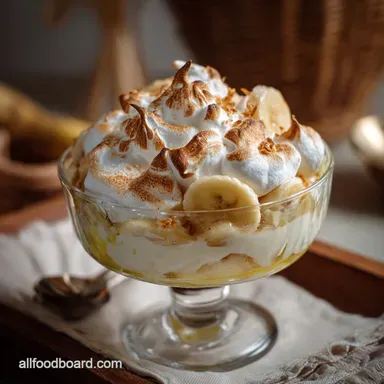
The genius of this dessert lies in its interplay of textures. The rigid vanilla wafers soften over the extended chill time, soaking up the custard and moisture from the bananas until they resemble a delicate, spiced cake. This softness is powerfully balanced by the fluffy, lightly browned baked meringue.
The meringue’s crisp exterior gives way to a marshmallow soft interior, ensuring that every spoonful delivers both a creamy base and an airy crunch.
The History and Southern Roots of Traditional Banana Pudding
This cherished dessert holds a significant place in American culinary history, particularly below the Mason Dixon Line. The recipes for Old Fashioned Banana Pudding commonly documented in the 19th and early 20th centuries relied on cooked custard and were often topped with a baked meringue.
This method was not only practical it utilized all parts of the egg (yolks for the cream, whites for the topping) but also provided a stunning visual for special occasions. Choosing the baked finish honors these deeply rooted traditions of spectacular Banana Pudding Desserts .
Essential Components for the Ultimate Crème Banana Pudding
To execute this sophisticated banana pudding recipe flawlessly, all components must be prepared and layered with intention. We are building eight generous portions, requiring a sturdy 8x8 inch deep dish.
The heart of the recipe is the rich custard, made from 2 cups of milk and 1 cup of heavy cream, ensuring maximum creaminess. For the fruit component, we require four to five medium bananas. For structural integrity, approximately 12 ounces of vanilla wafers are needed about three quarters of a standard box.
Finally, the magnificent meringue utilizes five room temperature egg whites, reserved specifically from the custard process, stabilized with cream of tartar.
Gathering Your Mise en Place: Tools and Ingredients List

Preparing your ingredients and ensuring you have the right tools ready makes the entire process of assembling the ultimate Homemade Banana Pudding seamless and enjoyable.
Selecting the Ideal Ripeness Level for Your Bananas
The choice of fruit is paramount. We want bananas that are fully yellow but still quite firm, exhibiting only a very light peppering of brown spots. Overripe bananas will turn mushy and oxidize quickly, resulting in a grey, unappetizing pudding. Bananas that are too green will be overly starchy.
Slicing them uniformly (about 1/4 inch thick) ensures they integrate evenly into the custard layers.
Understanding the Role of Egg Yolks in the Velvety Custard
The five large egg yolks, combined with 3 tablespoons of cornstarch, serve as the primary thickening agents. Unlike cornstarch alone, the fat and proteins in the yolks provide a profound richness that defines true Vanilla Banana Pudding .
When cooked correctly, these yolks emulsify the dairy, creating a consistently smooth, thick, and stable custard.
Must Have Equipment for a Smooth Meringue Peak
The specialized equipment for this banana pudding recipe ensures high-quality. A heavy bottomed saucepan is critical for distributing heat evenly when cooking the custard, preventing scalding.
For the meringue, a stand mixer with a whisk attachment or a powerful hand mixer is essential for achieving stiff, lasting peaks. Most importantly, a fine mesh sieve must be on hand to strain the custard post cooking, guaranteeing the elimination of any small lumps of cornstarch or overcooked egg.
Choosing the Right Vanilla Wafer Brand for Structure
The wafers serve as the sponge for the custard and the structural divider between layers. While the classic Nilla type wafer is traditional, choosing a brand known for its crispness helps maintain structure during assembly.
We use a double layer of wafers to hold the weight of the rich custard, allowing them to transform into that wonderfully soft, cake like texture as they absorb moisture while chilling.
Related Recipes Worth Trying
- Healthy Banana Nut Bread Overnight Oats Cozy Easy PrepAhead Breakfast — This healthy Banana Nut Bread Overnight Oats recipe captures the cosy spiced flavour of the loaf in a grabandgo meal Prep in 10 mins and wake up to breakfast
- Skip the Christmas Morning Rush Figgy Pudding Christmas Overnight Oats — These healthy Christmas Overnight Oats taste exactly like traditional Christmas Pudding Prepped in 10 mins they are a fibrerich spiced breakfast for a...
- The Ultimate Chocolate Banana Cottage Cheese Bowl Recipe — Ditch the chalky shakes This is the Chocolate and Banana Cottage Cheese Bowla creamy highprotein breakfast thats deceptively decadent Ready in 5 mins Get...
Mastering the Technique: step-by-step Guide to the Dessert Layers
The physical assembly is where this Banana Pudding truly comes together, requiring a cool, firm custard. Start by applying a thin layer of the chilled custard directly to the bottom of the deep baking dish. This anchor prevents the bottom layer of wafers from floating.
Next, tightly arrange a complete layer of vanilla wafers over the custard base, followed by a layer of evenly sliced bananas. Pour half of the remaining thick custard over this first layer, smoothing it gently.
Repeat the process with the second layer of wafers and bananas, finishing the entire base with the remaining custard, ensuring the top is perfectly level for the meringue application.
The Crucial Steps: Cooking the Custard and Whipping the Meringue
The success of the custard and meringue rests on precise heat control and careful incorporation of ingredients.
Tempering the Eggs: Preventing Scrambled Pudding
Tempering is the critical technique that separates a smooth custard from scrambled eggs. After heating the whole milk and heavy cream with the first half of the sugar until steaming, you must slowly introduce this hot liquid to the yolk mixture (whisked with cornstarch and remaining sugar).
Ladle the hot liquid in a thin stream, whisking vigorously. This process gradually raises the temperature of the five egg yolks without shocking them. Only once the yolks are warm and diluted should the mixture be poured back into the saucepan for the final, continuous cooking stage until the custard thickens.
Building the Base: Layering Wafers, Slices, and Warm Custard
The fully cooked custard must be immediately strained through a sieve and cooled for at least one hour before assembly. As noted in the layering guide, the custard must be chilled and thick before meeting the wafers and bananas.
Using a cold, sturdy custard prevents the wafers and slices from floating or shifting, resulting in a clean presentation and consistent texture.
Whipping Meringue to Stiff, Glossy Peaks
Using the five reserved egg whites, ensure the mixing bowl is free of any trace of grease. Add the crucial stabilizing ingredient, cream of tartar, before whipping the whites until they are foamy.
Slowly increase the speed, gradually drizzling in the 1/2 cup of sugar until the mixture forms rigid, glossy peaks that hold their shape perfectly when the whisk is lifted. This glossy texture ensures the meringue bakes properly and remains stable.
Baking the Meringue: Achieving the Golden Brown Crust
Spoon or pipe the meringue over the assembled pudding. The most important step here is ensuring the meringue touches and adheres firmly to the edges of the baking dish all the way around this creates a seal.
Baking at 350°F (175°C) for 12 to 15 minutes allows the exterior to dry out and achieve that beautiful, golden brown toasted finish, creating the signature look of an Old Fashioned Banana Pudding .
Troubleshooting and Expert Tips for Your Next Banana Pudding
Achieving the Best Banana Pudding Ever means knowing how to address potential pitfalls before they happen. Always whisk the hot liquid slowly into the yolks during tempering; if the custard begins to curdle on the stovetop, immediately remove it from the heat and whisk rapidly, or, in an emergency, try blending it briefly before chilling to restore some smoothness.
To guarantee a truly silky mouthfeel, do not under any circumstances skip the step of pouring the hot, finished custard through a fine mesh sieve to catch any tiny pieces of cooked egg or stray starch lumps.
Serving Strategies, Storage, and Flavor Variations
The final steps involve strategic resting time and thoughtful presentation to maximize the overall experience of this wonderful dessert.
Why Does My Pudding Look Watery? Common Fixes
If your finished Banana Pudding appears to be weeping clear liquid, there are two primary culprits. First, the custard may have been undercooked; it must reach a full boil for about thirty seconds to fully hydrate the cornstarch. Second, and more commonly, the meringue seal was likely compromised.
Ensure the meringue is firmly pressed against the inner perimeter of the dish before baking to prevent moisture evaporation that causes weeping.
Optimizing Chill Time for Maximum Flavor Absorption
While four hours of refrigeration is the minimum requirement for the custard to set and the wafers to begin softening, chilling for five to six hours, or even overnight, is truly recommended.
This extended rest time allows the vanilla wafers to reach their ideal cake like texture and fully marry the rich vanilla custard with the sweetness of the bananas, resulting in a deeply cohesive and satisfying flavor.
Prepping This Dessert Ahead for Stress Free Entertaining
This Homemade Banana Pudding is an excellent make-ahead option. You can prepare the custard two days in advance, keeping it tightly covered with plastic wrap pressed directly onto the surface to prevent a skin.
The full assembly, including the meringue baking, should be done no more than 24 hours before serving to ensure the meringue remains crisp and the bananas retain their best color.
dairy-free Substitutions for the Custard Base
For those requiring dairy alternatives, the rich texture of the custard can be successfully replicated. Substitute the heavy cream and milk with a combination of full fat canned coconut milk (for richness) and a quality oat or soy milk.
Alternatively, if you want to explore different formats, substituting vanilla wafers with graham crackers or shortbread and baking the dessert in a square pan provides an easy foundation for creating impressive banana pudding bars recipe .
For elegant presentation, dust the chilled meringue lightly with powdered sugar and serve alongside a small glass of aged bourbon, making this the perfect conclusion to any meal.

Recipe FAQs
Crikey, my scratch made custard for this Banana Pudding won't set! What's the trick?
If your custard is still runny, it usually means it didn't quite reach the correct temperature on the hob, or you haven't given it enough time to chill. You must ensure the custard bubbles once or twice while thickening that activates the cornstarch properly.
More often than not, the solution is patience; chilling for a minimum of four hours is essential, but leaving it overnight in the fridge is the real key to achieving that proper, sliceable texture, ready for a proper cuppa.
My bananas always turn brown and mushy is there a chef’s secret to keeping them looking spiffing?
The best defence is selecting the right level of ripeness: use bananas that are yellow with very few spots, as overly ripe fruit will discolour and dissolve into the custard. If you are serving the pudding on the same day, they should hold up fine, but rapid discolouration is often unavoidable with natural fruit.
For an extra safeguard, you can very briefly toss the slices in a tiny splash of lemon juice, but be mindful this adds a slight tang that some purists might not approve of!
My gorgeous baked meringue started ‘weeping’ clear liquid after a while what’s the remedy for that?
Meringue 'weeping' (syneresis) is generally a sign of trapped moisture. The first fix is structural: you must ensure the meringue topping creates a complete seal, touching all the way to the edges of the dish before it goes into the oven.
Also, make sure you beat the sugar in very slowly once the soft peaks form, and always use a mixing bowl that is meticulously clean and free of any residual grease or egg yolk, which can destabilise the whites.
If I’ve got some leftover pud after a Sunday roast, how long will it keep in the fridge?
This dessert is always best enjoyed within 48 to 72 hours of assembly. Keep it covered tightly with cling film to prevent it from drying out or absorbing fridge smells.
While the custard remains safe to eat for longer, after three days, the vanilla wafers lose their desirable texture and the bananas become overly soft and dark, making it less of a celebratory treat and more of a soggy mess.
I fancy a quicker version; can I skip the oven and do a no-bake finish instead of meringue?
Absolutely, that’s a brilliant shortcut for a fast dessert! If you want to skip the meringue and the baking step entirely, simply replace it with a generous layer of freshly whipped double cream.
Whip 2 cups of double cream until stiff, sweeten with a bit of icing sugar, and spread it over the assembled, chilled layers. This version is lighter and sets wonderfully without ever seeing the inside of the oven.
Scratchmade Banana Pudding With Meringue
Ingredients:
Instructions:
Nutrition Facts:
| Calories | 699 kcal |
|---|---|
| Protein | 8.3 g |
| Fat | 21.9 g |
| Carbs | 74.4 g |
| Fiber | 2.1 g |
| Sodium | 144 mg |
