Quick and Easy Homemade No Knead Artisan Bread
- Effort: 5 mins of prep; the rest is pure waiting.
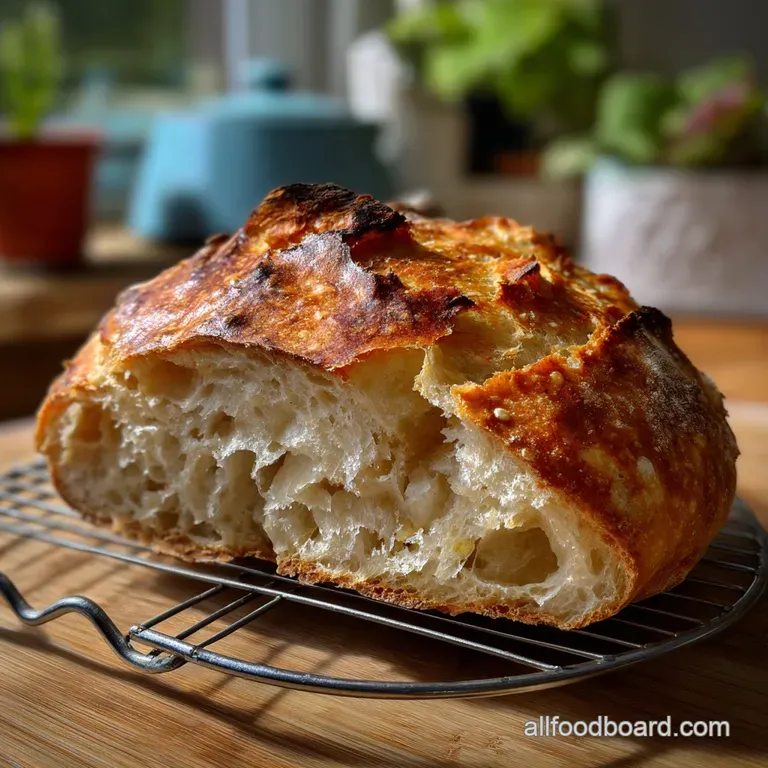
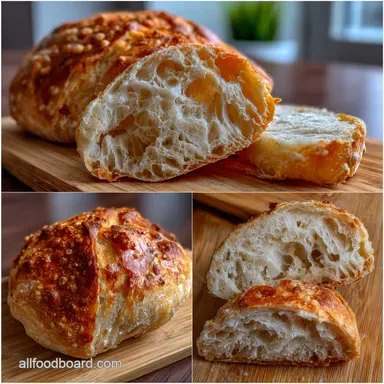
- Flavor: A crispy, crackling crust with a soft, airy crumb.
- Perfect for: Lazy Sunday mornings or serving alongside hearty stews.
- The Ultimate Guide to Quick and Easy Homemade No Knead Artisan Bread
- The Science of No-Knead Baking: Why This Method Works
- Essential Ingredients and Recommended Substitutions
- Step-by-Step Instructions for Quick and Easy Homemade No Knead Success
- Expert Tips and Troubleshooting Common Mistakes
- Best Practices for Storage and Freezing
- Creative Serving Suggestions and Pairings
- Nutrition Information
- Recipe FAQs
- 📝 Recipe Card
The Ultimate Guide to Quick and Easy Homemade No Knead Artisan Bread
Picture this: you wake up, and your kitchen smells like a Parisian bakery. You hear that distinct, high pitched "shatter" sound as you slice into a warm loaf. This Quick and Easy Homemade No Knead recipe is the one that finally worked for me after I turned three previous loaves into literal bricks.
I used to think bread was a high stakes science experiment. I was terrified of killing the yeast or over kneading the dough. But this method is so forgiving, it’s basically foolproof. If you can stir a spoon, you can make this bread.
We’re going to skip the workout and let time do the heavy lifting for us. You don't need a fancy stand mixer or a culinary degree. Let's crack on and get some flour on your hands it’s worth every crumb.
The Science of No-Knead Baking: Why This Method Works
Achieving Professional Results with Minimal Labor
The magic of this Quick and Easy Homemade No Knead process lies in high hydration. By using a wetter dough, we allow the gluten molecules to move around freely. They find each other and bond naturally over time.
You don't need to punch the dough to create structure; the water and yeast do it for you.
How Time and Hydration Replace Traditional Kneading
When we let the dough sit, we're triggering a process called autolysis. The flour fully absorbs the water, which aligns the gluten strands into a strong network. This creates those beautiful, irregular air pockets you see in expensive sourdough. It is chemistry in a bowl, working while you sleep.
The Benefits of Slow Fermentation for Flavor
Even with a Quick and Easy Homemade No Knead approach, the yeast produces carbon dioxide and alcohol. These gases get trapped in the gluten web, making the bread rise. The byproduct of this fermentation is a deep, complex flavor that you just can't get from store-bought loaves.
Why a One-Bowl Method Is Perfect for Beginners
Using just one bowl means less cleanup and less intimidation. You aren't chasing a ball of dough across a floured counter for ten minutes. This method keeps the mess contained and the stress levels low. It’s the perfect entry point into the world of Homemade Spaetzle Noodles Recipe: Quick German Egg Noodles or other dough based adventures.
Essential Ingredients and Recommended Substitutions
Selecting the Best Flour for a Light Airy Interior
The foundation of our Quick and Easy Homemade No Knead loaf is simple all-purpose flour. It has enough protein to create a sturdy structure without being too "tough." I’ve tried bread flour too, which yields a slightly chewier result that some people love.
Yeast and Salt: Managing the Rise and Flavor
We use instant yeast here because it’s fast and doesn't need to be bloomed in water first. The sea salt is crucial not just for taste, but for controlling the yeast. Without salt, your dough would rise too fast and then collapse like a sad balloon.
Smart Substitutions for Pantry Staples
Sometimes you're out of one thing and don't want to hit the store. This Quick and Easy Homemade No Knead recipe is flexible, but every change has a trade off. Here is how to swap ingredients without ruining your dinner.
| Original Ingredient | Best Substitute | Why It Works |
|---|---|---|
| All-Purpose Flour (3 ¼ cups) | Bread Flour (3 ¼ cups) | Higher protein creates a chewier, more professional "artisan" texture. |
| All-Purpose Flour (3 ¼ cups) | Whole Wheat Flour (Replace up to 1 cup) | Adds a nutty flavor and fiber. Note: Bread will be significantly denser and rise less. |
| Instant Yeast (1 ½ tsp) | Active Dry Yeast (1 ¾ tsp) | Works fine, but you MUST dissolve it in the warm water for 5 mins first to "wake it up." |
| Sea Salt (1 ½ tsp) | Table Salt (1 ¼ tsp) | Smaller grains mean it's saltier by volume; use slightly less to avoid over salting. |
step-by-step Instructions for Quick and Easy Homemade No Knead Success

Mixing the Dough to the Perfect Sticky Consistency
In a large bowl, whisk your 3 ¼ cups of flour, 1 ½ tsp yeast, and 1 ½ tsp salt. Pour in 1 ½ cups of warm water (think baby bath temperature, not boiling). Stir it until no dry streaks remain.
This Quick and Easy Homemade No Knead dough will look "shaggy" and feel quite sticky that’s exactly what you want!
Mastering the Critical Rising and Resting Phase
Cover the bowl tightly with plastic wrap or a damp kitchen towel. Let it sit in a warm, draft free spot for about 1 to 1. 5 hours. You’ll know it’s ready when it has doubled in size and looks bubbly on top. It’s like tucking in a baby; just leave it alone to do its thing.
Simple Shaping Techniques Without the Mess
Generously flour a piece of parchment paper. Gently scrape the dough onto the paper using a spatula. Don't worry about making a perfect sphere; a rustic, oblong shape works beautifully for this and Easy Homemade No Knead Artisan Bread .
Dust the top with a little more flour and let it rest for another 30 minutes while your oven preheats.
Baking in a Dutch Oven for a Shatteringly Crisp Crust
Place a heavy Dutch oven (with the lid) into your oven and preheat to 450°F (230°C). Carefully lift the parchment paper and drop the dough paper and all into the hot pot. Bake for 30 minutes with the lid on to trap steam, then 10 more minutes with the lid off.
The steam is what creates that velvety interior and a crust that crackles as it cools.
Chef's Expert Tip: For a truly professional look, use a sharp knife to "score" (slash) a deep line down the center of the dough right before it goes into the oven.
Also, toss two ice cubes into the Dutch oven (outside the parchment) right before closing the lid the extra steam makes the crust extra crispy.
Expert Tips and Troubleshooting Common Mistakes
Making a Quick and Easy Homemade No Knead loaf is simple, but little things can go wrong. If your bread didn't turn out like the pictures, don't sweat it. I once forgot the salt entirely, and it tasted like damp cardboard we've all been there!
| Problem | Why It Happens | The Fix |
|---|---|---|
| Dough didn't rise | Water was too hot (killed yeast) or yeast was expired. | Use lukewarm water (100°F) and check the "best by" date on your yeast packet. |
| Crust is soft/soggy | Not enough steam or cut into the bread too early. | Let the bread cool for at least 30 mins before slicing to let the structure set. |
| Bottom is burnt | The Dutch oven got too hot on the bottom rack. | Place a baking sheet on the rack below the Dutch oven to deflect direct heat. |
Best Practices for Storage and Freezing
Maintaining the Perfect Crust During Storage
This Quick and Easy Homemade No Knead bread is best eaten the day it's baked. If you have leftovers, store them in a paper bag at room temperature for up to 2 days. Avoid plastic bags, as they trap moisture and turn the crust into a rubbery mess.
Freezing and Reheating for Bakery Fresh Flavor
To freeze, slice the bread first and wrap it tightly in foil, then place it in a freezer bag. When you're ready for a snack, just pop a slice directly into the toaster. It comes back to life perfectly, tasting just as fresh as the hour it was baked.
Creative Serving Suggestions and Pairings
Elevating Your Meals with Warm Artisan Slices
This and Easy Homemade No Knead Artisan Bread is the ultimate sidekick. It is absolute heaven when dipped into the sauce of Chicken and Dumplings Classic Comfort in Under 30 Minutes . The thick crust stands up to heavy gravies without falling apart.
Innovative Ways to Use Day-Old Bread
If your Easy Homemade No Knead Artisan Bread gets a bit stale, don't toss it! It makes the best French toast or crunchy croutons for a Caesar salad. You can even rub a garlic clove on a toasted slice and top it with tomatoes for an easy bruschetta.
Adjusting Your Bake for Temperature and Humidity
On a humid day, your Easy Homemade No Knead Artisan Bread dough might feel extra sticky. Just add a tablespoon of flour at a time until it's manageable. If your kitchen is cold, your rise time might take closer to 2 hours.
Just be patient; the yeast is working, it's just moving slowly!
This Quick and Easy Homemade No Knead recipe is your ticket to being the hero of the dinner table. There is nothing quite like the pride of pulling a golden, steaming loaf out of your own oven.
Trust me, once you try this, you'll never want to buy the plastic wrapped stuff from the grocery store again. Happy baking!
Nutrition (Per Serving - Yields 4): Calories: 395 kcal | Protein: 11.6 g | Fat: 1.2 g | Carbs: 82.5 g

Nutrition Information
| Nutrient | Amount |
|---|---|
| Calories | 395 kcal |
| Protein | 11.6 g |
| Fat | 1.2 g |
| Carbs | 82.5 g |
| Fiber | 3.1 g |
| Sugar | 0.3 g |
| Sodium | 872 mg |
Recipe FAQs
Does "No Knead" truly mean zero physical effort in the preparation?
Yes, the recipe requires only about five minutes of active effort for mixing the ingredients. The rest of the process relies entirely on slow fermentation, meaning your hands do virtually no work, making it perfect for beginners.
What kind of texture should I expect from this quick bread?
You should expect a bakery quality loaf characterized by a crispy, crackling crust and a soft, airy crumb inside. This outcome is achieved because the long, slow rise allows the yeast to develop complex flavors typically associated with artisan baking.
Can I use alternative flours, like whole wheat, in this recipe?
No, substituting whole wheat for all the white flour is not recommended initially, as the structure relies heavily on standard all-purpose flour. Whole wheat absorbs more liquid and can result in a denser loaf, unlike the airy crumb achieved here; for recipes that handle dense ingredients well, perhaps check our Soft Flour Tortillas: The Ultimate Homemade Recipe That Puffs for a comparison.
How should I store leftover homemade bread to keep the crust crispy?
Store cooled bread cut-side down in a paper bag at room temperature for up to two days to best preserve the crust texture. Avoid plastic bags, as they trap moisture and cause the crust to soften quickly.
Is it possible to make this dough in a bread machine instead of a Dutch oven?
No, this specific recipe is designed around the slow, covered baking environment of a Dutch oven to simulate professional bakery steam injection. While some machines have a dough cycle, they do not replicate the high heat environment needed for the signature crust.
My dough didn't seem very active; is it still okay to bake?
Yes, the slow, long fermentation means the dough develops flavor and lift slowly, even if it doesn't look highly active like commercial yeast doughs. Trust the process, as the magic happens during the long, passive rise period.
What is the best way to serve this simple, crusty bread?
This bread is fantastic served simply with butter or used for dipping into hearty stews and soups. It pairs exceptionally well with rich, savory sauces, similar to how you might serve accompaniments for our Teriyaki Chicken Stir Fry Recipe Sticky Glazed Homemade Sauce.
No Knead Bread Quick Easy
Ingredients:
Instructions:
Nutrition Facts:
| Calories | 395 kcal |
|---|---|
| Protein | 11.6 g |
| Fat | 1.2 g |
| Carbs | 82.5 g |
| Fiber | 3.1 g |
| Sugar | 0.3 g |
| Sodium | 872 mg |
