Fruity Worm Pops
- Fruity Worm Pops: A Culinary Journey
- Your New Favorite Fruity Worm Pops
- Health and Nutrition Highlights
- Recipe at a Glance
- Master Ingredient List
- Kitchen Equipment Essentials
- Expert Cooking Method
- Expert Kitchen Wisdom
- Perfect Presentation
- Storage and Make-Ahead
- Creative Variations
- Expert FAQ Solutions
- Complete Nutrition Guide
- 📝 Recipe Card
I’ve always been fascinated by the rich tapestry of culinary history that weaves simple treats into art forms over the centuries.
Imagine a time when every homemade delight, like these fun fruit frozen pops, was a labor of love shared among families gathered around the hearth.
Over the years, recipes have evolved into modern diy frozen treats with kids’ fruity pops and frozen lollipops for kids taking center stage in family kitchens nationwide.
I myself have been drawn to these treats as they connect me to my own childhood memories of summer afternoons and homemade delights.
These fruity creations are more than just snacks; they carry a unique heritage that is both playful and steeped in tradition, offering a refreshing twist on the classic iced treat.
Fruity Worm Pops: A Culinary Journey
Fruity worm pops a delightful spin on the traditional layered popsicle recipe carry an enchanting origin story. their design was inspired by the natural layers found in a good old-fashioned english trifle and the playful world of gummy worm dessert ideas.
I remember when i first tried a fruity worm easy kid food recipe during a small family get-together. i was a bit nervous, thinking “will the layers hold up?” but oh, was i delighted when the pops looked as vibrant as a patchwork quilt!
The cultural significance of these pops lies in their ability to transform simple, natural ingredients into a fun, memorable treat for everyone.
They have become a modern day favorite, especially as an easy fruit snack recipe for children, combining both nutrition and a sense of wonder.
Your New Favorite Fruity Worm Pops
I genuinely believe these frosty delights are your new favorite fruity worm pops. the magic happens with unique flavor combinations that bring out the best in each fruit.
The process may seem a tad experimental trust me, i’ve had my fair share of failed blends (oops, did i just say that out loud?) but the embedded layers of strawberry, banana kiwi, and blueberry yogurt create a harmony that's almost poetic.
Adding gummy worms not only gives a visual pop of fun but also an element of surprise with every bite.
I often think about how this healthy kid-friendly dessert inspires creativity in the kitchen, and honestly, it's one of those foolproof techniques that even a novice like myself can master.
The expert tested method, with its time saving tips like partial freezing between layers, makes it a breeze to whip up these delightful treats on a busy summer day.
Health and Nutrition Highlights
Now, i know what you’re thinking: "is this just a pretty treat, or does it pack a nutritious punch?" well, let me tell you, these colorful fruit pops are a wonderful fusion of flavor and health benefits.
The naturally sweet strawberries, bananas, and kiwis offer essential vitamins and antioxidants, making this a nutritious frozen pops option packed with flavor as well as dietary benefits.
Each pop is a balanced package low in fat and high in protein from greek yogurt ideal for those mindful of healthy kid-friendly desserts.
It’s an easy summer treat for kids that satisfies not just their sweet cravings but also their nutritional needs. this recipe is truly a win-win, blending fun with vital wellness advantages without compromising on taste!
Recipe at a Glance
Here’s a quick look at what you’re in for with fruity worm pops fun frozen lollipops for kids:
• preparation time: roughly 20 minutes to gather and prep all the ingredients.
As you dive into creating these fun fruit frozen pops, remember that every misstep is a step toward perfecting a delicious family memory.
I’ve learned a lot from my early days like blending too coarsely or adding too many gummy worms! but each experiment brought me closer to mastering this layered popsicle recipe.
So, take a deep breath, gather your ingredients, and trust in the process. after all, great recipes are built on the joy of cooking and the spirit of experimentation, making them truly timeless treasures in our culinary history.
Enjoy making them as much as i did, and here’s to creating many happy moments in the kitchen together!
Master Ingredient List
Premium Core Ingredients
When i first tried making fruity worm pops for my kids, i learned that using only the best ingredients makes all the difference.
For our premium core, start with 1 cup of fresh strawberries hulled and chopped so they're ready for blending. i like to choose firm, ruby red strawberries; these tend to be juicier and more flavorful.
Next comes 1 medium ripe banana, sliced into small pieces. picking that banana at just the right moment when it’s neither too green nor overly mushy is key.
I remember the time i grabbed an overripe banana; it turned out too mushy and diluted the taste. oops! luckily, i corrected that in my next batch.
Add 1 kiwi fruit, peeled and chopped, to bring a zingy twist, and 1/2 cup of fresh blueberries for an extra touch of sweetness.
Using fresh, not frozen, fruits gives these pops their bright, natural flavor. for the creaminess, measure out 1 cup of plain greek yogurt.
It’s wholesome and kid-friendly perfect for fruit worm easy kid food ! to balance all the natural fruit flavors, mix in 2 tablespoons of honey (feel free to adjust based on how sweet your fruit is) and 1 tablespoon of fresh lime juice, which really livens things up.
When shipping these ingredients home, always store your fruits in the crisper and keep yogurt in the fridge. try selecting organically grown produce if you can; it's a little extra effort that makes a big difference in quality.
Signature Seasoning Blend
Now, you might be wondering about a seasoning blend for a popsicle recipe. yes, i know it sounds odd, but for layered recipes like these diy frozen treats, a dash of a signature spice cocktail can enhance natural flavors without overpowering them.
I like to mix a pinch of ground ginger with a tiny sprinkle of cinnamon it’s subtle but effective. a few leaves of mint, finely chopped, add a burst of aroma that makes every bite feel like a mini festival.
Also, consider just a smidge of vanilla extract to round off the tang and mellow the fruity wildness. each addition transforms these frozen treats into something even more exciting a real step up from typical frozen lollipops for kids.
Smart Substitutions
Some days you might not have the exact ingredients. perhaps you're in a rush or trying to cater to a dietary need; i’ve been there! if greek yogurt isn’t your cup of tea, swap it for coconut yogurt or another dairy-free version.
When strawberries are out of season, try using ripe raspberries or even chopped mango to keep things interesting. for those times when honey isn’t available, a drizzle of agave syrup works wonders.
And for extra fun, instead of gummy worms, you can experiment with fruit roll ups cut into worm shapes. these little changes can keep the recipe fresh and adaptable, making it a simple frozen snack for children that's always kid-friendly.
Kitchen Equipment Essentials

I’ve spent my fair share of afternoons scrounging through kitchen drawers for the perfect tools. for these fruity worm pops, some must have items can really simplify your prep.
A good quality blender is essential for achieving smooth purees and making sure that there are no chunky surprises. if you don’t have a popsicle mold, plastic popsicle makers or silicone molds work just as well.
I usually keep a set of 8 popsicle molds handy ideally labeled so i remember which ones need cleaning.
A popsicle stick insert tool isn’t mandatory, but it sure does save time, especially if your molds aren’t self centering. i sometimes forget to center the sticks on my first try (oops, then i had lopsided treats!), so i always pre-chill the first layer to help secure them in place.
A small bowl with a whisk is also useful when mixing your yogurt with berries this ensures the ingredients are well blended.
When it comes to storage, keeping these tools neatly in your cabinet not only saves space but also gives you a good excuse to show off your organized kitchen to friends and neighbors.
Pro Ingredient Tips
Let me share a few secrets i learned the hard way: first off, always taste your purees before layering. it helps you decide if you need more lime juice or extra honey to balance the flavor.
I once added too much honey and ended up with overly sweet pops luckily, a few extra splashes of lime juice fixed the issue!
When choosing your ingredients at the market, look for vibrant colors and firm textures; dull colors often mean less flavor.
I always gently tap the fruit on my counter to check for firmness and freshness if in doubt, give it a try.
And about storage: once you’ve chopped your fruits, store them in airtight containers in the fridge, so they stay crisp.
You might be tempted to toss them together at the last minute, but a little pre-prep goes a long way.
In terms of saving a few pennies, buy fruits when they’re in season. they’re naturally better and cheaper then. lastly, don’t be afraid to experiment with your seasonings a pinch here, a hint there and remember: cooking is as much fun as it is a learning process.
It's like making a homemade child friendly frozen recipe for the first time; every small misstep leads to a better result next time.
All in all, i can’t stress enough how fun it is to try out these kids’ fruity pops ideas at home.
They’re not just frozen lollipops for kids, they’re a canvas for creativity and a way to share joyful moments with the family.
Enjoy!
Expert Cooking Method
Today i’m super excited to share my step-by-step process for creating my beloved fruity worm pops a fun frozen treat perfect as kids’ fruity pops or even as a frozen lollipop snack for all ages.
I’ve honed these techniques over years of trial and error, and trust me, when you finally nail those colorful, layered pops, you'll be beaming with pride.
Let’s dive in!
Essential Preparation Steps
It all starts with proper mise en place. first off, gather your ingredients: strawberries, banana, kiwi, blueberries, greek yogurt, honey, lime juice, gummy worms (yep, even those playful gummy worms used for a gummy worm dessert), water, and your popsicle molds.
I always make sure everything’s on the counter because, honestly, nothing ruins a cooking vibe like scrambling for a missed item.
Next, prep your fruits by washing, peeling, and chopping them to the right sizes. for these type of healthy kid-friendly desserts, the fresher the ingredients, the better the flavor.
I learned once, during a rush, that over processing the fruits can leave them a bit mushy tippity, sorry, missing a detail here! so keep your blends and slices crisp.
I work with a digital timer set it for 30 minutes intervals, because timing precision is key to making sure each freeze layer sets correctly.
And don’t forget to check your equipment; clean molds, a sharp knife, and a trusty blender are your best pals here.
Professional Cooking Method
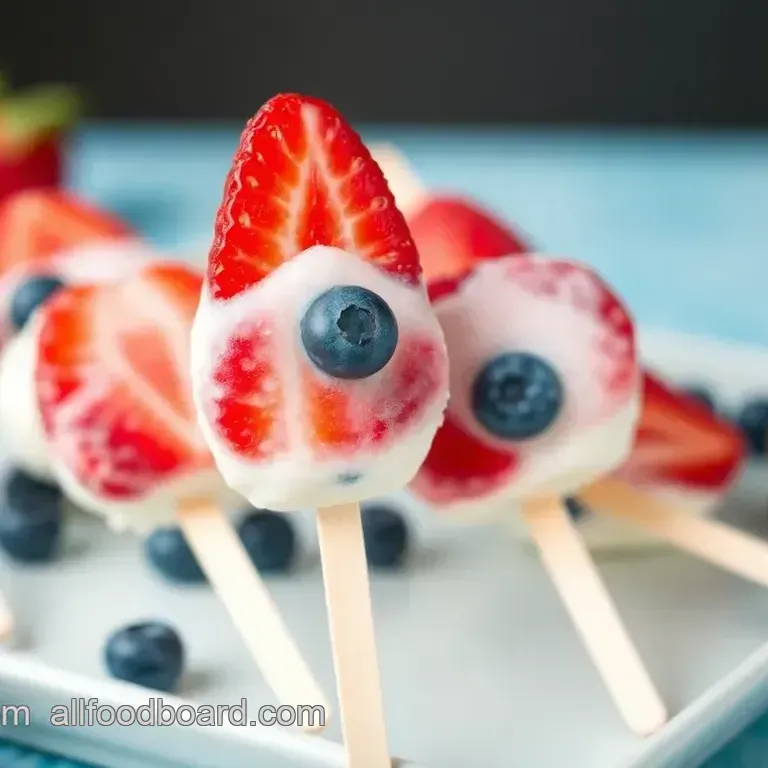
Now let’s talk process. after prepping, you'll be layering in your popsicle molds in three distinct steps. i typically start with a strawberry puree : blend your strawberries with about 1/6 cup water and a tablespoon of honey until smooth.
Pour roughly 2-3 tablespoons into each mold, and gently tap the molds on the counter to pop out any pesky air bubbles.
Sprinkle one or two gummy worms here remember, you want those worms to peek out so they’re visible later. freeze this first layer for 30 minutes.
Once that’s partially frozen, it’s time for layer b, the banana kiwi mix. blend your banana and kiwi with a bit more water until smooth, then add another 2-3 tablespoons on top of the first layer.
If you’re like me, you wonder about the best moment to insert those funny gummy shapes is it too early? i usually do it right away.
Freeze again for another 30 minutes.
Finally, top with a yogurt blueberry mix. stir in the blueberries into your yogurt with a splash of lime juice, or blend them slightly if you prefer a smoother consistency.
Pour this final layer over your hybrid pop, making sure each mold has an even cover, and nestle any remaining part of the gummy worms on top for that fun, visible twist.
Then, insert your popsicle sticks, if your mold needs them at this stage, and place the whole batch in the freezer for about 4 hours, or until solid.
A cool tip if your freezer settings allow, keep the temperature around 0°F/-18°C to ensure a consistent freeze. This fruit worm easy kid food treat must be firm yet flavorful.
Expert Techniques
Here’s where the magic happens. the success of these layered pops lies in a few professional techniques i cherish. firstly, layering is critical: every individual puree should be smooth to ensure the layers remain distinct.
Temperature control plays a huge role; the pops should freeze gradually so they develop a beautiful texture without large ice crystals.
Organize your pops systematically. i like to work on one row at a time so that i don’t rush or mix up layers.
And never underestimate the art of the tap on the counter this little trick helps remove trapped air for a smoother finish, which is vital when working with simple frozen snacks for children.
Quality checks along the way are essential. before assembling one layer on top of the other, give each puree a taste test.
If it’s too tangy or bland, adjust with a bit more honey or lime juice. and when layering, if you notice any smudges between the colors, a quick tap usually evens it out.
Yes, i once fumbled with a rush that left the layers muddled, but practice makes perfect!
Success Strategies
Finally, let’s talk troubleshooting and quality assurance. if your pops aren’t setting properly, double check your freezer’s temperature. i once had a set that was too soft because my freezer was overloaded a rookie mistake! another common hiccup is misaligned layers.
If one layer slips, simply go back to gently pushing it back into shape and refreeze again for 15 minutes before continuing.
To ensure perfect results every time, plan your steps and give each layer its own moment to harden. a consistent freeze time about 30 minutes per layer before final assembly ensures that the layers don’t mix.
And here’s a personal tip: work at a comfortable pace rather than rushing through the process. the joy of these diy frozen treats is not just in the eating, but in the making too.
In sum, these detailed steps offer a clear guide to transforming fresh ingredients into beautifully layered, child friendly frozen pops. whether you call them fruity worm pops or simple frozen snacks for children, the combination of careful prep, controlled temperatures, and some creative flair makes these treats special.
Enjoy the process, and remember: cooking is as much about love as it is about precision!
Expert Kitchen Wisdom
I’ve spent years tinkering in my cozy kitchen mixing fruit purees and layering flavors and let me tell you, there’s real magic in creating treats like these fruity worm pops.
Over time, i discovered that using fresh, ripe fruit truly makes all the difference, and transfixing those layers with partial freezings really is the secret sauce for these diy frozen treats.
When i first attempted layering, i ended up with more muddle than masterpiece (oops, my bad!); now i always plan ahead.
The trick is to blend your ingredients carefully and taste as you go this guarantees success every time. plus, this recipe is a fun little challenge, blending professional techniques with that old-fashioned homestyle touch of "fruit worm easy kid food.
"
Perfect Presentation
Let’s chat about presentation because we all know that we eat with our eyes first! when plating these pops, consider letting the bright colors shine.
I like to serve my kids’ fruity pops on a cheerful tray with a light drizzle of extra honey and a sprinkle of finely chopped mint leaves.
Each layer peeks out like a work of art. honestly, the key to a truly pleasing look is to ensure the gummy worms remain visible people love to see a bit of fun, especially when it’s a healthy kid-friendly dessert.
Every time i serve these frozen lollipops for kids, the kids and dare i say even the adults are impressed by their lively, layered charm.
Storage and make-ahead
I have to admit, one of my favorite parts of making these easy fruit snack recipes is that they can be prepped ahead of time.
If you’re making a batch for a family gathering or a school party, feel free to make the fruity worm pops in advance.
Once assembled, tuck them in the freezer; they’ll be fresh and ready in about 4 hours. just a quick tip: when you pull them out for serving, warm the molds slightly under tap water to release each pop easily.
I learned this the hard way once i ended up with pops half still stuck to their molds. keeping storage guidelines in check really makes for a hassle free, nutritious treat.
Creative Variations
I’m always exploring creative spins for my recipes, and this one is no exception. for a twist, you could swap out kiwi for mango when mangoes are in season or even add a hint of ginger for an extra kick.
If you’re catering to specific dietary needs, try substituting greek yogurt with a dairy-free alternative, making sure it remains a simple frozen snack for children without sacrificing flavor.
And here’s a fun idea: recreate those layered pops as layered popsicle recipe mini treats for a party. i’ve tried these variations several times and each time, i’m pleasantly surprised.
If you’re keen on experimenting, trust me it’s a delightful, hands-on way to brighten up your snack game!
Expert FAQ Solutions
One question that always pops up when i share this recipe is, “how can i get the layers to stick without mixing?” i used to struggle with this, too! my go-to tip is partial freezing between layers; it works like a charm.
Another common concern is about the gummy worms marring the finish but inserting them gently halfway through each freeze fixes that.
Besides, do you ever worry about the dessert melting too quickly? don’t fret, as long as you serve them immediately after removing from the freezer, they remain crisp and refreshing.
These little nuggets of advice, born from my own trial and error moments, guarantee every serving of this easy summer treat feels just right.
Complete Nutrition Guide
I know nutrition details can sometimes feel overwhelming, but here’s a simple, clear breakdown for you. each fruity worm pop clocks in around 100 120 kcal, which is pretty light for a home-made fruit lollipops treat.
They deliver 5 6 grams of protein and come with a wholesome mix of naturally occurring sugars, fiber, and a dash of healthy fats.
I especially appreciate that this recipe serves as a neat, balanced boost even if you’re enjoying these as a diy frozen treat for those warm summer days.
Portion guidance is easy too; just one pop per serving guarantees a fun yet controlled snack. and trust me, balancing flavor and nutrition makes every bite of this fruit worm easy kid food as satisfying as it is nourishing.
Fruit Worm Easy Kid Food 5 Best Diy Frozen Lolli

