Sliders Recipes the Glorious 30Minute Cheesy Beef Pub Grub
- The Magic of Sheet-Pan Sliders: Maximizing Gooey Perfection
- Why This Beef and Cheese Sliders Recipe Wins Every Time
- Assembling Your Arsenal: Essential Ingredients for Flavour-Bomb Sliders
- The Essential Kit: Tools and Prep for Sheet-Pan Success
- Step-by-Step Mastery: Building the Ultimate Baked Sliders
- The Assembly Line: Layering the Beef and Cheese for Maximum Melt
- Scaling Up and Swapping Out: Expert Tips for Party Hosting
- Beyond the Recipe: Storage, Freezing, and Flavor Variations
- Recipe FAQs
- 📝 Recipe Card
The Magic of Sheet Pan Sliders: Maximizing Gooey Perfection
Okay, listen up. If you are still trying to individually fry twelve tiny, sad little hamburger patties for a party, you are wasting your life. I was once that person. My kitchen looked like a grease fire had broken out, and I still ended up with buns that were either rock hard or completely saturated. Never again.
The absolute, definitive way to make sliders (and I mean proper party snacks, the kind you can’t stop eating) is to bake them as one glorious sheet pan block. This method is brilliant. It’s a total game changer.
You get maximum gooey cheese, incredibly flavourful beef, and, crucially, a steam softened bun that stays tender, never dry. We’re talking about the best ground beef recipes for dinner, scaled down for serious finger food.
This is my go-to recipe for everything from a Tuesday night when I can't be bothered to the Super Bowl.
Why This Beef and Cheese Sliders Recipe Wins Every Time
Honestly, most easy slider recipes miss the point. They focus too much on speed and forget that texture is everything. This beef and cheese version hits every single mark: it’s fast, it’s ridiculously flavourful, and the structure holds up, even after bathing in a garlic butter glaze.
From Prep to Plate in Under 20 Minutes
I know, that sounds aggressive, but trust me. We’re dealing with assembly work here, not intensive cooking. We quickly sear the beef, dump everything into the 9x13 dish, slap on the glaze, and let the oven do the heavy lifting.
Once you’ve done the minor chopping (diced onion, melting butter), the active assembly takes maybe ten minutes. That means you can have these flavour bomb slider sandwiches ready for guests arriving in half an hour.
The Secret Weapon: Steam Baking for Ultra Tender Buns
Soggy bottoms? Not here. We deal with the moisture (the beef grease) upfront. Then, we seal the dish with foil for the first stage of baking. That layer of aluminum foil traps the moisture released by the cheese and the rolls themselves. It essentially turns your oven into a giant steamer for the buns.
That’s how you get that delightfully soft, slightly chewy top roll, perfectly tender, while the bottom remains sturdy.
A Chef’s Ode to Elevated Pub Grub
This isn’t just sloppy cheese and meat. The addition of Worcestershire sauce and finely diced onion stirred right into the beef, plus the pungent kick of Dijon in the buttery glaze, transforms these. They taste complex, savoury, and deeply comforting.
They are exactly what pub grub should be: simple, rich, and utterly satisfying.
Ditching the Frying Pan for Zero Fuss Cooking
Why would anyone want to stand over a stove flipping 12 individual miniature patties? That’s pure culinary cruelty. By cooking the beef filling loosely (like you would for sloppy joes or chili) and spreading it in a single layer, you eliminate the need to babysit the stove.
It also means you only have one large skillet and one baking dish to clean up. Maximum party potential, minimum washing up effort.
Assembling Your Arsenal: Essential Ingredients for Flavour Bomb Sliders
When we talk about classic sliders recipes, the ingredient list is short, so quality really matters. Don't skimp on the cheese. Don’t even think about using margarine instead of proper butter for the glaze.
The Essential Kit: Tools and Prep for Sheet Pan Success

The required equipment is minimal, but specific items help tremendously with speed and cleanup:
| Tool | Purpose | Tip |
|---|---|---|
| 9x13 Baking Dish | Holds the rolls snugly. | Glass or ceramic works best for heat retention. |
| Serrated Knife | Slicing the roll block uniformly. | A long bread knife is essential here. |
| Pastry Brush | Applying the sticky glaze evenly. | Ensure it’s clean garlic butter residue can taint future bakes. |
Selecting the Ideal Ground Beef to Cheese Ratio
I always recommend an 80/20 ground beef mixture for this. Yes, it’s fattier, but that fat is where the flavour lives. You are going to drain it completely after cooking, so you get all the flavour without the resulting grease pool.
For the cheese, eight slices of processed American or classic cheddar works perfectly. It needs to be a cheese that melts beautifully and slightly oozes when you bite into it.
Must Have Condiments for a Classic Sliders Drip
The heart of the flavour profile is the glaze. It adds moisture, richness, and that distinct, savory sweet flavour on the top crust. Garlic powder is a non-negotiable here (fresh garlic risks burning), and the Dijon mustard balances the sweetness of the Hawaiian rolls perfectly.
If you want a little extra drip when serving, mix up that quick chef’s sauce: mayo, ketchup, and pickle brine or relish. It’s basic, but it’s brilliant.
The Unsung Hero: Choosing the Right Dinner Roll
Hawaiian Sweet Rolls are the industry standard for a reason. They come attached, which makes the whole assembly process ten times easier. Crucially, they have enough residual sugar and soft structure to handle the steam bake.
If you can’t find them, look for brioche dinner rolls they offer similar richness and structure. Avoid basic white dinner rolls if they seem dry; they will turn into bricks.
Quick Prep: Slicing the Buns for Uniform Baking
The trick here is to treat the whole package like a single loaf of bread. Don't separate them! Use your long serrated knife to cut the entire block of twelve rolls horizontally, making one perfect top slab and one perfect bottom slab.
This allows you to place the bottom slab into the dish, load up the filling, and then place the top slab back on without faffing around lining up individual tiny tops.
Related Recipes Worth Trying
- Proper Cheesy Philly Cheesesteak Sliders The Match Day Marvel — Forget faffing about with subs These Easy Philly Cheesesteak Sliders are the ultimate football party food Shaved steak gooey cheese and a crispy buttery...
- Easy Buttered Pepperoni Pizza Sliders Recipe Crowd Pleaser — Whip up these Ultimate Buttered Pepperoni Pizza Sliders They are the easiest party appetizers that taste better than takeout Get the recipe
- Smoked Brisket Sliders Texas BBQ Made Easy — Get ready for the best Brisket Sliders Tender smoky beef on soft buns with tangy slaw Perfect for BBQ parties or a weeknight treat Recipe inside
step-by-step Mastery: Building the Ultimate Baked Sliders
Right then, oven preheated to 350°F (180°C). Dish lightly greased. We are moving quickly now.
The Assembly Line: Layering the Beef and Cheese for Maximum Melt
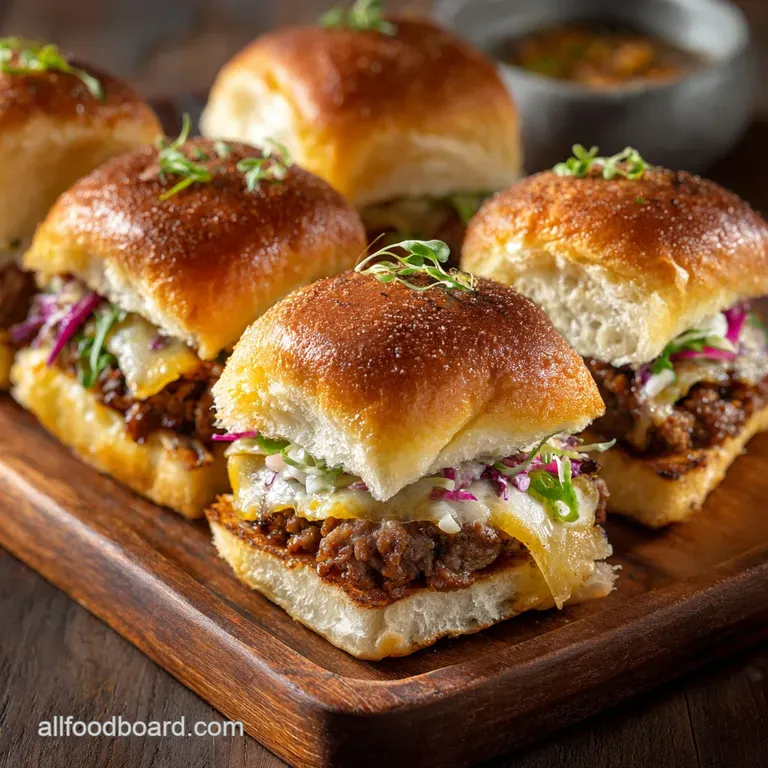
Spread the bottom rolls in the pan. They should fit snugly. Then comes the filling. Layering correctly is crucial for structural integrity when you pull them apart.
Searing the Beef Patty Base (Why Pre-Cooking Matters)
You need to lightly pre-cook the ground beef with the diced onion until it’s browned. This isn't just about cooking; it's about temperature and oil management. The moment the beef is browned, immediately take it off the heat and drain it.
CRUCIAL WARNING: Do not skip draining the fat. If you leave the grease in the mixture, the bottom rolls will absorb it all during baking, turning them into a sad, greasy mess. I learned this the hard way at a football viewing party it was a disaster.
Drain it, then stir in your seasoning and Worcestershire sauce.
Once drained, spread that mixture evenly right to the edges of the bottom buns. Layer your cheese slices next, making sure the cheese covers the meat fully, acting as the sealant.
Basting the Rolls: The Garlic Butter Glaze
This step is where we get that beautiful, bronzed top. Melt the butter, whisk in the garlic powder, Dijon mustard, and dried parsley (for colour, mostly). Use your pastry brush and be generous. Really paint the tops of those rolls, getting the glaze into all the little crevices.
Sprinkle on the sesame seeds now if you want that classic slider look.
Achieving the Perfect Sheet Pan Configuration
Make sure your 9x13 pan is lined up right, especially if you have an alternative roll. The rolls need to be pressed in fairly tightly. If they are too loose, they will shrink and dry out. Place the glazed top slab perfectly onto the cheese layer. Give it a gentle press down.
The Crucial Final Bake and Rest Period
Cover the pan tightly with foil and bake for 10 minutes. This creates the steam environment. Pull the foil off, admire the melting cheese underneath, and bake uncovered for another 5 to 8 minutes. We want golden brown tops and fully melted cheese.
When they come out, do not touch them for five minutes. That resting time is mandatory. It allows the bubbling cheese to cool slightly and firm up, meaning when you slice them along the score lines, they pull apart beautifully instead of melting into a messy puddle.
Scaling Up and Swapping Out: Expert Tips for Party Hosting
Thinking about making these for a huge gathering? You can easily double or triple the recipe and use multiple pans.
- Prep Ahead Strategy: Complete Steps 1-4 (Assemble and Glaze) up to 2 hours ahead of time. Cover tightly and refrigerate. Add 5 minutes to the initial covered bake time since the dish will be cold.
- The Double Foil Trick: If you are using a cheaper aluminum tray, use two layers of foil when covering, just to guarantee that steam stays trapped inside.
- Serving Warm: Keep the sliders warm for 30 minutes post bake by wrapping the entire pan in a heavy towel. Serve directly from the pan.
Beyond the Recipe: Storage, Freezing, and Flavor Variations
Meal Prep Strategy: Can You Make These Sliders Ahead?
You absolutely can prep the components. Cook the beef mixture completely, cool it, and store it for up to three days. Mix the glaze ahead of time and keep it refrigerated (you’ll need to reheat the butter gently before brushing).
I wouldn’t recommend fully assembling them uncooked more than 2 hours in advance, though, because the meat moisture will eventually turn the bottom bun soggy before you bake it.
Switching Proteins: Adapting the Recipe for Chicken or Pork
Ground turkey or chicken works fine, but they are leaner and much drier. If you use them, you must adjust the seasoning and add moisture. I suggest mixing the ground poultry with an extra tablespoon of Worcestershire sauce and maybe two tablespoons of cream cheese (or mayo) before layering.
It helps bind it and keeps the meat from tasting like sawdust. If you’re making BBQ pulled pork sliders, be sure the pork is drained and coated in a thick sauce to prevent runoff.
Adding Bacon: Crisping Techniques for Crunch on a Baked Slider
If you want bacon (and why wouldn't you?), you cannot bake raw bacon slices on top of the rolls. They will end up rubbery and pale. Instead, fully cook and crisp the bacon beforehand. Crumble it generously over the top of the cheese layer, right before you put the top bun on. That way, the crunch is preserved.
Reheating Leftovers Without Losing the Steam
Leftovers (if you have any!) are fantastic. Wrap them tightly in foil, place them on a baking sheet, and reheat them in a moderate oven (300°F / 150°C) for 10– 12 minutes. The foil traps the existing moisture and steams them again, keeping the rolls soft.
Do not, under any circumstance, microwave these for more than 30 seconds. You’ll ruin the bun structure forever.

Recipe FAQs
Crikey, I hate soggy bread! How do I stop the bottom of the sliders getting wet?
The secret is two-fold: ensure you drain all the fat from the beef after cooking (the "Drainage Rule"), and crucially, cover the dish tightly with foil for the first 10 minutes of baking, which helps keep the bottoms from getting saturated.
Can I assemble these Sliders the night before I plan to bake them?
Yes, you can be a clever cook and assemble them up to 12 hours ahead! Just skip the buttery garlic glaze for now, cover the unbaked pan tightly, refrigerate, and then brush on the glaze immediately before baking, adding an extra 5 minutes to the cook time.
I can't find Hawaiian rolls. Will normal dinner rolls work instead?
Absolutely, don't fret! Any standard small dinner rolls or mini brioche buns work perfectly, but ensure they are packed tightly in the baking dish for the best result, as this helps them steam and hold their structure during the cook.
What's the best way to reheat any leftovers without them tasting like rubber?
The best method is wrapping them individually in foil and reheating in the oven at 160°C (325°F) for about 10 minutes; the foil traps moisture, preventing them from becoming dry or leathery like they often do in a microwave.
I'm trying to be a bit healthier. Can I use turkey or a plant based alternative?
Of course; ground turkey or chicken works a treat, but remember these lean meats need a bit more flavour input (like an extra dash of Worcestershire sauce) and a tablespoon of oil added to the skillet to prevent them from drying out during the bake.
Easy Baked Cheesy Beef Sliders

Ingredients:
Instructions:
Nutrition Facts:
| Calories | 191 kcal |
|---|---|
| Protein | 1.8 g |
| Fat | 0.5 g |
| Carbs | 8.8 g |
| Fiber | 0.2 g |
| Sodium | 32 mg |
