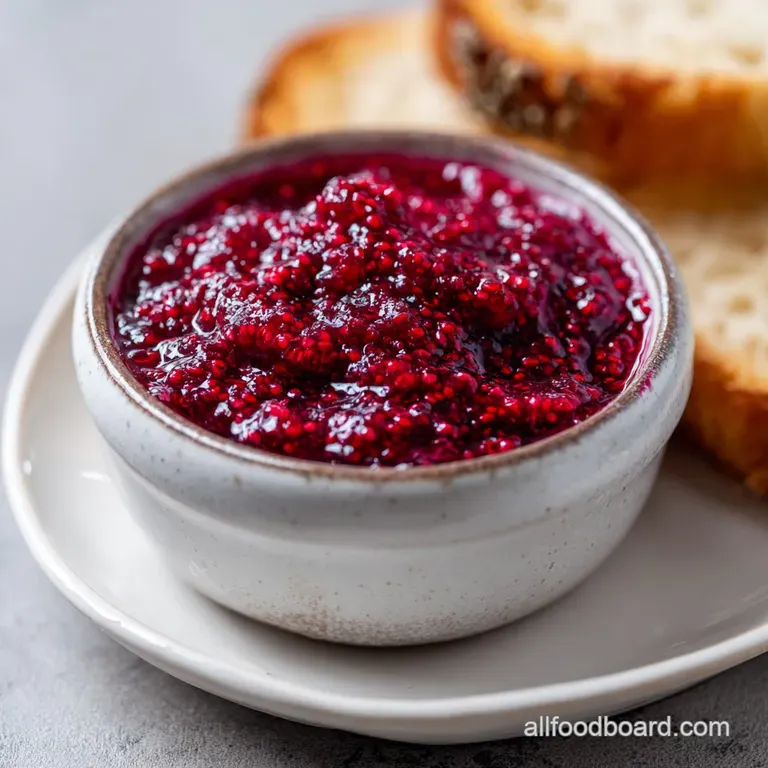
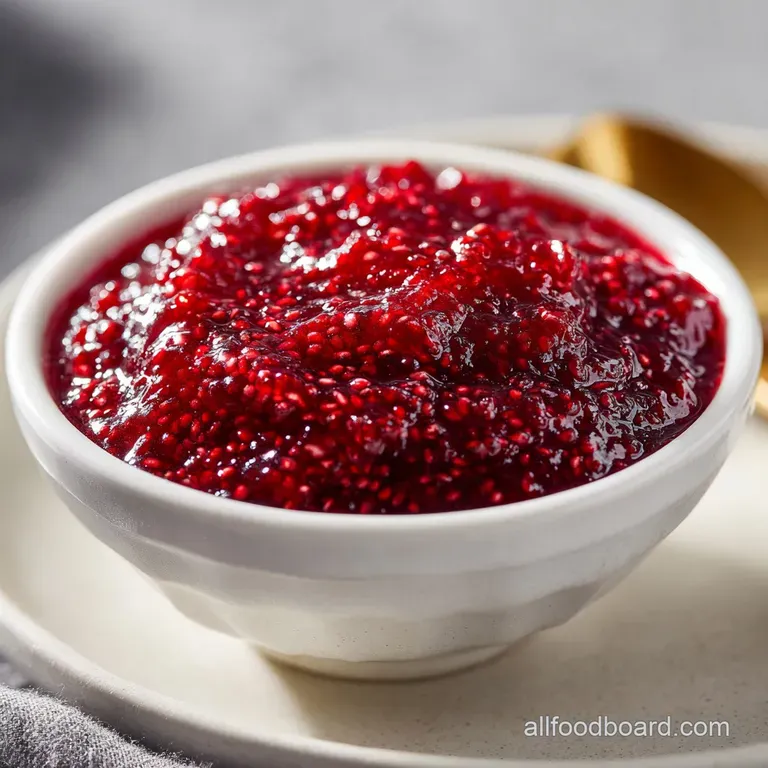
Chia Seed Jam: Quick No-Cook Spread
- Time: Active 2 minutes, Passive 8 minutes, Total 10 minutes
- Flavor/Texture: Bright, berry forward, and spreadable with a slight seedy pop
- Perfect for: Healthy breakfasts, quick meal prep, and low sugar diets
- Mastering the Healthy and Quick Chia Seed Jam
- The Science of Seed Thickening
- Selecting Quality Ingredients for Results
- Essential Tools for Faster Cooking
- Step by Step Cooking Instructions
- Fixing Common Recipe Issues Easily
- Flavor Swaps and Diet Variations
- Storage and Zero Waste Guidelines
- Storage and Zero Waste Tips
- Best Ways to Enjoy Jam
- Science Backed Myths
- Recipe FAQs
- 📝 Recipe Card
Mastering the Healthy and Quick Chia Seed Jam
The kitchen air completely changes when berries hit a warm pan. There is a specific, sharp spatter as the skins of 2 cups of raspberries or strawberries begin to burst, releasing a deep ruby liquid that smells like the height of summer.
I remember the first time I tried making traditional jam I spent three hours hovering over a bubbling cauldron of molten sugar, only to have it set like a brick. This recipe was my "lightbulb moment" because it skips the chemistry of pectin and the fear of a sugar burn, giving you that velvety, fruit first flavor in less time than it takes to brew a pot of coffee.
We are looking for that specific moment when the fruit turns from a solid mass into a glossy, bubbling compote. Using 1.5 tbsp of maple syrup or honey allows the natural tartness of the berries to shine without masking it under a mountain of refined sugar.
It is the kind of recipe you make once and then realize you can never go back to the store-bought jars that have been sitting on a shelf for months. We are making something alive and bright here, and the best part is that you don't need any special canning equipment to get it right.
This process is remarkably forgiving, but the magic happens in the rest. When you stir in those 2 tbsp of black or white chia seeds, they might look a bit lonely in the berry juice at first. But wait just a few minutes, and you will see the mixture transform into a thick, spreadable delight.
It is a kitchen trick that feels like a cheat code for healthy eating, especially when you are rushing to get a nutritious breakfast on the table for the family.
The Science of Seed Thickening
- Hydrophilic Absorption: Chia seeds can absorb up to 12 times their weight in liquid. When they hit the warm berry juice, the outer layer of the seed turns into a mucilaginous gel, which naturally binds the fruit together without the need for artificial thickeners.
- Cell Wall Breakdown: Heating the berries for 8 minutes softens the cellulose and releases natural juices. This creates the liquid environment necessary for the seeds to hydrate and expand.
- Acid Stabilization: The 1 tbsp of lemon juice does more than add tang. It helps brighten the color of the fruit and provides a tiny bit of natural pectin activation, ensuring the jam doesn't look dull or muddy after it cools.
- Cold Set Synergy: While the seeds start working in the pan, the final "set" happens as the temperature drops. The gel network stabilizes as the mixture reaches room temperature, creating that classic jammy consistency.
| Method | Time | Texture | Best For |
|---|---|---|---|
| Stovetop | 10 minutes | Very velvety and unified | Maximum flavor extraction |
| Microwave | 5 minutes | Slightly chunkier | Super fast single servings |
| Cold Soak | 2 hours | Raw and extremely fresh | Maximum nutrient retention |
Choosing the stovetop method allows the fruit to slightly caramelize, which adds a depth of flavor that the cold soak method lacks. However, if you are in a massive rush, the microwave trick works in a pinch by heating the berries in 30 second bursts until they are mashable.
Selecting Quality Ingredients for Results
| Ingredient | Science Role | Pro Secret |
|---|---|---|
| Chia Seeds | Structural Binder | Use white chia for light fruits like peaches to keep the color bright and clean. |
| Lemon Juice | pH Balancer | Freshly squeezed juice provides active enzymes that bottled juice simply lacks. |
| Maple Syrup | Natural Humectant | The liquid sugar helps keep the jam moist and prevents it from becoming a rubbery block. |
The foundation of this recipe is obviously the fruit. While 2 cups of fresh raspberries are incredible in July, frozen berries are actually a secret weapon for Chia Seed Jam during the winter. Frozen fruit is picked at peak ripeness and often releases more juice during the heating process, which gives the chia seeds more liquid to work with. If you find yourself with an abundance of summer fruit, you might also want to try this Peach Jam Recipe which uses a similar small batch philosophy.
| Original Ingredient | Substitute | Why It Works |
|---|---|---|
| Berries (2 cups) | Stone Fruit (2 cups, chopped) | Peaches or plums have high water content. Note: Peel skins for a smoother jam. |
| Maple Syrup (1.5 tbsp) | Honey (1.5 tbsp) | Similar viscosity. Note: Honey adds floral notes; maple is more neutral. |
| Lemon Juice (1 tbsp) | Lime Juice (1 tbsp) | Same acidity level. Best paired with tropical fruits like mango or blackberry. |
| Vanilla Extract (0.5 tsp) | Almond Extract (0.25 tsp) | Very strong flavor. Use half the amount for a nutty, "cherry pie" finish. |
| Black Chia Seeds | White Chia Seeds | Identical gelling properties. Use white seeds for a "hidden" look in light jams. |
Essential Tools for Faster Cooking
You really don't need much to get this going. A small non stick saucepan is my go to because it prevents the sugars in the fruit from catching on the bottom. You want something with enough surface area to let the steam escape, which helps thicken the juice as it simmers.
A simple silicone spatula is better than a spoon here because it lets you scrape every bit of that precious gel from the sides of the pan.
If you like a smoother jam, a potato masher is a brilliant tool to have on hand. It allows you to control the texture leave a few chunks for a rustic feel or pulverize the berries for a more refined spread. Finally, grab a glass Mason jar (like the ones from Ball) for storage.
Glass is non reactive, meaning the lemon juice won't pick up any weird metallic tastes while the jam sits in the fridge.
Chef's Tip: Put your empty glass jar in the fridge while you cook the jam. Pouring the hot jam into a chilled jar helps jumpstart the cooling process and sets the gel faster.
step-by-step Cooking Instructions
- Place 2 cups of raspberries, blueberries, or strawberries (fresh or frozen) into a small saucepan over medium heat.
- Add 1.5 tbsp of maple syrup or honey to the fruit. Note: This helps the fruit release its juices faster.
- Cook for 5 to 8 minutes, stirring occasionally, until the fruit softens and begins to bubble.
- Use a fork or potato masher to crush the berries until you reach your desired chunkiness.
- Remove the pan from the heat and stir in 1 tbsp of freshly squeezed lemon juice.
- Add 2 tbsp of chia seeds and 0.5 tsp of vanilla extract. Note: Vanilla rounds out the tartness of the fruit.
- Stir the mixture thoroughly until the seeds are evenly distributed.
- Let the jam sit in the pan for 5 minutes to thicken.
- Transfer the mixture to a clean glass jar and let it cool completely on the counter.
- Tighten the lid and refrigerate until the jam is cold and firm.
While the jam cools, it is the perfect time to prep the rest of your breakfast. This spread pairs beautifully with a bowl of Overnight Oats with recipe for a double dose of fiber and healthy fats. The way the tart jam cuts through the creamy oats is honestly one of the highlights of my morning routine.
Fixing Common Recipe Issues Easily
Correcting Thin Jam Consistency
Sometimes the fruit is exceptionally juicy, or you might have measured the seeds a bit light. If your jam looks more like a soup than a spread after 10 minutes, don't panic. The chia seeds continue to hydrate even as they cool.
If it is still too thin after an hour in the fridge, simply stir in an extra teaspoon of seeds and wait another 30 minutes.
Improving Flat Flavor Profiles
If the jam tastes "dull" or just like plain warm fruit, it usually needs more acid. The lemon juice is the "volume knob" for flavor in this recipe. A tiny extra squeeze of lemon or even a pinch of salt can make the berry flavors shatter across your palate.
Salt sounds strange for jam, but a literal pinch enhances the sweetness without needing more syrup.
| Problem | Root Cause | Solution |
|---|---|---|
| Jam is bitter | Berries weren't ripe | Add 1 tsp more maple syrup and a splash of vanilla. |
| Clumpy seeds | Added seeds too fast | Stir vigorously with a whisk to break up the "chia clumps." |
| Jam is too hard | Too many chia seeds | Stir in 1 tbsp of water or orange juice to loosen the gel. |
Common Mistakes Checklist
- ✓ Never boil the chia seeds; add them after removing the pan from the heat to preserve their nutrients.
- ✓ Don't skip the lemon juice; it prevents the jam from tasting flat and one dimensional.
- ✓ Avoid over mashing if you like texture; the seeds provide plenty of "bite" on their own.
- ✓ Use a clean jar; even though this isn't traditional canning, a dirty jar will spoil the jam in days.
- ✓ Give it time to cool; the jam doesn't reach its final thickness until it is completely cold.
Flavor Swaps and Diet Variations
If you want to move beyond basic berries, the world of seed based spreads is huge. For a deep, decadent treat, you can actually fold in a little cocoa powder to a strawberry version to create something that tastes like a chocolate covered berry. Speaking of chocolate, if you are a fan of these textures, you should definitely try my Chocolate Chia Seed recipe which uses a similar hydration technique for a dessert style finish.
Seasonal Berry Variations
In the autumn, I love swapping the berries for finely chopped pears or apples. You will need to simmer these for about 12 to 15 minutes with a splash of water to get them soft enough to mash, but the result is a "warm spice" jam that is incredible on sourdough toast.
Add a pinch of cinnamon or cardamom to really lean into those cozy vibes.
| Servings | Ingredient Adjustments | Jar Size | Cook Time |
|---|---|---|---|
| 12 (Standard) | 2 cups fruit, 2 tbsp seeds | 8 oz jar | 8 minutes |
| 24 (Double) | 4 cups fruit, 4 tbsp seeds | 16 oz jar | 12 minutes |
| 6 (Small) | 1 cup fruit, 1 tbsp seeds | 4 oz jar | 5 minutes |
When doubling the recipe, I suggest using 1.5x the lemon juice rather than 2x, as too much acid can overpower the fruit when working in larger batches. The cooking time also increases slightly because it takes longer for 4 cups of fruit to reach a simmer and break down effectively.
Storage and Zero Waste Guidelines
This jam doesn't have the high sugar content or the heat sealed lid of traditional preserves, so it belongs in the fridge. It will stay fresh and vibrant for about 7 to 10 days. If you see any liquid separating on top, just give it a quick stir that is just a bit of "weeping" from the fruit and is perfectly normal.
For zero waste, don't toss out the berry tops or the lemon rinds! I keep a bag in the freezer for berry stems and slightly bruised fruit scraps to throw into smoothies later. The lemon rinds can be tossed into a jar of white vinegar to make a natural countertop cleaner.
If you find you won't finish the jam in a week, you can actually freeze it in small silicone ice cube trays. Once frozen, pop the jam cubes into a freezer bag; they thaw in about 20 minutes and are perfect for single serve toast toppings.
Storage and Zero Waste Tips
Science of Preservation
Traditional jam uses sugar as a preservative by binding up water so bacteria can't grow. Since we use very little sugar, we rely on the acidity of the lemon and the cold temperature of the fridge.
This is why using a clean spoon every time you dip into the jar is vital it prevents cross contamination that could lead to early spoilage.
Creative Leftover Uses
If you have just a tablespoon or two left in the jar, don't wash it out! Pour in some almond milk and a scoop of oats, shake it up, and let it sit overnight. The leftover jam swirls into the milk, making a "built in" flavored breakfast.
You can also whisk the last bit of jam with some balsamic vinegar and olive oil for a quick berry vinaigrette that is incredible over a spinach and goat cheese salad.
Best Ways to Enjoy Jam
While toast is the classic vehicle, this jam is much more versatile. I love using it as a "middle layer" in a yogurt parfait. The seeds provide a nice textural contrast to creamy Greek yogurt and crunchy granola.
It also makes a fantastic topping for pancakes or waffles, especially if you warm it up slightly before serving so it runs into all the little nooks and crannies.
For a more sophisticated option, try serving a dollop of blackberry chia jam on a cheese board. The tartness of the fruit and the earthy crunch of the seeds pair beautifully with sharp cheddar or a creamy brie. It is an easy way to bring a homemade touch to a party without spending hours in the kitchen. If you're hosting a brunch, serving this alongside a Poppy Seed Cake recipe creates a beautiful balance of citrus and berry flavors that guests always rave about.
Science Backed Myths
One major misconception is that you need "special" chia seeds for jam. Whether you use the expensive organic black seeds or the white ones, the gelling capacity is identical. The only difference is aesthetic. Another myth is that the jam won't be "sweet enough" without cups of sugar.
In reality, cooking the fruit concentrates its natural fructose, and the maple syrup simply acts as a bridge to balance the acidity. You'll find that your palate actually prefers the punchy fruit flavor over the cloying sweetness of commercial brands once you make the switch.

Recipe FAQs
How long does it take for chia seeds to thicken jam?
About 10 minutes of rest time, plus 5 minutes of active stirring. The seeds start gelling immediately off the heat, but they need about 5 minutes to fully hydrate and stabilize the texture.
Is it okay to soak chia seeds for 10 minutes before cooking the fruit?
No, add them after heating the fruit. Adding seeds to cold liquid before cooking can cause them to clump immediately and form a thick outer gel before the fruit releases enough juice to bind properly.
Why can't you eat chia seeds every day?
False. You can safely eat chia seeds daily. They are high in fiber, so suddenly consuming large amounts might cause minor digestive upset in some people, but they are nutritionally very safe for regular consumption.
Can you use chia seeds to make jam?
Yes, this is the primary function of this recipe. Chia seeds act as a natural, high fiber thickener, replacing the need for pectin or excess sugar to achieve a spreadable consistency.
How do I make the jam smoother if the seeds are too chunky?
Use an immersion blender briefly, or mash harder initially. If the seeds are already gelled, you can try blending for 5 seconds, but the best texture control is achieved by thoroughly crushing the berries before adding the seeds.
How long will chia seed jam last in the refrigerator?
Expect 7 to 10 days maximum for the freshest flavor. Since this recipe bypasses traditional high sugar preservation methods, it must be kept cold and consumed relatively quickly.
How do I prevent the chia seeds from forming a noticeable layer at the bottom of the jar?
Stir continuously for the first 60 seconds after adding them. Ensure the seeds are evenly suspended in the warm fruit matrix before the gel network solidifies. If you mastered the stable emulsion required for that Healthy Banana Nut recipe, applying the same principles of vigorous mixing early on will prevent separation here.
10 Minute Chia Seed Jam
Ingredients:
Instructions:
Nutrition Facts:
| Calories | 28 calories |
|---|---|
| Protein | 0.6 g |
| Fat | 0.7 g |
| Carbs | 5.1 g |
| Fiber | 1.4 g |
| Sugar | 2.4 g |
| Sodium | 1 mg |
