Earthquake Cookies: a Cracked Delight
- A Sweet Introduction to Earthquake Cookies
- Recipe Overview: A Cookie With a History
- Key Benefits: More Than Just a Sweet Treat
- Essential Ingredients Guide: Earthquake Cookies & More
- Mastering the Art of Cooking: Essential Preparation Steps
- The Step-by-Step Process
- Expert Techniques to Elevate Your Cooking
- Success Strategies for Recipe Triumph
- Shake Things Up with Earthquake Cookies!
- Frequently Asked Questions
- 📝 Recipe Card
A Sweet Introduction to Earthquake Cookies
Oh my gosh, you guys! have you ever craved a dessert that strikes the perfect balance between chewy and crisp? picture this: it’s a chilly evening, you’re snuggled under a blanket, and all you want is something warm and chocolatey.
That’s where earthquake cookies come in. these delightful treats also known as chocolate crinkle cookies are like the ultimate hug in cookie form.
They bring comfort, nostalgia, and a bit of fun with their signature cracks. honestly, what’s not to love?
Now, you might be wondering how they got such a dramatic name, right? well, these cookies look like they’ve experienced a little tectonic action as they bake! with a sugary dusting and a rich chocolate flavor, they’re a showstopper at any gathering.
Whether you’re whipping them up for a family get-together or a cozy night in, they’re bound to leave everyone craving more.
Recipe Overview: A Cookie With a History
Let’s dive into a bit of history. earthquake cookies originated in the good ol’ u.s.a., and have become increasingly popular over the years.
They’re basically an american classic. the best part? they’re super easy to make! you don’t need to be a baking pro, because these cookies are user friendly.
Prep takes about 15 minutes, with a chill in the fridge for about 30 minutes before you pop them in the oven.
Bake time? just about 12 minutes, and voila! you’ll have about 24 of these lovely little nuggets.
Now, about the cost. the ingredients are pretty standard pantry staples; you likely already have most of them. sugar, butter, cocoa powder cheap and cheerful.
Plus, consider how many cookies you’ll end up with. trust me, your friends will thank you, and you’ll be the superstar cookie baker of the day!
Key Benefits: More Than Just a Sweet Treat
These cookies aren’t just delicious; they have some solid nutritional highlights, too. while we’re not calling these good foods for your meal prep, they do provide a sweet little pick-me-up.
Each cookie has around 150 calories , which isn’t too shabby for a treat, right?
Let’s chat about special occasions. earthquake cookies are perfect for holiday celebrations, birthday parties, or even a simple afternoon snack.
They’re versatile just like that friend who can pull of any look! and here’s a little fun fact: they beat out those overly sweet treats like nutter butter truffles any day! they have a unique texture and rich flavor that will keep your taste buds dancing.
Plus, if you fancy mixing things up, try adapting the recipe. you could toss in some nuts or dried fruits for a twist, or substitute cocoa powder with espresso powder for a mocha surprise.
The possibilities are pretty endless!
Before we jump into the ingredient list, remember this: baking is as much creativity as it is science. so, if you’re feeling adventurous, give these cookies a whirl with different flavors.
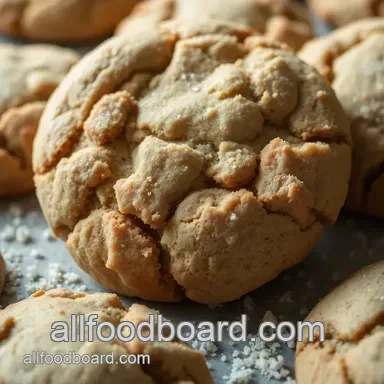
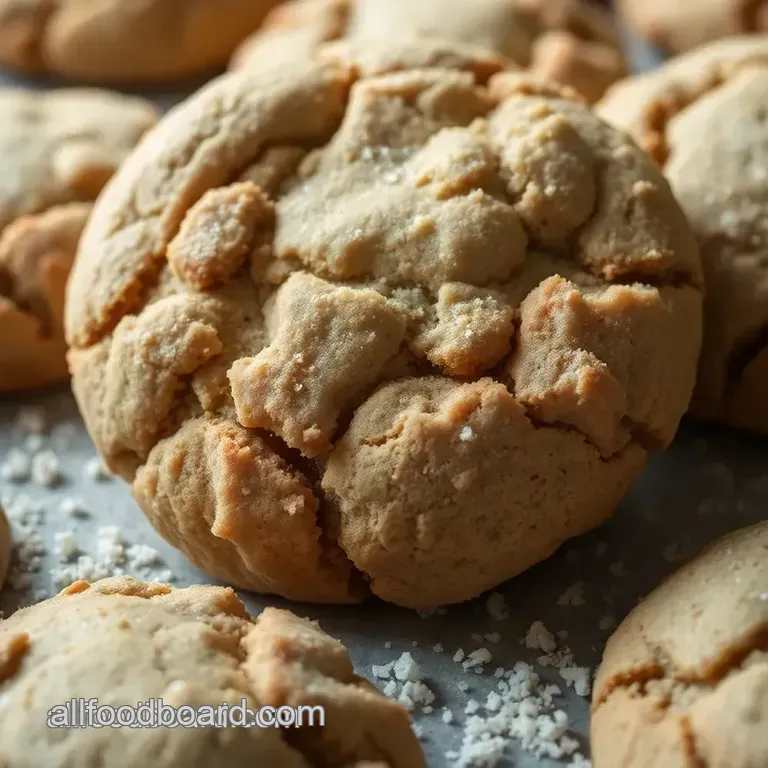
Lastly, don’t skimp on that powdered sugar coating it’s what gives them their adorable cracked appearance!
Let’s get ready to gather our ingredients and start the magic of making earthquake cookies that everyone will love. Here’s what you need!
Essential Ingredients Guide: Earthquake Cookies & More
Hey there, cookie lovers! let's take a little journey into the world of baking together. today, we're diving into a crucial aspect the essential ingredients you need.
As you whip up those earthquake cookies , the right ingredients will make or break your baking adventure. trust me, i've been there.
Premium Core Components
First off, before you get all excited and start throwing flour around, let’s talk about measurements. for those classic earthquake cookies, you’ll need 1 cup (200g) granulated sugar and ½ cup (100g) brown sugar .
If you mix in ½ cup (115g) unsalted butter and a couple of eggs, you’re halfway to perfection. having both us and metric measurements handy is a lifesaver, especially if you’re using those fancy thomas keller recipes or aiming for the ultimate brownies.
Now, about quality you want to look for good quality cocoa powder. i splurged on some recently and wow, the difference is like night and day! check for freshness, especially with your baking powder.
And while we’re at it, make sure to store your dry goods in a cool, dark place. most things will last a while, but just as a guideline, brown sugar can harden if not sealed well.
You don’t want that for your nutter butter truffles !
Signature Seasoning Blend
Oh, the spices! sure, right now we're all about the sweet stuff, but don’t underestimate your pantry. your basic salt , though often overlooked, really enhances those cookie flavors, so don’t skip it.
As you experiment with different recipes maybe try a cookie brownie recipe consider adding flavors like almond or nutmeg for a twist.
When it comes to herbs, think about how they can work wonders in savory recipes like chicken rice cheese dishes.
While you might not toss basil in your cookies, knowing the flavor profiles makes you a better cook overall!
Smart Substitutions
Now, life happens. you've got a recipe in front of you, and panic sets in when you realize you're out of chocolate chips.
Breathe! grab some chopped nuts or even dried fruit, and boom! you’ve got your creative juices flowing. also, if you’re on a health kick, try swapping out half the butter in your cookies for applesauce.
Trust me, you won’t even notice, especially in those perfect brownies !
And if someone in your family can't eat eggs, just whip up some flax eggs. look for 1 tablespoon of ground flaxseed with 2.
5 tablespoons of water as a great substitute. voila! there’s your emergency replacer.
Kitchen Equipment Essentials
Before we roll that dough (literally!), here are the must have tools you really need. a sturdy mixing bowl is your best friend, and an electric mixer saves you tons of elbow grease! don’t forget parchment paper ; it makes sure those brownie mix cookies come off the sheet like a dream.
If you don’t have a cookie scoop, a simple spoon will work just eyeball it! pro tip: keep your cooling rack nearby.
Transferring them while they’re warm is key to that perfect chewy texture.
Serving Suggestions & Final Thoughts
When your earthquake cookies are out of the oven, they're like little puffs of happiness. serve them warm with a glass of cold milk, or get adventurous and pair them with rich vanilla ice cream.
And remember, it’s not just about the cookies they're the perfect way to bond with friends and family around the kitchen.
Alright, my fellow bakers! now that we’ve covered the nitty gritty, we’re ready to whip up those cookies. stick around, and i’ll walk you through the mouthwatering steps to make your earthquake cookies the talk of the town.
Happy baking!
Mastering the Art of Cooking: Essential Preparation Steps
Cooking like a pro might seem daunting, but trust me, it doesn’t have to be! the secret sauce? mise en place .
It’s a fancy french term, but all it means is “everything in its place.” imagine you’re on a cooking show.
You wouldn't see the chef rummaging through cabinets looking for salt, right? start by gathering all your ingredients before diving into the actual cooking.
This not only saves time but also prevents those "oh snap, i forgot the eggs!" moments.
Time management is key too. it's like they say, “time flies when you’re having fun” and that includes cooking! set timers for key steps.
For example, if you’re making earthquake cookies , you’ll want to chill the dough for 30 minutes before baking.
Keep your eyes on the clock! this will ensure your cookies turn out chewy and not like rocks.
Next up is organization. keep your workspace tidy. i can’t stress this enough! a clutter free counter not only looks good but helps you stay focused.
And let’s not forget about safety always remember to keep those knives sharp and your hands clean. if you’re mixing dough, do it with clean hands or use a spatula.
Trust me, nobody wants cookie dough under their fingernails.
The step-by-step Process
Alright, let’s break it down into clear instructions. Here’s how to tackle those Earthquake Cookies .
Prep the dough : start by creaming together 1 cup of granulated sugar and ½ cup brown sugar with ½ cup softened butter until it’s light and fluffy.
Add in 2 large eggs one at a time.
Whisk the dry ingredients : in another bowl, sift 1 cup of flour , ½ cup cocoa powder , 2 teaspoons baking powder , and ¼ teaspoon salt .
Pro tip: sifting adds air and helps your cookies bake evenly.
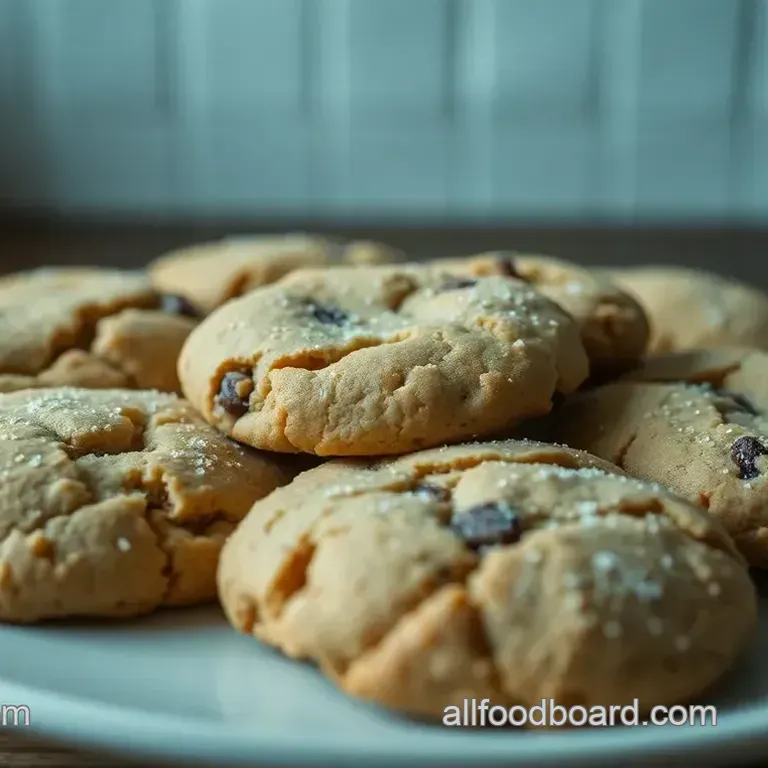
Combine Everything : Gradually mix the dry ingredients into your wet mixture. This is crucial don’t overmix. Fold in ½ cup chocolate chips if you're feeling extra decadent.
Chill : Cover the mixture and pop it in the fridge for 30 minutes . This gelato like wait time is the key to cookie perfection.
Preheat the Oven : Set that oven to 350° F ( 175° C) . You want it hot and ready for your beautiful cookie balls.
Form Those Cookies : Use a cookie scoop or your hands to roll the dough into bites. Roll them in ½ cup powdered sugar for that classic crinkle look.
Bake : space them out on a baking sheet about 2 inches apart and pop them in the oven. bake for 10- 12 minutes .
Keep an eye on them! they should look set but still soft in the center.
Cool Down : Once they’re out, let them chill on the baking sheet for 5 minutes before moving them to a cooling rack.
Expert Techniques to Elevate Your Cooking
Now, let’s discuss ways to kick your cooking game up a notch. first, remember to always taste your batter before baking.
It’s not just about following the thomas keller recipes to the letter; sometimes, you need to adjust sweetness or add a pinch of salt to elevate the flavors!
A good habit is to keep an eye on quality checkpoints. ensure you're using the best brownie ingredients for those ultimate brownies you’ve dreamed about.
Also, keep a watchful eye on the baking time. overbaking can ruin those chewy cookies we all love.
Another tip is to troubleshoot on the fly. if the cookies spread out too much while baking, it might mean you didn’t chill them long enough.
No shame in trying again! and feel free to mix things up with these bad boys. maybe swap some cocoa for espresso powder for a mocha twist or toss in some nuts for crunch.
Just don’t skimp on the powdered sugar for rolling, or you risk losing that trademark “earthquake” look.
Success Strategies for Recipe Triumph
Ah, the classic pit stops in baking! avoid common mistakes such as skipping the chilling step or substituting baking soda for baking powder.
Seriously, i’ve made that blunder more times than i can count.
A great quality assurance tip? trust your instincts! if you think the cookies need more chocolate, chuck in those chocolate chips! baking is all about adjustments and getting it just right.
And if you’re pressed for time, consider make-ahead options these cookies keep well in an airtight container. they’re perfect for last minute gifts or treats simply because they’re easy to whip up.
By following this step-by-step guide, you’ll be well on your way to making these irresistible earthquake cookies , or adapting the techniques to whip up nutter butter truffles or a delightful cookie brownie recipe .
You’ll feel accomplished, and if you're anything like me, you’ll probably end up eating half the batch before they even cool!
As we dive deeper into the world of cooking, remember that practice makes perfect, and every delicious disaster is a chance to learn.
Stick around for more tips and tricks in our next section on additional information…
Shake Things Up with Earthquake Cookies!
Oh my gosh, have you ever had those delightful Earthquake Cookies ? You know, the ones that look so cracked and beautiful it’s like they’re trying to tell a story? Trust me, these chocolate crinkle cookies are not only bursting with flavors but also kinda fun to bake!
So, let’s make sure you get the most out of this cookie adventure with some pro tips and tricks!
Pro Tips & Secrets
First off, chill the dough ! this is like the golden rule for cookie perfection. chilling helps maintain their shape and gives the flavors a chance to mingle like long lost friends.
If you’re impatient like me, put on some tunes and dance while you wait!
Want to enhance that chocolate goodness? use high-quality cocoa powder . honestly, you'd be surprised how much this can elevate your cookie game.
And please, please don’t overbake! aim for that soft center trust me, they’ll continue to cook a bit after you pull them out.
As for presentation? Roll those dough balls generously in powdered sugar. It’s what gives that signature crinkle appearance. It’s like adding the perfect accessory to your outfit everyone notices!
Perfect Presentation
Now, let’s talk visuals. a well plated cookie can steal the show! use a fun color combination when serving. for example, pair those rich, dark cookies with a bright white plate or even a splash of colorful napkins.
It’s all about that contrast!
Garnish them with a sprinkle of sea salt or some crushed nuts on top. just a little touch can lift the cookies from “nice” to “whoa!” and if you want to take it up another notch, drizzle some melted chocolate on top.
Seriously, how can you go wrong with more chocolate?
Storage & make-ahead
So, if you find yourself with a mountain of cookies (because who can stop at just one?), don’t fret! storage guidelines are pretty simple: keep your cookies in an airtight container at room temp for up to a week.
They’ll be just as soft and delicious if you don’t munch them all right away.
Thinking ahead? you can freeze the dough before baking. just scoop those cookie dough balls, freeze them on a baking sheet, then pop them into a ziploc bag.
They’ll keep for a couple of months! when the cookie craving strikes, just bake straight from the freezer! you can get those choc tastic goodies in no time!
Creative Variations
Here’s where it gets fun! want to spice things up? try adding a teaspoon of peppermint extract for a refreshing twist, or toss in some chopped nuts for a crunchy texture.
You can also pull a move inspired by brownie mix cookies and swap out some cocoa for brownie batter. trust me, that’s a combo you’ll adore!
If you’re feeling adventurous, there are loads of dietary modifications . use gluten-free flour for your pals who need it or sub in some applesauce for a healthier, moist cookie.
Seasonal twists can be fun, too! in the fall, how about adding some pumpkin spice? yum!
Complete Nutrition Guide
Let’s keep it real who doesn’t want to know what they’re munching on? these cookies pack about 150 calories each. not bad for a dreamy chocolate fix, right? they’re also giving you a bit of protein and a fair share of joy.
But hey, moderation is key! Enjoy those cookies with a side of fresh fruit or a scoop of vanilla ice cream for a treat without the guilt. Balance, my friend!
Closing Thoughts
In conclusion, whether you’re whipping up these earthquake cookies for a gathering or just as a personal snack, know this: baking is what you make it! if you’re up for it, bring in your own twists and flavors like the nutter butter truffles or even adding cheese to the mix in a fun savory treat.
Just have fun with it! you got this, and your taste buds will thank you. happy baking, friends!
Frequently Asked Questions
What are earthquake cookies and how do they get their name?
Earthquake cookies, also known as chocolate crinkle cookies, are delightful treats characterized by their chewy centers and crispy, sugary edges. The name comes from the cracks that form on the surface while baking, resembling tectonic shifts perfect for a bit of drama in your baking!
Can I make earthquake cookies gluten-free?
Absolutely! You can substitute all-purpose flour with a gluten-free flour blend. Just make sure that the blend has a good starch-to-flour ratio for the best texture, and your earthquake cookies will still have that lovely chewy goodness!
How should I store leftover earthquake cookies?
To keep your earthquake cookies fresh, store them in an airtight container at room temperature for up to a week. If you have a particularly large batch, you can freeze them for up to three months. Just pop them in the microwave for a few seconds to warm them up when you're ready to enjoy!
What are some variations I can try with earthquake cookies?
Get adventurous! You can add a teaspoon of peppermint extract for a festive twist, or mix in different types of chocolate chips like white chocolate or peanut butter. For a mocha kick, substitute some cocoa powder with espresso powder. The possibilities are endless!
What is the best way to ensure my earthquake cookies don’t flatten out?
A key tip is to chill the dough for at least 30 minutes before baking this helps maintain the cookie shape and enhances the flavor. Additionally, don’t be shy with the powdered sugar coating; it not only adds sweetness but helps create that signature crinkle look!
Are earthquake cookies healthy?
While earthquake cookies are delicious, they're more of a treat than a health food! Each cookie contains around 150 calories. However, you could lighten them slightly by reducing the sugar or using alternatives, or adding nuts for some protein.
Just remember, a cookie’s best enjoyed in moderation perhaps with a cup of tea!
Earthquake Cookies A Cracked Delight